
Popular categories
Looking for a yarn?


Comments / Questions (64)
![]() Grit Naqvi wrote:
Grit Naqvi wrote:
Meget uklædeligt design. Billedet viser ikke, at ærmerne faktisk stumper, og at ryggen er så bred, at den står ud bag dig som et telt. Strikkefasthed er overholdt. Utroligt skuffet.
16.11.2021 - 14:24
![]() Grit Naqvi wrote:
Grit Naqvi wrote:
Meget uklædeligt design. Billedet viser ikke, at ærmerne faktisk stumper, og at ryggen er så bred, at den står ud bag dig som et telt. Strikkefasthed er overholdt. Utroligt skuffet.
16.11.2021 - 14:22
![]() Michaela wrote:
Michaela wrote:
Hallo! Ich arbeite Größe M und habe ein Problem mit der Schulter. Wenn man 10x je 1 Ma in jeder 4. Reihe abnimmt, ergibt das 40 Reihen. Selbst wenn man noch ein paar Reihen dazu gibt, wegen der Abnahme für das Armloch, kommt man max. auf 44 Reihen. Das ergibt nach Maschenprobe ca. 14,5 cm. Laut Anleitung sollen aber nach den 10 Abnahmen bereits 18 cm erreicht sein. Das geht nicht auf! Wo liegt der Fehler??
03.08.2021 - 20:03DROPS Design answered:
Liebe Michaela, wenn alle Abnahmen fertig sind, dann stricken Sie wie zuvor weiter bis die Arbeit 18 cm mist (= 8 cm ab dem Abketten für den Armausschnitt), dann stricken Sie die verkürzten Reihen. Viel Spaß beim stricken!
04.08.2021 - 07:22
![]() Crochet Nathalie wrote:
Crochet Nathalie wrote:
Je ne vois pas les diagrammes !!! Où sont ils? Merci😁
16.03.2021 - 13:13DROPS Design answered:
Bonjour Mme Crochet, nous rencontrons actuellement des problèmes de chargement des images sur notre site et faisons notre maximum pour tout remettre en ordre le plus vite possible. Merci pour votre compréhension et patience.
16.03.2021 - 14:43
![]() Laura wrote:
Laura wrote:
Hey! I’m not sure where to put the decrease stitches on the right shoulder. The next step says “work 1 ridge over all stitches on row where you decrease 5 stitches evenly on row.” Could you please give further instructions? Thanks so much. :)
14.03.2021 - 01:31DROPS Design answered:
Dear Laura To work out how to increase/decrease evenly, count the total number of stitches on the needle (e.g. 20 stitches) and divide by the number of increases/decreases to be made (e.g. 4) = 5. In this example, increase approx. every 5th stitch by making 1 yarn over. On the next round, work the yarn overs twisted to avoid holes. If you are decreasing (in this example) knit together alternately approx. every 4th and 6th stitch. I hope this helps. Happy Knitting!
14.03.2021 - 02:19
![]() Cora wrote:
Cora wrote:
Ik kom bij het breien van de mouw (maat S) nooit tot 65 steken. Ik meerder wel in totaal 10 keer 2 steken, maar moet ook 10 keer 2 steken minderen. Uiteindelijk blijven het dus 45 steken. Wat doe ik fout?
28.12.2020 - 00:39DROPS Design answered:
Dag Cora,
In telpatronen A.3 en A.5 meerder je in totaal 20 keer en dat zijn dus in totaal 40 steken. Je mindert 20 steken aan de zijkanten, waardoor er netto 20 steken bij komen, waardoor je op 65 steken komt.
17.01.2021 - 13:51
![]() Janie Grote wrote:
Janie Grote wrote:
I am looking at pattern no Pattern no me-157. Why is it done on crcular needles when it is knitted back and forth. Can I just use ordinary knitting needles?
01.11.2020 - 16:14DROPS Design answered:
Dear Janie, even though the pattern is knitted back and forth, we prefer using circular needles since they are more comfortable when we knit with a high number of stitches. You could use ordinary knitting needles, but you may have more difficulty working with them. Happy knitting!
01.11.2020 - 16:22
![]() Verónica wrote:
Verónica wrote:
Hola, medí mi tensión y se corresponde a la indicación del patrón, 20 puntos miden 10 cm. Pero luego, montando los puntos que indican para el frente tamaño small, 129, mide mucho más que 60 cm según indica el gráfico. Que estoy entendiendo mal? Gracias
07.09.2020 - 16:35DROPS Design answered:
Hola Verónica. El delantero tiene forma triangular por lo tanto el borde de montaje no puede medir 60 cm. 60 cm mide el delantero en la parte recta. Mejor toma medidas a la altura del pecho. La espalda se trabaja recto desde el inicio y mide 60 cm en la parte inferior.
09.09.2020 - 20:31
![]() Lynn wrote:
Lynn wrote:
Hi. I am on the right shoulder and do not know how to tighten strand. Thank you
29.03.2020 - 15:41DROPS Design answered:
Dear Lynn, just pull he yarn back a little, so the stitch that is on the needle will have a smaller loop- thighter. Happy Knitting!
29.03.2020 - 22:30
![]() Theresa Hernandez wrote:
Theresa Hernandez wrote:
The instructions say that once I reach the end of the chart, to continue decreasing in A.1 and A.5 and increasing in A.3 and A.7. But the chart ends with only two stitches left in A.1 and A.5. How can I decrease when there are no stitches? Does A.1 merge with A.2 at that point?
21.03.2020 - 21:55DROPS Design answered:
Dear Mrs Hernandez, when diagrams have been worked one time in height, repeat them from row 1, ie work A.1 over the 8 first stitches (after edge st), and A.3 over the next 2 stitches after A.2, then A.4 over the next 7 sts as before, A.5 over the next 2 sts, A.6 as before and A.7 over the next 8 sts, finish with 1 edge st. Happy knitting!
23.03.2020 - 09:44
|
|||||||||||||||||||
Wednesday Morning#wednesdaymorningsweater |
|||||||||||||||||||
 |
 |
||||||||||||||||||
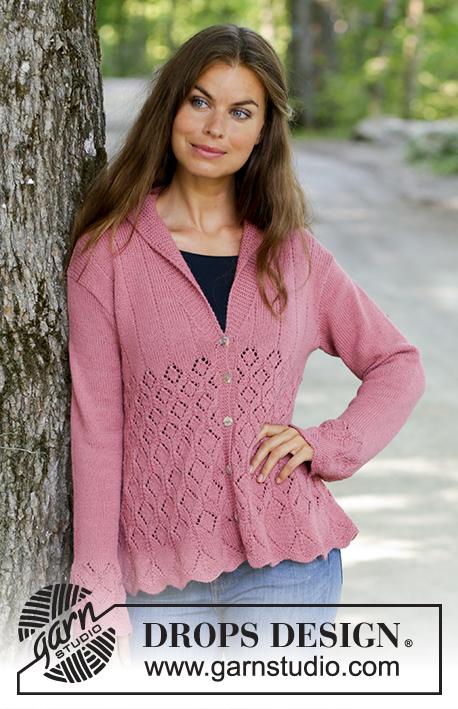
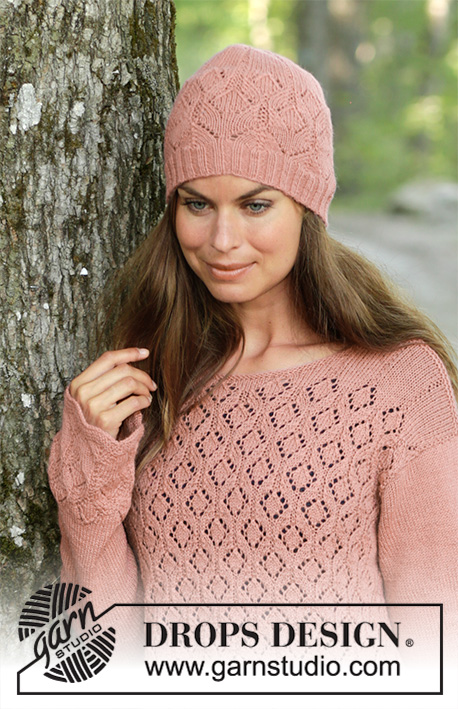
Knitted sweater in DROPS Merino Extra Fine. The piece is worked back and forth with texture and displacement. Sizes S - XXXL.
DROPS 197-27 |
|||||||||||||||||||
|
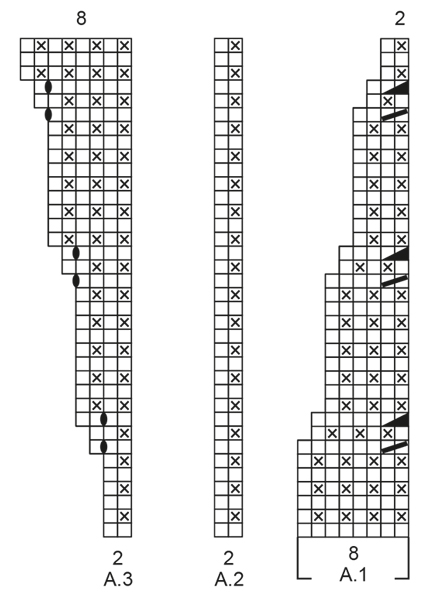
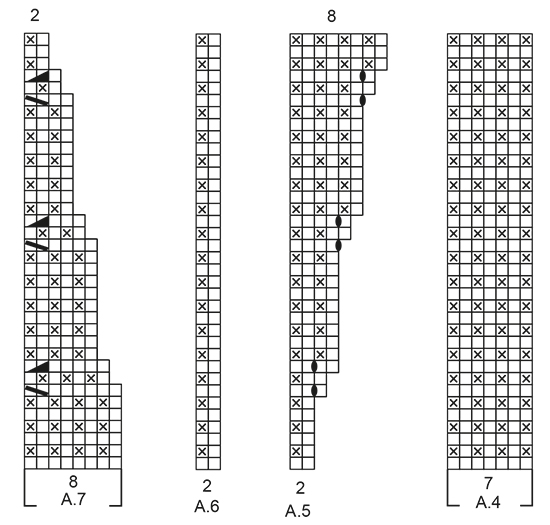
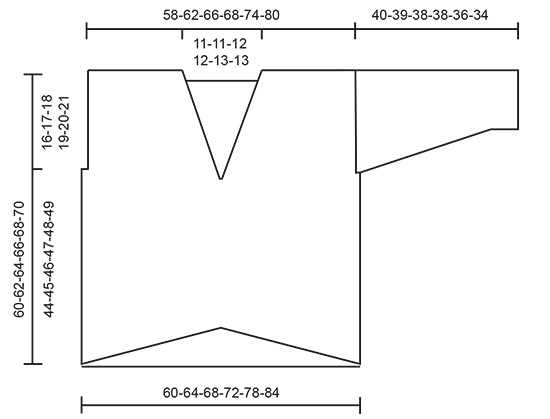
------------------------------------------------------- EXPLANATIONS FOR THE PATTERN: ------------------------------------------------------- RIDGE/GARTER STITCH (worked back and forth): 1 ridge = Knit 2 rows. PATTERN: See diagrams A.1 to A.7. The diagrams show all the rows in the pattern seen from the right side. DECREASE TIP: All decreases are made from the right side! Decrease in the same way as in diagrams A.1 and A.7 as follows: Decrease after the 1 edge stitch in garter stitch when the 2nd stitch on the row is worked in garter stitch as follows: Knit 2 together. Decrease after the 1 edge stitch in garter stitch when the 2nd stitch on the row is knitted as follows: Purl 2 together. Decrease before the 1 edge stitch in garter stitch when the next to last stitch on the row is in garter stitch as follows: Work until there are 3 stitches left on the row, slip 1 stitch as if to knit, knit 1 and pass the slipped stitch over the knitted stitch. Decrease before the 1 edge stitch in garter stitch when the next to last stitch on the row is knitted as follows: Work until there are 3 stitches left on the row, purl 2 together. ------------------------------------------------------- START THE PIECE HERE: ------------------------------------------------------- SWEATER - SHORT OVERVIEW OF THE PIECE: The piece is worked back and forth with circular needle in sections and sewn together to finish. The piece is worked bottom up. FRONT PIECE: Cast on 129-137-145-153-165-177 stitches with circular needle size 4.5 mm / US 7 and Merino Extra Fine. Purl 1 row from the wrong side. Now work pattern from the right side as follows: 1 edge stitch in GARTER STITCH - read description above, work A.1 over the first 8 stitches, A.2 over the next 50-54-58-62-68-74 stitches, A.3 over the next 2 stitches, A.4 over the next 7 stitches (= the middle 7 stitches on the row), A.5 over the next 2 stitches, A.6 over the next 50-54-58-62-68-74 stitches, A.7 over the next 8 stitches and 1 edge stitch in garter stitch. Continue back and forth like this. The number of stitches stays the same, but the pattern is displaced. REMEMBER THE GAUGE! When the diagrams have been completed in height, continue the pattern in the same way, i.e. increase stitches in A.3 and A.5 and decrease stitches in A.1 and A.7. When the piece measures approx. 34-34-35-35-35-35 cm / 13⅜"-13⅜"-13 ¾"-13 ¾"-13 ¾"-13 ¾" from the cast-on edge and up the side of the piece – adjust so that you finish after 5 rows after an increase, work the next row from the right side as follows: Work pattern as before over the first 64-68-72-76-82-88 stitches on the row, work 2 stitches in the next stitch (= mid-stitch), work pattern as before over the last 64-68-72-76-82-88 stitches on the row = 130-138-146-154-166-178 stitches. Insert a marker thread in each side of the piece. THE PIECE IS NOW MEASURED FROM HERE! Place the first 65-69-73-77-83-89 stitches (seen from the right side) on a thread for left shoulder and work the right shoulder. RIGHT SHOULDER: = 65-69-73-77-83-89 stitches. Work 1 row back from the wrong side. Now work pattern as follows from the right side: 2 edge stitches in garter stitch (= towards neck), continue pattern A.6 until there is 1 stitch left and work 1 edge stitch in garter stitch. AT THE SAME TIME on the first row from the right side decrease 1 stitch inside the 1 edge stitch in garter stitch towards the side - read DECREASE TIP. Decrease like this every 4th row a total of 10-10-11-11-12-12 times and when the piece measures 10-11-11-12-13-14 cm / 3⅞"-4 ¼"-4 ¼"-4⅝"-5⅛"-5 ½" from the marker thread bind off 2-2-2-4-4-4 stitches for the armhole = 53-57-60-62-67-73 stitches left on shoulder. When the piece measures 17-18-19-20-21-22 cm / 6¾"-7"-7½"-8"-8¼"-8¾" from the marker thread (= 7-7-8-8-8-8 cm / 2 ¾"-2 ¾"-3⅛"-3⅛"-3⅛"-3⅛" from where you bind off for the armhole) work short rows in pattern as before from the wrong side as follows: ROW 1 (wrong side): Work until there are 2 stitches left on the row, tighten strand. ROW 2 (right side): Work back. ROW 3: Work until there are 4 more stitches left on the row than the previous time (= 6 stitches), tighten strand. ROW 4: Work back. Repeat rows 3 and 4 and turn when there are 4-4-4-4-4-4 more stitches left than on the previous row 7-11-10-13-12-15 more times (= a total of 8-12-11-14-13-16 times) and then when there are 5-3-5-0-3-3 more stitches left than on the previous row 3-1-2-0-3-1 times (NOTE: In size XL turn after there are 4 more stitches left each time). Work 1 ridge over all stitches on row where you decrease 5 stitches evenly on row = 48-52-55-57-62-68 stitches left on shoulder. Bind off. The piece measures approx. 60-62-64-66-68-70 cm / 23⅝"-24⅜"-25¼"-26"-26¾"-27½" / 23⅝"-24⅜"-25¼"-26"-26¾"-27½" from the shoulder down. LEFT SHOULDER: = 65-69-73-77-83-89 stitches. Work 1 row back from the wrong side. Now work pattern as follows from the right side: 1 edge stitch in garter stitch (towards armhole), continue pattern A.6 until there are 2 stitches left and work 2 edge stitches in garter stitch (= towards neck). AT THE SAME TIME on the first row from the right side decrease 1 stitch inside the 1 edge stitch in garter stitch towards the side - remember DECREASE TIP. Decrease like this every 4th row a total of 10-10-11-11-12-12 times and when the piece measures 10-11-11-12-13-14 cm / 3⅞"-4 ¼"-4 ¼"-4⅝"-5⅛"-5 ½" from the marker thread bind off 2-2-2-4-4-4 stitches for the armhole = 53-57-60-62-67-73 stitches left on shoulder. When the piece measures 17-18-19-20-21-22 cm / 6¾"-7"-7½"-8"-8¼"-8¾" from the marker thread (= 7-7-8-8-8-8 cm / 2 ¾"-2 ¾"-3⅛"-3⅛"-3⅛"-3⅛" from where you bind off for the armhole) work short rows in pattern as before from the right side as follows: ROW 1 (right side): Work until there are 2 stitches left on the row, tighten strand. ROW 2 (wrong side): Work back. ROW 3: Work until there are 4 more stitches left than the previous time (= 6 stitches), tighten strand. ROW 4: Work back. Repeat rows 3 and 4 and turn when there are 4-4-4-4-4-4 more stitches left than the previous row 7-11-10-13-12-15 more times (= a total of 8-12-11-14-13-16 times) and then when there are 5-3-5-0-3-3 more stitches left than the previous time 3-1-2-0-3-1 times (NOTE: In size XL turn when there are 4 more stitches left each time). Work 1 ridge over all stitches on row where you decrease 5 stitches evenly on row = 48-52-55-57-62-68 stitches left on shoulder. Bind off. The piece measures approx. 60-62-64-66-68-70 cm / 23⅝"-24⅜"-25¼"-26"-26¾"-27½" / 23⅝"-24⅜"-25¼"-26"-26¾"-27½" from the shoulder down. BACK PIECE: Cast on 121-129-137-145-157-169 stitches with circular needle size 4.5 mm / US 7 and Merino Extra Fine. Purl 1 row from the wrong side. Now work pattern as follows from the right side: 1 edge stitch in garter stitch, work A.2 until there are 2 stitches left on the row, work the first stitch in A.2 and 1 edge stitch in garter stitch. Continue back and forth like this. When the piece measures 44-45-46-47-48-49 cm / 17¼"-17¾"-18"-18½"-19"-19¼" – adjust to match the front piece where you bind off stitches for the armholes, and bind off 2-2-2-4-4-4 stitches at the beginning of the next 2 rows for the armholes in each side = 117-125-133-137-149-161 stitches. Continue working until the piece measures 56-58-60-62-64-66 cm / 22"-22¾"-23⅝"-24⅜"-25¼"-26". Now work garter stitch over the middle 25-25-27-27-29-29 stitches on the row. When you have worked 2 ridges over these stitches, bind off the middle 21-21-23-23-25-25 stitches for neck and each shoulder is finished separately = 48-52-55-57-62-68 stitches on each shoulder. Continue with texture and 1 edge stitch in garter stitch in the side and 2 stitches in garter stitch towards the neck. When the piece measures 59-61-63-65-67-69 cm / 23¼"-24"-24¾"-25½"-26⅜"-27⅛" / 23¼"-24"-24¾"-25½"-26⅜"-27⅛" work 1 ridge over all stitches. Bind off. Work the other shoulder in the same way. The piece measures approx. 60-62-64-66-68-70 cm / 23⅝"-24⅜"-25¼"-26"-26¾"-27½" / 23⅝"-24⅜"-25¼"-26"-26¾"-27½" from the shoulder down. SLEEVE: Cast on 45-45-49-49-53-53 stitches with circular needle size 4.5 mm / US 7 and Merino Extra Fine. Purl 1 row from the wrong side. Now work pattern as follows from the right side: 1 edge stitch in garter stitch, A.2 over the next 16-16-18-18-20-20 stitches, A.3 over the next 2 stitches, A.4 over the middle 7 stitches on the sleeve, A.5 over the next 2 stitches, A.6 over the next 16-16-18-18-20-20 stitches and 1 edge stitch in garter stitch. Continue back and forth like this. You increase stitches on the middle of sleeve in diagrams A.3 and A.5. When the sleeve measures 7 cm / 2¾" decrease 1 stitch in each side - remember DECREASE TIP! NOTE: In size XXXL you do not decrease, but continue to work texture and increase stitches as before. Decrease like this every 10th-12th-18th-30th-28th-0 row a total of 10-8-6-4-4-0 times. When the diagrams have been completed in height continue to increase in the middle of the sleeve as before until you have increased a total of 20-20-18-18-18-16 times and there are 65-69-73-77-81-85 stitches on the needle. Then continue with texture until the sleeve measures 40-39-38-37-36-33 cm / 15 ¾"-15 ¼"-14⅞"-14 ½"-14⅛"-13". Bind off. Work the other sleeve in the same way. ASSEMBLY: Sew the shoulder seams with grafting stitches. Sew sleeves to body inside the 1 edge stitch in garter stitch on the body and inside the bind-off edge on the sleeve. Sew sleeve and side seams in one go inside the 1 edge stitch in garter stitch. |
|||||||||||||||||||
Diagram explanations |
|||||||||||||||||||
|
|||||||||||||||||||
 |
|||||||||||||||||||
 |
|||||||||||||||||||
 |
|||||||||||||||||||
Have you finished this pattern?Tag your pictures with #dropspattern #wednesdaymorningsweater or submit them to the #dropsfan gallery. Do you need help with this pattern?You'll find 21 tutorial videos, a Comments/Questions area and more by visiting the pattern on garnstudio.com. © 1982-2026 DROPS Design A/S. We reserve all rights. This document, including all its sub-sections, has copyrights. Read more about what you can do with our patterns at the bottom of each pattern on our site. |
|||||||||||||||||||


With over 40 years in knitting and crochet design, DROPS Design offers one of the most extensive collections of free patterns on the internet - translated to 17 languages. As of today we count 324 catalogs and 12290 patterns - 12280 of which are translated into English (US/in).
We work hard to bring you the best knitting and crochet have to offer, inspiration and advice as well as great quality yarns at incredible prices! Would you like to use our patterns for other than personal use? You can read what you are allowed to do in the Copyright text at the bottom of all our patterns. Happy crafting!
Post a comment to pattern DROPS 197-27
We would love to hear what you have to say about this pattern!
If you want to leave a question, please make sure you select the correct category in the form below, to speed up the answering process. Required fields are marked *.