
Popular categories
Looking for a yarn?


Comments / Questions (32)
![]() Blandine wrote:
Blandine wrote:
Magnifique !!!! Vivement les explications
08.07.2018 - 09:09
![]() Sonja wrote:
Sonja wrote:
Wunderschön. Bitte schnell her mit der Anleitung.
29.06.2018 - 17:53
![]() Karin wrote:
Karin wrote:
Ich warte sehnlichst auf die Anleitung. Das wird das erste Projekt der neuen Kollektion
21.06.2018 - 13:21
![]() Mémé Christiane wrote:
Mémé Christiane wrote:
Très joli, j'aime la Delight
16.06.2018 - 15:44
![]() Uschi wrote:
Uschi wrote:
Ein tolles Muster, das sicher in unterschiedlichen Farbrichtungen gut aussieht
13.06.2018 - 17:12
![]() Lizzy wrote:
Lizzy wrote:
This is very beautiful, I love the leaflike shapes. Could you recommend a non-wool yarn to make this with if the pattern is chosen?
12.06.2018 - 23:16
![]() Wilma wrote:
Wilma wrote:
Prachtige kleuren!
12.06.2018 - 15:44
![]() Uta wrote:
Uta wrote:
Wunderschön, diese Farbverläufe. Die Alternative in Blau würde mir auch gefallen.
06.06.2018 - 17:27
![]() Lowla wrote:
Lowla wrote:
This looks so great with the amazing colors!
05.06.2018 - 15:07
![]() Sylvie wrote:
Sylvie wrote:
Superbe !!
05.06.2018 - 13:50
|
||||||||||
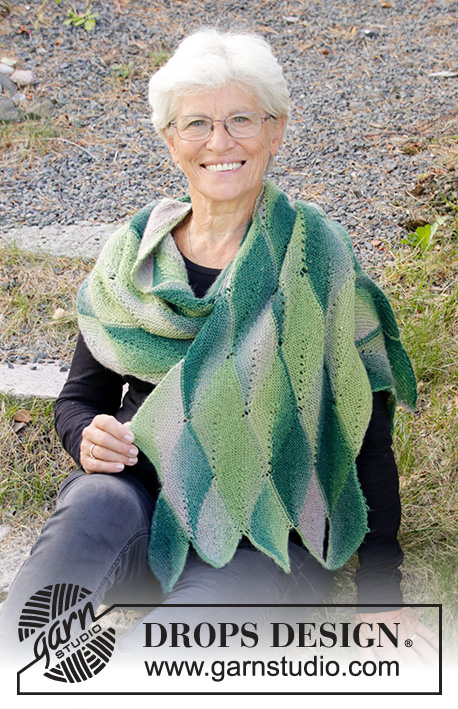
Forest Fling#forestflingshawl |
||||||||||
 |
 |
|||||||||
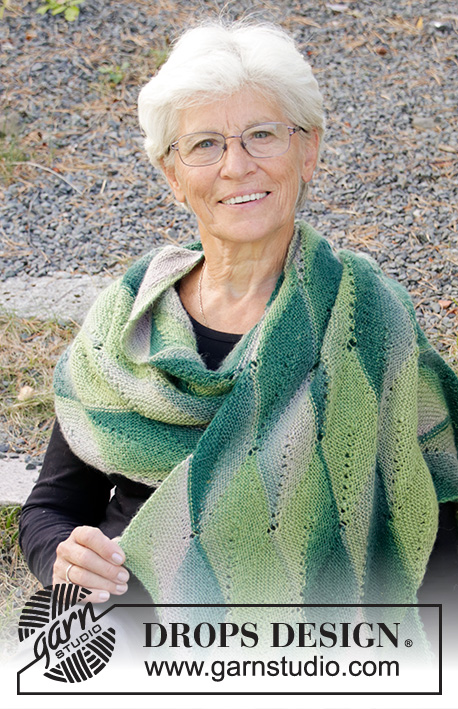
Knitted stole with leaves in DROPS Delight. The piece is worked in garter stitch with short rows.
DROPS 196-5 |
||||||||||
|
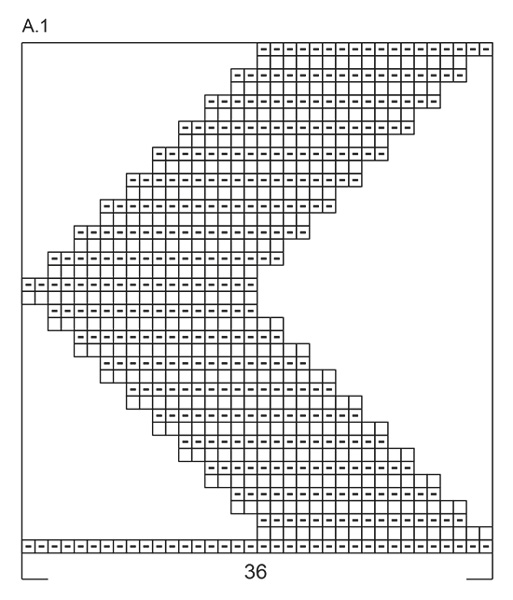
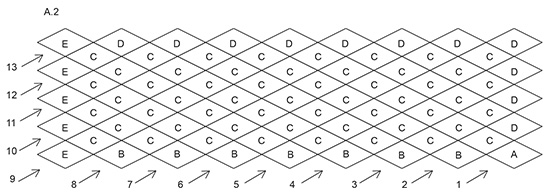
------------------------------------------------------- EXPLANATIONS FOR THE PATTERN: ------------------------------------------------------- RIDGE/GARTER STITCH (worked back and forth): All rows are knitted (1 ridge = knit 2 rows). PATTERN: See diagrams A.1 and A.2. Diagram A.1 shows all the rows in the pattern seen from the right side. Diagram A.1 is read from left to right on all rows from the wrong side. All rows from the right side are read from right to left. Diagram A.2 shows the leaves as well as the knitting direction and order of rows. COLOR SUGGESTION: To mix and change the pattern of colors while you work, you can change balls or use yarn from the other end of the ball each time you start a new row of leaves. Change color before each START-ROW 1 and START-ROW 2 are worked. ------------------------------------------------------- START THE PIECE HERE: ------------------------------------------------------- STOLE - SHORT OVERVIEW OF THE PIECE: The piece is worked back and forth with circular needle; from the one corner, diagonally upwards in rows with different numbers of leaves. Short rows are worked over one leaf at a time. The whole piece is worked in GARTER STITCH – read description above. Markers are used, inserted between and in the middle of leaves as you work. The markers are on the needle and will follow your work upwards. They make it easier to see where the leaves are to be worked. Read also COLOR SUGGESTION in description above. STOLE: Cast on 36 stitches with circular needle size 4 mm = US 6 and Delight. Then work as follows: ROW 1: Work LEAF A as follows: LEAF A: Work diagram A.1; the first row in the diagram is from the wrong side – read description above under pattern. Work the diagram 1 time in height = 1 leaf. The first row of leaves is now finished, turn the piece. In the transition between rows 1 and 2 with leaves, work START-ROW 1 as follows: START-ROW 1: From the right side: Bind off the first 18 stitches with knit, knit 18 stitches. Turn the piece, knit 18 stitches, insert 1 marker on the needle here and cast on 18 new stitches at the end of the row from the wrong side. Turn the piece and knit to end of row from the right side, insert a marker on the needle here. Cast on 36 new stitches at the end of the row. Now you are ready to work the next row of leaves. Turn the piece. ROW 2. Work LEAVES B, C and D as follows: LEAF B: Work diagram A.1 over the first 36 stitches on the needle (as far as the first marker seen from the wrong side). Work the diagram 1 time in height (you have now worked as far as the same marker again). Turn the piece, knit 36 stitches from the right side. Turn the piece, knit 18 stitches from the wrong side, insert 1 marker on the needle here, do not turn the piece; the next leaf is worked over the next 36 stitches. LEAF C: Work diagram A.1 over the next 36 stitches on the needle (past one marker and as far as the next). Work the diagram 1 time in height. Turn the piece and knit 36 stitches from the right side. Turn the piece, knit 18 stitches from the wrong side (as far as the marker in the middle of the leaf), do not turn the piece; the next leaf is worked over the next 36 stitches. LEAF D: Work diagram A.1 over the last 36 stitches on the needle (past the last marker and to end of row). Work the diagram 1 time in height. You have now worked 3 leaves and 2 rows of leaves are finished. Work START-ROW 1 – read description above, in the transition between rows 2 and 3 of leaves. ROW 3: Work LEAF B over the first 36 stitches, work LEAF C a total of 3 times in width, work LEAF D over the last 36 stitches (= 5 leaves on the row) and work START-ROW 1 in the transition between rows 3 and 4 of leaves. ROW 4: Work LEAF B over the first 36 stitches, work LEAF C a total of 5 times in width, work LEAF D over the last 36 stitches (= 7 leaves on the row) and work START-ROW 1 in the transition between rows 4 and 5 of leaves. ROW 5: Work LEAF B over the first 36 stitches, work LEAF C a total of 7 times in width and work LEAF D over the last 36 stitches (= 9 leaves on the row). NOTE! START-ROW 1 is not worked anymore from here; you work START-ROW 2 in the transition between rows 5 and 6 of leaves as follows: START-ROW 2: From the right side: Bind off the first 36 stitches with knit, knit to end of row, insert 1 marker on the row here. Cast on 36 new stitches at the end of the row and insert 1 marker on the row here. Now you are ready for the next row of leaves which are worked from here. Turn the piece. ROW 6: Work LEAF B over the first 36 stitches, work LEAF C a total of 7 times in width, work LEAF D over the last 36 stitches (= 9 leaves) and work START-ROW 2 in the transition between rows 6 and 7 of leaves. ROW 7: Work LEAF B over the first 36 stitches, work LEAF C a total of 7 times in width, work LEAF D over the last 36 stitches (= 9 leaves) and work START-ROW 2 in the transition between rows 7 and 8 of leaves. ROW 8: Work LEAF B over the first 36 stitches, work LEAF C a total of 7 times in width, work LEAF D over the last 36 stitches (= 9 leaves) and work START-ROW 2 in the transition between rows 8 and 9 of leaves. ROW 9: Work LEAF E as follows: LEAF E: Work diagram A.1 over the first 36 stitches (as far as the first marker on the needle seen from the wrong side). Work the diagram 1 time in height (you have now worked as far as the same marker again). Turn the piece. Knit 36 stitches from the right side. Turn the piece, bind off 18 stitches from the wrong side. Turn the piece, insert 1 marker on the needle here and cast on 18 new stitches from the right side. Turn the piece, knit 18 stitches from the wrong side. Do not turn the piece as the next leaf is worked over the next 36 stitches from here. Work LEAF C a total of 7 times in width and work LEAF D over the last 36 stitches (= 9 leaves on the row). Turn the piece, bind off the first 36 stitches with knit from the right side. Knit to end of row from the right side. ROW 10: Work LEAF E over the first 36 stitches, work LEAF C a total of 5 times in width and work LEAF D over the last 36 stitches (= 7 leaves on the row). Turn the piece, bind off the first 36 stitches with knit from the right side. Knit to end of row from the right side. ROW 11: Work LEAF E over the first 36 stitches, work LEAF C a total of 3 times in width and work LEAF D over the last 36 stitches (= 5 leaves on the row). Turn the piece, bind off the first 36 stitches from the right side. Knit to end of row from the right side. ROW 12: Work LEAF E over the first 36 stitches, work LEAF C 1 time in width and work LEAF D over the last 36 stitches (= 3 leaves). Turn the piece, bind off the first 36 stitches with knit from the right side. Knit to end of row from the right side. ROW 13: Work LEAF E over the last 36 stitches, but when diagram A.1 has been worked 1 time in height, bind off all stitches from the right side. Cut and fasten the strands. |
||||||||||
Diagram explanations |
||||||||||
|
||||||||||
 |
||||||||||
 |
||||||||||
Have you finished this pattern?Tag your pictures with #dropspattern #forestflingshawl or submit them to the #dropsfan gallery. Do you need help with this pattern?You'll find 10 tutorial videos, a Comments/Questions area and more by visiting the pattern on garnstudio.com. © 1982-2026 DROPS Design A/S. We reserve all rights. This document, including all its sub-sections, has copyrights. Read more about what you can do with our patterns at the bottom of each pattern on our site. |
||||||||||


With over 40 years in knitting and crochet design, DROPS Design offers one of the most extensive collections of free patterns on the internet - translated to 17 languages. As of today we count 325 catalogs and 12298 patterns - 12288 of which are translated into English (US/in).
We work hard to bring you the best knitting and crochet have to offer, inspiration and advice as well as great quality yarns at incredible prices! Would you like to use our patterns for other than personal use? You can read what you are allowed to do in the Copyright text at the bottom of all our patterns. Happy crafting!
Post a comment to pattern DROPS 196-5
We would love to hear what you have to say about this pattern!
If you want to leave a question, please make sure you select the correct category in the form below, to speed up the answering process. Required fields are marked *.