
Popular categories
Looking for a yarn?


Comments / Questions (95)
![]() Ineke Varley wrote:
Ineke Varley wrote:
Hi, I am doing the small size and having trouble with the sleeves especial rows 3 & 4 of A2 and the increasing. The pattern doesn’t come out evenly. I end up with 1 stitch too many in these rows that require sets of 3 stitches. Rows 1& 2 of A2 don’t have any issues. I also found that by time I get to 58 stitches total I will not be able to do the 3&4 row of A2 evenly. Do I just work A1 then A2 and do A3 (then also in reverse) until I have the required stitches. Thank you
07.07.2019 - 14:47DROPS Design answered:
Dear Mrs Varley, continue working A.2 on sleeve as explained, work the new stitches with dc only, and when there are enough sts to work one new repeat on each side of sleeve, continue working A.2 over these stitches. That way, pattern will not be displaced. And you will be sure to get the correct number of stitches. Happy crocheting!
08.07.2019 - 10:06
![]() Manuela wrote:
Manuela wrote:
Wieviele Knäuel brauche ich insgesamt für den Pullover wenn ich ihn in Größe M häkle?
02.06.2019 - 14:15DROPS Design answered:
Liebe Manuela, die Garnmenge für jede Größe finden Sie unter dem Kopfteil - hier lesen Sie mehr. Viel Spaß beim häkeln!
03.06.2019 - 10:09
![]() Yvette wrote:
Yvette wrote:
Bedankt, Maar weet iemand waar ik deze steek op internet kan vinden🤔
06.05.2019 - 20:22DROPS Design answered:
Hoi Yvette,
In deze video wordt het verschil uitgelegd tussen IN en OM de steek haken.
09.05.2019 - 21:56
![]() Yvette wrote:
Yvette wrote:
Hi Allemaal, Weet iemand wellicht wat de haaksteek bolletje in streepje betekent En hoe ik dat kan vinden op internet
04.05.2019 - 14:42DROPS Design answered:
Dag Yvette,
Dit is een stokje die je om de de steek van de vorige toer haakt.
05.05.2019 - 16:29
![]() Susana wrote:
Susana wrote:
El delantero también lleva sisa como la espalda?
15.04.2019 - 19:46DROPS Design answered:
Hola Susana. El delantero se trabaja igual que la espalda hasta el escote (incluyendo las sisas).
22.04.2019 - 13:01
![]() Lone wrote:
Lone wrote:
Hej Jeg forstår ikke A2 række 3. Jeg har 86 masker, jeg starter med 3 lm og A1 jeg har lavet 14 gange A2, men har ikke en maske at springe over før A3. Så jeg slutter med A3, og nu har jeg pludselig 87 masker? Jeg tæller maskerne for hver runde, og der var 86 masker, da runden startede. Udligner antallet sig i sidste runde A2?
05.04.2019 - 12:48DROPS Design answered:
Hej Lone, husk at første stangmaske erstattes af 3 luftmasker + 6 x 14 + 1st = ialt 86 stangmasker. God fornøjelse!
08.04.2019 - 09:09
![]() Passcalle wrote:
Passcalle wrote:
Als ik de beschrijving precies volg dan heb ik aan het begin 13 stokjes maar eindig niet met 13 stokjes....
29.03.2019 - 15:25DROPS Design answered:
Dag Passcalle,
Aan het begin zet je 94-101-108-122-129-143 lossen op en daarna haak je stokes in de lossen volgens beschrijving in patroon 80-86-92-104-110-122 stokjes. Je begint dan toch al met veel meer dan 13? Of bedoel je bij de hals/schouder op het voorpand?
31.03.2019 - 11:47
![]() Florence wrote:
Florence wrote:
Je ne comprends pas également ce que veux dire : une bride autour de la maille en l'air
22.02.2019 - 11:05DROPS Design answered:
Bonjour, vous n'allez pas piquer le crochet dans la maille en l'air mais dessous (= dans l'arceau d'1 maille en l'air) et ainsi crocheter la bride autour de la maille en l'air/dans l'arceau. Bon crochet!
22.02.2019 - 14:49
![]() Florence wrote:
Florence wrote:
Bonjour, je ne comprends pas les explications A1 : il faut faire 17 mailles (pour une taille XL) avant d'attaquer le A2 ? et après le A2 c'est juste une bride A3 ? merci je suis perdue
22.02.2019 - 10:54DROPS Design answered:
Bonjour Florence, on commence le rang par A.1, on répète ensuite A.2 et on termine par A.3, en taille XXL vous crochetez sur l'endroit: A.1 (= 1 bride = 3 ml au début du rang), répétez A.2 et terminez par A.3 (= 1 bride dans la dernière maille). Sur l'envers, crochetez A.3 (= 3 ml au début du rang), répétez A.2 et terminez par A.1. Bon crochet!
22.02.2019 - 14:43
![]() Marion wrote:
Marion wrote:
Als je met t patroon begint aan de goede kant, begin je dan links of rechts van de diagram?
05.01.2019 - 11:25DROPS Design answered:
Dag Marion,
Je begint altijd rechts onder in de telpatronen.
05.01.2019 - 12:34
|
||||||||||||||||
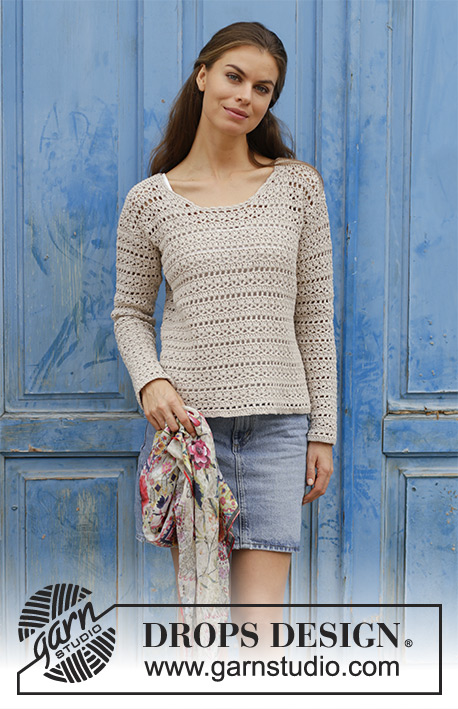
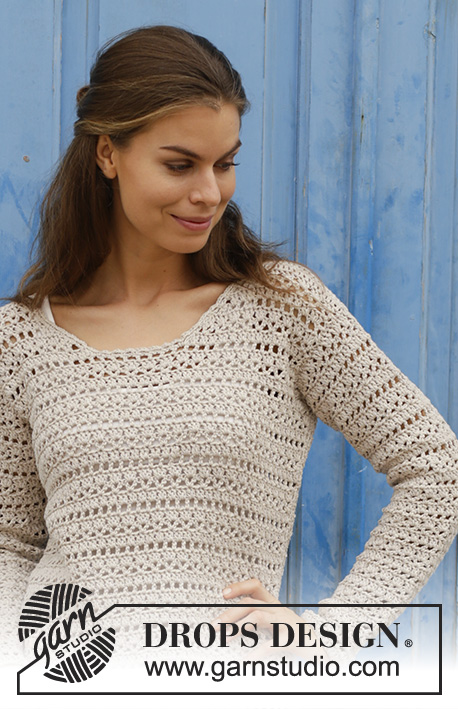
Miles Away#milesawaysweater |
||||||||||||||||
 |
 |
|||||||||||||||
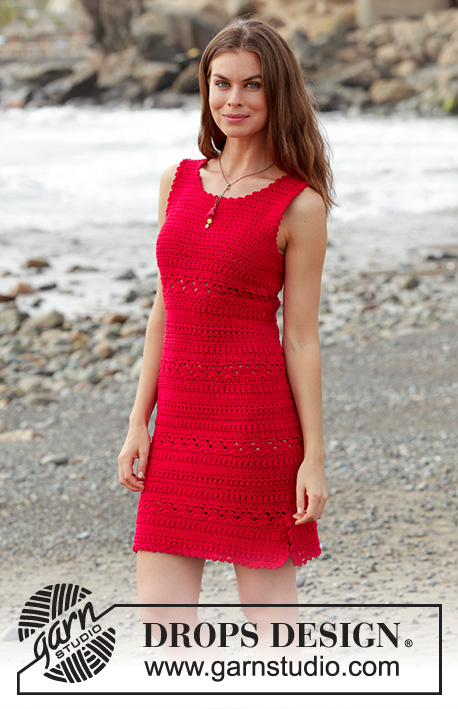
Crocheted sweater with lace pattern. Sizes S - XXXL. The piece is worked in DROPS Cotton Light.
DROPS 187-2 |
||||||||||||||||
|
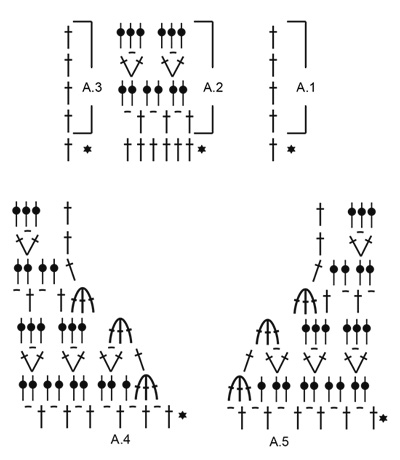
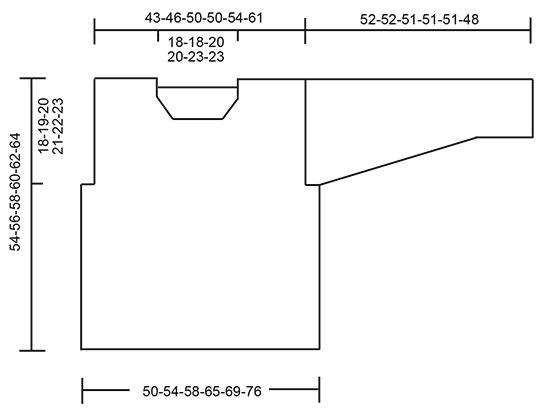
INFORMATION FOR THE PATTERN: PATTERN: See diagrams A.1 to A.5. CROCHET INFO: At the beginning of each row of double crochets, replace the first double crochet with 3 chain stitches. ---------------------------------------------------------- SWEATER: The piece is worked back and forth. First work the back and front pieces separately and then work the sleeves. All pieces are sewn together at the end. To finish, crochet an edge around the neck. BACK PIECE: Work 94-101-108-122-129-143 chain stitches with hook size 4.5 mm/US 7 and Cotton Light. Work 1 double crochet in the 4th chain stitch from the hook (= 2 double crochets), 1 double crochet in each of the next 5 chain stitches, * 1 double crochet in each of the next 6 chain stitches, skip 1 chain stitch *, work from *-* until there is 1 chain stitch left, 1 double crochet in the last chain stitch = 80-86-92-104-110-122 double crochets. Then work as follows from the right side: Work A.1 – read CROCHET INFO, A.2 (= 6 stitches) a total of 13-14-15-17-18-20 times in width and finish with A.3 over the last double crochet. Continue this pattern upwards. REMEMBER THE CROCHET GAUGE! A.1 to A.3 are repeated in height. When the piece measures 36-37-38-39-40-41 cm / 14¼"-14½"-15"-14¼"-15¾"-16⅛", work the armholes as follows: Cut the strand, skip 6-6-6-12-12-12 stitches (= armhole), work 1 slip stitch in the next stitch, 3 chain stitches, A.2 over the next 66-72-78-78-84-96 stitches and finish with A.3 over the next stitch (there are now 6-6-6-12-12-12 stitches left for the other armhole = a total of 68-74-80-80-86-98 stitches on the row. On the next row work A.1 in the last double crochet. Continue the pattern like this. When the piece measures 52-54-56-58-60-62 cm / 20½"-21¼"-22"-22¾"-23⅝"-24⅜", adjust so that the last row was worked from the wrong side, finish each shoulder separately. Work 1 double crochet in each of the first 20-23-24-24-25-31 double crochets (= shoulder). Work 2 rows with 1 double crochet in each. Cut and fasten strand. The piece measures a total of 54-56-58-60-62-64 cm / 21¼"-22"-22¾"-23⅝"-24⅜"-25¼". Skip 28-28-32-32-36-36 stitches for neck, work 1 slip stitch in the next stitch and 3 chain stitches (= 1 double crochet), work 1 double crochet in each of the last 19-22-23-23-24-30 stitches. Finish the shoulder in the same way as the other shoulder. FRONT PIECE: Work as for back piece until piece measures 42-44-44-46-46-48 cm / 16½"-17¼"-17¼"-18"-18"-19", adjust so that the last row worked is the first row of A.2 (the last row is worked from the right side). Now divide the piece and each shoulder is finished separately as follows: RIGHT SHOULDER (when the garment is worn): The first row is worked from the wrong side. Work A.3 over the first 1-1-2-2-3-3 stitches (work around chain stitches and in double crochets), work A.2 over the next 15-18-18-18-18-24 stitches, work A.4 over the next 12 stitches, turn the piece. Continue the pattern and decreases to neck according to diagram A.4. When A.4 has been worked 1 time in height, there are 20-23-24-24-25-31 double crochets on the last row. Work pattern until the piece measures 52-54-56-58-60-62 cm / 20½"-21¼"-22"-22¾"-24½", adjust so that you finish with 1 row of double crochets from the wrong side. Work 1 double crochet in each double crochet until the piece measures 54-56-58-60-62-64 cm / 21¼"-22"-22¾"-23⅝"-24⅜"-25¼". Cut and fasten the strand. LEFT SHOULDER (when the garment is worn): Now work the left shoulder as follows (first row = wrong side): Skip 12-12-16-16-20-20 double crochets from where A.4 was worked (= for neck), work 1 slip stitch in the next stitch, then work A.5 over the same stitch and the next 11 stitches (= a total of 12 stitches), work A.2 over the next 15-18-18-18-18-24 stitches and finish with A.1 over the last 1-1-2-2-3-3 stitches (work around chain stitches and in double crochets). Continue the pattern and decrease according to diagram A.5. When A.5 has been worked 1 time in height, there are 20-23-24-24-25-31 double crochets on the last row. Work pattern until the piece measures 52-54-56-58-60-62 cm / ½"-21¼"-22"-22¾"-24½", adjust to match the right shoulder. Work 1 double crochet in each double crochet until the piece measures 54-56-58-60-62-64 cm / 21¼"-22"-22¾"-23⅝"-24⅜"-25¼". Cut and fasten the strand. SLEEVE: The piece is worked back and forth. Work 45-45-49-49-52-52 chain stitches with hook size 4.5 mm/US 7 and Cotton Light. Work 1 double crochet in the 4th chain stitch from the hook (= 2 double crochets), 1 double crochet in each of the next 5-5-7-7-5-5 chain stitches, * 1 double crochet in each of the next 6 chain stitches, skip 1 chain stitch *, work from *-* until there are 1-1-3-3-1-1 chain stitches left, 1 double crochet in each of the last 1-1-3-3-1-1 chain stitches = 38-38-42-42-44-44 double crochets. Work A.1 over the first 1-1-3-3-1-1 double crochets, A.2 until there are 1-1-3-3-1-1 double crochets left (= 6-6-6-6-7-7 times in width), A.3 over the last 1-1-3-3-1-1 double crochets. Work A.1 to A.3 in height to finished length. When the piece measures 10 cm / 4" increase 1 double crochet in each side of the piece by working 2 double crochets in the first and last double crochet on the row (= 2 double crochets increased). Increase like this every 4-3½-3½-2½-2½-2 cm / 1½"-1¼"-1¼"-⅞"-⅞"-¾" a total of 10-11-11-13-13-15 times = 58-60-64-68-70-74 stitches. The increased stitches are worked into A.2 as you go. NOTE: There is always 1 double crochet (or 3 chain stitches = 1 double crochet) in each side of the piece. When the piece measures 48-48-47-44-44-41 cm / 19"-19"-18½"-17¼"-17¼"-16", insert 1 marker at the beginning of the row; the sleeve seams will later be sewn as far as the marker and the remaining rows sewn together with the 6-6-6-12-12-12 double crochets on the back/front piece which were skipped to make the armhole in each side of the piece (= mid under sleeve). Continue back and forth until the piece measures 52-52-51-51-51-48 cm / 20½"-20½"-20"-20"-20"-19" (shorter measurements in larger sizes due to wider shoulders). Cut and fasten strand. Work 1 more sleeve in the same way. ASSEMBLY: Sew shoulder seams in the outermost loop of the outermost stitch. Sew in the sleeves, the marker on the sleeve marks the side seam on the front and back pieces and the rows worked after the marker are sewn to the 6-6-6-12-12-12 stitches skipped for armholes on front and back pieces. Start at bottom of sleeve and sew sleeve seam in the outermost loop of the outermost stitch, continue with side seam on front and back pieces. Cut and fasten all strands. NECK: Crochet an edge around the neck as follows from mid top of shoulder: Work 1 single crochet, * 3 chain stitches, skip approx. 1 cm / ⅜", 1 single crochet *, work from *-* around the whole neck and finish with 3 chain stitches and 1 slip stitch in the first single crochet at the beginning of the round, make sure the edge is not tight. Cut and fasten the strand. |
||||||||||||||||
Diagram explanations |
||||||||||||||||
|
||||||||||||||||
 |
||||||||||||||||
 |
||||||||||||||||
Have you finished this pattern?Tag your pictures with #dropspattern #milesawaysweater or submit them to the #dropsfan gallery. Do you need help with this pattern?You'll find 8 tutorial videos, a Comments/Questions area and more by visiting the pattern on garnstudio.com. © 1982-2026 DROPS Design A/S. We reserve all rights. This document, including all its sub-sections, has copyrights. Read more about what you can do with our patterns at the bottom of each pattern on our site. |
||||||||||||||||


With over 40 years in knitting and crochet design, DROPS Design offers one of the most extensive collections of free patterns on the internet - translated to 17 languages. As of today we count 325 catalogs and 12298 patterns - 12288 of which are translated into English (US/in).
We work hard to bring you the best knitting and crochet have to offer, inspiration and advice as well as great quality yarns at incredible prices! Would you like to use our patterns for other than personal use? You can read what you are allowed to do in the Copyright text at the bottom of all our patterns. Happy crafting!
Post a comment to pattern DROPS 187-2
We would love to hear what you have to say about this pattern!
If you want to leave a question, please make sure you select the correct category in the form below, to speed up the answering process. Required fields are marked *.