
Popular categories
Looking for a yarn?


Comments / Questions (31)
![]() Gio Edwards wrote:
Gio Edwards wrote:
Am i missing something in the pattern as I can’t find how many stitches make up the neck
08.05.2025 - 23:10DROPS Design answered:
Dear Mrs Edwards, you don't pick up extra stitches for neck, so for the neck on back piece you will cast off 17, 19 or 21 sts (see size) + 1 stitch at the beg of next row from neck on each shoulder so that the total width of neck will be 19, 21 or 23 sts on back piece. On front pieces you work garter stitch on each side towards neck, this will create the front edge sts and you will decrease inside these stitches for V-neck. Happy knitting!
09.05.2025 - 07:53
![]() Eugenia wrote:
Eugenia wrote:
Hello !!! Good morning !! I ´d like to change the yarn but your yarn converter does not work !!! How could I solve this problem ??? TIA
07.10.2023 - 14:25DROPS Design answered:
Dear Eugenia, you can read the following lesson on how to change yarns: https://www.garnstudio.com/lesson.php?id=14&cid=19. Happy knitting!
08.10.2023 - 21:16
![]() Diane wrote:
Diane wrote:
Bonjour, si j’enlève les 4 mailles lisière, est-ce que je pourrais faire ce tricot en rond? Merci
30.06.2023 - 21:32DROPS Design answered:
Bonjour Diane, probablement, notez que ces 4 mailles lisières sont celles montées à la fin des fentes côtés. Bon tricot!
03.07.2023 - 09:34
![]() Marie Holmström wrote:
Marie Holmström wrote:
Hej, undrar vad ni menar med texten: "När plagget has på" (bredvid HÖGER AXEL)?
25.01.2022 - 14:40DROPS Design answered:
Hej Marie, du skal se tøjet fra dit perspektiv når du har det på (ikke når det ligger på bordet foran dig) :)
27.01.2022 - 10:27
![]() Sylvi wrote:
Sylvi wrote:
Jeg får itte mønstret til stemme foran, for det er jo mere kast enn det er felling er og da sitter man igjen med alt for mange masker. Er det noe jeg har oversett eller er det en feil ett sted? 🤔
02.10.2021 - 08:29DROPS Design answered:
Hej Sylvi. Det ska vara samma antal fellingar som kast i diagrammen. Vilken storlek gör du och vilket diagram är det som blir fel? Mvh DROPS Design
04.10.2021 - 11:50
![]() Ebtsam wrote:
Ebtsam wrote:
Very nice indeed.
03.04.2021 - 07:33
![]() Ane Johnsen wrote:
Ane Johnsen wrote:
Hvor finner jeg målene på de forskjellige størrelsene??
06.03.2021 - 21:45
![]() Danielle Tremblay wrote:
Danielle Tremblay wrote:
Good day, I am disappointed!! I purchased 6 balls of Drops Air to make this project in a small as recommended! I ran out of wool at the right shoulder .... I'm so disappointed, hopefully I will be able to purchase in the same color lot!!
27.03.2020 - 16:06DROPS Design answered:
Dear Mrs Tremblay, we are very sorry - did you get and keep correct tension? ie 15 sts in width and 19 rows in height = 10 x 10 cm. Please ask your DROPS store for the dyelot, and remember you can also ask on our DROPS Workshop. Happy knitting!
27.03.2020 - 16:44
![]() Claudia wrote:
Claudia wrote:
1 )Ich habe Probleme mit dem Abketten bezüglich der Armausschnitte ! In der Anleitung heißt es - je 3 Maschen beidseitig abketten - das sind dann für mich insgesamt 6 Maschen . Gesamtmaschenzahl nach der Abnahme also 75 Maschen ! Die Maschenanzahl nach der Abnahme wird aber mit 77 Maschen angegeben . Wo ist mein gedanklicher Fehler ? 2) was bedeutet - am Ende der nächsten 2 Reihen ? Ich arbeite die Abnahme also nicht gleich in einer Reihe ? Ich freue mich auf eine schnelle Antwort :)
29.09.2019 - 16:26DROPS Design answered:
Liebe Claudia, in die erste Größe beginnen Sie mit 81 M dann schlagen Sie 1 M auf beiden Seiten an = 83 M; dann werden 3 Maschen am Anfang (und nicht am Ende) jeder beiden Reihe (= beidseitig 3 M) abgekettet = 77 Maschen. Anleitung wurde korrigiert, danke für den Hinweis. Viel Spaß beim stricken!
01.10.2019 - 09:23
![]() Merete Manley Madsen wrote:
Merete Manley Madsen wrote:
Hej - jeg kan slet ikke få diagramforklaringen til at stemme - jeg har også forgæves ledt efter hjælpevideo til 188-21. Jeres opskrifter plejer at være nemme, men denne skal der tilføjes nogle omslag før eller efter. Hvad betder lyft?? Hvis man følger diagramforklaringerne får man igen masker til at strikke med. Hjælp gerne hurtigst muligt.
01.09.2019 - 12:16DROPS Design answered:
Hei Merete. Her hadde det sneket inn feil oversettelse og forklarelse på den danske og svenske siden. Dette er nå ordnet. Takk for at du gjorde oss oppmerksom på dette og god fornøyelse vidre med genseren. mvh Drops design
02.09.2019 - 12:06
|
|||||||||||||||||||
Matelot#matelotsweater |
|||||||||||||||||||
|
|
|||||||||||||||||||
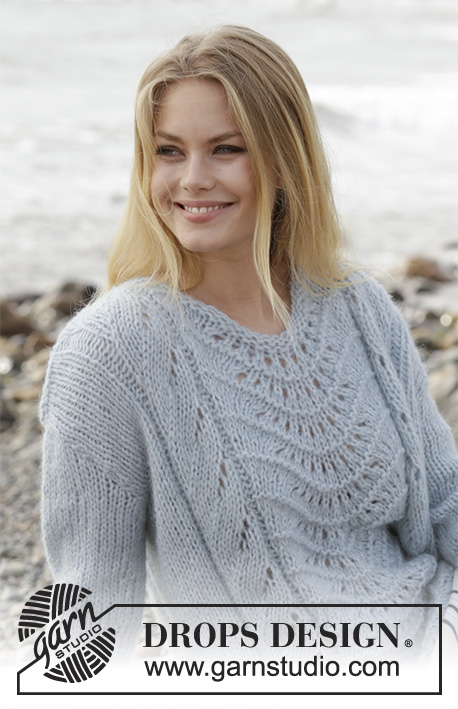
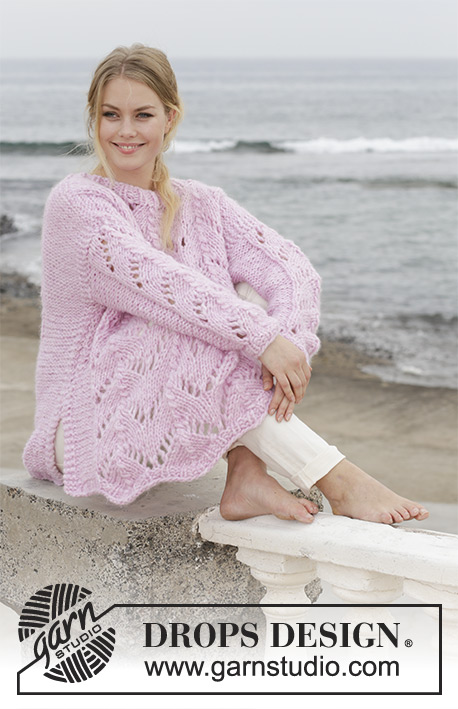
Knitted sweater with lace pattern, garter stitch, V-neck and split in sides. Sizes S - XXXL. The piece is worked in DROPS Air.
DROPS 188-21 |
|||||||||||||||||||
|
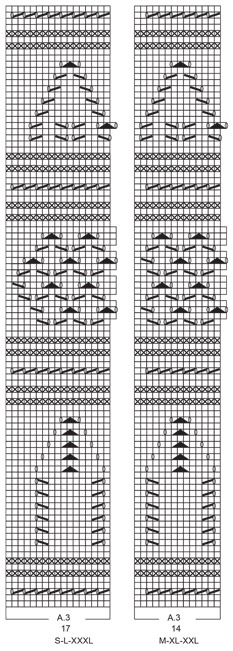
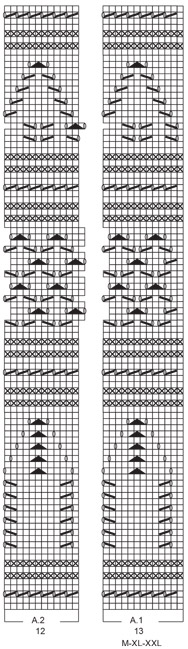
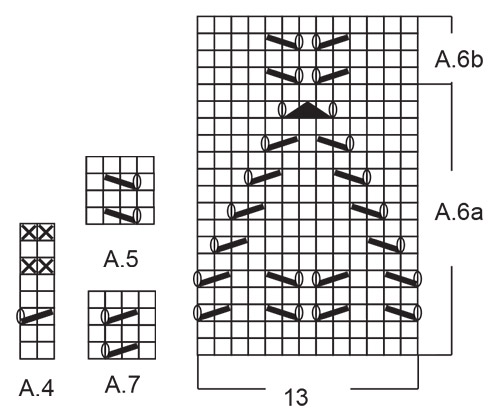
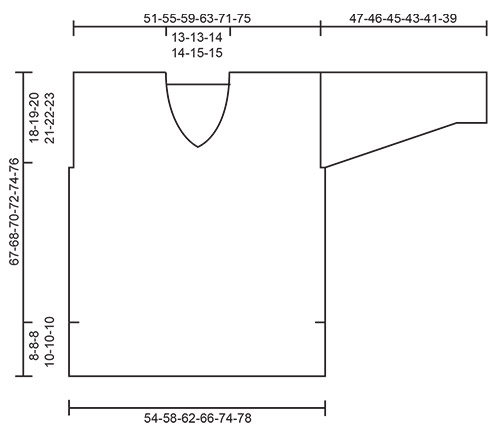
INFORMATION FOR THE PATTERN: RIDGE/GARTER STITCH (worked back and forth): 1 ridge = Knit 2 rows. PATTERN: See diagrams A.1 to A.7. Choose diagram for your size (applies to A.1 and A.3). The diagrams show all the rows in the pattern seen from the right side. DECREASE TIP (for neck): All decreases are made from the right side! Decrease for neck inside the 3 edge stitches in garter stitch. Decrease as follows before the 3 edge stitches: Knit 2 together. Decrease as follows after the 3 edge stitches: Slip 1 stitch as if to knit, knit 1, pass the slipped stitch over the knitted stitch. INCREASE TIP (for sleeves): All increases are made from the right side! Increase with 1 yarn over between 2 stitches. Purl the yarn over on the next row to leave a hole. ---------------------------------------------------------- SWEATER: The front and back pieces are worked separately back and forth on circular needle. The front piece is worked with lace pattern and garter stitch. The back piece is worked in garter stitch. The sleeves are worked back and forth on circular needle with lace pattern and stockinette stitch. BACK PIECE: Cast on 81-87-93-99-111-117 stitches with circular needle size 6 mm / US 10 and Air. Work GARTER STITCH – see description above. When the piece measures 8-8-8-10-10-10 cm / 3"-3"-3"-4"-4"-4" cast on 1 edge stitch in each side of the piece at the end of the next 2 rows = 83-89-95-101-113-119 stitches. REMEMBER THE GAUGE! Continue with garter stitch over all stitches. When the piece measures 49-49-50-51-52-53 cm / 19¼"-19¼"-19¾"-20"-20½-21" bind off 3 stitches at the beginning of the next 2 rows for armholes = 77-83-89-95-107-113 stitches. When the piece measures 65-66-68-70-72-74 cm / 25½"-26"-26¾"-27½"-28½"-29" bind off the middle 17-17-19-19-21-21 stitches for neck (= 30-33-35-38-43-46 stitches on each shoulder). Each shoulder is now finished separately. On the next row from the right side decrease 1 stitch for the neck inside the 3 stitches – read DECREASE TIP = 29-32-34-37-42-45 stitches. Bind off when the piece measures 67-68-70-72-74-76 cm / 26½"-26¾"-27½"-28½"-29"-30". Work the other shoulder in the same way. FRONT PIECE: Cast on 81-87-93-99-111-117 stitches with circular needle size 6 mm / US 10 and Air. Work garter stitch. When the piece measures 8-8-8-10-10-10 cm / 4" cast on 1 edge stitch in each side of the piece at the end of the next 2 rows = 83-89-95-101-113-119 stitches. The edge stitch in each side is worked in garter stitch. On the next row from the right side, work as follows: Work 1 edge stitch in garter stitch, A.1 (= 16-13-16-13-13-16 stitches), work A.2 (= 12 stitches) over the next 48-60-60-72-84-84 stitches (= 4-5-5-6-7-7 times in width), A.3 (= 17-14-17-14-14-17 stitches) and finish with 1 edge stitch in garter stitch. When the piece measures 49-49-50-51-52-53 cm / 19¼"-19¼"-19¾"-20"-20½-21" bind off 3 stitches at the beginning of the next 2 rows for armholes = 77-83-89-95-107-113 stitches. The other stitches are worked in pattern as before. The stitches which do not fit into the pattern are worked in stockinette stitch when all stitches are worked in stockinette stitch/lace pattern and in garter stitch when they are worked in garter stitch. When A.1 to A.3 have been completed in height, the piece measures approx. 55-55-55-57-57-57 cm / 21½"-21½"-21½"-22½"-22½"-22½". Work garter stitch to finished length. When the piece measures 57-58-59-61-62-64 cm / 22½"-22¾"-23¼"-24"-24½"-25¼" decrease 1 stitch in middle of piece on the next row from the right side as follows: Work the first 37-40-43-46-52-55 stitches from the right side, knit the next 2 stitches together (= 1 stitch decreased), turn and work back = 38-41-44-47-53-56 stitches on each shoulder. Now finish each shoulder separately as follows: LEFT SHOULDER (when the garment is worn): Decrease for neck as follows: Decrease 1 stitch inside the 3 stitches at end of each row from the right side a total of 9-9-10-10-11-11 times = 29-32-34-37-42-45 stitches on shoulder. When the piece measures 67-68-70-72-74-76 cm / 26½"-26¾"-27½"-28½"-29"-30" bind off all stitches. RIGHT SHOULDER (when the garment is worn): Work as left shoulder, but decrease for neck inside the 3 stitches at the beginning of each row from the right side. SLEEVE: The piece is worked back and forth on circular needle. Cast on 37-37-39-39-43-43 stitches (including 1 edge stitch in each side of piece) with circular needle size 6 mm / US 10 and Air. Work 6 ridges. Then work 1 edge stitch in garter stitch, A.4 (= 2 stitches) until there are 2 stitches left, finish with 1 stitch stockinette stitch and 1 edge stitch in garter stitch. When A.4 has been worked 1 time in height, work the next row as follows from the right side: Work 1 edge stitch in garter stitch, A.5 (= 4 stitches), 7-7-8-8-10-10 stitches stockinette stitch, A.6a (= 13 stitches), 7-7-8-8-10-10 stitches stockinette stitch, finish with A.7 (= 4 stitches) and 1 edge stitch in stockinette stitch. Continue with pattern AT THE SAME TIME as you increase mid under sleeve as follows: PATTERN: A.5 and A.7 are repeated in height, A.6a is repeated a total of 4 times in height, then work A.6b over A.6a. INCREASE: When the piece measures 9 cm / 3½" increase 1 stitch after A.5 and 1 stitch before A.7 – read INCREASE TIP! Increase in this way every 3½-3-2½-2-2-1½ cm / 1¼"-1⅛"-⅞"-¾"-¾"-½" a total of 10-12-12-14-13-15 times = 57-61-63-67-69-73 stitches. The increased stitches are worked in stockinette stitch. When the piece measures 44-43-42-40-38-36 cm / 17¼"-17"-16½"-15¾"-15"-14¼" bind off the 1 edge stitch in garter stitch at the end of the next 2 rows = 55-59-61-65-67-71 stitches. Insert 1 marker in both sides of piece (there are now 2 cm / ¾" left to full length). The markers show where the sleeve will be sewn to the armhole on the sweater later (marker = side seam of sweater). Continue working back and forth in stockinette stitch over all stitches until the sleeve measures 47-46-45-43-41-39 (shorter measurements in larger sizes due to broader shoulders). Bind off; make sure the bind-off edge is not tight, use a 1 size larger needle if necessary. Work the other sleeve in the same way. ASSEMBLY: Sew the shoulder seams inside the bind-off edge – make sure the seam is not tight. Sew in sleeves in the outermost loop of the outermost stitch and sew the bottom of the armhole (marker on sleeve should match side seam on body). Sew sleeve seams and side seams in one go inside the 1 edge stitch to where the 1 edge stitch was cast on, both on front and back pieces (= approx. 8-8-8-10-10-10 cm / 3"-3"-3"-4"-4"-4" split). |
|||||||||||||||||||
Diagram explanations |
|||||||||||||||||||
|
|||||||||||||||||||
 |
|||||||||||||||||||
 |
|||||||||||||||||||
 |
|||||||||||||||||||
 |
|||||||||||||||||||
 |
|||||||||||||||||||
Have you finished this pattern?Tag your pictures with #dropspattern #matelotsweater or submit them to the #dropsfan gallery. Do you need help with this pattern?You'll find 22 tutorial videos, a Comments/Questions area and more by visiting the pattern on garnstudio.com. © 1982-2026 DROPS Design A/S. We reserve all rights. This document, including all its sub-sections, has copyrights. Read more about what you can do with our patterns at the bottom of each pattern on our site. |
|||||||||||||||||||


With over 40 years in knitting and crochet design, DROPS Design offers one of the most extensive collections of free patterns on the internet - translated to 17 languages. As of today we count 324 catalogs and 12278 patterns - 12268 of which are translated into English (US/in).
We work hard to bring you the best knitting and crochet have to offer, inspiration and advice as well as great quality yarns at incredible prices! Would you like to use our patterns for other than personal use? You can read what you are allowed to do in the Copyright text at the bottom of all our patterns. Happy crafting!
Post a comment to pattern DROPS 188-21
We would love to hear what you have to say about this pattern!
If you want to leave a question, please make sure you select the correct category in the form below, to speed up the answering process. Required fields are marked *.