DROPS Air
DROPS Air
65% Alpaca, 28% Polyamide, 7% Wool
from 6.45 $ /50g
Get the yarn to make this pattern from 38.70$.

The yarn cost is calculated from the pattern’s smallest size and the yarn’s cheapest product type. Looking for an even better price? You might find it on the DROPS Deals!

DROPS SS24

Matelot

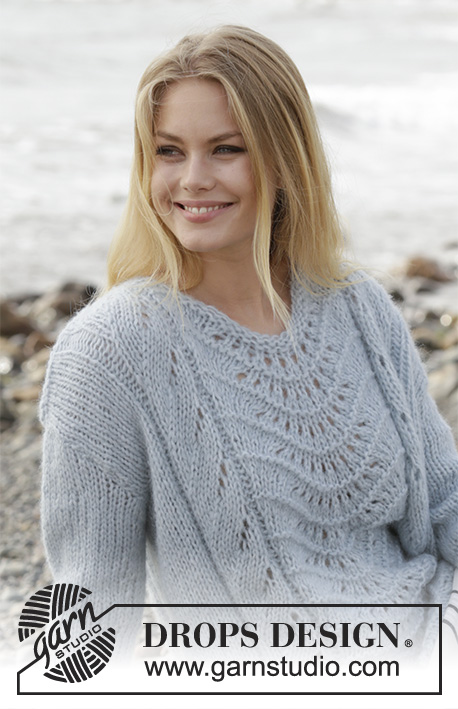
Knitted sweater with lace pattern, garter stitch, V-neck and split in sides. Sizes S - XXXL. The piece is worked in DROPS Air.

DROPS 188-21
DROPS Design: Pattern no ai-123
Yarn group C or A + A
-----------------------------------------------------------
Sizes: S - M - L - XL - XXL - XXXL
Materials:
DROPS AIR from Garnstudio (belongs to yarn group C)
300-350-350-400-450-450 g color 18, light gray green

The piece can also be knitted with yarn from:
"Alternative yarn (Yarn group C)" – see link below.

DROPS CIRCULAR NEEDLE (60 or 80 cm / 24" or 32") SIZE 6 mm/US 10 – or the size needed to get 15 stitches and 19 rows stockinette stitch on 10 cm / 4" in width and 10 cm / 4" in height.

-------------------------------------------------------

Alternative Yarn – See how to change yarns here
Yarn Groups A to F – Use the same pattern and change the yarn here
Yarn usage using an alternative yarn – Use our yarn converter here

-------------------------------------------------------

DROPS Air
DROPS Air
65% Alpaca, 28% Polyamide, 7% Wool
from 6.45 $ /50g
Get the yarn to make this pattern from 38.70$.

The yarn cost is calculated from the pattern’s smallest size and the yarn’s cheapest product type. Looking for an even better price? You might find it on the DROPS Deals!

Pattern instructions

NOTE: This pattern is written in American English. All measurements in charts are in cm. For conversion from inches to cm - click here. There are different terms for crocheting in American and British English. If this pattern includes crochet, click for "crochet terms" here. For this pattern in British English, please click here.
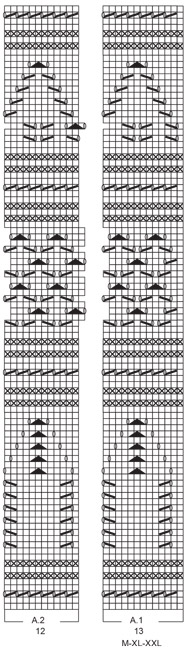
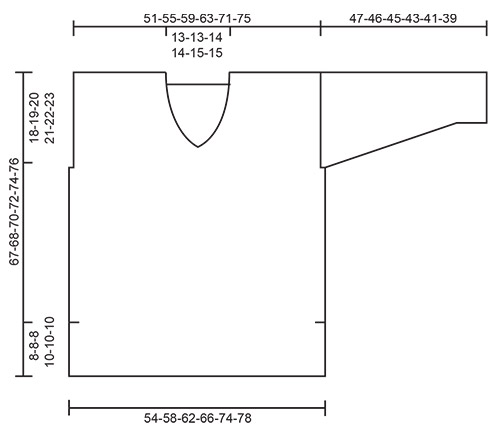
INFORMATION FOR THE PATTERN:

RIDGE/GARTER STITCH (worked back and forth):
1 ridge = Knit 2 rows.

PATTERN:
See diagrams A.1 to A.7. Choose diagram for your size (applies to A.1 and A.3).
The diagrams show all the rows in the pattern seen from the right side.

DECREASE TIP (for neck):
All decreases are made from the right side! Decrease for neck inside the 3 edge stitches in garter stitch.
Decrease as follows before the 3 edge stitches: Knit 2 together.
Decrease as follows after the 3 edge stitches: Slip 1 stitch as if to knit, knit 1, pass the slipped stitch over the knitted stitch.

INCREASE TIP (for sleeves):
All increases are made from the right side!
Increase with 1 yarn over between 2 stitches. Purl the yarn over on the next row to leave a hole.
----------------------------------------------------------

SWEATER:
The front and back pieces are worked separately back and forth on circular needle. The front piece is worked with lace pattern and garter stitch. The back piece is worked in garter stitch. The sleeves are worked back and forth on circular needle with lace pattern and stockinette stitch.

BACK PIECE:
Cast on 81-87-93-99-111-117 stitches with circular needle size 6 mm / US 10 and Air. Work GARTER STITCH – see description above. When the piece measures 8-8-8-10-10-10 cm / 3"-3"-3"-4"-4"-4" cast on 1 edge stitch in each side of the piece at the end of the next 2 rows = 83-89-95-101-113-119 stitches. REMEMBER THE GAUGE! Continue with garter stitch over all stitches. When the piece measures 49-49-50-51-52-53 cm / 19¼"-19¼"-19¾"-20"-20½-21" bind off 3 stitches at the beginning of the next 2 rows for armholes = 77-83-89-95-107-113 stitches. When the piece measures 65-66-68-70-72-74 cm / 25½"-26"-26¾"-27½"-28½"-29" bind off the middle 17-17-19-19-21-21 stitches for neck (= 30-33-35-38-43-46 stitches on each shoulder). Each shoulder is now finished separately. On the next row from the right side decrease 1 stitch for the neck inside the 3 stitches – read DECREASE TIP = 29-32-34-37-42-45 stitches. Bind off when the piece measures 67-68-70-72-74-76 cm / 26½"-26¾"-27½"-28½"-29"-30". Work the other shoulder in the same way.

FRONT PIECE:
Cast on 81-87-93-99-111-117 stitches with circular needle size 6 mm / US 10 and Air. Work garter stitch. When the piece measures 8-8-8-10-10-10 cm / 4" cast on 1 edge stitch in each side of the piece at the end of the next 2 rows = 83-89-95-101-113-119 stitches. The edge stitch in each side is worked in garter stitch. On the next row from the right side, work as follows: Work 1 edge stitch in garter stitch, A.1 (= 16-13-16-13-13-16 stitches), work A.2 (= 12 stitches) over the next 48-60-60-72-84-84 stitches (= 4-5-5-6-7-7 times in width), A.3 (= 17-14-17-14-14-17 stitches) and finish with 1 edge stitch in garter stitch. When the piece measures 49-49-50-51-52-53 cm / 19¼"-19¼"-19¾"-20"-20½-21" bind off 3 stitches at the beginning of the next 2 rows for armholes = 77-83-89-95-107-113 stitches. The other stitches are worked in pattern as before. The stitches which do not fit into the
pattern are worked in stockinette stitch when all stitches are worked in stockinette stitch/lace pattern and in garter stitch when they are worked in garter stitch.
When A.1 to A.3 have been completed in height, the piece measures approx. 55-55-55-57-57-57 cm / 21½"-21½"-21½"-22½"-22½"-22½". Work garter stitch to finished length. When the piece measures 57-58-59-61-62-64 cm / 22½"-22¾"-23¼"-24"-24½"-25¼" decrease 1 stitch in middle of piece on the next row from the right side as follows:
Work the first 37-40-43-46-52-55 stitches from the right side, knit the next 2 stitches together (= 1 stitch decreased), turn and work back = 38-41-44-47-53-56 stitches on each shoulder. Now finish each shoulder separately as follows:

LEFT SHOULDER (when the garment is worn):
Decrease for neck as follows: Decrease 1 stitch inside the 3 stitches at end of each row from the right side a total of 9-9-10-10-11-11 times = 29-32-34-37-42-45 stitches on shoulder. When the piece measures 67-68-70-72-74-76 cm / 26½"-26¾"-27½"-28½"-29"-30" bind off all stitches.

RIGHT SHOULDER (when the garment is worn):
Work as left shoulder, but decrease for neck inside the 3 stitches at the beginning of each row from the right side.

SLEEVE:
The piece is worked back and forth on circular needle. Cast on 37-37-39-39-43-43 stitches (including 1 edge stitch in each side of piece) with circular needle size 6 mm / US 10 and Air. Work 6 ridges. Then work 1 edge stitch in garter stitch, A.4 (= 2 stitches) until there are 2 stitches left, finish with 1 stitch stockinette stitch and 1 edge stitch in garter stitch. When A.4 has been worked 1 time in height, work the next row as follows from the right side: Work 1 edge stitch in garter stitch, A.5 (= 4 stitches), 7-7-8-8-10-10 stitches stockinette stitch, A.6a (= 13 stitches), 7-7-8-8-10-10 stitches stockinette stitch, finish with A.7 (= 4 stitches) and 1 edge stitch in stockinette stitch. Continue with pattern AT THE SAME TIME as you increase mid under sleeve as follows:
PATTERN:
A.5 and A.7 are repeated in height, A.6a is repeated a total of 4 times in height, then work A.6b over A.6a.
INCREASE:
When the piece measures 9 cm / 3½" increase 1 stitch after A.5 and 1 stitch before A.7 – read INCREASE TIP! Increase in this way every 3½-3-2½-2-2-1½ cm / 1¼"-1⅛"-⅞"-¾"-¾"-½" a total of 10-12-12-14-13-15 times = 57-61-63-67-69-73 stitches. The increased stitches are worked in stockinette stitch.
When the piece measures 44-43-42-40-38-36 cm / 17¼"-17"-16½"-15¾"-15"-14¼" bind off the 1 edge stitch in garter stitch at the end of the next 2 rows = 55-59-61-65-67-71 stitches. Insert 1 marker in both sides of piece (there are now 2 cm / ¾" left to full length). The markers show where the sleeve will be sewn to the armhole on the sweater later (marker = side seam of sweater). Continue working back and forth in stockinette stitch over all stitches until the sleeve measures 47-46-45-43-41-39 (shorter measurements in larger sizes due to broader shoulders). Bind off; make sure the bind-off edge is not tight, use a 1 size larger needle if necessary. Work the other sleeve in the same way.

ASSEMBLY:
Sew the shoulder seams inside the bind-off edge – make sure the seam is not tight. Sew in sleeves in the outermost loop of the outermost stitch and sew the bottom of the armhole (marker on sleeve should match side seam on body). Sew sleeve seams and side seams in one go inside the 1 edge stitch to where the 1 edge stitch was cast on, both on front and back pieces (= approx. 8-8-8-10-10-10 cm / 3"-3"-3"-4"-4"-4" split).

This pattern has been corrected.

Updated online: 02.09.2019
chart explanation on 1st and 2nd chart icon corrected.

Diagram

All measurements in charts are in cm.

symbols = knit from right side, purl from wrong side
symbols = knit from wrong side
symbols = between 2 stitches make 1 yarn over
symbols = knit 2 together
symbols = slip 1 stitch as if to knit, knit, pass the slipped stitch over the knitted stitch
symbols = slip 1 stitch as if to knit, knit 2 together, pass the slipped stitch over the knitted together stitches
diagram
diagram
diagram
diagram
diagram
Do you have a question? See a list of frequently asked questions (FAQ)

Knitting tension is what determines the final measurements of your work, and is usually measured per 10 x 10 cm. It is provided like so: number of stitches in width x number of rows in height - eg: 19 stitches x 26 rows = 10 x 10 cm.

The knitting tension is very individual; some people knit/crochet loosely while others work tightly. You adjust the knitting tension with the needle size, which is why the suggested needle size only serve as a guide! You need to adjust this (up or down) to ensure that YOUR knitting tension matches the knitting tension provided in the pattern. If you work with a different knitting tension than provided you will have a different yarn consumption, and your work will have different measurements than what the pattern suggests.

The knitting tension also determines which yarns can replace each other. As long as you achieve the same knitting tension you can replace one yarn with another.

See DROPS lesson: How to measure your tension/gauge

See DROPS video: How to make a gauge tension swatch

The required amount of yarn is provided in grams, eg: 450 g. To calculate how many balls you’ll need you first need to know how many grams are in 1 ball (25g, 50g or 100g). This information is available if you click on the individual yarn quality on our pages. Divide the amount required with the amount of each ball. For example, if each ball is 50g (the most common amount), the calculation will be as follows: 450 / 50 = 9 balls.

The important thing when changing from one yarn to another is that the knitting/crochet tension remains the same. This is so that the measurements of the finished piece will be the same as on the sketch provided. It is easier to achieve the same knitting tension using yarns from the same yarn group. It is also possible to work with multiple strands of a thinner yarn to achieve the knitting tension of a thicker one. Please try our yarn converter. We recommend you to always work a test swatch.

Please NOTE: when changing yarn the garment might have a different look and feel to the garment in the photo, due to individual properties and qualities of each yarn.

See DROPS lesson: Can I use a different yarn than the one mentioned in the pattern?

All our yarns are categorised into yarn groups (from A to F) according to thickness and knitting tension – group A contains the thinnest yarns and group F the thickest. This makes it easier for you to find alternative yarns to our patterns, should you wish to switch yarn. All yarns within the same group have a similar knitting tension and can easily replace each other. However, different yarn qualities have different structures and properties which will give the finished work a unique look and feel.

Click here for an overview of the yarns in each yarn group

At the top of all our patterns you’ll find a link to our yarn converter, which is a helpful tool should you wish to use a different yarn than suggested. By filling in the yarn quality you wish to replace, the amount (in your size) and number of strands, the converter will present good alternative yarns with the same knitting tension. Additionally it will tell you how much you’ll require in the new qualities and whether you’ll need to work with multiple strands. Most skeins are 50g (some are 25g or 100g).

If the pattern is worked with multiple colours, every colour will have to be converted separately. Similarly, if the pattern is worked with several strands of different yarns (for example 1 strand Alpaca and 1 strand Kid-Silk) you will have to find alternatives for each, individually.

Click here to see our yarn converter

Since different yarns have different qualities and textures we have chosen to keep the original yarn in our patterns. However, you can easily find options among our available qualities by using our yarn converter, or simply pick a yarn from the same yarn group.

It is possible that some retailers still have discontinued yarns in stock, or that someone has a few skeins at home that they would like to find patterns for.

The yarn converter will provide both alternative yarn as well as required amount in the new quality.

If you think it's hard to decide what size to make, it can be a good idea to measure a garment you own already and like the size of. Then you can pick the size by comparing those measures with the ones available in the pattern's size chart.

You'll find the size chart at the bottom of the pattern.

See DROPS lesson: How to read size chart

The needle size provided in the pattern serves only as a guide, the important thing is to follow the knitting tension. And since knitting tension is very individual, you will have to adjust the needle size to ensure that YOUR tension is the same as in the pattern – maybe you’ll have to adjust 1, or even 2 needle sizes, up or down to achieve the correct tension. For this, we recommend that you work test swatches.

Should you work with a different knitting tension than the one provided, the measurements of the finished garment might deviate from the measurement sketch.

See DROPS lesson: How to measure your tension/gauge

See DROPS video: How to make a gauge tension swatch

Working a garment top-down provides more flexibility and room for personal adjustment. For example it is easier to try the garment on while working, as well as making adjustments to length of yoke and shoulder caps.

The instructions are carefully explaining every step, in the correct order. Diagrams are adjusted to the knitting direction and are worked as usual.

The diagram depicts all rows/rounds, and every stitch seen from the right side. It is read from bottom to top, from right to left. 1 square = 1 stitch.

When working back and forth, every other row is worked from the right side and every other row is worked from the wrong side. When working from the wrong side, the diagram will have to be worked reversed: from left to right, knit stitches are purled, purl stitches are knit etc.

When working in the round every round is worked from the right side and the diagram are worked from right to left on all rounds.

See DROPS lesson: How to read knitting diagrams

The diagram depicts all rows/rounds, and every stitch seen from the right side. It is worked from bottom to top, from right to left.

When working back and forth every other row is worked from the right side: from right to left and every other row is worked from the wrong side: from left to right.

When working in the round, every row in the diagram are worked from the right side, from right to left.

When working a circular diagram you start in the middle and work your way outwards, counter clockwise, row by row.

The rows usually start with a given number of chain stitches (equivalent to the height of the following stitch), this will either be depicted in the diagram or explained in the pattern.

See DROPS lesson: How to read crochet diagrams

Instructions for working several diagrams after each other on the same row/round, will often be written like so: “work A.1, A.2, A.3 a total of 0-0-2-3-4 times". This means you work A.1 once, then A.2 is worked once, and A.3 is repeated (in width) the number of times provided for your size – in this case like so: S = 0 times, M = 0 times, L=2 times, XL= 3 times and XXL = 4 times.

The diagrams are worked as usual: begin with the first row in A.1, then work the first row in A.2 etc.

See DROPS lesson: How to read knitting diagrams

See DROPS lesson: How to read crochet diagrams

The total width of the garment (from wrist-to-wrist) will be larger in the larger sizes, despite the actual sleeves being shorter. The larger sizes have longer sleeve caps and wider shoulders, so there will be a good fit in all sizes.

The measurement sketch/schematic drawing provides information regarding the full length of the garment. If it’s a jumper or a jacket the length is measured from the highest point on the shoulder (usually closest to the neckline), and straight down to the bottom of the garment. It is NOT measured from the tip of shoulder. Similarly, the length of yoke is measured from the highest point on the shoulder and down to where yoke is split into body and sleeves.

See DROPS lesson: How to read a schematic drawing

Diagrams are often repeated on the round or in height. 1 repeat is the diagram the way it appears in the pattern. If it says to work 5 repeats of A.1 in the round, then you work A.1 a total of 5 times after/next to each other in the round. If it says to work 2 repeats of A.1 vertically/in height you work the entire diagram once, then begin again at the start and work the entire diagram one more time.

Chain stitches are slightly narrower than other stitches and to avoid working the cast-on edge too tight, we simply chain more stitches to begin with. The stitch count will be adjusted on the following row to fit the pattern and measurement sketch.

The rib edge is more elastic and will contract slightly compared to, for example, stocking stitch. By increasing before the rib edge, you avoid a visible difference in width between the rib edge and the rest of the body.

It’s very easy to cast off too tightly, and by making yarn overs while casting off (and simultaneously casting these off) you avoid a too tight cast off edge.

See DROPS video: How to bind off with yarn overs (yo)

To achieve an even increase (or decrease) you can increase on, for example: every 3rd and 4th row alternately, like so: work 2 rows and increase on the 3rd row, work 3 rows and increase on the 4th. Repeat this until the increase is complete.

See DROPS lesson: Increase or decrease 1 st on every 3rd and 4th row alternately

Should you prefer to work in the round instead of back and forth, you may of course adjust the pattern. You’ll need to add steeks mid-front (usually 5 stitches), and follow the instructions. When you would normally turn and work from the wrong side, simply work across the steek and continue in the round. At the end you’ll cut the piece open, pick up stitches to work bands, and cover the cut edges.

See DROPS video: How to knit steeks and cut open

Should you prefer to work back and forth instead of in the round, you may of course adjust the pattern so you work the pieces separately and then assemble them at the end. Divide the stitches for the body in 2, add 1 edge stitch in each side (for sewing) and work the front and back pieces separately.

See DROPS lesson: Can I adapt a pattern for circular needles into straight needles?

Pattern repeats can vary slightly in the different sizes, in order to get the correct proportions. If you’re not working the exact same size as the garment in the photo, yours might deviate slightly. This has been carefully developed and adjusted so that the complete impression of the garment is the same in all sizes.

Make sure to follow instructions and diagrams for your size!

If you have found a pattern you like which is available in women’s size it’s not very difficult to convert it to men’s size. The biggest difference will be the length of sleeves and body. Start working on the women size that you think would fit across the chest. The additional length will be worked right before you cast off for the armhole/sleeve cap. If the pattern is worked top-down you can add the length right after the armhole or before the first decrease on sleeve.

Regarding additional yarn amount, this will depend on how much length you add, but it is better with a skein too many than too few.

All yarns will have excess fibres (from production) that might come off as lint or shedding. Brushed yarns (ie hairier yarns) have more of these loose, excess fibres, causing more shedding.

Shedding also depends on what is worn under or over the garment, and whether this pulls at the yarn fibres. It’s therefore not possible to guarantee that there will be no shedding

Below are some tips on how to get the best result when working with hairier yarns:

1. When the garment is finished (before you wash it) shake it vigorously so the looser hairs come off. NOTE: do NOT use a lint roller, brush or any method that pulls at the yarn.

2. Place the garment in a plastic bag and put it in your freezer - the temperature will cause the fibres to become less attached to each other, and excess fibres will come off easier.

3. Leave in the freezer for a few hours before taking it out and shaking it again.

4. Wash the garment according to the instructions on the yarn label.

Pilling is a natural process that happens to even the most exclusive of fibers. It's a natural sign of wear and tear that is hard to avoid, and that is most visible in high friction areas of your garment like a sweater's arms and cuffs.

You can make your garment look as new by removing the pilling, using a fabric comb or a pill/lint remover.

Still can't find the answer you need? Then scroll down and leave your question so one of our experts can try to help you. This will be done normally within 5 to 10 working days.
In the meantime, you can read the questions and answers that others have left to this pattern or join the DROPS Workshop on Facebook to get help from fellow knitters/crocheters!

You might also like...

Post a comment to pattern DROPS 188-21

We would love to hear what you have to say about this pattern!

If you want to leave a question, please make sure you select the correct category in the form below, to speed up the answering process. Required fields are marked *.

Comments / Questions (30)

country flag Sarah wrote:

So I’m working through this sweater, and I am at a total loss for how to read the charts. I don’t know how or why the stitch counts are changing in the repeats. How do I read these charts? I tried just knitting straight through, but my stitch count was WAY off by the time I got to the end of the row.

22.07.2019 - 22:58

DROPS Design answered:

Dear Sarah, please read here how to read knitting diagrams - it can be a good idea to add markers between each diagram to make sure you always have the same number of stitches in each diagram. Happy knitting!

06.08.2019 - 09:27

country flag Fiona Moore wrote:

Love this pattern but don’t do charts. I really need it in words, please

05.06.2019 - 11:05

DROPS Design answered:

Dear Mrs Moore, we only have diagrams for this pattern, read more here how to read diagrams. Happy knitting!

05.06.2019 - 12:52

country flag Helena wrote:

Hallo, ik zie geen uitleg over de afwerking van de hals. Hoe kan ik de V-hals mooi afwerken, zodat de afgekante steken niet zichtbaar zijn?

08.05.2019 - 12:23

DROPS Design answered:

Dag Helena,

Bij dit ontwerp is er verder geen afwerking voor de hals in de vorm van een boor o.i.d.

09.05.2019 - 21:50

country flag Bente Sørensen wrote:

Der må være en fejl i diregramnet da man skal tage 2 ret sammen men ingen slå om pinden ???? Så bliver trøjen meget lille Der overhoved ingen slå om pinde meget mærkelig opskrift 🧐🧐

02.04.2019 - 11:41

DROPS Design answered:

Hej Bente, jo for hver gang du strikker 2 sammen, så laver du også et omslag. Se det lille omslag som er en cirkel imellem 2 masker. God fornøjelse!

05.04.2019 - 14:19

country flag Heidi Halberg wrote:

Er i tvivl om den strikkes med en eller 2 tråde?

04.02.2019 - 23:49

country flag Dominique TOURNIER wrote:

Bonjour, je souhaite tricoter le modèle MATELOT avec la laine préconisée (Drop Air) en taille Médium... je n'arrive pas à voir le nombre de pelotes à commander. Pouvez vous me préciser SVP ?

03.12.2018 - 16:07

DROPS Design answered:

Bonjour Mme Tournier, la quantité de laine nécessaire à la réalisation de chaque ouvrage se trouve, au poids, dans l'en-tête, soit en taille M: 350 g DROPS Air / 50 g la pelote = 7 pelotes DROPS Air en taille M. Bon tricot!

03.12.2018 - 16:23

Celina wrote:

Hola ya he visto en varios patrones que en las indicaciones dice "con la prenda puesta", como en este caso en el frente la parte del hombro, pero no entiendo que quiere decir: "HOMBRO IZQUIERDO (con la prenda puesta):"

18.09.2018 - 17:49

DROPS Design answered:

Hola Celina, con la prenda puesta quiere decir el hombro que va a ser tu izquierdo y no el izquierdo cuando tienes delante la labor. Si lo estás observando con el delantero hacia delante, en tu labor el hombro izquierdo se encontraría a tu derecha, pero al ponerte la prenda, ese hombro va a estar a tu izquierda.

29.09.2018 - 20:01

country flag Marie Holmström wrote:

Undrar över framstycket. Förklaringen till den tomma rutan i diagrammet stå på norska. Betyder de tomma rutorna i mönstret räta maskor på framsidan och aviga maskor på baksidan? (slätstickning). De maskor som är markerade med x (i mönstret) ska ju stickas räta från baksidan och om inte de andra stickas avigt från baksidan så blir det ju ingen skillnad? Hoppas på svar. Hälsningar Marie

08.06.2018 - 14:42

country flag Yvonne Smeijsters wrote:

Er staat een fout in de omschrijving van het rugpand de afkantingen voor de armsgaten worden toch normaal aan het begin van de naald gemaakt en hier staat aan het eind van de naald dit lijkt me raar

11.05.2018 - 14:53

country flag Claire wrote:

Trying to add this to favorites but cannot see a link anywhere for add to favorites. Help please.

05.04.2018 - 20:55

DROPS Design answered:

Dear Claire, you can find the add to favorites button right above the detailed instructions for the patterns, in line with the, and to the right of the part's title that says "Pattern Instruction". I hope this helps. Happy Crafting!

05.04.2018 - 23:27