
Popular categories
Looking for a yarn?


Comments / Questions (7)
![]() Christina wrote:
Christina wrote:
Dear Drops team, First of all, tusen takk for your great website, designs, and wool. I do have a question regarding the sleeve description. As per pattern, I first casted off 24 stitches, then casted on 24 stitches leaving a sleeve hole of roughly 48cm. Not sure if I am misreading the pattern but 10 remaining stitches for the upper sleeve don't seem enough. Could I follow sleeve pattern for DROPS 172-26 instead?
14.11.2019 - 18:00DROPS Design answered:
Dear Christina, the whole top of sleeve will sewn around armhole, ie from the 3 sts cast off on each side to the 10 remaining stitches, you should have then enough stitches in width and enough rows in height to sew the top of sleeve along the 48 stitches (24 sts cast off + 24 sts cast off). Happy knitting!
15.11.2019 - 09:03
![]() Prescilla wrote:
Prescilla wrote:
In welke steken word de spies gebreid?
04.03.2019 - 11:23DROPS Design answered:
Dag Prescilla,
Deze wordt meteen aan het begin, midden achter gebreid, door verkorte toeren te breien. In het patroon staat per naald precies aangegeven wat je moet doen.
05.03.2019 - 18:10
![]() Gerrie wrote:
Gerrie wrote:
Het vest kan het ook in 1 geheel deel gebreid worden toch?
24.01.2019 - 08:13DROPS Design answered:
Dag Gerrie,
Het vest wordt in 2 delen gebreid vanaf midden achter, zodat het er aan beide kanten gelijk uit ziet. Als je het in 1 deel wilt breien, zou je het patroon aan moeten passen.
08.02.2019 - 17:52
![]() Angelique wrote:
Angelique wrote:
Excuses. Ik zie net dat het breien van de spie anders gaat om het onderstaande te voorkomen. Ik ga aan de slag met dit prachtige patroon.
14.01.2019 - 21:15
![]() Angelique wrote:
Angelique wrote:
Bij het tweede deel van het vest is het enige verschil dat het aantal te breien steken voor het afkanten van de mouw meer is dan bij het eerste deel. Komt de spie op deze manier niet aan de verkeerde kant van het vest?
14.01.2019 - 20:32DROPS Design answered:
Dag Angelique,
Het tweede deel brei je a.h.w. in spiegelbeeld, dus daarom brei je bij het tweede deel in naald 4 van de spie de eerste 16 steken (op het eerste deel is dat in naald 3) en brei je bij het tweede deel eerst het onderste deel van het vest, voordat je afkant voor de mouw (bij het eerste deel brei je eerst het bovenste deel voordat je afkant voor de mouw).
17.01.2019 - 11:20
![]() Pia Lidman wrote:
Pia Lidman wrote:
Underbart vacker!
14.01.2018 - 09:45
![]() Marlemio wrote:
Marlemio wrote:
Perfektes Model für den Sommer! Ob zum Kleid oder zur Jeans - auch sehr schöne Farbe! Das möchte ich gern nacharbeiten, obwohl mir Häkeln schwer fällt!
19.12.2017 - 07:46
|
||||||||||||||||
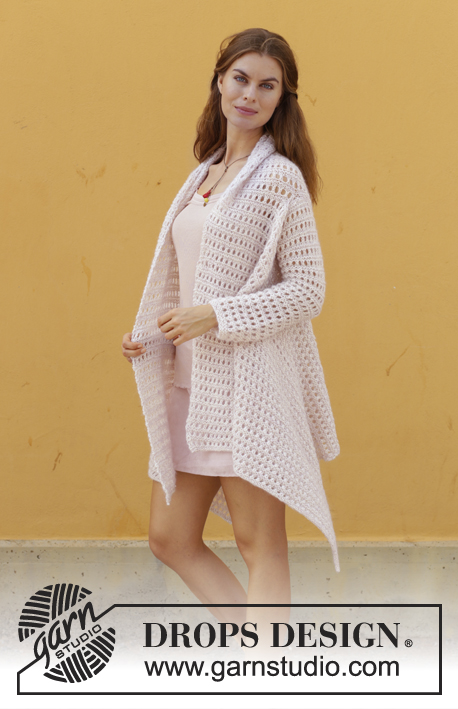
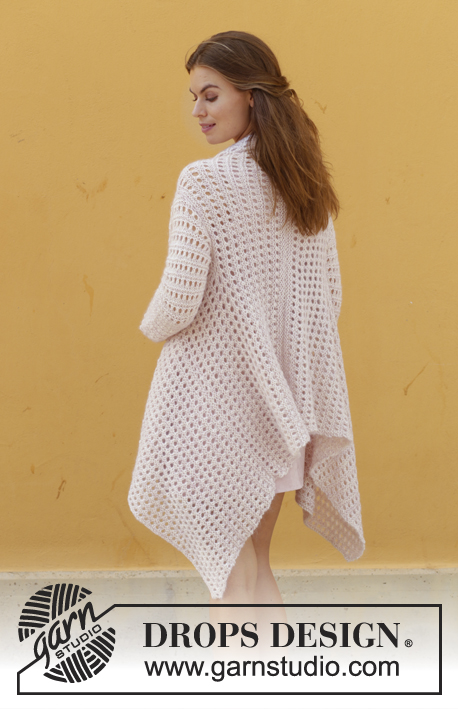
Sweet Blossom#sweetblossomjacket |
||||||||||||||||
 |
 |
|||||||||||||||
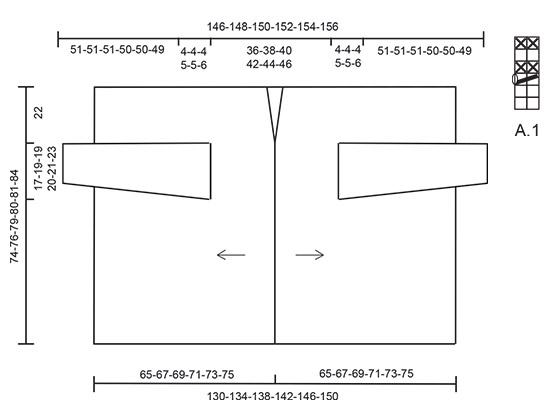
Jacket with lace pattern, knitted in 2 parts from mid back. Size: S - XXXL Piece is knitted in DROPS Alpaca and DROPS Kid-Silk.
DROPS 188-30 |
||||||||||||||||
|
INFORMATION FOR PATTERN: GARTER STITCH (back and forth): 1 ridge = knit 2 rows. PATTERN: See diagram A.1. Diagrams show all rows in pattern seen from the right side. INCREASE TIP: All increases are done from right side. Increase 1 stitch by making a yarn over. On next row work yarn overs twisted to avoid holes. Then work the new stitches in pattern A.1. ---------------------------------------------------------- JACKET: Piece is worked with 1 strand Alpaca + 1 strand Kid-Silk (= 2 strands), back and forth in 2 parts that are sewn together mid back. Sleeves are worked back and forth on circular needle, bottom up. Work first part as follows: Cast on 104-106-110-112-114-118 stitches on with 1 strand Alpaca + 1 strand Kid-Silk (= 2 strands) on circular needle size 6 mm / US 10. Work a gusset in the back of neck as follows: ROW 1 (= right side): Knit all stitches. ROW 2 (= wrong side): Knit back. ROW 3: Knit the first 16 stitches, turn. ROW 4: Knit back. ROW 5: Knit the first 31 stitches, turn. ROW 6: Knit back. ROW 7: Knit all stitches. ROW 8: Knit back. Gusset in the back of neck is now done. Now work as follows from right side: 1 edge stitch in GARTER STITCH - see explanation above, A.1 until 1 stitch remains on needle, 1 edge stitch in garter stitch. Continue like this until piece measures 18-19-20-21-22-23 cm / 7"-7½"-8"-8¼"-8¾"-9" – make sure not to measure over gusset and adjust so that next row is from right side. REMEMBER THE GAUGE! Work pattern as before over the first 31 stitches, loosely bind off the next 24-26-26-28-30-32 stitches for armhole, work pattern as before over the remaining 49-49-53-53-53-55 stitches. Turn and work back from wrong side as follows: Continue pattern over the first 49-49-53-53-53-55 stitches, cast on 24-26-26-28-30-32 new stitches for armhole, work the remaining 31 stitches. There are now 104-106-110-112-114-118 stitches on needle. Continue back and forth with A.1 and 1 edge stitch in garter stitch in each side until piece measures 65-67-69-71-73-75 cm / 25½"-26⅜"-27⅛"-28"-28¾"-29½" – make sure not to measure over gusset and adjust to finish after one whole repetition of A.1 vertically. Bind off from right side - switch to a larger sized needle to avoid a tight bind-off edge if needed. Work the second part as follows: Cast on 104-106-110-112-114-118 stitches on with 1 strand Alpaca + 1 strand Kid-Silk (= 2 strands) on circular needle size 6 mm / US 10. Work a gusset in the back of neck as follows: ROW 1 (= right side): Knit all stitches. ROW 2 (= wrong side): Knit back. ROW 3: Knit all stitches. ROW 4: Knit the first 16 stitches, turn. ROW 5: Knit back. ROW 6: Knit the first 31 stitches, turn. ROW 7: Knit back. ROW 8: Knit all stitches. Gusset in the back of neck is now done. Work pattern from right side as follows: 1 edge stitch in garter stitch, A.1 until 1 stitch remains on needle, 1 edge stitch in garter stitch. Continue like this until piece measures 18-19-20-21-22-23 cm / 7"-7½"-8"-8¼"-8¾"-9" – make sure not to measure over gusset and adjust to finish after the same row as on first part (i.e. next row is from right side). Work pattern as before over the first 49-49-53-53-53-55 stitches, loosely bind off the next 24-26-26-28-30-32 stitches for armhole, work pattern as before over the remaining 31 stitches. Turn and work back as follows from wrong side: Continue pattern over the first 31 stitches, cast on 24-26-26-28-30-32 new stitches for armhole, work the remaining 49-49-53-53-53-55 stitches. There are now 104-106-110-112-114-118 stitches on needle. Continue back and forth with A.1 and 1 edge stitch in garter stitch in each side until piece measures 65-67-69-71-73-75 cm / 25½"-26⅜"-27⅛"-28"-28¾"-29½" – make sure not to measure over gusset and adjust to finish after one whole repetition of A.1 vertically and according to the other part. Bind off from right side - switch to a larger sized needle to avoid a tight bind-off edge if needed. SLEEVES: Loosely cast on 30-32-34-36-38-38 stitches on circular needle size 6 mm / US 10. Work 2 ridges back and forth. Work pattern A.1 with 1 edge stitch in garter stitch in each side. When piece measures 11-7-7-10-10-11 cm / 4½"-2¾"-2¾"-4"-4"-4½", increase 1 stitch inside 1 edge stitch in garter stitch in each side - READ INCREASE TIP. Increase like this approx. every 6-5-5-4-4-3 cm / 2½"-2"-2"-1½"-1½"-1" 7-9-9-10-10-12 times in total = 44-50-52-56-58-62 stitches. Work the increased stitches in pattern A.1. When piece measures 51-51-51-50-50-49 cm / 20"-20"-20"-19¾"-19¾"-19¼", bind off stitches at the beginning of every row in each side for sleeve cap as follows: bind off 3 stitches 1 time and 2 stitches 4-5-5-6-6-7 times and 3 stitches 2 times = 10-12-14-14-16-16 stitches remain on needle. Bind off. Make another sleeve. ASSEMBLY: Sew the 2 parts together inside cast-on edge mid back. Sew together stitch by stitch. Make sure that to avoid a tight seam. Sew sleeves to body inside bind-off/cast-on edges and sew seam under sleeves inside 1 edge stitch in garter stitch - make sure to avoid a tight seam! |
||||||||||||||||
Diagram explanations |
||||||||||||||||
|
||||||||||||||||
 |
||||||||||||||||
Have you finished this pattern?Tag your pictures with #dropspattern #sweetblossomjacket or submit them to the #dropsfan gallery. Do you need help with this pattern?You'll find 22 tutorial videos, a Comments/Questions area and more by visiting the pattern on garnstudio.com. © 1982-2026 DROPS Design A/S. We reserve all rights. This document, including all its sub-sections, has copyrights. Read more about what you can do with our patterns at the bottom of each pattern on our site. |
||||||||||||||||


With over 40 years in knitting and crochet design, DROPS Design offers one of the most extensive collections of free patterns on the internet - translated to 17 languages. As of today we count 324 catalogs and 12290 patterns - 12280 of which are translated into English (US/in).
We work hard to bring you the best knitting and crochet have to offer, inspiration and advice as well as great quality yarns at incredible prices! Would you like to use our patterns for other than personal use? You can read what you are allowed to do in the Copyright text at the bottom of all our patterns. Happy crafting!
Post a comment to pattern DROPS 188-30
We would love to hear what you have to say about this pattern!
If you want to leave a question, please make sure you select the correct category in the form below, to speed up the answering process. Required fields are marked *.