
Popular categories
Looking for a yarn?


Comments / Questions (32)
![]() Jossan wrote:
Jossan wrote:
Hej! På oket, varför görs minskningar och sedan ökningar direkt på varandra precis efter resåren har stickats? Vad fyller det för funktion? Och varför i rätstickning? Det ser inte ut att höra hemma med resten av plagget.
24.03.2026 - 20:40DROPS Design answered:
Hej Jossan, koftan är konstruerat så, för at du skal få en snygg markering i övergången efter halsen :)
09.04.2026 - 07:42
![]() Helene wrote:
Helene wrote:
Hej! Jag har snart ökat klart maskorna på raglanärmen men förstår inte riktigt hur man fortsätter sticka efter det när man inte ska öka längre. Slutar man med hålen då? Skriv gärna hur man stickar före/efter markörerna vid ärmarna.! Annars jätteroligt mönster att sticka som blir mycket snyggt. Hälsningar Helene
06.07.2024 - 22:20DROPS Design answered:
Hei Helene. Ja, da slutter man med hull. Det er kun noen få pinner og dette er under ermene = vises ikke. mvh DROPS Design
09.07.2024 - 10:32
![]() Pauline wrote:
Pauline wrote:
Les jetés tricotées purl côté envers paraissent maille endroit sur l'endroit dois-je les tricoter envers pour agencer avec les mailles des manches quand je fais les mailles des manches
24.05.2024 - 01:42DROPS Design answered:
Bonjour Pauline, les augmentations du raglan des manches se tricotent en jersey, autrement dit, on les tricote torse à l'envers au rang suivant l'augmentation puis on les tricote en jersey, comme les autres mailles des manches. Bon tricot!
24.05.2024 - 08:17
![]() Pauline wrote:
Pauline wrote:
Je suis celle qui a posé la dernière question mais nous pouvons l'omettre , je continuerai comme l'entièreté des diagrammes. Ma nouvelle question ,est ce que les mailles jersey avec le fil marqueur entre sont tricotées envers car en dessous ,c'est mailles envers dans mon travail, (manches).
13.05.2024 - 03:47DROPS Design answered:
Bonjour Pauline, les mailles des raglans (les 2 mailles jersey entre les augmentations) se tricotent en jersey, autrement dit à l'endroit sur l'endroit et à l'envers sur l'envers. Bon tricot!
13.05.2024 - 08:21
![]() Pauline wrote:
Pauline wrote:
Bonjour , est ce que je peux faire ce modèle en omettant de faire le diagramme A2 et A3 dans le dos mais en tricotantcomme les manches Merci madame
12.05.2024 - 02:29DROPS Design answered:
Bonjour Pauline, le nombre de mailles du dos dans ce modèle est ajusté pour avoir la bonne largeur à cause des torsades (il faut toujours un peu plus de mailles pour des torsades que pour du jersey), en tricotant le dos en jersey vous risquez d'avoir trop de largeur, il est donc recommandé de plutôt tricoter le motif dans le dos également. Bon tricot!
13.05.2024 - 07:58
![]() Ginette Allen wrote:
Ginette Allen wrote:
Que signifie "Tricoter les augmentations de chaque raglan en Jersey" Est-ce que ça signifie " tricoter les jetés en maille torse" pour ne pas faire de trou?
23.11.2023 - 14:19DROPS Design answered:
Bonjour Mme Allen, au 1er rang (sur l'envers) après l'augmentation, on va tricoter ces jetés torse à l'envers (= on va tricoter le jeté dans le brin arrière au lieu du brin avant pour éviter un trou, cf vidéo), puis ces nouvelles mailles se tricotent simplement en jersey (à l'endroit sur l'endroit et à l'envers sur l'envers). Bon tricot!
23.11.2023 - 15:47
![]() Sirpa wrote:
Sirpa wrote:
Ohjeessa on mainonta A.2 mutta en ohjeesta löydä kyseistä malliohjetta? Mikähän noista malli ohjeista on A.2?
22.09.2023 - 08:02DROPS Design answered:
Hei piirrokset A.2 löytyvät sivun alareunasta (vasemmalla puolella).
02.10.2023 - 17:29
![]() Marianne wrote:
Marianne wrote:
Bonjour, Comme Sylvie l'a déjà demandé, je ne trouve pas les diagrammes A2 et A3. Faut-il seulement tricoter les mailles en jersey?
14.07.2023 - 15:44DROPS Design answered:
Bonjour Marianne, les diagrammes A.2 et A.3 se trouvent au dessus du diagramme des mesures (choisissez le diagramme correspondant a votre taille). Si vous ne les voyez toujours pas, changez de navigateur internet. Bon tricot!
15.07.2023 - 11:42
![]() Lena wrote:
Lena wrote:
Hej! Som jag förstår mönstret så är det även mönsterstickning på ryggen? Kan man skippa mönstret på ryggen utan att det påverkar måtten? För övrigt vill jag lämna en synpunkt på fotona. Upplever att det oftast presenteras flera foton från samma vinkel. Man vill se framsida, baksida, från sidan och några inzoomade detaljer.
10.04.2023 - 09:33DROPS Design answered:
Hej Lena, ja det bestemmer du selv. Tak for input, det tager vi med os :)
14.04.2023 - 07:49
![]() Sylvie wrote:
Sylvie wrote:
Bonjour Je ne trouve pas le diagramme A2 ni A3 sur le modèle
01.03.2023 - 15:38
|
||||||||||||||||||||||
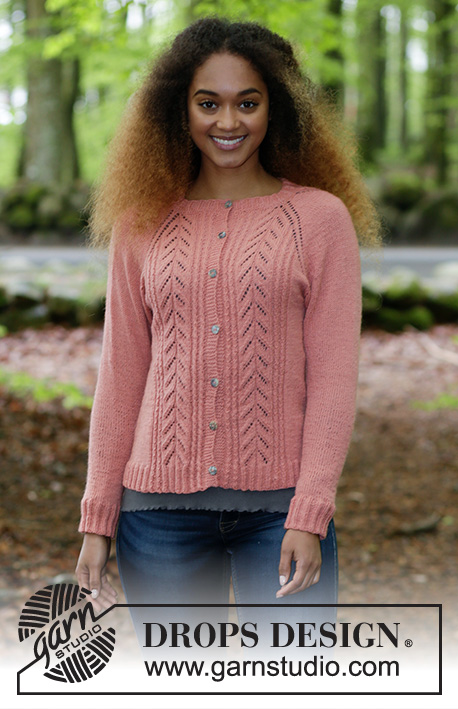
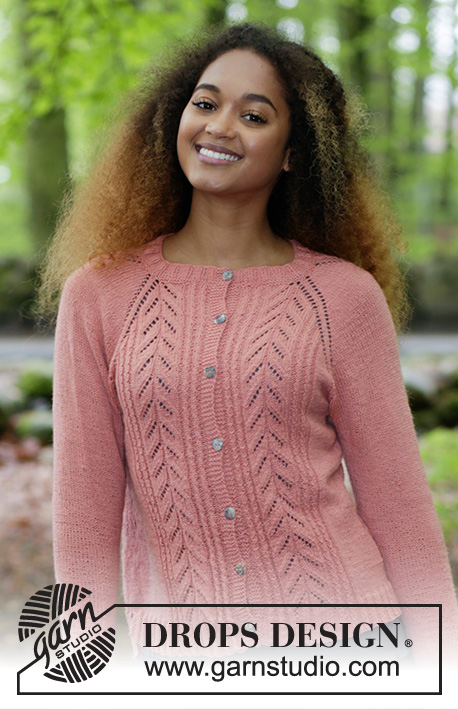
Für Elise Jacket#furelisejacket |
||||||||||||||||||||||
 |
 |
|||||||||||||||||||||
Knitted jacket with lace pattern, small cables and raglan, worked top down. Sizes S - XXXL. The piece is worked in DROPS Flora.
DROPS 183-22 |
||||||||||||||||||||||
|
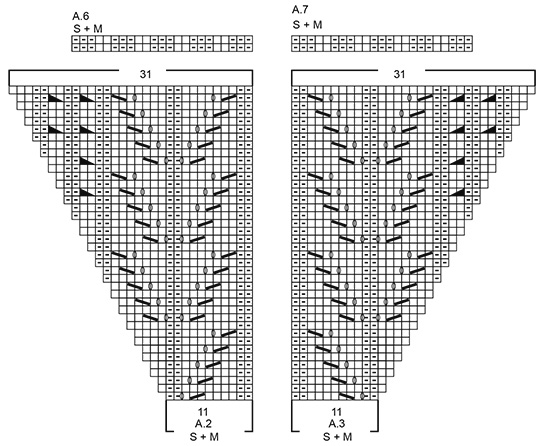
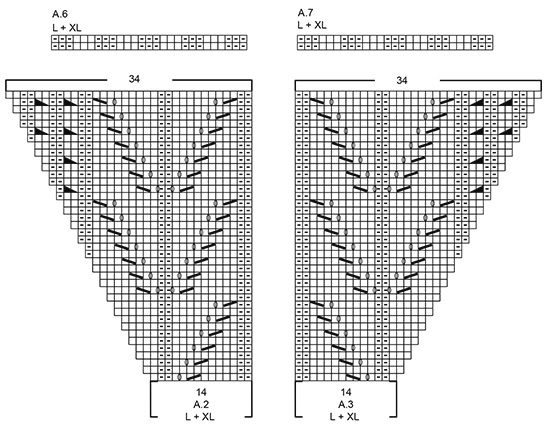
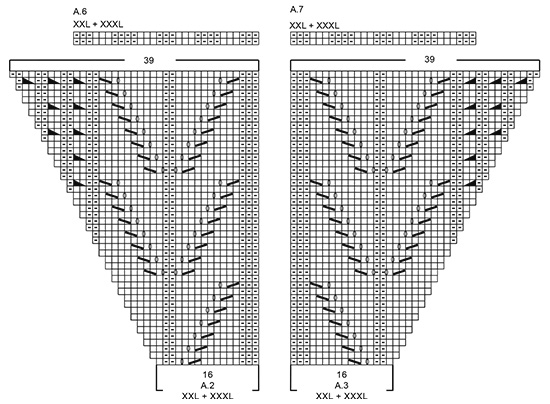
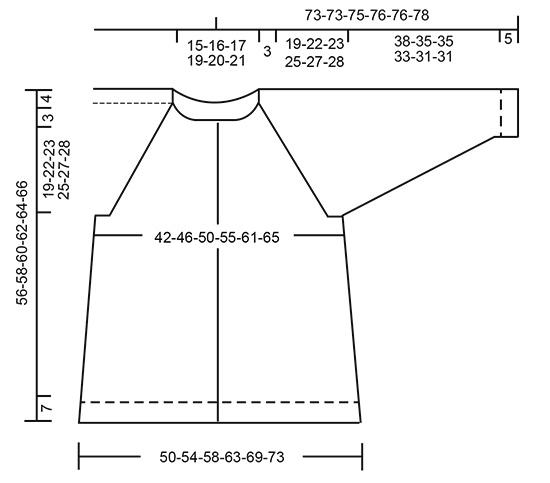
INFORMATION FOR THE PATTERN: RIDGE/GARTER STITCH (worked back and forth): 1 ridge = Knit 2 rows. DECREASE/INCREASE TIP (evenly spaced): To work out how to decrease/increase evenly, count the total number of stitches on needle (e.g. 132 stitches), minus the bands (e.g. 10 stitches) and divide by the number of decreases/increases to be made (e.g. 12) = 10.1. In this example, decrease by knitting together approx. every 9th and 10th stitch. Do not decrease over the bands. When increasing, make 1 yarn over after approx. every 10th stitch (on next row knit the yarn overs twisted to avoid holes). PATTERN: See diagrams A.1 to A.7. Choose diagram for your size! The diagrams show all rows in the pattern seen from the right side. RAGLAN: All increases are worked from the right side! Increase raglan in each transition between body and sleeves. Increase as follows: Work as far as 1 stitch before marker thread, 1 yarn over, 2 stitches stockinette stitch (marker thread sits in the middle of these 2 stitches), 1 yarn over. Repeat at each of the remaining transitions between body and sleeves (= 8 stitches increased on row). On the next row (from wrong side) purl yarn overs so that there are holes. Then work the new stitches on the front and back pieces into the pattern A.2/A.3. The new stitches on the sleeves are worked in stockinette stitch. INCREASE TIP (for sides of body): Start 5 stitches before marker thread, make 1 yarn over, knit 10 stitches (marker thread sits in the middle of these 10 stitches), make 1 yarn over (= 2 stitches increased). On the next row purl the yarn overs twisted to avoid holes. DECREASE TIP (for mid under sleeve): Start 3 stitches before marker thread, knit 2 together, knit 2 (marker thread sits in the middle of these 2 stitches), slip 1 stitch as if to knit, knit 1, pass the slipped stitch over the knitted stitch (= 2 stitches decreased). BUTTONHOLES: Work buttonholes on right band (when garment is worn): Work from the right side until there are 3 stitches left at end of row, make 1 yarn over, knit together the next 2 stitches and knit 1. On the next row, knit the yarn over to leave a hole. The first buttonhole is worked when the rib on the neck measures approx. 2 cm / ¾". Then work the remaining 6-6-7-7-8-8 buttonholes with approx. 8-8-7½-7½-7-7 cm / 3⅛"-3⅛"-2⅞"-2⅞"-2¾"-2¾" between each. ---------------------------------------------------------- JACKET: The piece is worked back and forth with circular needle. It is worked top down. The sleeves are worked in the round with double pointed needles. YOKE: Cast on 132-137-142-147-152-157 stitches (including 5 band stitches in each side towards mid front) with circular needle size 2.5 mm / US 1.5 and Flora. Purl 1 row from the wrong side. The next row is worked as follows from the right side: 5 band stitches in GARTER STITCH – see description above, * knit 2, purl 3 *, repeat from *-* until there are 7 stitches left on row, knit 2 and finish with 5 band stitches in garter stitch. Continue the rib in this way - remember BUTTONHOLE on right band – see description above. When the rib measures 3 cm / 1" knit 1 row from the right side where you decrease 12-13-12-11-10-9 stitches evenly on row – read DECREASE/INCREASE TIP = 120-124-130-136-142-148 stitches. Knit 1 row from wrong side. Work 1 row from right side where you increase as follows: 5 band stitches in garter stitch, knit 26-28-28-31-28-31 stitches, * knit 1, 1 yarn over *, work from *-* a total of 4-2-5-2-10-7 times, knit 50-54-54-60-56-62 stitches, * knit 1, 1 yarn over *, work from *-* a total of 4-2-5-2-10-7 times, knit 26-28-28-31-28-31 stitches, 5 band stitches in garter stitch = 128-128-140-140-162-162 stitches on row. Knit 1 row from wrong side where all yarn overs are knitted twisted to avoid holes. REMEMBER THE GAUGE! Change to circular needle size 3 mm / US 2.5 and work PATTERN – see description above, from the right side: 5 band stitches in garter stitch, A.1 (= 8-8-8-8-12-12 stitches), A.2 (= 11-11-14-14-16-16 stitches), 1 yarn over, 2 stitches stockinette stitch and insert a marker thread in the middle of these 2 stitches (= 1 stitch stockinette stitch on each side of the marker thread), 1 yarn over, 17 stitches stockinette stitch (= sleeve), 1 yarn over, 2 stitches stockinette stitch and insert a marker thread in the middle of these 2 stitches (= 1 stitch stockinette stitch on each side of the marker thread), 1 yarn over, A.3 (= 11-11-14-14-16-16 stitches), A.4 (= 16-16-16-16-22-22 stitches), A.2, 1 yarn over, 2 stitches stockinette stitch and insert a marker thread in the middle of these 2 stitches (= 1 stitch stockinette stitch on each side of the marker thread),1 yarn over, 17 stitches stockinette stitch (= sleeve), 1 yarn over, 2 stitches stockinette stitch and insert a marker thread in the middle of these 2 stitches (= 1 stitch stockinette stitch on each side of the marker thread), 1 yarn over, A.3, A.5 (= 8-8-8-8-12-12 stitches), 5 band stitches in garter stitch. Work 1 row back in the same way (= 2nd row in diagrams), the yarn overs in each transition between body and sleeves are purled to leave holes. The first increases to raglan are now finished (= 8 stitches increased). Continue the pattern in this way and increase to RAGLAN – see description above. Increase like this every 2nd row (= each row from the right side) a total of 26-30-31-37-38-42 times = 336-368-388-436-466-498 stitches. NOTE: When A.2/A.3 has been completed in height, work the new increased stitches in each raglan in stockinette stitch. The pattern in A.2/A.3 continues in height as before, i.e. the last 10-10-14-14-16-16 rows in diagram A.2/A.3 are repeated in height – NOTE!: The 2-2-2-2-3-3 cables in the diagrams are worked every 4th row to finished length. When all increases are finished, work 8-10-12-6-10-6 rows of pattern as before without increasing to raglan. The piece measures approx. 22-25-26-28-30-31 cm / 8¾"-9¾"-10¼"-11"-11¾"-12¼". The next row is worked as follows from the wrong side: Work the first 51-55-59-65-72-76 stitches (= right front piece), place the next 71-79-81-93-95-103 stitches on a thread (= sleeve), cast on 8-10-12-12-14-16 new stitches mid under sleeve, work the next 92-100-108-120-132-140 stitches (= back piece), place the next 71-79-81-93-95-103 stitches on a thread (= sleeve), cast on 8-10-12-12-14-16 new stitches mid under sleeve, work the remaining 51-55-59-65-72-76 stitches (= left front piece). Body and sleeves are finished separately. THE PIECE IS NOW MEASURED FROM HERE! BODY: = 210-230-250-274-304-324 stitches. Insert a marker thread after 55-60-65-71-79-84 stitches in each side (= 100-110-120-132-146-156 stitches on back piece). Continue back and forth with pattern, stockinette stitch and 5 band stitches in garter stitch in each side towards mid front. Work stockinette stitch over the new stitches cast on in each side. When piece measures 4 cm / 1½" increase 2 stitches in each side (= 4 stitches increased on row) – read INCREASE TIP. Increase in this way every 6th round 10 times = 250-270-290-314-344-364 stitches. When piece measures 23-22-23-23-23-24 cm / 9"-8¾"-9"-9"-9"-9½" change to circular needle size 2.5 mm / US 1.5. The next row from the right side is worked as follows: 5 band stitches in garter stitch, work pattern as before over the next 39-39-42-42-51-51 stitches AT THE SAME TIME as all purl 2 are increased to purl 3 (= 7-7-7-7-8-8 stitches increased), work the next 42-52-56-68-66-76 stitches AT THE SAME TIME as you increase 19-19-27-25-31-31 stitches evenly over these stitches, work pattern as before over the next 78-78-84-84-100-100 stitches AT THE SAME TIME as all purl 2 are increased to purl 3 (= 11-11-11-11-15-15 stitches increased), work the next 42-52-56-68-66-76 stitches AT THE SAME TIME as you increase 19-19-27-25-31-31 stitches evenly over these stitches, work pattern as before over the next 39-39-42-42-51-51 stitches AT THE SAME TIME as all purl 2 are increased to purl 3 (= 7-7-7-7-8-8 stitches increased), finish with 5 band stitches in garter stitch = 313-335-371-391-437-457 stitches. Now work rib as follows: 5 band stitches in garter stitch, work rib with (purl 3 /2 cable stitches) as before over the next 10-10-10-10-15-15 stitches, A.6 (= 23-23-27-27-29-29 stitches), work (2 cable stitches/purl 3) as before over the next 10-10-10-10-15-15 stitches, continue with (knit 2 /purl 3) over the next 67-77-87-97-97-107 stitches, work (purl 3 /2 cable stitches) as before over the next 10-10-10-10-15-15 stitches, A.7 (= 23-23-27-27-29-29 stitches), purl over purl and cable over cable over the next 19-19-19-19-27-27 stitches, A.6, work (2 cable stitches/purl 3) as before over the next 10-10-10-10-15-15 stitches, continue with (knit 2 /purl 3) over the next 67-77-87-97-97-107 stitches, work (purl 3 /2 cable stitches) as before over the next 10-10-10-10-15-15 stitches, A.7, work (2 cable stitches/ purl 3) as before over the next 10-10-10-10-15-15 stitches, finish with 5 band stitches in garter stitch. Continue in this way until the rib measures 7 cm / 2¾". Bind off with knit over knit and purl over purl. To avoid a tight bind-off edge you can bind off with a size larger needle. SLEEVE: Place the 71-79-81-93-95-103 stitches from the thread on double pointed needles size 3 mm / US 2.5 and, in addition, knit up 1 stitch in each of the 8-10-12-12-14-16 new stitches cast on under the sleeve = 79-89-93-105-109-119 stitches. Insert a marker thread in the middle of the new stitches cast on under the sleeve (= 4-5-6-6-7-8 new stitches on each side of the marker thread). The start of the round is mid under sleeve. Work stockinette stitch in the round. When the piece measures 4 cm / 1½" decrease 1 stitch on each side of the marker thread under the sleeve - read DECREASE TIP-2. Decrease in this way every 8th-5th-5th-3rd-3rd-3rd round a total of 13-18-19-24-25-28 times = 53-53-55-57-59-63 stitches. Continue with stockinette stitch until the sleeve measures 38-35-35-33-31-31 cm / 15"-13¾"-13¾"-13"-12¼"-12¼" (shorter measurements in larger sizes because of broader shoulders). Work 1 round where you increase 12-12-15-13-11-12 stitches evenly on round = 65-65-70-70-70-75 stitches. Work rib (knit 2 /purl 3). When the rib measures 5 cm / 2" bind off with knit over knit and purl over purl. To avoid a tight bind-off edge you can bind off with a size larger needle. The sleeve measures 43-40-40-38-36-36 cm / 17"-15¾"-15¾"-15"-14¼"-14¼". Work the other sleeve in the same way. ASSEMBLY: Sew buttons onto left band. |
||||||||||||||||||||||
Diagram explanations |
||||||||||||||||||||||
|
||||||||||||||||||||||
 |
||||||||||||||||||||||
 |
||||||||||||||||||||||
 |
||||||||||||||||||||||
 |
||||||||||||||||||||||
 |
||||||||||||||||||||||
Have you finished this pattern?Tag your pictures with #dropspattern #furelisejacket or submit them to the #dropsfan gallery. Do you need help with this pattern?You'll find 28 tutorial videos, a Comments/Questions area and more by visiting the pattern on garnstudio.com. © 1982-2026 DROPS Design A/S. We reserve all rights. This document, including all its sub-sections, has copyrights. Read more about what you can do with our patterns at the bottom of each pattern on our site. |
||||||||||||||||||||||


With over 40 years in knitting and crochet design, DROPS Design offers one of the most extensive collections of free patterns on the internet - translated to 17 languages. As of today we count 324 catalogs and 12290 patterns - 12280 of which are translated into English (US/in).
We work hard to bring you the best knitting and crochet have to offer, inspiration and advice as well as great quality yarns at incredible prices! Would you like to use our patterns for other than personal use? You can read what you are allowed to do in the Copyright text at the bottom of all our patterns. Happy crafting!
Post a comment to pattern DROPS 183-22
We would love to hear what you have to say about this pattern!
If you want to leave a question, please make sure you select the correct category in the form below, to speed up the answering process. Required fields are marked *.