
Popular categories
Looking for a yarn?


Comments / Questions (17)
![]() Amandine wrote:
Amandine wrote:
Bonjour quand vous dîtes dans le premier paragraphe continuer en côte ainsi . Je reprends toujours comme au début un rang à l'envers puis le rang maille de bordure en mousse etc..? Ou bien je continue juste 3 mailles de bordure en mousse sur etc.. merci à vous
29.01.2018 - 23:21DROPS Design answered:
Bonjour Amandine, on continue en côtes comme le rang qui vient d'être tricoté, c'est-à-dire en côtes 1 m end,3 m env (= sur l'endroit, sur l'envers on va tricoter 1 m env, 3 m end autrement dit, sur l'envers, tricotez les mailles comme elles se présentent) avec 3 m point mousse de chaque côté. Bon tricot!
30.01.2018 - 09:20
![]() Patricia wrote:
Patricia wrote:
Bonjour Je ne comprends pas diminuer 1 maille envers dans toutes les sections 3 mailles envers. Pourriez vous mettre une vidéo svp merci d'avance ?
30.11.2017 - 21:43DROPS Design answered:
Bonjour Patricia, vous tricotez d'abord en côtes 1 m end, 3 m env (vu sur l'endroit). Pour diminuer 1 m env dans chacune des sections 3 m env, tricotez 1 rang ainsi: *1 m end, 2 m ens à l'env, 1 m env*, et répétez de *-* = il reste 2 m env dans chacune des sections 3 m env. Bon tricot!
01.12.2017 - 09:09
![]() Patricia wrote:
Patricia wrote:
Bonjour Je ne comprends pas diminuer 1 maille envers dans toutes les sections 3 mailles envers. Pourriez vous mettre une vidéo svp merci d'avance ?
30.11.2017 - 21:41Alice wrote:
Never mind my question about provisional cast on -- I see the pattern begins at the ends, not the back. Sorry!
26.10.2017 - 20:27
![]() Alice wrote:
Alice wrote:
Would a provisional cast on work with this pattern?
26.10.2017 - 16:44DROPS Design answered:
Dear Alice, it wouldn't since the cast on edge is the end of the scarf - but you can slip sts at the end of 1st piece on another needle/st holder/thread and graft both pieces together to avoid a seam. Happy knitting!
27.10.2017 - 09:54
![]() Natividad wrote:
Natividad wrote:
Estoy haciendo la estola drop calados y estoy bloqueada porque hice la primera vuelta revés la segunda bien no se como son las del reves
23.09.2017 - 20:58DROPS Design answered:
Hola Natividad. Las siguientes filas por el lado revés se trabajan como se presentan los puntos, aparte de los puntos del borde a cada lado, que se trabajan en punto musgo.
24.09.2017 - 18:04
![]() Marion wrote:
Marion wrote:
Prachtig, mooi afwisselend patroon!
10.06.2017 - 05:30
|
|||||||||||||||||||
Dreamy Daffodil#dreamydaffodilshawl |
|||||||||||||||||||
 |
 |
||||||||||||||||||
Knitted stole with lace pattern and rib. The piece is worked in DROPS Alpaca.
DROPS 180-14 |
|||||||||||||||||||
|
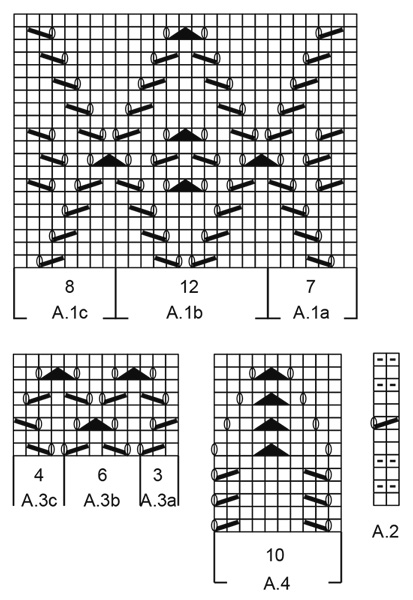
INFORMATION FOR THE PATTERN: RIDGE/GARTER STITCH (worked back and forth): 1 ridge = Knit 2 rows. PATTERN: See diagrams A.1 to A.4. The diagrams show all the rows in the pattern seen from the right side. ---------------------------------------------------------- STOLE: The piece is worked back and forth with circular needle in two equal parts, which are sewn together in the middle. Cast on 155 stitches with circular needle size 3 mm / US 2.5 and Alpaca. Purl 1 row from the wrong side. The next row is worked as follows from the right side: 3 edge stitches in GARTER STITCH – see description above, * knit 1, purl 3 *, repeat from *-* until there are 4 stitches left on the needle, finish with knit 1 and 3 edge stitches in garter stitch. Continue the rib in this way. When the piece measures 2 cm / ¾" decrease all the purl 3 (seen from the right side) to purl 2 = 118 stitches. When the piece measures 3 cm / 1", decrease every other purl 2 to purl 1 (NOTE: decrease in the first and last purl sections = 19 stitches decreased) = 99 stitches. When the piece measures 4 cm / 1½" decrease the remaining purl 2 to purl 1 (= 18 stitches decreased) = 81 stitches. When the rib measures 5 cm / 2" – adjust so that the last row is worked from the wrong side, change to circular needle size 3.5 mm / US 4. The next row is worked as follows from the right side: 3 edge stitches in garter stitch, work PATTERN according to diagrams A.1a (= 7 stitches), A.1b (= 12 stitches) 5 times in width, A.1c (= 8 stitches), 3 edge stitches in garter stitch. Continue the pattern in this way until you have worked 4 complete repeats of A.1a to A.1c in height. REMEMBER THE GAUGE! The next row is worked from the right side as follows: Work 3 edge stitches in garter stitch, work A.2 until there are 5 stitches left on the needle, knit the next 2 stitches together (= 1 stitch decreased (this is done so that the pattern will fit the number of stitches)), work 3 edge stitches in garter stitch = 80 stitches. Continue the pattern until A.2 has been completed in height. Work 2 rows stockinette stitch with 3 edge stitches in garter stitch in each side, where you decrease 1 stitch at the end of the last row (this is done so that the pattern will fit the number of stitches) = 79 stitches. Now work pattern from the right side as follows: 3 edge stitches in garter stitch, A.3a (= 3 stitches), A.3b (= 6 stitches) 11 times in width, A.3c (= 4 stitches), 3 edge stitches in garter stitch. Repeat diagram A.3 in height until the piece measures 53 cm / 21" – adjust so that you finish after a completed repeat in height. The next row is worked as follows from the right side: Work 3 edge stitches in garter stitch, work A.2 until there are 3 stitches left on the needle and decrease at the same time 1 stitch (this is done so that the pattern fits the number of stitches), 3 edge stitches in garter stitch = 78 stitches. Continue the pattern until A.2 has been completed in height. Work 2 rows stockinette stitch with 3 edge stitches in each side where you decrease 1 stitch at the end of the last row (this is done so that the pattern fits the number of stitches) = 77 stitches. Now work pattern as follows from the right side: 3 edge stitches in garter stitch, A.4 (= 10 stitches) 7 times in width, 1 stitch stockinette stitch, 3 edge stitches in garter stitch. Continue the pattern in this way until the you have worked 4 repeats in height. The next row is worked as follows from the right side: Work 3 edge stitches in garter stitch, work A.2 until there are 3 stitches left on the needle and at the same time increase 1 stitch on the first row (this is done so that the pattern fits the number of stitches), 3 edge stitches in garter stitch = 78 stitches. Continue the pattern until A.2 has been completed in height. Bind off. To prevent the bind-off edge being tight, you can use a larger needle or you can make a yarn over which is then bind off after every 4th stitch. The piece measures approx. 78 cm / 30¾". Work a second part in the same way. Sew the two parts together inside the bind-off edge so that there are 4 ridges in the middle of the stole. Sew in each-and-every stitch and make sure the seam is not tight! |
|||||||||||||||||||
Diagram explanations |
|||||||||||||||||||
|
|||||||||||||||||||
 |
|||||||||||||||||||
Have you finished this pattern?Tag your pictures with #dropspattern #dreamydaffodilshawl or submit them to the #dropsfan gallery. Do you need help with this pattern?You'll find 19 tutorial videos, a Comments/Questions area and more by visiting the pattern on garnstudio.com. © 1982-2026 DROPS Design A/S. We reserve all rights. This document, including all its sub-sections, has copyrights. Read more about what you can do with our patterns at the bottom of each pattern on our site. |
|||||||||||||||||||


With over 40 years in knitting and crochet design, DROPS Design offers one of the most extensive collections of free patterns on the internet - translated to 17 languages. As of today we count 324 catalogs and 12290 patterns - 12280 of which are translated into English (US/in).
We work hard to bring you the best knitting and crochet have to offer, inspiration and advice as well as great quality yarns at incredible prices! Would you like to use our patterns for other than personal use? You can read what you are allowed to do in the Copyright text at the bottom of all our patterns. Happy crafting!
Post a comment to pattern DROPS 180-14
We would love to hear what you have to say about this pattern!
If you want to leave a question, please make sure you select the correct category in the form below, to speed up the answering process. Required fields are marked *.