
Popular categories
Looking for a yarn?


Comments / Questions (49)
Camila wrote:
Cuando se logran los 20 cm. y dicen que hay que pasar a A3, piden hacer calzar la hilera marcada con flecha para ser tejida por el lado revés. Cuando miro el diagrama muestran que la hilera con la flecha viene inmediatamente luego de hacer una hilera realizada por el lado revés. Siendo así como hago calzarlo? Tendría que omitir la fila de puntos revés por el lado revés que sale en el diagrama??. El diagrama me confunde
20.01.2018 - 18:13DROPS Design answered:
Hola Camila. Ten en cuenta que en este patrón la primera fila se trabaja por el lado revés. En este caso, la fila con la flecha, justo toca trabajarla por el lado revés. (revés-derecho-revés-derecho-revés...).
28.01.2018 - 16:39Maria Coggins wrote:
Ik heb het truitje iets langer gebreid. Het patroon is scheef wanneer ik het draag. Dit is al vaker voorgekomen wanneer ik de rondbreinaald gebruik. Wat doe ik verkeerd?
14.09.2017 - 15:01
![]() Marina wrote:
Marina wrote:
Buongiorno, scusate ma non capisco bene il passaggio riguardante il diagramma A3: " Quando il lavoro misura 19-20-21-22-23-24 cm, lavorare il diagramma A.3 sulle 7 maglie centrali a partire dalla riga indicata dalla freccia". Cioè ripeto il diagramma A3 su tutte le maglie o solo sulle 7 centrali?
08.08.2017 - 19:07DROPS Design answered:
Buonasera Marina, deve lavorare il diagramma A.3 solo sulle 7 maglie centrali. Buon lavoro!
08.08.2017 - 19:49
![]() Marina wrote:
Marina wrote:
E inoltre: il diagramma A1 è formato da 8 ferri, giusto?
29.07.2017 - 13:15DROPS Design answered:
Buongiorno Marina, si, il diagramma A.1 è formato da 8 ferri. Buon lavoro!
29.07.2017 - 13:21
![]() Marina wrote:
Marina wrote:
Buongiorno, ho iniziato questo top ma non capisco bene le istruzioni per il dietro: lavoro 3m a legaccio, 1 a diritto poi diagramma A1 e infine 3m a legaccio. Poi c'è scritto "continuare così": come lavoro quella m a diritto? Sul rovescio come dovrei procedere? 3 m a legaccio, 1 a diritto e A1? O la m a diritto in più sul rovescio va lavorata prima delle ultime 3? Grazie
29.07.2017 - 12:53DROPS Design answered:
Buongiorno Marina, la maglia a diritto sul rovescio del lavoro va lavorata a rovescio prima delle ultime 3 maglie. Buon lavoro!
29.07.2017 - 13:24
![]() Petra Kaiser wrote:
Petra Kaiser wrote:
Ich habe diesen Pulli lt. Anleitung gestrickt. Es gelang mir trotz größter Anstrengung nicht, eine schöne Seitennaht zu machen. So habe ich ihn wieder aufgetrennt und dieses Mal auf einer Rundnadel gestrickt. Dagegen spricht nichts. Die Naht seitlich ist nicht mehr notwendig und schön ist er geworden.
16.07.2017 - 15:49
![]() Marina wrote:
Marina wrote:
Intendevo: quante m posso togliere per non alterare gli schemi? Le 11 di A4 o le 7 di A3?
14.07.2017 - 12:38DROPS Design answered:
Buongiorno Marina. Il diagramma A4 viene lavorato sulle spalline e il diagramma A3 sulle maglie centrali del davanti e del dietro, subito prima di separare il lavoro per il lato destro/sinistro del dietro/davanti. E’ sufficiente che tolga un numero pari di maglie; in questo modo i diagrammi A1 e A2, verranno lavorati correttamente. Buon lavoro!
14.07.2017 - 13:51
![]() Marina wrote:
Marina wrote:
Buongiorno, se volessi farlo ancora più piccolo quante maglie dovrei togliere? Grazie
14.07.2017 - 11:43DROPS Design answered:
Buongiorno Marina. In base al suo campione e alle misure finali che desidera ottenere, dovrà ricalcolare il numero di maglie necessario. Per un aiuto più personalizzato può contattare il suo rivenditore Drops di fiducia. Buon lavoro!
14.07.2017 - 12:33
![]() Véronique33 wrote:
Véronique33 wrote:
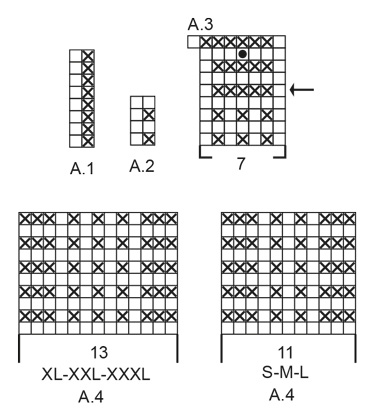
Bonjour, Une petite erreur s'est glissée : pour les diagrammes A4 les tailles S-M-L correspondent à 11 mailles de la bretelle (et non pas 13 qui correspondent aux autres tailles). Merci pour tout votre travail fabuleux.
22.06.2017 - 13:44DROPS Design answered:
Bonjour Véronique et merci pour votre retour, les diagrammes ont dû être inversé et seront bientôt corrigés. Bon tricot!
22.06.2017 - 16:43
|
|||||||||||||
Mazo#mazotop |
|||||||||||||
 |
 |
||||||||||||
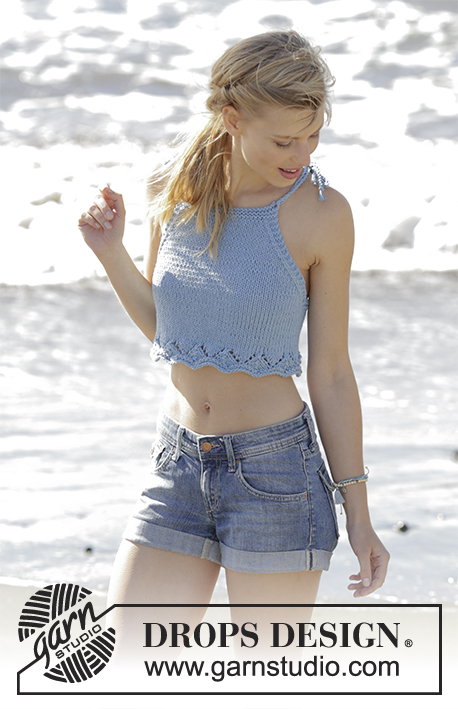
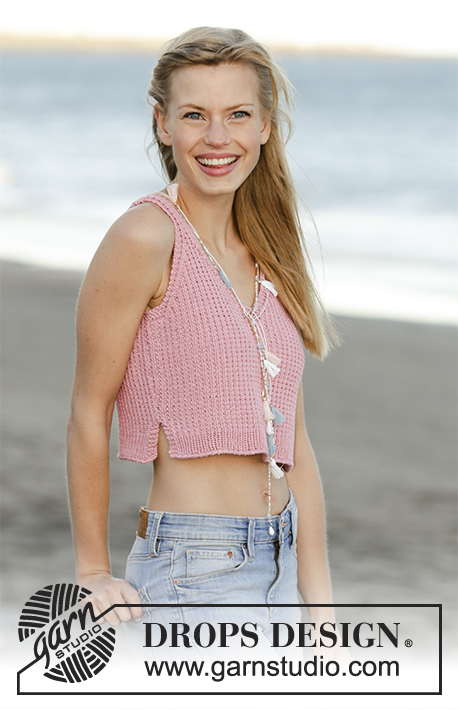
Top with V-neck, textured pattern and vents in the sides, worked bottom up in DROPS Muskat. Size: S - XXXL.
DROPS 178-66 |
|||||||||||||
|
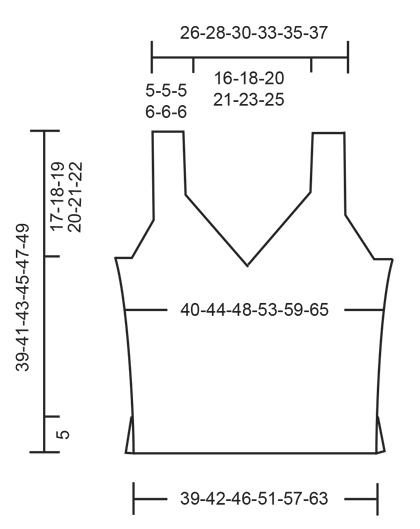
GARTER STITCH (back and forth): Knit all rows. 1 ridge = knit 2 rows. PATTERN: See diagrams A.1 to A.4. Diagrams show all rows in pattern seen from the right side. Choose diagram for your size. INCREASE TIP: Increase 1 stitch by making a yarn over. On next row knit yarn over twisted to avoid hole. NOTE: Work the new stitches gradually in the pattern A.2. DECREASE TIP: Decrease 1 stitch inside 3 edge stitches in garter stitch. All decreases are done from the right side. Decrease as follows after 3 edge stitches in garter stitch: Slip 1 stitch knitwise, knit 1, pass slipped stitch over stitch worked Decrease as follows before 3 edge stitches in garter stitch: Begin 2 stitches before the 3 edge stitches in garter stitch and knit 2 together. ---------------------------------------------------------- TOP: Worked back and forth in 2 parts and sewn together when finished. BACK PIECE: Cast on 81-89-97-107-119-133 stitches with Muskat on circular needle size 4 mm / US 6. Purl 1 row from wrong side. Work rib as follows (1st row = right side): Work 3 stitches in GARTER STITCH - see explanation above, knit 1 stitch, repeat A.1 (= 2 stitches) until 3 stitches remain on row, work 3 stitches in garter stitch. Continue pattern back and forth like this until A.1 has been worked vertically. Then work A.2 (= 2 stitches) over A.1. REMEMBER THE GAUGE! When piece measures 5 cm / 2", cast on 1 new stitch at the end of the next 2 rows (marks where vents end) = 83-91-99-109-121-135 stitches. Work pattern as follows: 1 edge stitch in garter stitch, knit 1, A.2 until 1 stitch remains, 1 edge stitch in garter stitch. When piece measures 7 cm / 2¾", increase 1 stitch inside 1 edge stitches in garter stitch in each side - READ INCREASE TIP! Repeat increase when piece measures 10 cm / 4" = 87-95-103-113-125-139 stitches. When piece measures 19-20-21-22-23-24 cm / 7½"-8"-8¼"-8¾"-9"-9½", work from arrow in A.3 over the middle 7 stitches on row - adjust so that this row marked with arrow is worked from wrong side. On first row from right side after A.3 work over the first 44-48-52-57-63-70 stitches on row and slip the remaining 44-48-52-57-63-70 stitches on 1 stitch holder. RIGHT SIDE AT THE BACK: = 44-48-52-57-63-70 stitches. READ ALL OF THE FOLLOWING SECTION - decrease for neck and armhole at the same time as follows: Work pattern A.2 as before with 3 edge stitches in garter stitch towards neck and 1 edge stitch in garter stitch towards the side. NECK: On first row from right side begin decrease for neck. Decrease 1 stitch inside the 3 edge stitches in garter stitch - READ DECREASE TIP. Decrease like this every other row (i.e. on every row from right side) 16-18-20-22-24-26 times in total. ARMHOLE: When piece measures 21-22-23-24-25-26 cm / 8¼"-8¾"-9"-9½"-9¾"-10¼", work in garter stitch over the outermost 10-10-12-11-11-14 stitches towards the side (including 1 edge stitch in garter stitch). When 4 rows have been worked (= 2 ridges) over these stitches, bind off the first 7-7-9-8-8-11 stitches at beginning of row for armhole. Work the next 3 stitches in garter stitch (= edge towards armhole). Decrease 1 stitch inside the 3 edge stitches in garter stitch towards the armhole. Decrease like this every other row (i.e. on every row from right side) 10-12-12-14-18-20 times in total. After all bind offs and decreases for armhole and neck, 11-11-11-13-13-13 stitches remain on row for strap. Continue the pattern as before with 3 edge stitches in garter stitch in each side. Work strap as shown in A.4 - choose diagram for size. When piece measures 39-41-43-45-47-49 cm / 15¼"-16"-17"-17¾"-18½"-19¼", bind off all stitches. LEFT SIDE AT THE BACK: Slip the 44-48-52-57-63-70 stitches from stitch holder in the other side back on circular needle size 4 mm / US 6 and work the same way as right side at the back but reversed – NOTE: When binding off for armhole in the side, bind off at beginning of row from wrong side (instead of beginning of row from right side). The remaining decreases for armhole and neck are done from right side. FRONT PIECE: Cast on and work as back piece. ASSEMBLY: Sew the two straps together with grafting/kitchener stitches to avoid a chunky seam. Sew side seam inside 1 edge stitch in garter stitch in each side from armhole and down to vent. Repeat in the other side. Fasten off. |
|||||||||||||
Diagram explanations |
|||||||||||||
|
|||||||||||||
 |
|||||||||||||
 |
|||||||||||||
Have you finished this pattern?Tag your pictures with #dropspattern #mazotop or submit them to the #dropsfan gallery. Do you need help with this pattern?You'll find 22 tutorial videos, a Comments/Questions area and more by visiting the pattern on garnstudio.com. © 1982-2026 DROPS Design A/S. We reserve all rights. This document, including all its sub-sections, has copyrights. Read more about what you can do with our patterns at the bottom of each pattern on our site. |
|||||||||||||


With over 40 years in knitting and crochet design, DROPS Design offers one of the most extensive collections of free patterns on the internet - translated to 17 languages. As of today we count 325 catalogs and 12298 patterns - 12288 of which are translated into English (US/in).
We work hard to bring you the best knitting and crochet have to offer, inspiration and advice as well as great quality yarns at incredible prices! Would you like to use our patterns for other than personal use? You can read what you are allowed to do in the Copyright text at the bottom of all our patterns. Happy crafting!
Post a comment to pattern DROPS 178-66
We would love to hear what you have to say about this pattern!
If you want to leave a question, please make sure you select the correct category in the form below, to speed up the answering process. Required fields are marked *.