
Popular categories
Looking for a yarn?


Comments / Questions (29)
Jiji wrote:
Thanks for this great pattern.
26.02.2018 - 23:48
![]() Rumi Dutta wrote:
Rumi Dutta wrote:
Hi, I am usually a visual learner and recently i started to crochet reading patterns from redheart.com. They are so simple and easy to understand. THey start with row1 to last row. But i am having a hard time to understand your patterns. They are very pretty but difficult to understand. Can you please explain what is A.1, a.2 etc. Am i supposed to make them separetely and join them at the end? i want to make: DROPS / 178 / 29 Forever Lace vest. Please help
06.02.2018 - 21:40DROPS Design answered:
Dear Mrs Dutta, A.1, A.2 ... are the diagrams you have to work when written pattern requires you to, ie you start with diagram A.1: crochet row 1 in A.1a one time in width, then repeat row 1 in A.1b 4 times in total, then work row 2 in both diagrams and so on until whole diagram has been worked in height. Remmeber for any further assistance with the diagrams your DROPS store will help you, even per mail, telephone or on social medias. Happy crocheting!
07.02.2018 - 08:44
![]() Bettie wrote:
Bettie wrote:
Nee precies A. Knol en dat vind ik heel erg zonde. Ik twijfel er geen moment aan dat het een heel werk is om een patroon uit te schrijven en ik ben natuurlijk blij met alle gratis patronen van drops maar zo heeft niemand er iets aan!
15.07.2017 - 14:26
![]() A. Knol wrote:
A. Knol wrote:
Hahaha Bertie ! Ik denk dat ze het aan de andere kant ook niet meer zien zitten, want ze reageren niet meer.....
15.07.2017 - 11:48
![]() Bettie wrote:
Bettie wrote:
Uittrekken bedoel ik natuurlijk!
14.07.2017 - 18:20
![]() Bettie wrote:
Bettie wrote:
Helemaal eens met A. Knol Heel enthousiast begonnen maar na een week puzzelen, uitrekken, opnieuw beginnen en er weer niet uit komen is ook voor mij de lol er af. Patroon is niet te volgen!
14.07.2017 - 18:19
![]() A. Knol wrote:
A. Knol wrote:
Bedankt voor je reactie, maar ik geef het op! Vanaf de derde toer is het echt niet goed aangegeven en klopt bv het aantal lossen niet. De vierde toer doe ik op mijn eigen manier en dat lukt dan wel, maar als het hele patroon zo moeilijk gaat dan is de lol er bij mij vanaf.
30.06.2017 - 16:24
![]() A. Knol wrote:
A. Knol wrote:
De vorige vragenstelster kon wel eens gelijk hebben. Al helemaal in het begin van het vierkant ga ik de mist in met de telling. Is de tekening wel juist ?
28.06.2017 - 20:27DROPS Design answered:
Hoi,' Misschien helpt het als ik even een korte omschrijving maak als opstart :) : Haak 4 lossen en sluit deze met een hv tot een ring. Haak dan 3 lossen (deze vervangt het eerste stokje; dus het stokje welke met een pijl staat aangegeven in A.1.a), lees dan het patroon naar links richting de pijl en haak dus 2 lossen, haak dan volgens het grote ovale symbool Haak 2 stokjes samen om de ring/lossenlus als volgt: haak 1 stokje....enz en ga zo verder met 4 herhalingen van de eerste toer van A.1.b. Op het einde. Eindig de toer met 1 hv (lees ook informatie voor het haken) 1e toer is nu klaar en ga verder met de volgende toer, ook weer 4 herhalingen.
29.06.2017 - 20:51
![]() Emmy Spanenburg-van Beek wrote:
Emmy Spanenburg-van Beek wrote:
Ik kom niet uit het patroon van het vierkant volgens mij klopt er iets niet heeft u geen duidelijke patroon
24.05.2017 - 22:28DROPS Design answered:
Hallo Emmy, Waar loop je precies tegenaan? Het telpatroon laat 1 hoek van het vierkant zien. Je haakt eerst A.1.a dan brei je 4 x A.1a. Dan ben je weer aan het begin en doe je de volgende toer. Op deze manier brei je A.1 een maal in de hoogte. Je begint rechts onder in het telpatroon (= midden van het vierkant) Boven het telpatroon staat de uitleg van de symbolen.
26.05.2017 - 15:53
|
||||||||||||||||||||||||||||||||||||||||
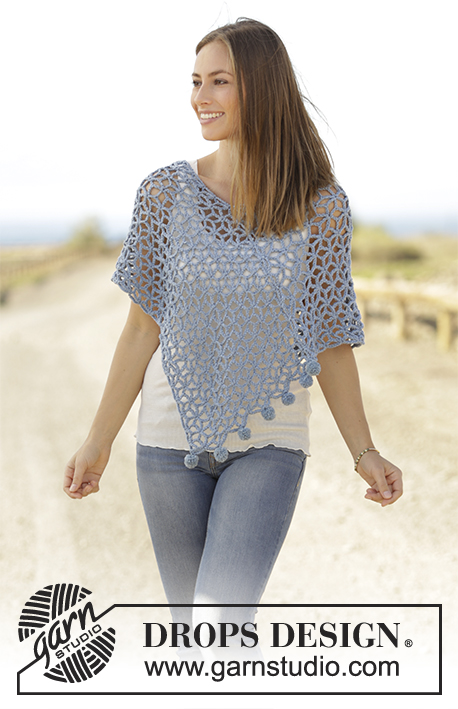
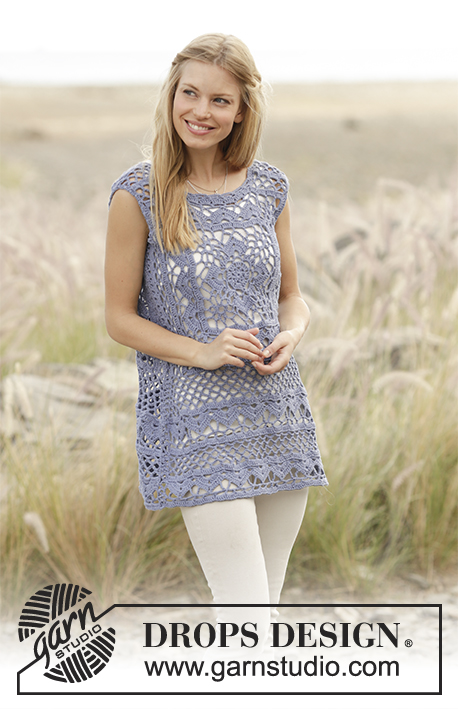
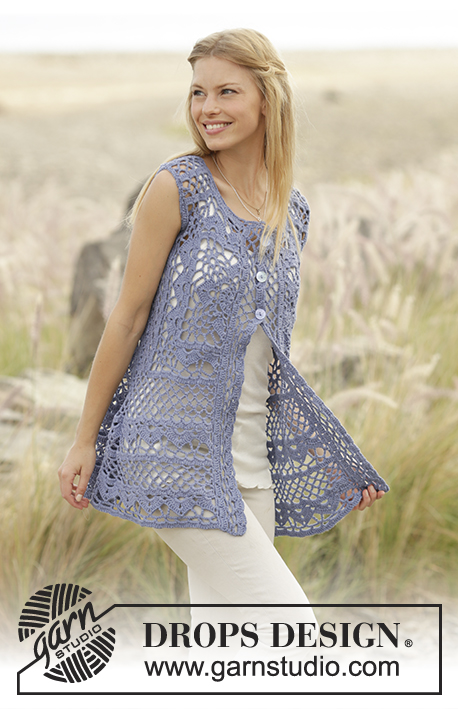
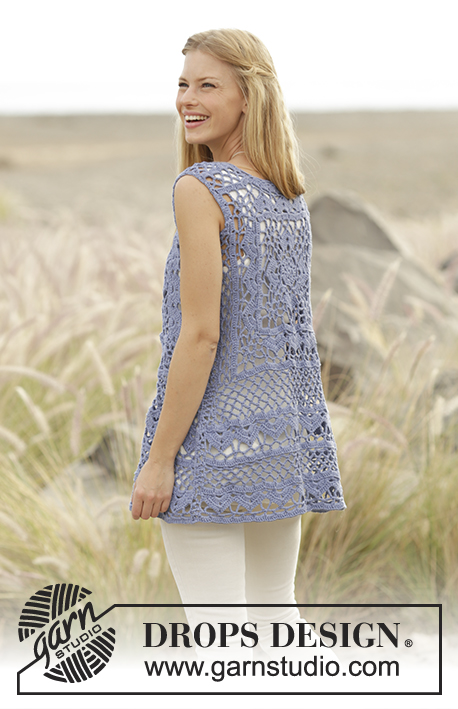
Forever Lace#foreverlacevest |
||||||||||||||||||||||||||||||||||||||||
 |
 |
|||||||||||||||||||||||||||||||||||||||
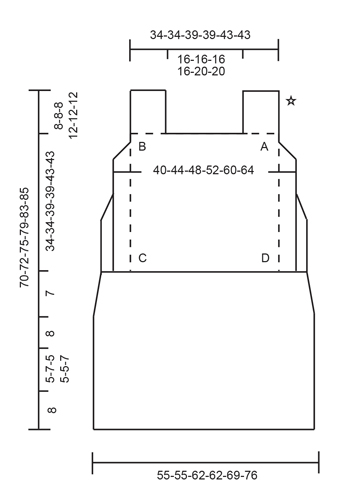
Vest with crochet square and lace pattern, worked top down in DROPS Cotton Light. Sizes S - XXXL.
DROPS 178-29 |
||||||||||||||||||||||||||||||||||||||||
|
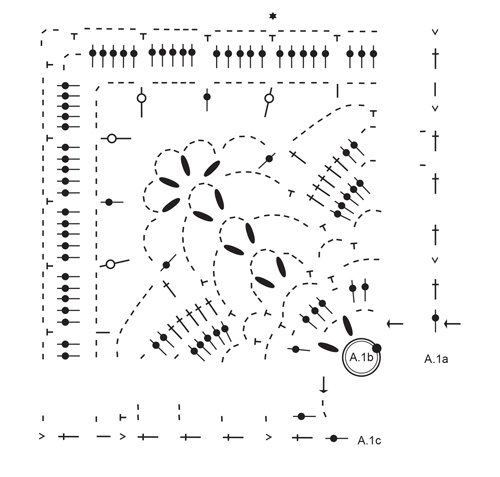
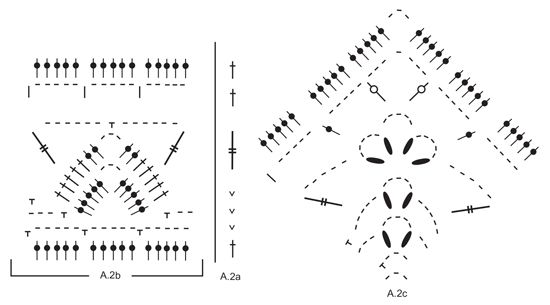
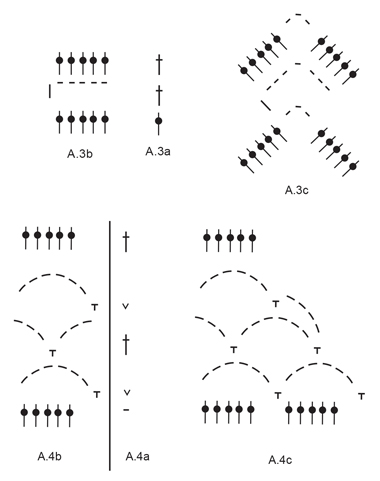
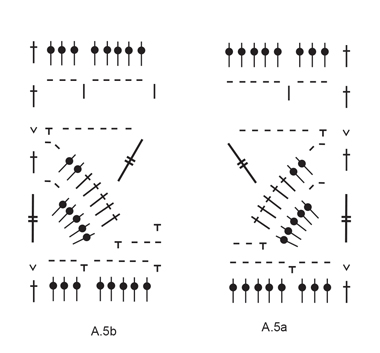
CROCHET INFO: At the beginning of each row/round with single crochets, replace the first single crochet with 1 chain stitch. The round finishes with 1 slip stitch in the first chain stitch. At the beginning of each row/round with half double crochets, replace the first half double crochet with 2 chain stitches. The round finishes with 1 slip stitch in the 2nd chain stitch. At the beginning of every row/round with double crochets, replace the first double crochet with 3 chain stitches. The round finishes with 1 slip stitch in the 3rd chain stitch. At the beginning of every row/round with double treble crochets, replace the first double treble crochet with 5 chain stitches. The round finishes with 1 slip stitch in the 5th chain stitch. INCREASE TIP: You increase in each side by working an extra chain-space (= 6 chain stitches and 1 single crochet) around the first and last chain-space on the row (= chain-space with 3 chain stitches). PATTERN: See diagrams A.1 to A.5. The diagrams show all the rows/rounds seen from the right side. ---------------------------------------------------------- VEST: The crochet square on the back piece is worked in the round. Then you work back and forth in sections and then these sections are assembled together. BACK PIECE: CROCHET SQUARE: Start with hook size 3 mm / C and Cotton Light. Work 4 chain stitches and form them to a ring with 1 slip stitch in the first chain stitch. Work in the round from the row in the diagrams with the arrow as follows: Work A.1a (shows how the rounds start and finish) – READ CROCHET INFO, work A.1b a total of 4 times on the round. REMEMBER THE CROCHET GAUGE! When the diagrams have been completed in height the crochet square measures approx. 21 x 21 cm / 8¼" x 8¼". Work slip stitches as far as the 4th single crochet before the next corner (= 3 chain-spaces before the corner – see star in A.1b). Start on the 3rd round in the diagrams and work as follows: Work A.2a in the single crochet (shows how the round starts and finishes), work A.2b over the next 3 chain-spaces,* work A.2c (= the corner), work A.2b over the next 9 chain-spaces (= 3 repeats) *, repeat from *-* 2 more times, work A.2c in the corner and finish with A.2b over the remaining 6 chain-spaces (= 2 repeats) on the round. When the diagrams have been completed in height, the crochet square measures approx. 34 x 34 cm / 13½" x 13½". The crochet square is now finished for sizes S and M. For sizes L, XL, XXL and XXXL continue as follows: Start on the 2nd round in the diagrams and work A.3a (shows how the round starts and finishes), work A.3b around the whole round but in each corner, work A.3c. When the diagrams have been completed in height, the crochet square measures approx. 39 x 39 cm / 15¼" x 15¼" and the crochet square is now finished for sizes L and XL. I n sizes XXL and XXXL work the last 2 rounds of A.3 1 more time in height (= a total of 2 times in height). The crochet square now measures approx. 43 x 43 cm / 17" x 17" and is finished for sizes XXL and XXXL. Cut the strand. RIGHT SHOULDER: Start on row 2 in the diagrams and work the shoulder back and forth as follows: Work A.4a around the chain-space in corner A – see the sketch, work A.4b over the next 20-20-25-25-25-25 double crochets (= 4-4-5-5-5-5 repeats), work A.4a around the space between the next 2 double crochets. Turn and continue in the same way until the diagrams have been completed in height. Work 2nd–5th rows 1-1-1-2-2-2 more times in height (= a total of 2-2-2-3-3-3 times in height). The shoulder measures approx. 8-8-8-12-12-12 cm / 3"-3"-3"-4¾"-4¾"-4¾" from the crochet square. Cut and fasten the strand. LEFT SHOULDER: Skip 35-35-35-35-45-45 double crochets for the neck after the right shoulder = 20-20-25-25-25-25 double crochets for the left shoulder. Around the space between the next 2 double crochets, fasten the strand with 1 single crochet (= A.4a). Start on the 2nd row in the diagrams and work A.4a (as mentioned above), work A.4b over the next 20-20-25-25-25-25 double crochets (= 4-4-5-5-5-5 repeats), work A.4a around the chain-space in corner B – see sketch. Turn and continue as for the right shoulder. LEFT SIDE (between corners B and C – see sketch): Skip 15 double crochets in all sizes from the chain-space in corner B. Start on the 2nd row in the diagrams and work A.4c over the next 10 double crochets, work A.4b over the next 50-50-60-60-70-70 double crochets, finish with A.4a around the chain-space in corner C on the crochet square (= 12-12-14-14-16-16 chain-spaces). Turn and work back and forth until the 4th row has been completed. You have now decreased 1 chain-space in A.4c = 11-11-13-13-15-15 chain-spaces. Work the 3rd and 4th rows in A.4a and A.4b 0-1-1-2-3-4 more times in height (= 3-5-5-7-9-11 rows with chain-spaces). There are now 11-11-13-13-15-15 chain spaces for the left side. Work the 3rd row from the wrong side as follows: Work A.4a, work A.4b a total of 5-5-6-6-7-7 times in width, work 3 chain stitches and 1 single crochet around the next chain-space. Cut the strand. NOTE: This row is worked to allow the side to slope outwards slightly at the bottom. Fasten the strand with 1 single crochet around the top chain-space in the side seen from the right side (i.e. the chain-space outermost by the armhole), work 3 chain stitches (= 1 double crochet), work 4 double crochets around the same chain-space, work 5 double crochets around each of the next 4-4-5-5-6-6 chain-spaces (= up to the last chain-space worked on the previous row), work 3 double crochets around the next chain-space (there is already a single crochet around this chain-space), continue with 5 double crochets around each of the next 6-6-7-7-8-8 chain-spaces and work 2 double crochets around the last chain-space (= chain-space with 3 chain stitches) = 55-55-65-65-75-75 double crochets. The left side is now finished. Cut and fasten the strand. RIGHT SIDE (between corners A and D – see the sketch): The right side is worked in the same way as the left side but in reverse. Work from the wrong side and skip 15 double crochets from the chain-space in corner A. Do not cut the strand when the last row with double crochets has been finished. CONTINUING DOWN THE BODY: THE PIECE IS NOW MEASURED FROM HERE! You now continue working on down the body over the bottom edge of the sides and the crochet square. Start from the wrong side and work from the 2nd row in the diagrams as follows: Work A.4a, work 3-4-4-5-6-7 repeats of A.4b along the bottom edge on the right side, continue with A.4b over the 75-75-85-85-95-95 double crochets on the crochet square (between corners D and C), work 3-4-4-5-6-7 repeats of A.4b along the bottom edge of the left side and finish with A.4a = 21-23-25-27-31-33 chain-spaces. Work rows 3 and 4 in the diagrams 3 times (= a total of 7 rows with chain-spaces) AT THE SAME TIME as you increase 1 chain-space in each side every time you work row 4 – READ INCREASE TIP = 27-29-31-33-37-39 chain-spaces. The piece measures approx. 7 cm / 2¾". Work the next row from the right side as follows: Work 4 double crochets around each chain-space AT THE SAME TIME as you increase 14-6-13-5-4-11 double crochets evenly along the round = 122-122-137-137-152-167 double crochets. Work from the 2nd row in the diagrams from the wrong side as follows: Work A.2a, work A.2b (= 8-8-9-9-10-11 repeats in width), work A.2a. On the last row in the diagrams, increase 15-25-20-30-35-30 double crochets evenly along the row = 137-147-157-167-187-197 double crochets. When the diagrams have been completed in height, the piece measures approx. 15 cm / 6". Work from the 2nd row in the diagrams from the wrong side as follows: Work A.4a, work A.4b until there is 1 double crochet left on the row, work A.4a (= 27-29-31-33-37-39 chain-spaces). Work rows 3 and 4 until you have worked a total of 5-7-5-5-5-7 rows with chain-spaces in height. The piece measures approx. 20-22-20-20-20-22 cm / 8"-8¾"-8"-8"-8"-8¾". Work the next row from the right side as follows: Work 4 double crochets around each chain-space AT THE SAME TIME as you increase 14-6-13-5-4-11 double crochets evenly along the row = 122-122-137-137-152-167 double crochets. Start on row 2 in the diagrams and work A.2a, work A.2b (= 8-8-9-9-10-11 times in width), work A.2a. When the diagrams have been completed in height, the piece measures approx. 70-72-75-79-83-85 cm / 27½"-28½"-29½"-31"-32¾"-33½" from the shoulder. Cut and fasten the strand. RIGHT FRONT PIECE: HALF SQUARE: Work 4 chain stitches and form them to a ring with 1 slip stitch in the first chain stitch. Work back and forth from the row with the arrow in the diagrams as follows: Work A.1a (shows how the row starts and finishes), work A.1b a total of 2 times, work A.1c (shows how the row starts and finishes). When the diagrams have been completed in height, the half square measures approx. 21 x 11 cm / 8¼"-4½". Start on row 3 in the diagrams and work as follows: Work A.5a, work A.2b over the next 3 chain-spaces, work A.2c (= the corner), work A.2b over the next 9 chain-spaces (= 3 repeats), work A.2c (= corner), work A.2b over the next 3 chain-spaces, finish with A.5b. When the diagrams have been completed in height, the half square measures approx. 34 x 18 cm / 15" x 7". The half square for sizes S and M is now finished. For sizes L, XL, XXL and XXXL continue as follows: Start on the next to last row in the diagrams and work A.5a (the half double crochet on the next to last row is worked around the space between the 3rd and 4th double crochet), then work A.3b for the rest of the row but in each corner work A.3c, finish with A.5b (NOTE: The first half double crochet is worked around the space when there are 9 double crochets left on the row and the second half double crochet is worked around the space when there are 4 double crochets left on the row). When the diagrams have been completed in height, the half square measures approx. 39 x 20 cm / 15¼" x 8" and the half square is now finished for sizes L and XL. For sizes XXL and XXXL work the last 2 rounds 1 more time in height (= a total of 2 times in height). The half square now measures approx. 43 x 22 cm / 17" x 8¾" and is finished for sizes XXL and XXXL. Cut the strand. RIGHT SHOULDER: Skip 19-19-19-19-24-24 double crochets from mid front and work the shoulder in the same way as for the left shoulder on the back piece. RIGHT SIDE: Work the right side in the same way as the left side on the back piece. CONTINUING DOWN THE BODY: THE PIECE IS NOW MEASURED FROM HERE! Start from the right side, outermost on the right side and work from row 2 as follows: Work A.4a, work 3-4-4-5-6-7 repeats of A.4b along the bottom edge on the right side, then continue with A.4b over the next 35-35-40-40-45-45 double crochets, work A.4b over the remaining 3 double crochets and finish with A.4a = 11-12-13-14-16-17 chain-spaces. Work rows 3 and 4 in the diagrams a total of 3 times (= a total of 7 rows with chain-spaces) AT THE SAME TIME as you increase 1 chain-space in the right side as for the back piece = 14-15-16-17-19-20 chain-spaces. The piece measures approx. 7 cm / 2¾". Work the next row from the wrong side as follows: Work 5 double crochets around each chain-space, AT THE SAME TIME in sizes M and XXL decrease 5-2 double crochets evenly spaced along the row and in size L increase 5 double crochets evenly spaced = 70-70-85-85-93-100 double crochets. Work from row 2 in the diagrams from the right side as follows: Work A.2a 1-1-1-1-0-1 time, work A.5a 0-0-0-0-1-0 time, work A.2b 4-4-5-5-5-6 times, work A.5b. On the last row in the diagram, adjust the number of stitches to 70-75-80-85-95-100 double crochets. When the diagrams have been completed in height, the piece measures approx.15 cm / 6". Work from row 2 in the diagrams from the right side as follows: Work A.4a, work A.4b until there is 1 double crochet left on the row, work A.4a (= 14-15-16-17-19-20 chain-spaces). Work rows 3 and 4 until you have worked a total of 5-7-5-5-5-7 rows with chain-spaces in height. The piece measures approx. 20-22-20-20-20-22 cm / 8"-8¾"-8"-8"-8"-8¾". Work a row of double crochets from the wrong side as follows: Work 5 double crochets around each chain-space, AT THE SAME TIME in sizes M and XXL decrease 5-2 double crochets evenly along the row and in size L increase 5 double crochets evenly = 70-70-85-85-93-100 double crochets. Turn and work from row 2 in the diagrams from the right side as follows: Work A.2a 1-1-1-1-0-1 time, work A.5a 0-0-0-0-1-0 times, work A.2b 4-4-5-5-5-6 times, work A.5b. When the diagrams have been completed in height, the piece measurers approx. 70-72-75-79-83-85 cm / 27½"-28½"-29½"-31"-32¾"-33½" from the shoulder. Cut and fasten the strand. BAND: Work the band on the right front piece as follows: Start mid front from the wrong side, i.e. from the neck and fasten the strand with 1 single crochet. Work * 4 chain stitches, skip approx. 2½ cm / ⅞", work 1 single crochet around the edge *, repeat from *-* along the whole edge, turn and work the last row in the diagrams from the right side as follows: Work A.4a, work A.4b until there is 1 single crochet left, work A.4a. Turn the piece and work rows 2 - 4. Cut and fasten the strand. LEFT FRONT PIECE: Work the left front piece in the same way as the right front piece but in reverse. In other words, the shoulder is worked in the same way as the right shoulder on the back piece. The side is worked in the same way as the right side on the back piece. When you work down the body, work the first row of chain-spaces from the right side as for the right front piece, but in reverse. When the last row in A.4a, A.4b and A.4c has been completed work as follows from the right side: Work A.5a, work A.2b 4-4-5-5-5-6 times, A.5b 0-0-0-0-1-0 times, A.2a 1-1-1-1-0-1 time. Adjust to match the right front piece. ASSEMBLY: Sew the shoulder seams together in the outermost loop of the outermost stitch so that the seam is not thick. Lay the side of the one front piece against the side of the back piece and work the sides together from the right side as follows: Start with 1 single crochet in the first double crochet towards the armhole, work 3 chain stitches, work 1 single crochet in the double crochet on the opposite side, * work 3 chain stitches, skip approx. 1 cm / ⅜", work 1 single crochet in the double crochet/around the chain-space on the other side *, repeat from *-* down along the whole side. Cut and fasten the strand. Work the other side together in the same way. Sew the buttons on to the left band through the last row of double crochets worked on the band. Sew the first button on approx. 3 cm / 1" from the neck, then sew the 2 other buttons on with approx. 7 cm / 2¾" between them. Fasten the buttons by pushing them through the chain-spaces on the right band. SLEEVE EDGE: Work 1 single crochet mid under the armhole, * 3 chain stitches, skip approx. 1 cm / ⅜", 1 single crochet *, repeat from *-* around the whole armhole, but finish with 1 slip stitch in the first single crochet. Cut and fasten the strand. Work around the other sleeve in the same way. NECKLINE: Start mid front on the band on the right front piece and work as follows: ROW 1 (= right side): Work 1 single crochet, * work 3 chain stitches, skip approx. 1 cm / ⅜", 1 single crochet *, repeat from *-* around the whole neck. The number of chain-spaces should be an odd number. ROW 2 (= wrong side): Work 3 chain stitches, 1 single crochet in the first chain-space, * 3 chain stitches, skip 1 chain-space, 1 single crochet around the next chain-space *, repeat from *-* to the last chain-space, work 3 chain stitches and finish with 1 single crochet in the first stitch at the beginning of the previous round. Cut and fasten the strand. |
||||||||||||||||||||||||||||||||||||||||
Diagram explanations |
||||||||||||||||||||||||||||||||||||||||
|
||||||||||||||||||||||||||||||||||||||||
 |
||||||||||||||||||||||||||||||||||||||||
 |
||||||||||||||||||||||||||||||||||||||||
 |
||||||||||||||||||||||||||||||||||||||||
 |
||||||||||||||||||||||||||||||||||||||||
 |
||||||||||||||||||||||||||||||||||||||||
Have you finished this pattern?Tag your pictures with #dropspattern #foreverlacevest or submit them to the #dropsfan gallery. Do you need help with this pattern?You'll find 11 tutorial videos, a Comments/Questions area and more by visiting the pattern on garnstudio.com. © 1982-2026 DROPS Design A/S. We reserve all rights. This document, including all its sub-sections, has copyrights. Read more about what you can do with our patterns at the bottom of each pattern on our site. |
||||||||||||||||||||||||||||||||||||||||


With over 40 years in knitting and crochet design, DROPS Design offers one of the most extensive collections of free patterns on the internet - translated to 17 languages. As of today we count 324 catalogs and 12290 patterns - 12280 of which are translated into English (US/in).
We work hard to bring you the best knitting and crochet have to offer, inspiration and advice as well as great quality yarns at incredible prices! Would you like to use our patterns for other than personal use? You can read what you are allowed to do in the Copyright text at the bottom of all our patterns. Happy crafting!
Post a comment to pattern DROPS 178-29
We would love to hear what you have to say about this pattern!
If you want to leave a question, please make sure you select the correct category in the form below, to speed up the answering process. Required fields are marked *.