
Popular categories
Looking for a yarn?


Comments / Questions (47)
![]() Pakki wrote:
Pakki wrote:
Estoy hecha un lío con el diagrama a-4 y a-5 . Sobre todo el a-4(primer punto) Hay algún video? O podría decirme si son 3 cadenetas y un punto raso? Muchas gracias
18.05.2019 - 00:06DROPS Design answered:
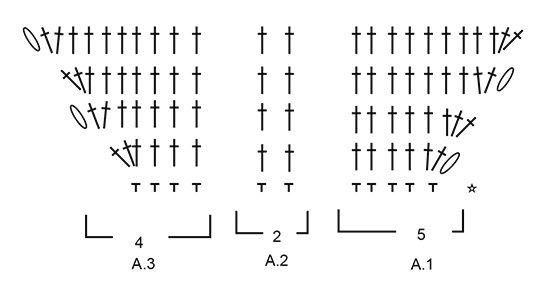
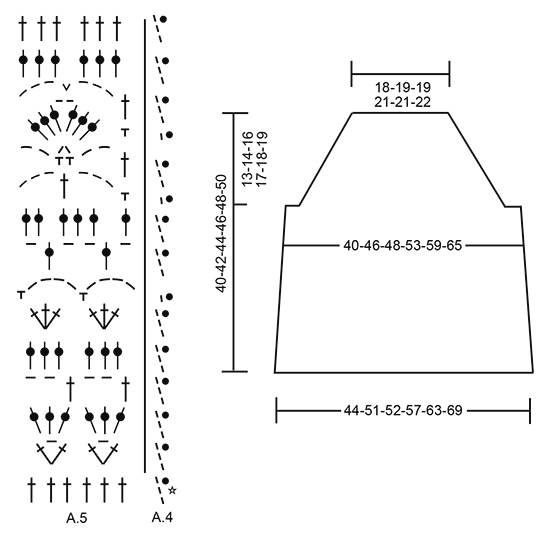
Hola Pakki, El diagrama A.4 muestra cómo comienza (con 3 puntos de cadeneta) y finaliza (con 1 punto enano en el tercer punto de cadeneta del inicio de la vuelta) la vuelta cuando trabajamos el cuerpo.
18.05.2019 - 20:07
![]() Terese wrote:
Terese wrote:
Er det mulig å gjøre denne oppskriften mindre? Hvor mange lm skal jeg hekle om toppen feks skal være en xs?
16.04.2019 - 02:37DROPS Design answered:
Hei Terese. Denne oppskriften finnes dessverre ikke i XS. Det er selvfølgelig ikke noe i veien for at du lager den mindre selv, men vi har ikke mulighet til å regne den om for deg. Du kan ta utgangspunkt i de målene du ønsker, og gange med heklefastheten (gang med 1,8) så får du antall masker du trenger i bredden (det kan være lurt å justere dette så det går opp i hele rapporter av mønsteret). Når du hekler luftmaskene på starten hekles det1 luftmaske mer ca hver 4 maske (altså 5 luftmasker blir til 4 fastmasker neste omgang). God fornøyelse
23.04.2019 - 11:16
![]() Laura wrote:
Laura wrote:
Liebes Drops-Team, die Anleitung ist toll, aber ich hänge beim Rumpfteil mit den Zunahmen. Ich nehme an beiden Markierungen jeweils 4cm vorher und nachher einmal zu. Und dann? Alle 3cm über die ganze Breite? Was bedeutet insgesamt 4 mal? 4 Runden lang so zunehmen oder 4 mal alle 3 cm? Ich freue mich über eine Antwort Liebe Grüße
02.08.2018 - 08:31DROPS Design answered:
Liebe Laura, nach 4 cm nehmen Sie 4 Maschen zu (= 1 M auf beiden Seite der Markierungen), dann *3-4 cm (siehe Größe) häkeln, bei der nächsten Runde noch mal 4 Maschen wie zuvor zunehmen (= 1 M auf beiden Seiten der Markierungen)*, und von *-* noch 2 Mal häkeln = Sie haben jetzt 4 Mal 4 Maschen zugenommen. Viel Spaß beim häkeln!
02.08.2018 - 09:31
![]() Audrey wrote:
Audrey wrote:
Bonsoir J aimerai me lancer mais j'ai déjà du mal au début..... Il faut 42ml ca c pour mon S Après je fait 7 fois Sauter une maille et 4 ms? Merci
25.06.2018 - 17:24DROPS Design answered:
Bonjour Audrey, en taille S montez 42 ml, puis crochetez ainsi: 1 ml dans la 2ème ml à partir du crochet, (sautez 1 ml, 1 ms dans chacune des 4 ml suivantes), répétez de (à) encore 7 fois (= 8 fois au total) = vous avez 33 ms à la f in du 1er rang. Bon crochet!
26.06.2018 - 08:53
![]() Sheily wrote:
Sheily wrote:
When piece measures 4 cm / 1½, increase 1 double crochet on each side of each marker thread - READ INCREASE TIP. Increase every 3-3-3-3-4-4 cm / 1-1-1-1½1½ 4 times in total = 160-182-188-206-228-250 double crochets. Piece now measures 14-15-15-16-17-18 cm / 5½-6-6-6 1/4-6 3/4-7 work 1 round while increasing 3-5-5-5-1-3 double crochets evenly = 163- I dont understand this part. How many stitches am i increasing into on each side of the marker? How many rows Am I increasing?
13.06.2018 - 23:29DROPS Design answered:
Dear Sheily, there are 2 markers (= 1 marker on each side) and you increase 1 st on each side of both markers = you will increase a total of 4 sts per increase row x 4 times in total every 3rd-4 cm/1-1½" (see size) = a total of 16 sts will be increased when all increases have been done. Happy crocheting!
14.06.2018 - 08:38
![]() Sheily wrote:
Sheily wrote:
When piece measures 4 cm / 1½, increase 1 double crochet on each side of each marker thread - READ INCREASE TIP. Increase every 3-3-3-3-4-4 cm / 1-1-1-1½1½ 4 times in total = 160-182-188-206-228-250 double crochets. Piece now measures 14-15-15-16-17-18 cm / 5½-6-6-6 1/4-6 3/4-7 work 1 round while increasing 3-5-5-5-1-3 double crochets evenly = 163- I dont understand this part. How many stitches am i increasing into on each side of the marker? How many rows Am I increasing?
13.06.2018 - 23:27
![]() Sheily wrote:
Sheily wrote:
Hi, Im working on the body of the top. In the instructions where it states to increase. How many stitches am i increasing into on the opposite side of the marks? Thank you.
13.06.2018 - 06:25DROPS Design answered:
Dear Shelly, diagrams A.1 and A.3 are showing how to increase at the beg of row from RS (= in A.1) and end of row from RS (= in A.3) and how to increase at the beg of row from WS (= in A.3) and at the end of row from WS (= in A.1) , when the diagrams have been worked 1 time in height, continue increasing from RS and from WS as shown in diagram until you have worked the number of rows for your size. Happy crocheting!
13.06.2018 - 08:21
![]() Sheily wrote:
Sheily wrote:
Hi, Im working on the body of the top. In the instructions where it states to increase. How many stitches am i increasing into on the opposite side of the marks? Thank you.
13.06.2018 - 06:22
![]() Sheily wrote:
Sheily wrote:
Hi. I just started crocheting this top, and I'm confused with the instructions. In the crochet info it states that in rows A.1 and A.3 the 5 chs does not replace the first dc. Am I suppose to dc in the top of the 3rd ch of the 5ch. or dc into the ch 5-sp. Then continue with 3 dc increases for every row?
30.05.2018 - 21:09DROPS Design answered:
Dear Sheily, these 5 ch in A.1 and A.3 do not replace the first tr, so that at the end of row, work 2/3 dc in the last dc and not in the 5 chains - see also diagram. Happy crocheting!
31.05.2018 - 08:08
![]() Maria wrote:
Maria wrote:
Hola.he usado el mismo hilo y el mismo ganchillo.Intento hacer una talla s y he tenido que deshacernos porque con las explicaciones sale muy grande.¿Me podéis ayudar? No se que hacer..
14.05.2018 - 00:27DROPS Design answered:
Hola Maria. El tamaño del ganchillo en todos los patrones es solo recomendable. Lo importante es hacer una muestra con el hilo que vas a trabajar y el ganchillo y comprobar que tu tensión coincide con la recomendada en el patrón, en este caso: 18 puntos altos x 9 filas = 10 cm de ancho y 10 cm en vertical. Si tu muestra mide igual puedes empezar a trabajar pero siempre manteniendo la misma tensión del tejido. Si la muestra no tiene las medidas recomendadas tienes cambiar el ganchillo a un tamaño más pequeño ( si la muestra es demasiado grande) o más grande ( si la muestra es muy pequeña).
20.05.2018 - 19:29
|
|||||||||||||||||||||||||
Hawaiian Breeze#hawaiianbreezetop |
|||||||||||||||||||||||||
|
|
|||||||||||||||||||||||||
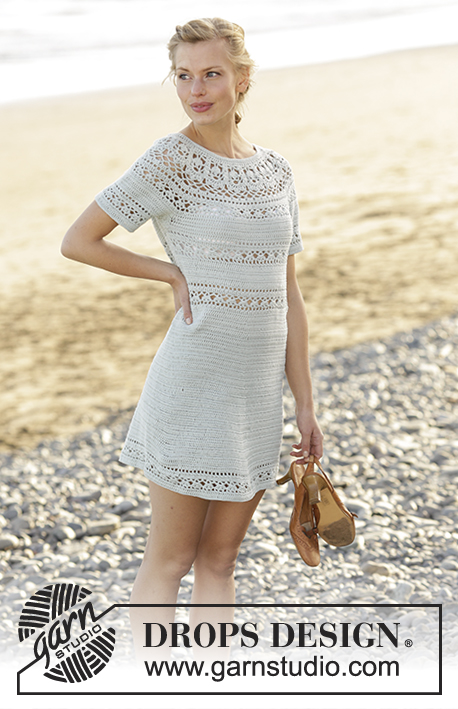
Crochet top with lace pattern and fringes in DROPS Muskat. Size: S - XXXL
DROPS 175-27 |
|||||||||||||||||||||||||
|
CROCHET INFO: At beginning of every row with double crochets in A.1 and A.3 work 5 chain stitches to turn with. These 5 chain stitches do not replace first double crochet. When working in the round, replace the first double crochet with 3 chain stitches, finish round with 1 slip stitch in 3rd chain stitch at beginning of round. PATTERN: See diagrams A.1 to A.5. INCREASE TIP: Increase by working 2 double crochets in 1 double crochet. ---------------------------------------------------------- TOP: Top is worked top down. First work front piece and back piece back and forth separately, then work in the round over both parts. FRONT PIECE: Work 42-44-44-47-47-49 loose chain stitches on hook size 4 mm / G/6 with Muskat. Turn and work as follows: Work 1 single crochet in second chain stitch from hook (= 1 single crochet + 1 chain stitch to turn with), work 1 single crochet in each of the next 0-2-2-0-0-2 chain stitches, * skip 1 chain stitch, work 1 single crochet in each of the next 4 chain stitches *, repeat from *-* 7-7-7-8-8-8 more times = 33-35-35-37-37-39 single crochets. Turn and work pattern as follows: Begin on 2nd row. Work A.1 over the first 5 single crochet, A.2 over the next 24-26-26-28-28-30 single crochets, A.3 over the remaining 4 single crochet - READ CROCHET INFO. REMEMBER THE CROCHET GAUGE! When diagram A.1 to A.3 have been done vertically, continue with double crochets and increases the same way until 11-12-13-14-15-16 rows with increases have been worked in total (increase 3 double crochets on every row). There are now 66-71-74-79-82-87 double crochets on row. Put piece aside. BACK PIECE: Work the same way as on front piece. BODY: Now work the two parts together as follows: Turn and work 1 double crochet in each of the 66-71-74-79-82-87 double crochets from back piece, work 6-12-12-16-24-30 chain stitches, work 1 double crochet in each of the 66-71-74-79-82-87 double crochets from front piece, work 6-12-12-16-24-30 chain stitches and finish with 1 slip stitch in 3rd chain stitch at beginning of round. Then work piece in the round, continue with 1 double crochet in every double crochet/chain stitch = 144-166-172-190-212-234 double crochets. When working in the round, turn after every round to work alternately from right side and wrong side. This is so that the texture is the same on the entire top. Insert 1 marker thread in each side, in the middle of the 6-12-12-16-24-30 chain stitches. NOW MEASURE THE PIECE FROM HERE. When piece measures 4 cm / 1½", increase 1 double crochet on each side of each marker thread - READ INCREASE TIP. Increase every 3-3-3-3-4-4 cm / 1"-1"-1"-1"-1½"-1½" 4 times in total = 160-182-188-206-228-250 double crochets. Piece now measures 14-15-15-16-17-18 cm / 5½"-6"-6"-6¼"-6¾-7" work 1 round while increasing 3-5-5-5-1-3 double crochets evenly = 163-187-193-211-229-253 double crochets, then work as follows: Work A.4 over the first double crochet on round, then repeat A.5 over the remaining double crochets. A.4 shows beginning and end of round. Do not turn, work all rounds from right side. Fasten off when A.4 and A.5 have been worked 1 time vertically. Piece measures approx. 40-42-44-46-48-50 cm / 15¾"-16½"-17¼"-18"-19"-19¾" in total. TIE: Work 2 loose ties as follows: Work chain stitches with Muskat on hook size 4 mm / G/6 until the tie measures 100 cm / 39½", turn and work 1 slip stitch in every chain stitch but make sure that the slipped stitches are not worked tighter than chain stitches. Fasten off. Work another tie the same way. Baste tie through one side on front piece, between second and third double crochet from edge in the first row with double crochets. Baste tie through one side on back piece the same way and tie a knot on shoulder. Repeat on the other side of top. FRINGES: Cut 4 lengths of yarn of 20 cm / 8". Place them double, thread loop from right side between 2 double crochets at the bottom of body. Then pull yarn ends through loops and tighten. Fasten fringes approx. 2 cm / ¾" apart at the bottom of top. |
|||||||||||||||||||||||||
Diagram explanations |
|||||||||||||||||||||||||
|
|||||||||||||||||||||||||
 |
|||||||||||||||||||||||||
 |
|||||||||||||||||||||||||
Have you finished this pattern?Tag your pictures with #dropspattern #hawaiianbreezetop or submit them to the #dropsfan gallery. Do you need help with this pattern?You'll find 9 tutorial videos, a Comments/Questions area and more by visiting the pattern on garnstudio.com. © 1982-2026 DROPS Design A/S. We reserve all rights. This document, including all its sub-sections, has copyrights. Read more about what you can do with our patterns at the bottom of each pattern on our site. |
|||||||||||||||||||||||||


With over 40 years in knitting and crochet design, DROPS Design offers one of the most extensive collections of free patterns on the internet - translated to 17 languages. As of today we count 325 catalogs and 12298 patterns - 12288 of which are translated into English (US/in).
We work hard to bring you the best knitting and crochet have to offer, inspiration and advice as well as great quality yarns at incredible prices! Would you like to use our patterns for other than personal use? You can read what you are allowed to do in the Copyright text at the bottom of all our patterns. Happy crafting!
Post a comment to pattern DROPS 175-27
We would love to hear what you have to say about this pattern!
If you want to leave a question, please make sure you select the correct category in the form below, to speed up the answering process. Required fields are marked *.