
Popular categories
Looking for a yarn?


Comments / Questions (24)
![]() Knitmaur wrote:
Knitmaur wrote:
Pattern works , trust it...I have a lovely Dragon Heart Shawl
20.02.2019 - 21:50
![]() Monique Deraeve wrote:
Monique Deraeve wrote:
Echt mooi maar kan je hem op 2 nld breien
30.01.2019 - 15:06
![]() Rosemarie Jarz wrote:
Rosemarie Jarz wrote:
Also meiner Meinung nach, passen Beschreibung und Zeichnung am Anfang überhaupt nicht überein. Ich stricke aber schon etliche Jahre
13.08.2018 - 12:06DROPS Design answered:
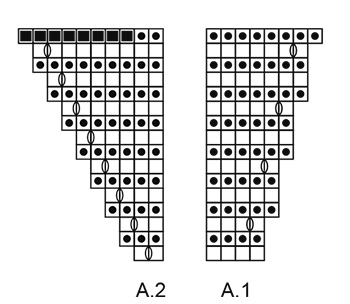
Liebe Frau Jarz, Anleitung stimmt: Sie stricken zuerst A.1 über die ersten 4 Maschen, dann haben Sie 1 Markierer, und A.2 stricken Sie über die 2 letzten Maschen. Markierer immer so lassen, nach A.1/A.2 1x in der Höhe gestrickt werden, stricken Sie A.1 über die 4 ersten Maschen, wie zuvor bis Markierer und A.2 über die letzten 2 Maschen. Immer so wiederholen, zwischen A.1 und dem Markierer gibt es immer wieder mehr Maschen. Viel Spaß beim stricken!
13.08.2018 - 12:54Cathy Morrison wrote:
I don\'t understand this patten. It should be very simple. I can\'t see how the zig zag effect is achieved on the edge of the scarf when only one or two stitch increase on each row. Can you please elaborate. I have already had to abandon one project from your site Lights Embrace as it turned out way too big even though my tension was fine.
13.06.2018 - 15:09DROPS Design answered:
Dear Mrs Morrison, work from RS: A.1 over the first 4 sts, then work A.2 over the last 2 sts. When diagrams have been worked 1 time in height, repeat them in height the same way: A.1 over the first 4 sts and A.2 over the last 2 sts - until you have repeated the diagrams a total of 34 times in height = 146 sts and 35 tips on the left side of shawl (A.2). For any further individual assistance, you are welcome to contact the store where you bought the yarn, even per mail or telephone. Happy knitting!
13.06.2018 - 16:31
![]() Francine Marcil wrote:
Francine Marcil wrote:
Je ne comprends pas le diagramme A1. Les lignes suivant celles qui contiennent des jetés ne sont pas augmentées d' une maille contrairement à A2. Les jetés sont -elles à la bonne place ou quelque chose m'édhappe? Merci à l'avance.
08.06.2017 - 04:06DROPS Design answered:
Bonjour Mme Marcil, les augmentations sont au bon endroit, mais il manque effectivement la case pour la maille supplémentaire aux rangs suivants. Le diagramme va être corrigé, merci. Bon tricot!
08.06.2017 - 09:40
![]() Paola wrote:
Paola wrote:
Perfetto!!così mi ha tolto i miei dubbi.... Grazie ancora x la vostra pazienza Buon weekend
06.05.2017 - 11:08
![]() Paola wrote:
Paola wrote:
Cioè quello che non capisco è questo: nel 2 diagramma schema A2 ho effettivamente due maglie, schema A1 ne ho 8. Lavoro A4 su 4 m e le altre 4 prima del segnapunti a maglia rasata normalmente? Scusate mi rimane a volte difficile spiegarmi e magari mi faccio problemi inutili. Se è così allora ho capito e vi chiedo ancora scusa x il vostro tempo..
06.05.2017 - 09:46DROPS Design answered:
Buongiorno Paola. Ogni volta che inizia di nuovo i diagrammi, lavora A1 sulle prime 4 maglie, lavora le m successive a diritto e lavora il diagramma A2 sulle ultime 2 maglie. Buon lavoro!
06.05.2017 - 10:38
![]() Paola wrote:
Paola wrote:
Scusate lo stress.....Finito primo diagramma ed effettivamente ho lo stesso numero di maglie sul ferro. Probabilmente era solo una dimenticanza sullo schema o io non ho capito. Tutto posto fin qui. Ultimo ferro capisco che devo intrecciare le maglie quindi poi fisso figlio taglio e ricomincio ma prima del segnapunti ho due m su A1 non riesco ad andare avanti....posso avere aiuto x 2 diagramma?
06.05.2017 - 09:13DROPS Design answered:
Buongiorno Paola. Nel diagramma A1 la m aumentata p.es al ferro 3 è stata per sbaglio indicata nel ferro 6 e non nel 4. Sull'ultima riga dei diagrammi intreccia le maglie sul rovescio del lavoro. Non deve tagliare il filo ma riprende i diagrammi al ferro successivo sul diritto. Lavora A1 sulle prime 4 maglie, A2 sulle ultime 2 maglie e le altre maglie a diritto. Buon lavoro!
06.05.2017 - 10:46
![]() PaOla wrote:
PaOla wrote:
Grazie!! Sempre molto gentili!! Rimango allora in attesa. Buon weekend
06.05.2017 - 07:21
![]() PaOla wrote:
PaOla wrote:
Scusate nella terza riga del diagramma A1 e À2 ci sono in tutto due gettati che porterebbero il numero delle maglie a 9. Come mai nella quarta riga da fare a rovescio le maglie sono 8? Stessa cosa succede 7 e 8 riga e 11 e 12 Grazie mille
05.05.2017 - 19:55DROPS Design answered:
Buonasera Paola, chiederemo una verifica al settore design. Buon lavoro!
05.05.2017 - 23:20
|
|||||||||||||
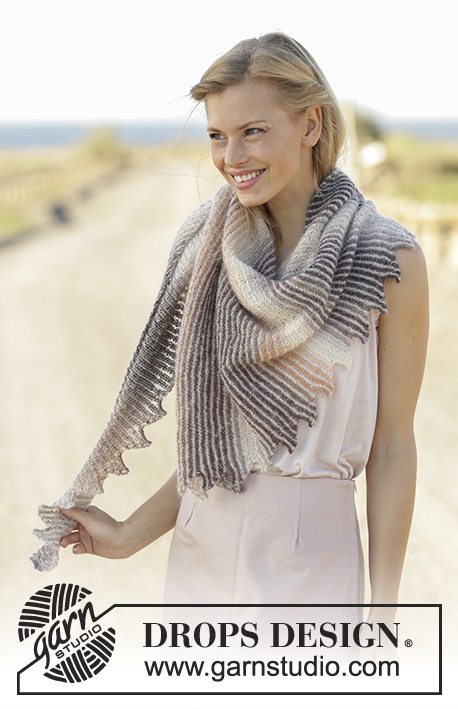
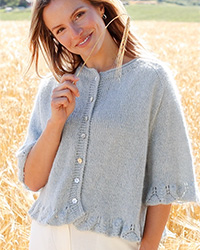
Dragon Heart#dragonheartshawl |
|||||||||||||
 |
 |
||||||||||||
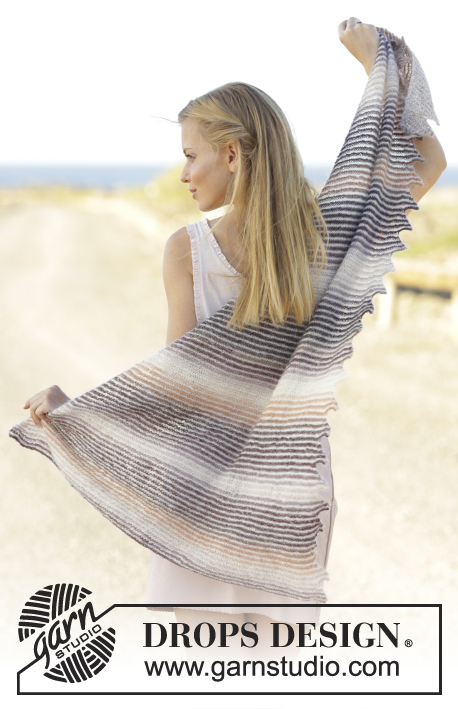
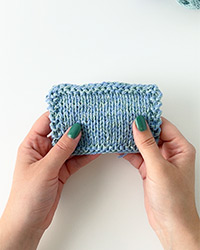
Knitted shawl with stripes and tips in DROPS Delight and Kid-Silk.
DROPS 176-28 |
|||||||||||||
|
GARTER STITCH (back and forth): 1 ridge = knit 2 rows. PATTERN: See diagrams A.1 and A.2. Diagrams show all rows in pattern seen from the right side. STRIPES: * Knit 2 rows with Kid-Silk, knit 2 rows with Delight *, repeat from *-* until finished measurements. ---------------------------------------------------------- SHAWL: Work piece back and forth on circular needle. The entire shawl is worked in GARTER STITCH - see explanation above. Cast on 4 stitches on circular needle size 4 mm / US 6 with Delight. ROW 1 (= wrong side): Knit all stitches. ROW 2 (= right side): Knit 1, 1 yarn over, knit 2, insert 1 marker thread before next stitch and move it upwards when working, 1 yarn over, knit 1 = 6 stitches. ROW 3 (= wrong side): Knit all stitches, knit yarn overs from previous row twisted to avoid holes. Then work according to diagram while working STRIPES - see explanation above. Switch to Kid-Silk and begin from right side as follows: Work A.1 over 4 stitches (marker thread is after the last of these 4 stitches), work A.2 over 2 stitches. Continue to work according to diagram A.1 and A.2 and REMEMBER STRIPES. When diagrams have been worked 1 time vertically, 4 stitches have been increased in right hand side of piece = 10 stitches on needle. REMEMBER THE KNITTING GAUGE Continue to work according to diagrams A.1 and A.2 as follows: Work A.1 over 4 stitches, work until marker thread, work A.2 over 2 stitches. Continue to work diagrams like this, every time diagrams have been worked 1 time vertically, 4 stitches have been increased between marker thread and A.1. Work until diagrams has been worked 34 times in total vertically. Then work diagrams one last time vertically and on last row from wrong side bind off all the 146 stitches. There are 35 tips in left side, piece measures approx. 73 cm / 28¾" along bind-off and approx. 140 cm / 55" measured along marker thread. Fasten off. |
|||||||||||||
Diagram explanations |
|||||||||||||
|
|||||||||||||
 |
|||||||||||||
Have you finished this pattern?Tag your pictures with #dropspattern #dragonheartshawl or submit them to the #dropsfan gallery. Do you need help with this pattern?You'll find 11 tutorial videos, a Comments/Questions area and more by visiting the pattern on garnstudio.com. © 1982-2026 DROPS Design A/S. We reserve all rights. This document, including all its sub-sections, has copyrights. Read more about what you can do with our patterns at the bottom of each pattern on our site. |
|||||||||||||

With over 40 years in knitting and crochet design, DROPS Design offers one of the most extensive collections of free patterns on the internet - translated to 17 languages. As of today we count 324 catalogs and 12166 patterns - 12155 of which are translated into English (US/in).
We work hard to bring you the best knitting and crochet have to offer, inspiration and advice as well as great quality yarns at incredible prices! Would you like to use our patterns for other than personal use? You can read what you are allowed to do in the Copyright text at the bottom of all our patterns. Happy crafting!
Post a comment to pattern DROPS 176-28
We would love to hear what you have to say about this pattern!
If you want to leave a question, please make sure you select the correct category in the form below, to speed up the answering process. Required fields are marked *.