
Popular categories
Looking for a yarn?


Comments / Questions (17)
![]() Cathie Castaneda wrote:
Cathie Castaneda wrote:
I just sent you a question about the yarn list. I answered my own question by reading how to do the stripes. Thank you!
05.10.2024 - 10:40
![]() Cathie Castaneda wrote:
Cathie Castaneda wrote:
The picture appears to show 6 color.s. The yarn list shows 5 colors. Is there list missing a color on the list?
05.10.2024 - 10:34
![]() Patty Walk wrote:
Patty Walk wrote:
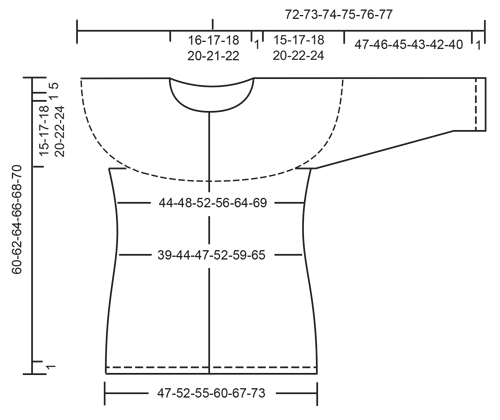
What are the bust measurements for each size of this sweater pattern?
16.04.2024 - 20:38DROPS Design answered:
Dear Patty, you can find all the relevant measurments of the sweater on the schematic drawing at the bottom of the pattern. The measurements are given in cm's. We suggest, you take a similar sweater that fits the intented wearer and compare. Happy Crafting!
16.04.2024 - 21:31
![]() Kathy Rogers wrote:
Kathy Rogers wrote:
I have followed the directions exactly a written and the yoke increases do no work out. Having the three sections at the back and increasing as directed makes the back huge! and much larger than the front.
06.03.2021 - 16:52DROPS Design answered:
Dear Mrs Rogers, we are sorry to hear you are having some worries, do you want us to help you? Please let us know which size you are working on so that we can help you to understand how to work and increase for the yoke. Happy knitting!
08.03.2021 - 09:55
![]() Donica wrote:
Donica wrote:
I previously posted as a comment. My question is: can this pattern be knit with a single strand of alpaka yarn to create a lighter weight sweater? My understanding is that this sweater is heavy and made to be worn outdoors.
30.08.2018 - 06:02DROPS Design answered:
Hi Donica, If you wish to use a lighter garn you will have to work out the knitting tension and then adjust the number of rows and stitches on a row so that the piece has the right measurements. It takes some work, but can be done! Happy knitting!
30.08.2018 - 08:18
![]() Donica wrote:
Donica wrote:
I am told that alpak a yarn knit with double strands will make a very warm sweater. I have the yarn in this array of gray but wish the sweater to be a lighter weight to be worn indoors as part of an outfit. I love the pattern. Can I knit this sweater with a single strand of each color? How would I convert?
30.08.2018 - 05:48DROPS Design answered:
Dear Donica, we use here 2 strands to get smoother stripes. You can use instead of 2 strands yarn group A 1 strand yarn group C - read more about alternatives here. Happy knitting!
06.09.2018 - 09:56
![]() A HERVE wrote:
A HERVE wrote:
Bonjour, Pour les augmentations 2 (empiècement), faut-il augmenter 1 maille sur les rangs endroits uniquement ou 1m sur l'endroit et 1m sur l'envers? Merci
23.07.2018 - 13:36DROPS Design answered:
Bonjour Mme Herve, on augmente pour l'empiècement d'abord tous les rangs (et non tours, correction faite), puis tous les 2 rangs, quand on augmente tous les rangs, on va augmenter alternativement sur l'endroit et sur l'envers, quand on augmente tous les 2 rangs, on augmente seulement sur les rangs sur l'endroit. Bon tricot!
23.07.2018 - 14:40
![]() A HERVE wrote:
A HERVE wrote:
Lorsque vous parlez de TOURS pour les augmentations , page 5,est_ce qu' un tour signifie un aller_retour,c'est à dire 2 rangs?1 jeté sur l'endroit tricoté en maille torse sur l'envers? Merci pour votre réponse
16.04.2018 - 10:33DROPS Design answered:
Bonjour Mme Hervé, l'empiècement se tricote en allers et retours, quand on augmente, on va tricoter en rangs et non en tours (seules les manches se tricotent en rond ensuite). La correction sera bientôt faite, merci. Bon tricot!
16.04.2018 - 12:18
![]() A HERVE wrote:
A HERVE wrote:
Lorsque pour les augmentations p5 vous parlrez de TOURS , est-ce que un tour =un aller retour? Jeté à l'endroit et maille torse tricotée sur l'envers Merci
16.04.2018 - 10:28
![]() Iwona wrote:
Iwona wrote:
Dziękuję!
30.08.2017 - 16:55
|
|
Shades of Grey Cardigan |
|
|
|
|
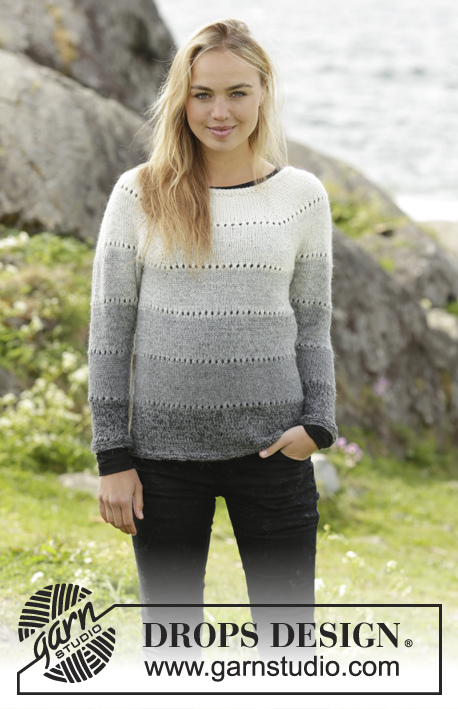
Knitted jacket in 2 strands DROPS Alpaca with round yoke, stripes and lace pattern, worked top down. Size: S - XXXL.
DROPS Extra 0-1325 |
|
|
GARTER ST (worked in the round): 1 ridge = 2 rounds. * K 1 round and P 1 round *, repeat from *-*. GARTER ST (back and forth): K all rows. 1 ridge = K2 rows. ELEVATION AT THE BACK: NOTE: On every turn in the middle of piece slip 1st st, tighten yarn and continue to work. Work an elevation in stockinette st at the back of neck as follows, beg from WS: K 4 (= band), P over the next 52-54-58-60-62-69 sts, insert a marker here (= mid back), continue over the next 8-9-10-11-11-12 sts, turn, tighten yarn and work 16-18-20-22-22-24 sts, turn, tighten yarn and work 29-31-33-35-35-37 sts, turn, tighten yarn and work 42-44-46-48-48-50 sts, turn, tighten yarn and work 50-52-54-56-56-58 sts, turn, tighten yarn and work 58-60-62-64-64-66 sts. Turn and P until 4 sts remain on needle, K 4. STRIPES: Work all stripes with 2 strands Alpaca. When approx. 1 cm / ⅜" in 1st-5th stripe remain, work a EYELET ROW - see explanation below. Stripe 1: 9-9-9-10-10-10 cm / 3½"-3½"-3½"-4"-4"-4" with 2 strands off white. Stripe 2: 9-9-10-10-10-11 cm / 3½"-3½"-4"-4"-4"-4½" with 1 strand off white + 1 strand light pearl gray. Stripe 3: 9-9-10-10-10-11 cm / 3½"-3½"-4"-4"-4"-4½" with 1 strand light pearl gray + 1 strand light gray. Stripe 4: 9-10-10-10-11-11 cm / 3½"-4"-4"-4"-4½"-4½" with 1 strand light gray + 1 strand medium gray. Stripe 5: 9-10-10-10-11-11 cm / 3½"-4"-4"-4"-4½"-4½" with 2 strands medium gray. Stripe 6: 1 strand medium gray + 1 strand dark gray until finished measurements. EYELET ROW: When approx. 1 cm / ⅜" remains on stripe 1-5, work an eyelet row as follows, beg from RS: Work 4 band sts in garter st, * K 2 tog, 1 YO *, repeat from *-* until 4 sts remain, 4 band sts in garter st. NOTE: If 1 st remains on row before the last 4 band sts this round, K this st. On next row P the YOs to make holes. NOTE: When working eyelet row on sleeves, work in the round. K the YOs on next round to make holes. INCREASE TIP-1 (evenly spaced): To calculate how to inc evenly, use the total no of sts on row (e.g. 96 sts), minus bands (e.g. 8 sts) and divide the remaining sts by no of inc to be done (e.g. 16) = 5.5. I.e. in this example inc 1 st after 5th and 6th st alternately and do not inc over bands. INCREASE TIP-2 (yoke) Inc as follows from RS: Inc 1 st by making a YO. On next row P YOs twisted to avoid holes. Inc as follows from WS: Inc 1 st by making a YO. On next row K YOs twisted to avoid holes. Inc alternately on right and left side of each marker seen from RS. I.e. first time inc on the right side of all markers and second time inc on the left side of all markers, etc. INCREASE TIP-3 (body): All inc are done from RS. Work until 2 st remains before marker, 1 YO, K 4 (marker is between these sts), 1 YO. On next row P YO twisted to avoid holes. DECREASE TIP: All dec are done from RS! Work until 4 sts remain before marker, K 2 tog, K 4 (marker is in the middle of these sts), slip 1 st as if to K, K 1, psso. NOTE: Adjust dec to avoid it on a round with eyelet row. BIND-OFF TIP: To avoid a tight bind-off edge you may use a needle ½ size larger. BUTTONHOLES: Dec for buttonhole on right band (when garment is worn). Dec from RS when 3 sts remain on row as follows: Make 1 YO, K the next 2 sts tog, K last st. On next round K the YO to make a hole. Dec for 1st buttonhole when piece measures 2 cm / ¾" (measured along band). Then dec the next 5 buttonholes on the same row while working eyelet row. Dec for 7th buttonhole (= last buttonhole) when piece measures 57-59-61-63-65-67 cm / 22½"-23¼"-24"-24¾"-25½"-26⅜". ---------------------------------------------------------- JACKET: Worked top down, back and forth on circular needle. Worked in the round on double pointed needles. YOKE: Cast on 96-100-103-107-111-117 sts (includes 4 band sts in each side towards mid front) with 2 strand off white on circular needle size 4.5 mm / US 7. Work 2 ridges in GARTER ST - see explanation above. K 1 row from RS while inc 16-16-21-21-21-23 sts evenly - READ INCREASE TIP-1 (evenly), do not inc over bands = 112-116-124-128-132-140 sts. Switch to circular needle size 5 mm / US 8. For better shape work an ELEVATION AT THE BACK, see explanation above, in stockinette st. REMEMBER THE KNITTING GAUGE Now work in stockinette st with 4 band sts in garter st in each side and insert 6 markers as follows: Work 13-13-14-14-15-15 sts, insert a marker, work 17-18-19-20-20-22 sts, insert a marker, work 17-18-19-20-20-22 sts, insert a marker, work 18-18-20-20-22-22 sts, insert a marker, work 17-18-19-20-20-22 sts, insert a marker work 17-18-19-20-20-22 sts, insert a marker, work the remaining 13-13-14-14-15-15 sts. REMEMBER BUTTONHOLES! Continue back and forth with STRIPES and EYELET ROW - see explanation above. On next row from RS, inc 1 st at every marker – Read INCREASE TIP-2 (yoke). Inc like this every round 13-17-19-20-21-21 times, then every other round 8-8-8-10-12-14 times (= 21-25-27-30-33-35 times in total) = 238-266-286-308-330-350 sts. Work 1 row from RS while AT THE SAME TIME inc 2-4-2-2-4-2 sts evenly = 240-270-288-310-334-352 sts. Now work next row from WS as follows: Work the first 38-42-44-48-53-57 sts (= left front piece), slip the next 48-55-60-63-65-66 sts on a stitch holder (= sleeve), cast on 6-6-8-8-10-12 sts under sleeve, work the next 68-76-80-88-98-106 sts (= back piece), slip the next 48-55-60-63-65-66 sts on a stitch holder (= sleeve), cast on 6-6-8-8-10-12 sts under sleeve, work the remaining 38-42-44-48-53-57 sts (= right front piece). BODY: There are now 156-172-184-200-224-244 sts for body. Insert a marker in the middle of the new 6-6-8-8-10-12 sts cast on under each sleeve (= 3-3-4-4-5-6 new sts on each side). NOW MEASURE THE PIECE FROM HERE. Continue back and forth with 4 band sts in each side towards mid front, stripes, stocking st and eyelet row as before. When piece measures 4 cm / 1½", dec 1 st on each side of marker in each side - READ DECREASE TIP. Dec like this every 2 cm / ¾" a total of 4 times = 140-156-168-184-208-228 sts. When piece measures 15-15-16-16-16-16 cm /6"-6"-6¼"-6¼"-6¼"-6¼", inc 1 st on each side of marker in each side – see INCREASE TIP-3 (body). Inc like this every 2 cm / ¾" a total of 7 times = 168-184-196-212-236-256 sts. When piece measures 39-39-40-40-40-40 cm / 15¼"-15¼"-15¾"-15¾"-15¾"-15¾"', switch to circular needle size 4.5 mm / US 7. Work 2 ridges in garter st and bind off - READ BIND-OFF TIP. Piece measures 60-62-64-66-68-70 cm / 23⅝"-24⅜"-25¼"-26"-26¾"-27½" in total from shoulder. SLEEVE: Work sleeves in the round on double pointed needles. NOW MEASURE THE PIECE FROM HERE. Slip sts from stitch holder back on double pointed needles size 5 mm / US 8 (= 48-55-60-63-65-66 sts). Pick up 1 st in each of the 6-6-8-8-10-12 sts cast on under sleeve, insert a marker in the middle of these sts (= 3-3-4-4-5-6 new sts on each side of marker) = 54-61-68-71-75-78 sts. Continue with stockinette st, stripes and eyelet holes as on body. When piece measures 4 cm / 1½", dec 1 st on each side of marker mid under sleeve. Dec like this approx. every 4-3-2-2-2-2 cm / 1½"-1"-¾"-¾"-¾"-¾" 9-12-15-15-16-17 times in total = 36-37-38-41-43-44 sts. AT THE SAME TIME in size S, M and L work 3rd, 4th and 5th stripe 2-2-1 cm / ¾"-¾"-½" longer than on body (this is done so that the last stripes will not be much more longer than the other). In size XL, XXL and XXXL work stripes as on body. Work 6th stripe until piece measures 46-45-44-42-41-39 cm. Now work an eyelet row. Switch to double pointed needles size 4.5 mm / US 7. Work 2 ridges and bind off. Make another sleeve the same way. ASSEMBLY: Sew the buttons on to the left band. |
|
 |
|
Have you finished this pattern?Tag your pictures with #dropspattern or submit them to the #dropsfan gallery. Do you need help with this pattern?You'll find 26 tutorial videos, a Comments/Questions area and more by visiting the pattern on garnstudio.com. © 1982-2026 DROPS Design A/S. We reserve all rights. This document, including all its sub-sections, has copyrights. Read more about what you can do with our patterns at the bottom of each pattern on our site. |


With over 40 years in knitting and crochet design, DROPS Design offers one of the most extensive collections of free patterns on the internet - translated to 17 languages. As of today we count 324 catalogs and 12290 patterns - 12280 of which are translated into English (US/in).
We work hard to bring you the best knitting and crochet have to offer, inspiration and advice as well as great quality yarns at incredible prices! Would you like to use our patterns for other than personal use? You can read what you are allowed to do in the Copyright text at the bottom of all our patterns. Happy crafting!
Post a comment to pattern DROPS Extra 0-1325
We would love to hear what you have to say about this pattern!
If you want to leave a question, please make sure you select the correct category in the form below, to speed up the answering process. Required fields are marked *.