
Popular categories
Looking for a yarn?


Comments / Questions (28)
![]() Maria wrote:
Maria wrote:
Buon pomeriggio. Premetto che io sono piccolina di statura e porto la L come misura. Vorrei sapere per favore, come potrei fare per realizzare uno dei vostri capi adattandolo a me e non farlo sembrare sproporzionato.Grazie
23.11.2024 - 16:04DROPS Design answered:
Buonasera Maria, per un aiuto così personalizzato può rivolgersi al suo rivenditore DROPS di fiducia. Buon lavoro!
23.11.2024 - 20:09
![]() Maria wrote:
Maria wrote:
Buon pomeriggio. Premetto che io sono piccolina di statura e porto la L come misura. Vorrei sapere per favore, come potrei fare per realizzare uno dei vostri capi adattandolo a me e non farlo sembrare sproporzionato.Grazie
23.11.2024 - 16:03DROPS Design answered:
Buonasera Maria, per un'assistenza così personalizzata può rivolgersi al suo rivenditore DROPS di fiducia. Buon lavoro!
23.11.2024 - 20:11
![]() Mary wrote:
Mary wrote:
Buongiorno. Vorrei realizzare questo capo,anche se mi sembra un po’ difficile seguire la spiegazione. Soprattutto non capisco che significa ( quando il capo è indossato. Potete aiutarmi? Grazie
09.11.2024 - 08:54DROPS Design answered:
Buonasera Mary, vuol dire che in quel punto deve immaginare il capo come se lo stesse indossando. Buon lavoro!
09.11.2024 - 18:49
![]() Ginette wrote:
Ginette wrote:
For pattern 171-3 Bridget how much yarn in group c - Puna would I require to make this in the large size?
19.11.2020 - 17:09DROPS Design answered:
Dear Ginette, DROPS Puna is yarn group B you cannot use to replace 2 strands yarn group A - you should use instead a yarn group C as Air for example - read more about alternatives here. Happy knitting!
20.11.2020 - 08:14
![]() Jorunn wrote:
Jorunn wrote:
Jeg finner ikke hvor jeg skal begynne med første knapphull
09.05.2020 - 11:30DROPS Design answered:
Hei Jorunn, På toppen av oppskriften, under Instruksjoner og deretter under Knapphull, har du plassering for alle knapphull. God fornøyelse!
11.05.2020 - 07:20
![]() Simone wrote:
Simone wrote:
I'm not clear how the left and right Front pieces are attached - how is the 10cm section of garter stitch (5 stitches wide) stitched into the neckline? A diagram would help me!
17.12.2019 - 14:22DROPS Design answered:
Dear Simone, the 10 cm garter stitch worked over the 5 stitches at the beg of front piece will be then sewn along neckline on back piece - could this video help you to visualize how it should be - the video is showing a bottom -up pattern ie ending with shawl collar while here you start with shawl collar. Happy knitting!
17.12.2019 - 15:08
![]() Perrot.isabelle wrote:
Perrot.isabelle wrote:
Bonjour, en tricotant ce (très joli) cardigan, j'ai du inverser A1 et A2 pour avoir les torsades près de la bordure (sur le devant)…. N'y aurait-il pas une erreur dans les explication? Il est en effet dit A1 pour le devant droit et A2 pour le devant gauche, ce qui place la diminution sur les trois mailles près de la bordure. Cordialement, Isabelle Perrot
10.02.2019 - 12:17DROPS Design answered:
Bonjour Mme Perrot, on tricote bien A.1 pour le devant droit et A.2 pour le devant gauche, vu sur l'endroit, on commence par la torsade ajourée pour terminer par la torsade sur 6 m et la bordure devant pour le devant droit, et, pour le devant gauche, vu sur l'endroit , après la bordure devant, on tricote d'abord la torsade puis la torsade ajourée de A.2. Bon tricot!
11.02.2019 - 09:55
![]() Nicole wrote:
Nicole wrote:
Bjr.je tricote la 1ere taille et le cote droit.je suis arrivee apres les 4 cm .augmenter 1 m avant A1....je ne comprends pas le decalage
13.02.2018 - 23:43DROPS Design answered:
Bonjour Nicole, en même temps que le décalage de A.2, on augmente pour l'encolure avant les 5 m point mousse de la bordure devant:: 2x tous les 4 rangs et 12x tous les 2 rangs. En même temps, vous décalez A.1 vers A.3 8 x tous les 4 rangs. Le nombre de mailles augmentant après A.1 vous pouvez ainsi décaler A.1 vers la gauche. Bon tricot
14.02.2018 - 09:10
![]() Genay wrote:
Genay wrote:
Merci pour votre reponse. J'ai bien compris la facon de faire les decalage mais je ne peux pas diminuer 8 fois 1 m apres A1 piusque je n'ai que 2 m. Je suis vraiment bloquee à cet endroit.
12.02.2018 - 19:56DROPS Design answered:
Bonjour Mme Genay, pouvez-vous préciser la taille tricotée et l'endroit exact où vous êtes arrivée? Ces informations peuvent être utile pour vous aider.
13.02.2018 - 08:40
![]() N8cole wrote:
N8cole wrote:
Bonjour. Pour le côté droit comment diminuer 1 m. Après A1 8 fois au total puisqu'il n'y aura pas assez de mailles. Il n'y en a que 2.
24.01.2018 - 18:43DROPS Design answered:
Bonjour Nicole, A.1 se tricote en début de rang sur l'endroit et on augmente 1 m avant A.1 (on diminue 1 m après A.1). Les diminutions et les augmentations sont expliquées sous DÉCALAGE DE A.1/A.2 sous le DOS et DÉCALAGE DE A.1 sous le devant. Bon tricot!
25.01.2018 - 08:50
|
||||||||||||||||||||||
Bridget Jacket#bridgetjacketcardigan |
||||||||||||||||||||||
|
|
||||||||||||||||||||||
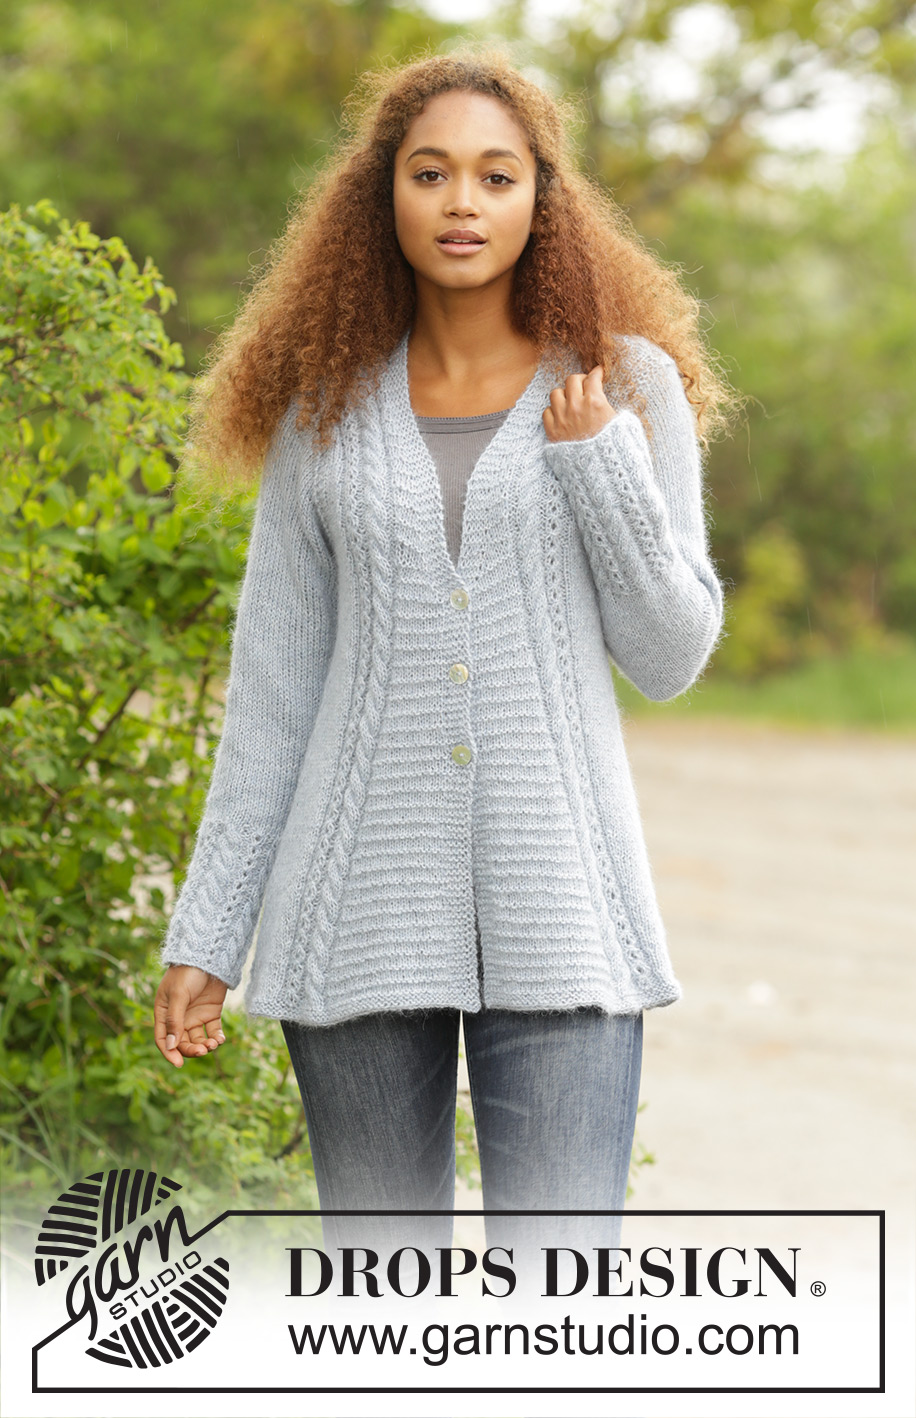
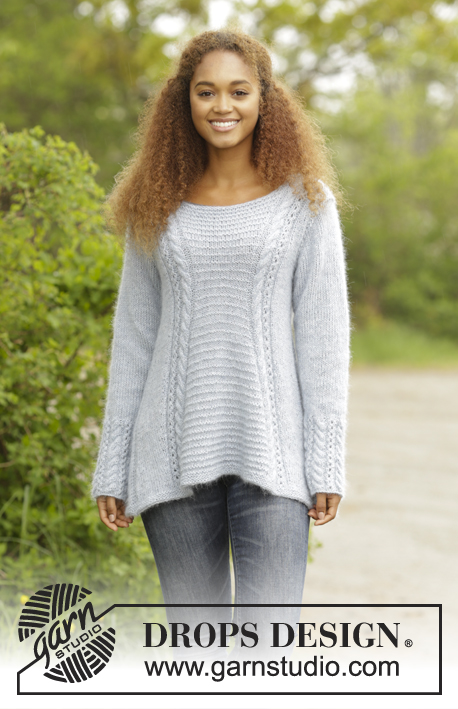
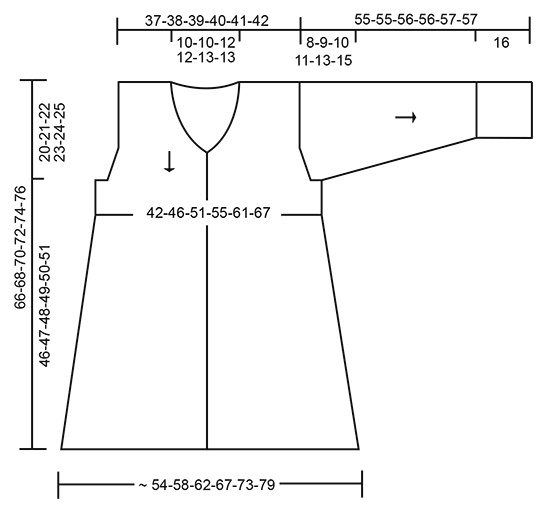
Knitted DROPS jacket with textured pattern, V-neck and A-shape worked top down in ”Alpaca” and “Kid-Silk”. Size: S - XXXL.
DROPS 171-3 |
||||||||||||||||||||||
|
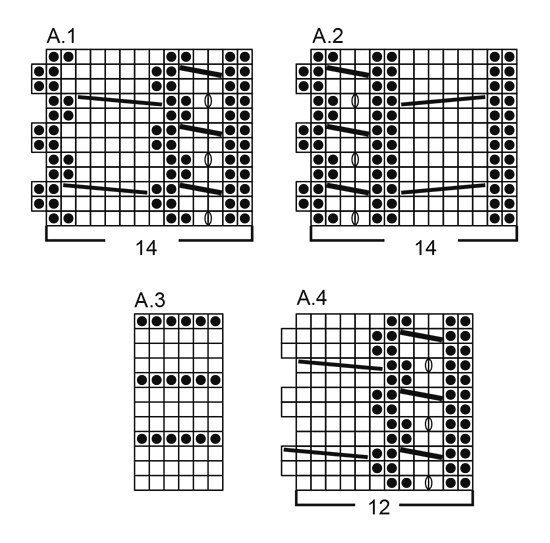
GARTER ST (back and forth): K all rows. 1 ridge = K2 rows. PATTERN: See diagrams A.1 to A.4. The diagrams show all rows in pattern seen from RS. DECREASE TIP-1: All dec are done from RS! Dec as follows before marker: Beg 2 sts before marker and K 2 tog. Dec as follows after marker: Slip 1 st as if to K, K 1, psso. INCREASE TIP: All inc are done from RS. Inc after/before marker by making 1 YO. On next row P YO twisted to avoid holes. DECREASE TIP-2: Beg 3 sts before marker and K 2 tog, K 2 (marker is between these sts), slip 1 st as if to K, K 1, psso (= 2 sts dec). KNITTING TIP: Because of the shape of the jacket it will be somewhat longer in the sides than mid front/mid back. To avoid this work short rows over middle part as follows: RIGHT FRONT PIECE: * Beg from RS and work as before over all sts, turn, tighten yarn and work from WS until A.1, turn, tighten yarn and work from RS as before the rest of row *. LEFT FRONT PIECE: * Beg from WS and work as before over all sts, turn, tighten yarn and work from RS as before until A.2, turn, tighten yarn and work from WS as before the rest of row *. BACK PIECE: * Beg from RS and work as before until A.2, turn, tighten yarn and work from WS until A.1, turn, tighten yarn and work from RS as before the rest of row *. ALL PARTS: Repeat from *-* approx. every 7th cm / 2 3/4th inch. BUTTONHOLES: Dec for buttonhole on right band (when garment is worn). Dec for buttonholes at the end of row from RS as follows: Work until 3 sts remain on row, make 1 YO, K 2 tog and K last st. On next round K the YO to make a hole. Dec first buttonhole when 1 cm / ⅜" has been worked after last inc for V-neck. Then dec the next 3-3-3-3-4-4, approx. 8-8-8-7-7-7 cm / 3"-3"-3"-2¾"-2¾"-2¾" between each buttonhole. ---------------------------------------------------------- JACKET: Work front and back piece back and forth on circular needle in sections. BACK PIECE: Beg with right shoulder (when garment is worn), then work left shoulder before casting on sts for neck and continuing over all sts - READ KNITTING TIP. RIGHT SHOULDER (when garment is worn): Cast on 17-18-18-19-19-20 sts on circular needle size 5 mm / US 8 with 1 strand Alpaca and 1 strand Kid-Silk (= 2 strands). K 1 row from WS. Work next row as follows from RS: 2 edge sts in GARTER ST – see explanation above (= towards the neck), P 2, inc 1 st in each of the next 3 sts (K 2 in each st), P 2, K 2, P 2, 1-2-2-3-3-4 sts in stockinette st and 3 edge sts in garter st towards armhole = 20-21-21-22-22-23 sts on needle. Work back from WS with garter st over garter st, P over P, K over K. Work next row as follows from RS: 2 edge sts in garter st, work pattern according to diagram A.2 over the next 14 sts, 1-2-2-3-3-4 sts in stockinette st and 3 edge sts in garter st. Continue pattern like this until piece measures 2 cm / ¾". REMEMBER THE KNITTING GAUGE Beg the inc for neck by casting on 1 new st at the end of first row from WS (work inc st in garter st) = 21-22-22-23-23-24 sts. Put piece aside and work left shoulder. LEFT SHOULDER (when garment is worn): Cast on 17-18-18-19-19-20 sts on circular needle size 5 mm / US 8 with 1 strand Alpaca and 1 strand Kid-Silk (= 2 strands). K 1 row from WS. Work next row as follows from RS: 3 edge sts in garter st towards armhole, 1-2-2-3-3-4 sts in stockinette st, P 2, K 2, P 2, inc 1 st in each of the next 3 sts (K 2 in each st), P 2 and 2 edge sts in garter st towards the neck = 20-21-21-22-22-23 sts on needle. Work back from WS with K over K, P over P and garter st over garter st. Work next row as follows from RS: 3 edge sts in garter st, 1-2-2-3-3-4 sts in stockinette st, work pattern according to A.1 over the next 14 sts and finish with 2 edge sts in garter st. Continue pattern like this until piece measures 2 cm / ¾". Now beg the inc for neck by casting on new sts for neck at the end of every row from RS as follows: Cast on 1 st 1 time and then 26-26-28-28-30-30 sts 1 time (work the inc sts in garter st) = 47-48-50-51-53-54 sts. Now work left and right shoulder tog for back piece. BACK PIECE: Keep sts on left shoulder on needle and continue pattern from RS over sts from right shoulder = 68-70-72-74-76-78 sts on needle. Work next row as follows from WS: 3 edge sts in garter st, P until A.2, continue A.2 (= 14 sts), K over the next 32-32-34-34-36-36 sts (i.e. sts between A.2 and A.1), continue A.1 (= 14 sts), P until 3 sts remain on needle and finish with 3 edge sts in garter st. Work next row as follows from RS: 3 edge sts in garter st, work in stockinette st until A.1, continue A.1, work A.3 over sts between A.1 and A.2, continue A.2, work in stockinette st until 3 sts remain on needle and finish with 3 edge sts in garter st. Continue pattern like this until piece measures 4 cm / 1½". Insert 1 marker 1 st before A.1 (seen from RS) and 1 marker after A.1 (= 15 sts between markers), in addition insert 1 marker before A.2 and 1 marker 1 st after A.2 (= 15 sts between markers). Now beg displacement of cables towards mid back as follows (from RS): DISPLACEMENT IN A.1/A.2: Inc 1 st before A.1 and dec 1 st after A.1 in addition dec 1 st before A.2 and inc 1 st after A.2 – READ INCREASE TIP and DECREASE TIP-1. Inc and dec like this every 4th-6th-6th-8th-10th-10th row 8-7-7-6-6-6 times in total (work the inc sts in stockinette st). AT THE SAME TIME when piece measures 17-17-17-16-14-12 cm / 6¾"-6¾"-6¾"-6¼"-5½"-4¾", inc for armholes in each side (from RS): Inc 1 st inside 3 edge sts in garter st in each side by making 1 YO. On next row P YO twisted to avoid holes. Inc like this every other row (i.e. on every row from RS) 2-3-5-7-10-13 times in total, then cast on 3-4-5-6-7-8 new sts at the end of the next 2 rows for armholes = 78-84-92-100-110-120 sts on needle. READ ALL OF THE FOLLOWING SECTION BEFORE CONTINUING! Continue pattern as before but work 1 ridge over the outermost 6-7-8-9-10-11 sts in each side (work the remaining sts as before). NOTE: In size XXL + XXXL continue displacements in A.1/A.2 as before (in size S + M + L + XL displacements are now done if the knitting gauge is kept vertically). When 1 ridge has been worked over the outermost 6-7-8-9-10-11 sts in each side continue pattern as before, but with 2-2-2-3-3-3 edge sts in garter st in each side until finished measurements. When displacement is done in all sizes, there are 16-18-20-22-24-24 sts pattern according to A.3 mid back and 15-17-20-22-26-31 sts in stockinette st on inside of 2-2-2-3-3-3 edge sts in garter st in each side. Continue to work without displacement until piece measures 28-30-32-34-36-38 cm / 11"-11¾"-12½"-13⅜"-14¼"-15" from shoulder – adjust so that the next row is worked from RS. Now beg inc in the sides AT THE SAME TIME the cables will displace towards the sides as follows: INC IN THE SIDES: Inc 1 st inside of the outermost 5-5-5-6-6-6 sts in each side by making 1 YO. On next row P YO twisted to avoid holes. Inc like this every 8th row 10 times in total in each side (or desired length – NOTE: All inc are done from RS). DISPLACEMENT IN A.1/A.2: Dec 1 st before A.1 and inc 1 st after A.1, inc 1 st before A.2 and dec 1 st after A.2 (work the inc sts in towards the middle in A.3 so that middle part with A.3 get bigger and bigger). Dec and inc like this every 8th row until finished measurements. Continue like this until piece measures approx. 64-66-68-70-72-74 cm / 25¼"-26"-26¾"-27½"-28⅜"-29⅛" from the shoulder and down (adjust so that next row is worked from RS) = approx. 98-104-112-120-130-140 sts on needle. Switch to circular needle 4 and work 3 ridges back and forth over all sts – AT THE SAME TIME on first row dec over each cable by working sts in the cables K tog two by two (= 6 sts dec) = approx. 92-98-106-114-124-134 sts. Switch back to circular needle size 5 mm / US 8 and bind off (this is done to avoid a tight bind-off edge). RIGHT FRONT PIECE (when garment is worn): Beg with edge in garter st that is sewn to neck line at the back of neck. Cast on 5 sts on needle size 4 mm / US 6 with 1 strand Alpaca + 1 strand Kid-Silk (= 2 strands) and work in garter st back and forth for 9-9-10-10-11-11 cm / 3½"-3½"-4"-4"-4½"-4½", finish with K 1 row from WS and leave sts on needle. RIGHT SHOULDER - FRONT PIECE: Cast on 17-18-18-19-19-20 sts on circular needle size 5 mm / US 8 with 1 strand Alpaca and 1 strand Kid-Silk (= 2 strands). K 1 row from WS. Work next row as follows from RS: 3 edge sts in garter st towards armhole, 1-2-2-3-3-4 sts in stockinette st, P 2, K 2, P 2, inc 1 st in each of the next 3 sts, P 2, 2 sts pattern according to diagram A.3 and then the 5 sts in garter st from edge in garter st worked first = 25-26-26-27-27-28 sts on needle. Work back from WS with garter st over garter st, P over P, K over K. Work next row as follows from RS: 3 edge sts in garter st, 1-2-2-3-3-4 sts in stockinette st, work pattern according to A.1 over the next 14 sts, continue A.3 over the next 2 sts and finish with 5 band sts in garter st towards the neck. Continue pattern like this until piece measures 4 cm / 1½". Insert 1 marker 1 st before A.1 (seen from RS) and 1 marker after A.1 (= 15 sts between markers). Now beg displacement of cable mid front AT THE SAME TIME inc for V-neck inside the 5 band sts mid front: DISPLACEMENT IN A.1: Inc 1 st before A.1 and dec 1 st after A.1 – READ INCREASE TIP and DECREASE TIP-1. Inc and dec like this every 4th-6th-6th-8th-10th-10th row 8-7-7-6-6-6 times in total (work the inc sts in stockinette st). V-NECK: At the same time on 1st row from RS beg inc for V-neck and inc 1 st inside the 5 band sts in garter st by making 1 YO. On next row work YO twisted to avoid holes - work the inc sts in A.3. Inc like this every 4th row a total of 2-2-3-5-6-8 times, and on every other row a total of 12-12-12-10-10-8 times. NOTE: After last inc towards mid front work 1 ridge back and forth only over the 5 band sts (do not work the other sts on needle). Then work as before over all sts again (this is done to make the band fold nicely). REMEMBER BUTTON HOLES ON BAND - see explanation above. ARMHOLE: at the same time when piece measures 17-17-17-16-14-12 cm / 6¾"-6¾"-6¾"-6¼"-5½"-4¾", inc for armhole in the side as on back piece, i.e. inc as follows: Inc 1 st inside 3 edge sts in garter st in the side by making 1 YO. On next row work YO twisted to avoid holes - work inc sts in stockinette st. Inc like this every other row 2-3-5-7-10-13 times in total, then cast on 3-4-5-6-7-8 new sts at the end row from WS. After all inc for V-neck and armhole are done, there are 44-47-51-55-60-65 sts on needle. READ ALL OF THE FOLLOWING SECTION BEFORE CONTINUING! Continue pattern as before but work 1 ridge over the outermost 6-7-8-9-10-11 sts in the side towards armhole (work the remaining sts as before). NOTE: In size XXL + XXXL continue displacements in A.1/A.2 as before (in size S + M + L + XL displacements are now done if the knitting gauge is kept vertically). When 1 ridge has been worked over the outermost 6-7-8-9-10-11 sts in the side continue pattern as before, but with 2-2-2-3-3-3 edge sts in garter st until finished measurements. When displacement is done in all sizes, there are 8-9-10-11-12-12 sts pattern according to A.3 inside band towards mid front and 15-17-20-22-26-31 sts in stockinette st on inside of 2-2-2-3-3-3 edge sts in garter st in the side. Continue to work without displacement until piece measures 28-30-32-34-36-38 cm / 11"-11¾"-12½"-13⅜"-14¼"-15" from shoulder – adjust so that the next row is worked from RS. Now beg inc in the side AT THE SAME TIME the cables will displace out towards the side as follows: INC IN THE SIDE: Inc 1 st inside of the outermost 5-5-5-6-6-6 sts in the side by making 1 YO. On next row P YO twisted to avoid holes. Inc like this every 8th row 10 times in total (or desired length – NOTE: All inc are done from RS). DISPLACEMENT IN A.1/A.2: Dec 1 st before A.1 and inc 1 st after A.1 (work the inc sts towards mid front in A.3 so that middle part with A.3 gets bigger and bigger). Dec and inc like this every 8th row until finished measurements. Continue like this until piece measures approx. 64-66-68-70-72-74 cm / 25¼"-26"-26¾"-27½"-28⅜"-29⅛" from the shoulder and down (adjust so that next row is worked from RS) = approx. 54-57-61-65-70-75 sts on needle. Switch to circular needle 4 and work 3 ridges back and forth over all sts – AT THE SAME TIME on first row dec over cable by working sts in the cable K tog two by two (= 3 sts dec) = approx. 51-54-58-62-67-72 sts on needle. Switch back to circular needle size 5 mm / US 8 and bind off (this is done to avoid a tight bind-off edge). LEFT FRONT PIECE: Beg with an edge in garter st as on right front piece. Cast on 5 sts on needle size 4 mm / US 6 and work in garter st back and forth for 10-10-11-11-12-12 cm / 4"-4"-4⅜"-4⅜"-4¾"-4¾", finish after 1 row K from WS, switch to circular needle size 5 mm / US 8. LEFT SHOULDER - FRONT PIECE: K the 5 sts in garter st from neck edge and cast in addition on 17-18-18-19-19-20 sts on needle = 22-23-23-24-24-25 sts. K 1 row from WS. Work next row as follows from RS: 5 band sts in garter st, 2 sts pattern according to diagram A.3, P 2, inc 1 st in each of the next 3 sts, P 2, K 2, P 2, 1-2-2-3-3-4 sts in stockinette st and 3 edge sts in garter st towards armhole = 25-26-26-27-27-28 sts on needle. Work back from WS with garter st over garter st, P over P, K over K. Work next row as follows from RS: 5 band sts in garter st, continue A.3 over the next 2 sts, work pattern according to diagram A.2 over the next 14 sts, work 1-2-2-3-3-4 sts in stockinette st and finish with 3 edge sts in garter st towards armhole. Continue pattern like this until piece measures 4 cm / 1½". Insert 1 marker before A.2 (seen from RS) and 1 marker 1 st after A.1 (= 15 sts between markers). Now beg displacement of cable mid front AT THE SAME TIME inc for V-neck inside the 5 band sts mid front: DISPLACEMENT IN A.2: Dec 1 st before A.2 and inc 1 st after A.2 – READ DECREASE TIP and INCREASE TIP-1. Inc and dec like this every 4th-6th-6th-8th-10th-10th row 8-7-7-6-6-6 times in total (work the inc sts in stockinette st). V-NECK: At the same time on 1st row from RS beg inc for V-neck and inc 1 st inside the 5 band sts in garter st the same way as on right front piece. AT THE SAME TIME when piece measures 17-17-17-16-14-12 cm / 6¾"-6¾"-6¾"-6¼"-5½"-4¾", beg inc for armhole in the side and work the rest of left front piece the same way as right front piece but reversed (NOTE: Do not dec for buttonholes on left band). SLEEVE: Work back and forth on a short circular needle, top down until sleeve cap is done, then work sleeve in the round on a short circular needle/double pointed needles until finished measurements. Cast on 24-24-26-24-24-24 sts on a short circular needle size 5 mm / US 8 with 1 strand Alpaca and 1 strand Kid-Silk (= 2 strands). Work stockinette st back and forth AT THE SAME TIME cast on new sts for sleeve cap at the end of every row in each side as follows: Cast on 3 sts 1 time in all sizes, 2 sts 2-3-3-3-3-3 times, 1 st 3-3-3-3-5-7 times, 2 sts 2-2-3-3-3-3 times and 3 sts 1-1-1-2-2-2 times = 58-62-68-72-76-80 sts on needle (piece measures approx. 8-9-10-11-13-15 cm / 3"-3½"-4"-4½"-5"-6"). Insert 1 marker thread at beg of row (= mid under sleeve). Then work in stockinette st in the round. When piece measures 2 cm / ¾" from marker thread, dec 2 sts mid under sleeve - READ DECREASE TIP-2. Dec a total of 12-13-15-17-18-19 times in Size S: Alternately on every 5th and 6th round, in size M: On every 5th round, in size L: On every 4th round, in size XL: Alternately on every 3rd and 4th round, in size XXL: On every 3rd round and in size XXXL: Alternately on every 2nd and 3rd round = 34-36-38-38-40-42 sts. When piece measures 31-30-30-29-28-26 cm / 12¼"-11¾"-11¾"-11½"-11"-10¼" from marker thread (entire sleeve measures approx. 39-39-40-40-41-41 cm / 15¼"-15¼"-15¾"-15¾"-16"-16" and dec should be done), K 1 round while inc 26-24-22-22-32-30 sts evenly = 60-60-60-60-72-72 sts. Switch to double pointed needles size 4 mm / US 6 and work pattern in the round according to diagram A.4 for 15 cm / 6" (= 5-5-5-5-6-6 repetitions of 12 sts). K 1 round while working sts in every cable K tog two by two (= 15-15-15-15-18-18 sts dec) = 45-45-45-45-54-54 sts. Then bind off sts with K over K and P over P. Sleeve measures approx. 55-55-56-56-57-57 cm / 21⅝"-21⅝"-22"-22"-22½"-22½" from cast-on edge. ASSEMBLY: Sew shoulder seams inside cast-on edges. Sew edge in garter st tog mid back and sew it to the neckline at the back of neck with neat, little stitches. Sew side seam from armhole and down, sew in outer loops of edge sts so that the seam is flat. Place one sleeve in under edge in garter st in armhole and sew neatly with small stitches (edge in garter st should be on the outside of sleeve - make sure to avoid a tight seam). Sew in the other sleeve the same way. Sew on buttons. |
||||||||||||||||||||||
Diagram explanations |
||||||||||||||||||||||
|
||||||||||||||||||||||
 |
||||||||||||||||||||||
 |
||||||||||||||||||||||
Have you finished this pattern?Tag your pictures with #dropspattern #bridgetjacketcardigan or submit them to the #dropsfan gallery. Do you need help with this pattern?You'll find 30 tutorial videos, a Comments/Questions area and more by visiting the pattern on garnstudio.com. © 1982-2026 DROPS Design A/S. We reserve all rights. This document, including all its sub-sections, has copyrights. Read more about what you can do with our patterns at the bottom of each pattern on our site. |
||||||||||||||||||||||


With over 40 years in knitting and crochet design, DROPS Design offers one of the most extensive collections of free patterns on the internet - translated to 17 languages. As of today we count 324 catalogs and 12290 patterns - 12280 of which are translated into English (US/in).
We work hard to bring you the best knitting and crochet have to offer, inspiration and advice as well as great quality yarns at incredible prices! Would you like to use our patterns for other than personal use? You can read what you are allowed to do in the Copyright text at the bottom of all our patterns. Happy crafting!
Post a comment to pattern DROPS 171-3
We would love to hear what you have to say about this pattern!
If you want to leave a question, please make sure you select the correct category in the form below, to speed up the answering process. Required fields are marked *.