
Popular categories
Looking for a yarn?


Comments / Questions (46)
![]() Pearl Walker wrote:
Pearl Walker wrote:
How much allowance does this pattern have are the sizes given a close fit?
20.09.2020 - 12:46DROPS Design answered:
Dear Pearl, for the exact measurements of this sweater, please refer to the schematic drawings at the bottom of the pattern. It is bets to check them against a sweater that fits you well. The modell is wearing a rather close fit one, that is only has a small positive ease, maybe an inch at the most. Happy Crafting!
21.09.2020 - 00:25
![]() Annelin wrote:
Annelin wrote:
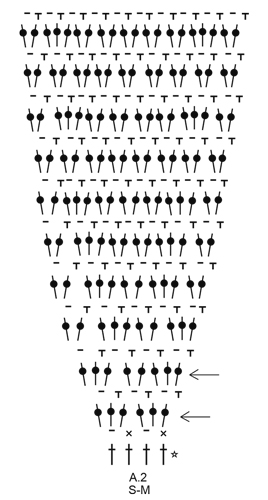
Hei. Fra rad 7 og videre skal diagram A2 følges. Når jeg leser om hvordan diagram skal leses, så skal jeg starte diagram linjen på ny når den er fullført og gjentas til raden er ferdig heklet. Det gir meg alt for mange masker. Skal jeg ikke gjenta diagrammet i A2 og fortsette med 0 øking etter A2 er gjort en gang? Eller er det forklart noen sted hvor mange ganger den skal gjentas.? Synes det var et vanskelig mønster og følge.
21.03.2020 - 14:10DROPS Design answered:
Hei Annelin. Vi skal hjelpe deg så godt vi kan, men hvilken størrelse hekler du? mvh DROPS design
30.03.2020 - 08:27
![]() Lisa wrote:
Lisa wrote:
Hallo. Bei mir haut es mit den Zunahmen in A.2 nicht hin. In Größe XXL passt es in Reihe 5 noch mit 176 Maschen. In Reihe 13 hab ich das doppelte. Hab mich an die Häkelschrift gehalten, x-mal geribbelt und gezählt. Was mache ich falsch?
15.09.2019 - 09:45DROPS Design answered:
Liebe Lisa, in der Größe XXXL haben Sie 176 M bei der 5. Reihe, dann nehmen Sie nur in A.2 zu, nicht mehr in A.1b, dh Sie haben bei der vorletzte Reihe in A.2 je 26 M in jedem A.2 (= 52 M in jedem A.2-Teil) und 320 M bei der vorletzen Reihe in A.2. Viel Spaß beim häkeln!
16.09.2019 - 11:02
![]() Amalie wrote:
Amalie wrote:
Jeg har d. 24/3-2019 stillet et spørgsmål, som jeg desværre endnu ikke har fået svar på, håber snart at jeg får et svar.
01.04.2019 - 09:53DROPS Design answered:
Hei Amalie. Beklager sent svar, men se svar under.
02.04.2019 - 13:25
![]() Amalie wrote:
Amalie wrote:
Hej Drops 😊 jeg er lige blevet færdig med diagrammet og skal til at tage ud til ærmer. Jeg har dog det problem, at jeg er ved at hækle str. XL, og ifølge opskriften skal stykket, som jeg har hæklet, være ca. 19 cm, jeg har dog kun ca. 17 cm 😔 jeg vil derfor spørge om man godt kan hækle et par cm mere på, dog uden at jeg tager ud, eller vil dette ikke komme til at fungere? 😉 Mvh Amalie 😊
27.03.2019 - 09:36DROPS Design answered:
Hei Amalie. Se svar under :)
02.04.2019 - 13:25
![]() Amalie wrote:
Amalie wrote:
Hej Drops 😊 jeg ved lige blevet færdig med diagrammet og skal til at tage ud til ærmer. Jeg har dog det problem, at jeg er ved at hækle str. XL, og ifølge opskriften skal stykket, som jeg har hæklet, være ca. 19 cm, jeg har dog kun ca. 17 cm 😔 jeg vil derfor spørge om man godt kan hækle et par cm mere på, dog uden at jeg tager ud, eller vil dette ikke komme til at fungere? 😉 Mvh Amalie 😊
24.03.2019 - 14:48DROPS Design answered:
Hei Amalie. Ja, det kan gjerne hekle et par cm uten økning for å få den korrekte lengden på bærestykket. God fornøyelse
02.04.2019 - 09:21
![]() Judith Opitz wrote:
Judith Opitz wrote:
Hallo, die Jacke sieht wunderschön aus, weshalb ich mich nun daran gemacht habe, sie zu häkeln. Könnten sie bitte Angaben zu der Maschenanzahl in den Reihen 8,10,12,14,16 usw. (Feste M. und LM im Wechsel) machen ? In Größe M soll man ja am Schluss 234 Maschen haben-aber ich komme mit den Zunahmen nicht klar. Laut Anleitung hätte ich nach Reihe 12 schon über 300 Maschen. Grüße, Judith
09.12.2018 - 15:12DROPS Design answered:
Liebe Frau Opitz, nach 5. Reihe haben Sie 138 M; dann wird es nur in A.2 (wie im Diagram gezeigt) zugenommen - diese Zunahmen entstehen mit den Stb-Reihen - die Reihen mit Feste M. und Lm im Wechsel häkeln sie wie am Anfang A.2. Viel Spaß beim häkeln!
10.12.2018 - 09:41
![]() Vic wrote:
Vic wrote:
Bonjour, Si j'ai bien compris les explications que vous donnez à Béatrice à propos du changement de couleur, on obtient en fin de rang, une hauteur de ml d'une autre couleur. N'est-ce pas gênant au montage et est-ce qu'on parvient à le dissimuler totalement ? Merci pour la réponse.
08.12.2018 - 11:59DROPS Design answered:
Bonjour Vic, ce changement de couleur ne se verra pas, car on va crocheter les bordures le long des devants. Pour les manches, veillez à ce que le changement de couleur reste bien sur l'envers. Bon crochet!
10.12.2018 - 08:44
![]() Vic wrote:
Vic wrote:
Bonjour, J'ai un problème dés le début ! à savoir que je n'ai pas le même rapport mailles/rangs: quand je fais un échantillon avec un crochet n°5, j'obtiens 14 m pour 8.5 rgs et si je prends un crochet n°4.5 comme préconisé, j'obtiens 15/16 m mais 9 rgs au lieu des 8. Du coup, je ne sais pas trop que faire. Merci pour vous suggestions.
02.12.2018 - 11:39DROPS Design answered:
Bonjour Vic, nous n'avons pas toute la même façon de crocheter, il semble que le crochet 4,5 convient le mieux en largeur, pour que la hauteur convienne également, essayez de tirer les mailles un peu plus en hauteur pour que les 8 rangs fassent bien 10 cm - et pensez à toujours bien conserver vos 16 m = 10 cm. Pensez également à laver votre échantillon terminé, laissez-le sécher bien à plat et vérifiez ensuite vos mesures. Bon crochet!
03.12.2018 - 09:36
![]() Beatrice wrote:
Beatrice wrote:
À la fin de chaque rang de B/ms crocheter ainsi: changer de couleur avant le dernier jeté de la dernière B/ms ainsi: attraper la couleur suivante qui se trouve 2 rangs (= 1 rang de B et 1 rang de ms) plus bas, et avec cette couleur, faire 1 mc autour de ce rang (c'est-à-dire autour la dernière B/ms), 4 ml, écouler le dernier jeté de la dernière m. On procède ainsi pour éviter que les fils ne soient trop serrés sur le côté. Bonsoir je me comprend pas très bien cette phrase
19.06.2018 - 22:34DROPS Design answered:
Bonjour Béatrice, on change de couleur lorsque l'on fait la dernière maille du rang, au moment de faire le dernier jeté de la bride ou de la ms (la dernière fois que l'on écoule les boucles ensemble), on le fait avec le fil de la couleur suivante de la rayure (pas avec celle du rang que l'on termine) dont le fil est 2 rangs plus bas: quand il reste les 2 dernières boucles sur le crochet, on prend le fil 2 rangs plus bas, on fait 1 mc autour de ce rang, puis 4 ml (pour avoir la bonne hauteur et terminer la m sur le crochet), 1 jeté, et on écoule les 2 dernières boucles sur le crochet. Bon crochet!
20.06.2018 - 08:17
|
||||||||||||||||||||||
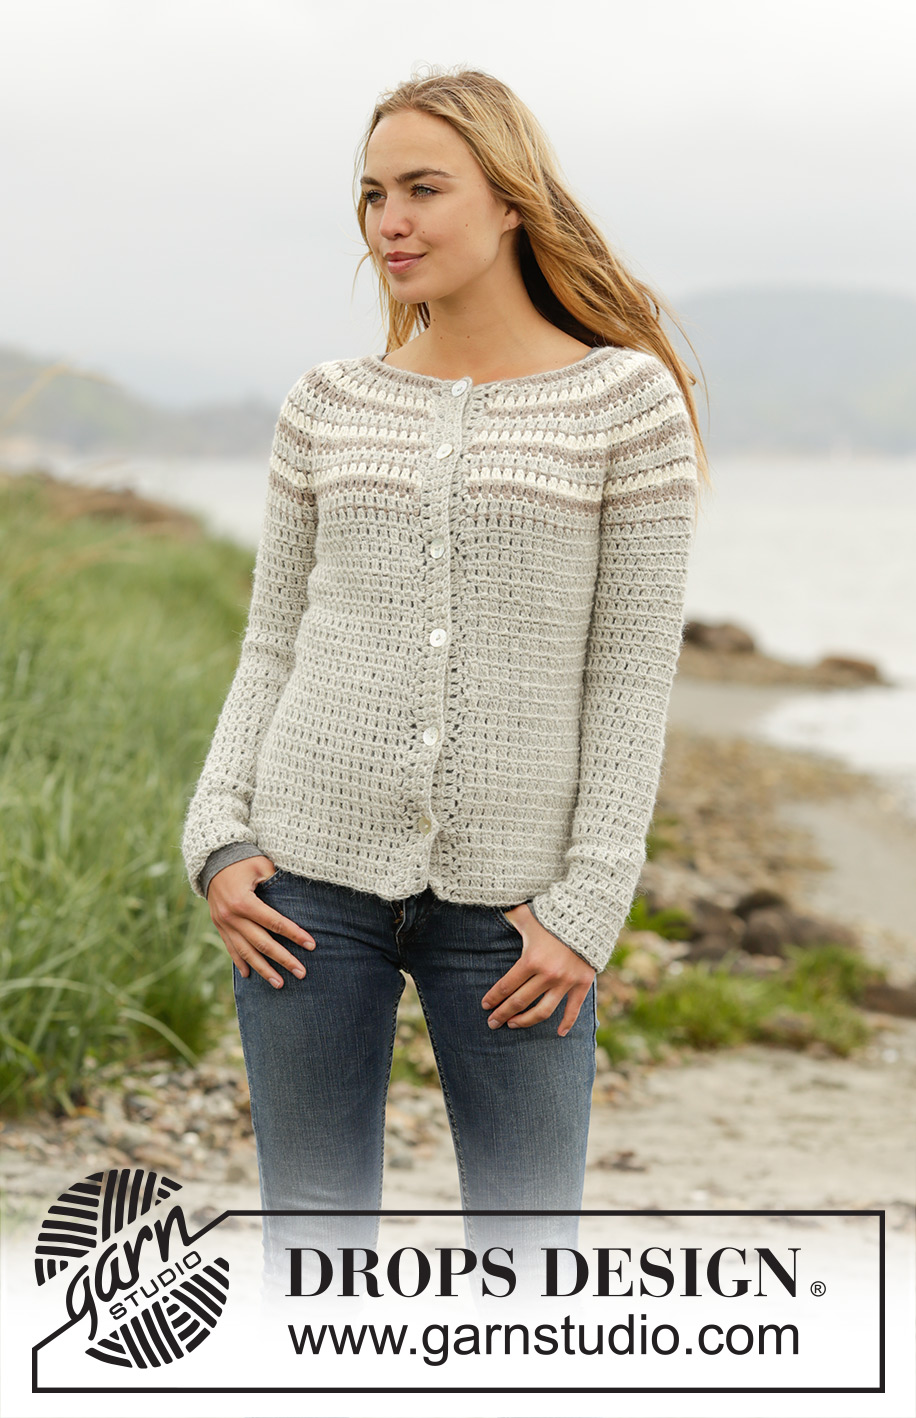
Misty Mountain Cardigan#mistymountaincardigan |
||||||||||||||||||||||
|
|
||||||||||||||||||||||
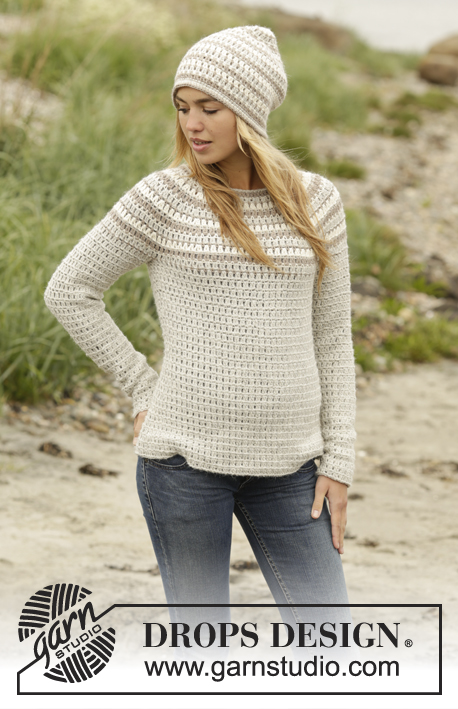
Crochet DROPS jacket with stripes, worked top down in ”Puna”. Size: S - XXXL.
DROPS 173-38 |
||||||||||||||||||||||
|
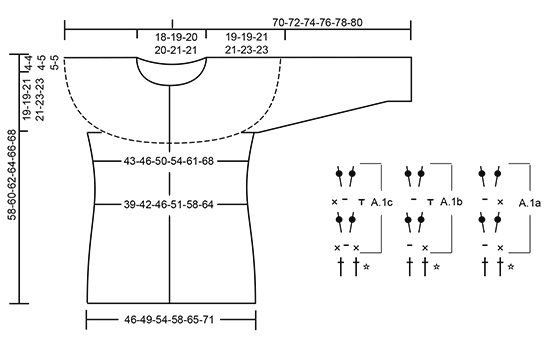
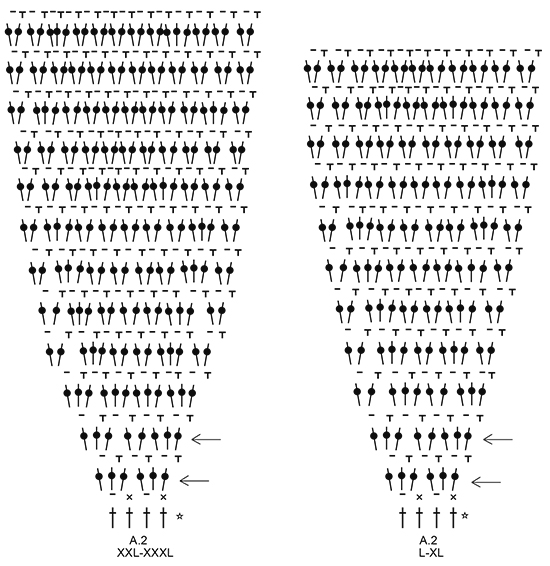
PATTERN: See diagrams A.1 and A.2. All rows with dc = RS. See diagram for correct size. CROCHET INFO: When working back and forth: Beg every dc row with 3 ch (does not replace first dc). Beg every sc row with 1 ch (does not replace first sc). At the end of every row with dc/sc work as follows: Before last pull through of last dc/sc switch color as follows: Get next color, i.e. 2 rows down (1 dc row and 1 sc row), with the new color work 1 sl st around row it was worked on (i.e. around last dc/sc), ch 4, pull then through last loop on hook. This is done to avoid a tight strand in the side of piece. When working in the round: Beg every sc round with 1 ch (this replaces first sc) and finish with 1 sl st in first ch from beg of round. Beg every round with dc with 3 ch (= first dc) and finish with 1 sl st in 3rd ch at beg of round. STRIPES: STRIPE 1: 1 row off white. STRIPE 2: 1 row light gray. STRIPE 3: 1 row taupe. DECREASE TIP (applies to body): Adjust so that next row is 1 row with dc. Work as before until 1 ch remains before marker, * work 1 dc around next ch, but wait with last pull through, work 1 dc more around same ch, but on last pull through, pull yarn through all sts on hook (= 1 dc dec) *, repeat from *-* around next ch (i.e. on the other side of marker) = 2 dc dec at each marker (= 4 dc in total). Every time you dec, repeat A.1b 2 times less in total in width. INCREASE TIP: Adjust so that next row is 1 row with dc. Work as before until 1 ch remains before marker, * work 3 dc around next ch *, repeat from *-* 2 times in total = 2 dc inc at marker, repeat at both markers (= 4 dc inc in total). Every time you inc, repeat A.1b 2 more times in total in width. DECREASE TIP-1 (applies to sleeve): Adjust so that next round is 1 round with dc. * Work 1 dc around first/next ch on round but wait with last pull through, work 1 dc more around the same ch but on last pull through, pull yarn through all sts on hook (= 1 dc dec) *, repeat from *-* around next ch = 2 dc dec. Every time you dec, repeat A.1b 1 time less in total in width. Dec alternately at beg and end of round (i.e. when dec at the end work as before until 2 ch remain on round). ---------------------------------------------------------- JACKET: Worked top down, back and forth. Work band at the end. YOKE: Work 100-103-107-114-117-124 ch (includes 3 ch to turn with) on hook size 4.5 mm/US 7 with taupe. Work 1 dc in 4th ch from hook - READ CROCHET INFO, 1 dc in each of the next 5-1-5-5-1-1 ch, * skip ch 1, 1 dc in each of the next 6 ch *, repeat from *-* the entire row = 84-86-90-96-98-104 dc. Work 2nd row in pattern as follows (= from WS with sc/ch) in STRIPES - see explanation above. Work A.1c over the next 2 dc, A.1b over the first 8-8-10-10-10-12 dc (= 4-4-5-5-5-6 times in width), A.2 over the next 8 dc (= 2 times in width), A.1b over the next 6-6-6-8-8-8 dc (= 3-3-3-4-4-4 times in width), A.2 over the next 8 dc (= 2 times in width), A.1b over the next 20-22-22-24-26-28 dc (= 10-11-11-12-13-14 times in width), A.2 over the next 8 dc (= 2 times in width), A.1b over the next 6-6-6-8-8-8 dc (= 3-3-3-4-4-4 times in width), A.2 over the next 8 dc (= 2 times in width), A.1b over the next 8-8-10-10-10-12 dc (= 4-4-5-5-5-6 times in width), finish with A.1a over the last 2 dc. Repeat A.1a to A.1c vertically and inc as shown in A.2 AT THE SAME TIME inc evenly as follows: Work 3rd row in pattern AT THE SAME TIME inc evenly as follows (= from RS): Work A.1a over the first 2 sts, A.1b over the next 8-8-10-10-10-12 sts and inc 0-2-2-4-4-4 dc evenly, A.2 as before (= 2 times in width), A.1b over the next 6-6-6-8-8-8 sts and inc 0-4-4-4-4-4 dc evenly, A.2 as before, A.1b over the next 20-22-22-24-26-28 sts and inc 0-4-4-6-6-8 dc evenly, A.2 as before, A.1b over the next 6-6-6-8-8-8 sts and inc 0-4-4-4-4-4 dc evenly, A.2 as before, A.1b over the next 8-8-10-10-10-12 sts and inc 0-2-2-4-4-4 dc evenly, finish with A.1c over the last 2 sts = 100-118-122-134-136-144 dc (includes inc in A.2). REMEMBER THE CROCHET GAUGE! Work 4th row in pattern as follows (= from WS): Work A.1c over the first 2 dc, A.1b over the next 8-10-12-14-14-16 dc, A.2 as before, A.1b over the next 6-10-10-12-12-12 dc, A.2 as before, A.1b over the next 20-26-26-30-32-36 dc, A.2 as before, A.1b over the next 6-10-10-12-12-12 dc, A.2 as before, A.1b over the next 8-10-12-14-14-16 dc, finish with A.1a over the last 2 sts. Work 5th row in pattern AT THE SAME TIME inc evenly as follows (= from RS): Work A.1a over the first 2 sts, A.1b over the next 8-10-12-14-14-16 sts and inc 0-0-0-0-2-4 dc evenly, A.2 as before (= 2 times in width), A.1b over the next 6-10-10-12-12-12 sts and inc 0-2-4-4-0-0 dc evenly, A.2 as before, A.1b over the next 20-26-26-30-32-36 sts and inc 0-0-2-4-4-8 dc evenly, A.2 as before, A.1b over the next 6-10-10-12-12-12 sts and inc 0-2-4-4-0-0 dc evenly, A.2 as before, A.1b over the next 8-10-12-14-14-16 sts and inc 0-0-0-0-2-4 dc evenly, finish with A.1c over the last 2 sts = 116-138-148-162-160-176 dc (includes inc in A.2). Continue pattern and inc in A.2. When last row remains in A.2, piece measures approx. 18-18-19-19-21-21 cm / 7"-7"-7½"-7½"-8¼"-8¼" from neck edge (= 212-234-260-274-304-320 dc). Work last row of A.2 from WS as follows: Work A.1c over the first 2 dc, A.1b over the next 8-10-12-14-16-20 dc, A.2 over the next 20-20-22-22-26-26 dc (= 1 time in width), 8-8-8-10-10-12 ch, skip the next 46-52-58-60-64-64 dc (i.e. 20-20-22-22-26-26 dc A.2, 6-12-14-16-12-12 dc A.1b and 20-20-22-22-26-26 dc A.2 for sleeve), A.2 over the next 20-20-22-22-26-26 dc (= 1 time in width), A.1b over the next 20-26-28-34-36-44 dc, A.2 over the next 20-20-22-22-26-26 dc (= 1 time in width), 8-8-8-10-10-12 ch, skip the next 46-52-58-60-64-64 dc (i.e. 20-20-22-22-26-26 dc A.2, 6-12-14-16-12-12 dc A.1b and 20-20-22-22-26-26 dc A.2 for sleeve), A.2 over the next 20-20-22-22-26-26 dc (= 1 time in width), A.1b over the next 8-10-12-14-16-20 dc, finish with A.1a over the last 2 dc = 137-147-161-175-197-217 sts. Continue piece with light gray. Work next row as follows from RS: Work A.1a over the first 2 dc, A.1b over the next 28-30-34-36-42-46 sts, 1 dc in each of the 8-8-8-10-10-12 ch under sleeve, insert 1 marker between these sts, A.1b over the next 60-66-72-78-88-96 sts, 1 dc in each of the 8-8-8-10-10-12 ch under sleeve, insert 1 marker between these, A.1b over the next 28-30-34-36-42-46 sts, finish with A.1c over the last 3 sts. Insert 1 marker in piece, NOW MEASURE PIECE FROM HERE. Work next row as follows from WS: Work A.1c over the first 2 dc as before, repeat A.1b over the next 132-142-156-170-192-212 dc, finish with A.1a over the last 2 dc. Continue pattern like this. When piece measures 4 cm / 1½" from marker, dec 2 dc at each marker - READ DECREASE TIP. Dec like this every 4-4½-4½-5½-5½-6 cm / 1½"-1¾"-1¾"-2¼"-2¼"-2½" 3 times in total = 124-134-148-162-184-204 dc. When piece measures 14-16-16-17-17-19 cm / 5½"-6¼"-6¼"-6¾"-6¾"-7½" from marker, inc 2 dc at each marker – see INCREASE TIP. Inc like this every 2½ cm / ⅞" a total of 6 times = 148-158-172-186-208-228 dc. Continue pattern until piece measures 35-37-37-38-38-40 cm / 13¾"-14½"-14½"-15"-15"-15¾" from marker (= 54-56-58-59-61-63 cm / 21¼"-22"-22¾"-23¼"-24"-24¾" from neck edge), adjust to finish with 1 row dc. Fasten off. SLEEVE: = 46-52-58-60-64-64 dc. Work first round on sleeve with same color as last stripe in sc on body. Sleeve is worked in the round, top down. Beg by working mid under sleeve as follows: Work 1 sc in the 5th-5th-5th-5th-5th-6th ch of the 8-8-8-10-10-12 ch worked in armhole on body, work 1 ch (= 1 sc), work 1 sc in each of the next 3-3-3-5-5-6 ch, A.1b (i.e. 1 round with sc and ch) over the 46-52-58-60-64-64 dc over sleeve, finish with 1 sc in each of the remaining 4-4-4-4-4-5 ch under sleeve = 54-60-66-70-74-76 sts. Continue piece with light gray. Insert 1 marker in piece, NOW MEASURE PIECE FROM HERE. Work A.1b in the round. When piece measures 3 cm / 1" from marker, dec 2 dc under sleeve - READ DECREASE TIP-1. Dec like this every 3-2½-2-2-2-2 cm / 1⅛"-⅞"-¾"-¾"-¾"-¾" 11-13-15-17-18-18 times in total = 32-34-36-36-38-40 sts. When piece measures 42-44-43-45-45-47 cm / 16½"-17¼"-17"-17¾"-17¾"-18½" from marker, adjust to finish with 1 round dc. Fasten off. Work the other sleeve the same way. LEFT BAND: Beg at the bottom of jacket from WS. Worked back and forth. Work with light gray as follows: Work 1 sl st around first dc, 1 sc, * ch 2, skip approx. 1 cm / ⅜", 1 sc around next dc *, repeat from *-* evenly up along edge on jacket, adjust to finish with 1 sc in last dc at the top of neck. On next row work 2 dc around every ch-space. Then work A.1a over the first 2 dc, repeat A.1b until 2 dc remain, finish with A.1c over the last 2 dc. Work a total of 3 rows of A.1 (= last row is a row with sc and ch). Fasten off. RIGHT BAND: Work as left but now from the top of jack down along the edge of jacket from WS. NECK EDGE: Work with light gray from RS as follows: Beg with 1 sl st around first dc on band, 1 ch (= 1 sc), work 1 sc around same dc, 2 sc around each of the next dc on band, 1 sc in every ch where dc was worked in first row (= 84-86-90-96-98-104 sc), finish with 2 sc around every dc over band. Fasten off. ASSEMBLY: Sew on buttons on left band. Fasten 1st button approx. 2 cm / ¾" from neck edge, then fasten them approx. 8 cm / 3⅛" apart. Button between 2 dc on right band. |
||||||||||||||||||||||
Diagram explanations |
||||||||||||||||||||||
|
||||||||||||||||||||||
 |
||||||||||||||||||||||
 |
||||||||||||||||||||||
 |
||||||||||||||||||||||
Have you finished this pattern?Tag your pictures with #dropspattern #mistymountaincardigan or submit them to the #dropsfan gallery. Do you need help with this pattern?You'll find 12 tutorial videos, a Comments/Questions area and more by visiting the pattern on garnstudio.com. © 1982-2026 DROPS Design A/S. We reserve all rights. This document, including all its sub-sections, has copyrights. Read more about what you can do with our patterns at the bottom of each pattern on our site. |
||||||||||||||||||||||


With over 40 years in knitting and crochet design, DROPS Design offers one of the most extensive collections of free patterns on the internet - translated to 17 languages. As of today we count 324 catalogs and 12290 patterns - 12280 of which are translated into English (US/in).
We work hard to bring you the best knitting and crochet have to offer, inspiration and advice as well as great quality yarns at incredible prices! Would you like to use our patterns for other than personal use? You can read what you are allowed to do in the Copyright text at the bottom of all our patterns. Happy crafting!
Post a comment to pattern DROPS 173-38
We would love to hear what you have to say about this pattern!
If you want to leave a question, please make sure you select the correct category in the form below, to speed up the answering process. Required fields are marked *.