
Popular categories
Looking for a yarn?


Comments / Questions (135)
![]() FERNANDA PIATTELLI wrote:
FERNANDA PIATTELLI wrote:
Buon giorno non capisco il 5 giro dello sprone perche c'e scritto taglia xxl--xxxl ma per la l o xl ce si deve fare? Aspetto vostra risposta al piu presto se no non riesco ad andare avanti grazie fernanda
23.03.2020 - 19:53DROPS Design answered:
Buongiorno Fernanda. Per le taglie l e Xl lavora il quinto giro a maglie alte, senza aumenti. Su questo giro, gli aumenti sono previsti solo per le taglie xxl-xxxl. Buon lavoro!
24.03.2020 - 08:27
![]() Sylvie wrote:
Sylvie wrote:
Bonjour, je bloque après le rang 6: que signifie "répéter ensuite A1 2 fois ou 6 fois " ? Et comment crochète -t- on A1 jusqu'à la fin de A2? Merci!
03.02.2020 - 15:47DROPS Design answered:
Bonjour Sylvie, vous avez suffisamment de mailles pour crocheter 2 motifs (= 2 fois) A.1 ou bien 6 motifs (=6 fois) A.1 entre les marqueurs indiqués. Bon crochet!
03.02.2020 - 16:34
![]() Charlotte wrote:
Charlotte wrote:
Are all rows worked from the right side?
07.11.2019 - 15:51DROPS Design answered:
Dear Charlotte! Yea, every row / round is crocheted from the right side in this piece. Happy Crafting!
08.11.2019 - 23:04
![]() Charlotte wrote:
Charlotte wrote:
Are all rows worked from the right side?
07.11.2019 - 15:50DROPS Design answered:
Dear Charlotte, yes correct, you are working here in the round, always from the right side - ie read diagrams from the left towards the right on every round. Happy crocheting!
07.11.2019 - 16:29
![]() B‘Tina wrote:
B‘Tina wrote:
Hallo, ich arbeite das Modell in meiner Größe M. Meine Maschenprobe ist identisch, wie in der Anleitung. Die Höhe der Passe ist 18cm. Leider bin ich - nach Anprobe - noch einiges von meiner Achsel entfernt, müsste also weitere Rd. häkeln. Lt. Anleitung und lt. meiner Arbeit habe ich 48M zwischen den Markern für den Ärmel + 8LM unter der Achsel = 56M. Da komme ich aber selbst mit Geduld und Spucke nicht mit meinem Arm hinein bzw. der Ärmel spannt unkomfortabel. Was tun?
19.08.2019 - 00:13DROPS Design answered:
Liebe B"Tina, wir können leider nicht jede Anleitung nach jeder Anfrage anpassen, aber in Ihrem Fall können Sie vielleicht einige extra Runde in A.3 häkeln, dann A.1 bei der nächsten Runde weiterhäkeln damit das Muster in der Höhe stimmt, probieren Sie mal ob es so klappt oder nicht; Bei individuelle Anfragen nehmen Sie bitte Kontakt mit Ihrem Laden auf. Viel Spaß beim häkeln!
19.08.2019 - 10:53
![]() Sandra wrote:
Sandra wrote:
I just finished the 6th round with the DC where you increase in a.1. The pattern then says REPEAT diagram a.1 so many times between specific markers and work a.2 as before. Am I going back to the arrow on a.1 and repeating the rows I just did? Or am I continuing into a.1a and a.2 all the way up the pattern? Thank you!
31.07.2019 - 02:44DROPS Design answered:
Dear Sandra, after you have increased on row 6 in A.1 (dc row), crochet row 7 as shown in diagram as before. Since you increased some stitches, you will have more repeats of A.1 between the markers, A.2 is worked as before. Happy crocheting!
08.08.2019 - 11:28
![]() Sylvia wrote:
Sylvia wrote:
I want to know what round should be on for 2nd round of under arm where says for all sizes & Dec 4 I'm doing m size. Gosh why this pattern so hard to understand it's driving me crazy
02.07.2019 - 11:34DROPS Design answered:
Dear Sylvia, when working body you are continuing with A.1a from yoke and dc in the stitches under sleeves, you then decrease on next round worked entirely with dc in A.1a, depending on your tension and size, the row may be different, it just need to be a row worked with only dc (= like row 1, 3, 5... in A.1a). Happy crocheting!
02.07.2019 - 11:45
![]() Sylvia wrote:
Sylvia wrote:
I'm stuck on beginning body where says all sizes says on first round with dc Dec 4 dc evenly where do I place them? And what row do I start as finished on fan st ie 3dc 2ch 3dc. So do I miss out nxt ch row ?
01.07.2019 - 16:42DROPS Design answered:
Dear Sylvie, you will have to decrease on next round worked with dc, ie continue diagram to the next round with only dc, then decrease 4 dc evenly on the round - calculate here where to decrease. Happy crocheting!
02.07.2019 - 08:38
![]() Sylvia wrote:
Sylvia wrote:
I don't think you understood my question. It's the last 2 rows of A2 row below has 1ch starting beginning & end then also same on A1 . So what do I do after ch1 ie another ch1 or dc in between as when do the last round not enough sts
24.06.2019 - 10:54DROPS Design answered:
Dear Sylvia, sorry for misunderstanding, yes you start each A.1a with 1 ch, and ends with 1 ch, ie you will have 2 chains between each treble (UK English)/double crochet (US English) on next to last row in A.2 - and also 2 chains at the transition between A.1/A.2 and A.2/A.1. Happy crocheting!
24.06.2019 - 11:10
![]() Sylvia wrote:
Sylvia wrote:
I'm struggling with round 13 where starts with 1 ch either end. Do I carry it over so always 2 ch? But when do nxt round is it 1 dc 3dc 2dc in frequency as don't work out right. I've undone this pattern so many times. Never struggled with anything so much!
23.06.2019 - 16:10DROPS Design answered:
Dear Sylvia, not sure which round you are meaning sorry, but every round starts with A.4 (= 1 or 3 chains) and this stitch replace 1st stitch on the round (see CROCHET INFO), ie when you have to start with 1 chain this replace the first dc on round, then crochet the next chains/the next trebles as shown in diagram, and finish round with 1 slip stitch in the chain from beg of round. Happy crocheting!
24.06.2019 - 08:06
|
||||||||||||||||||||||||||||
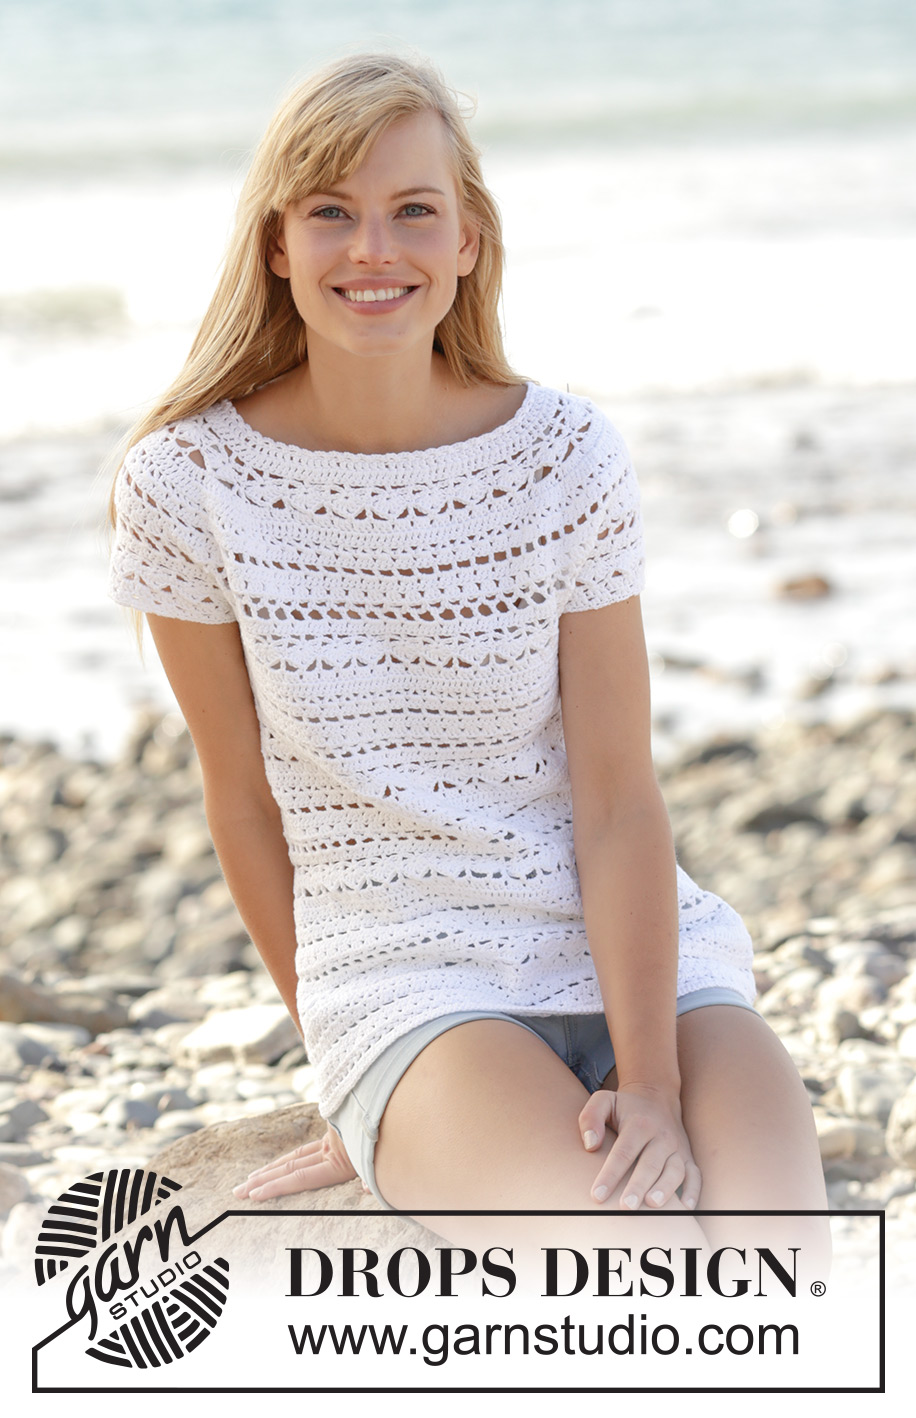
Seashore Bliss Top#seashoreblisstop |
||||||||||||||||||||||||||||
|
|
||||||||||||||||||||||||||||
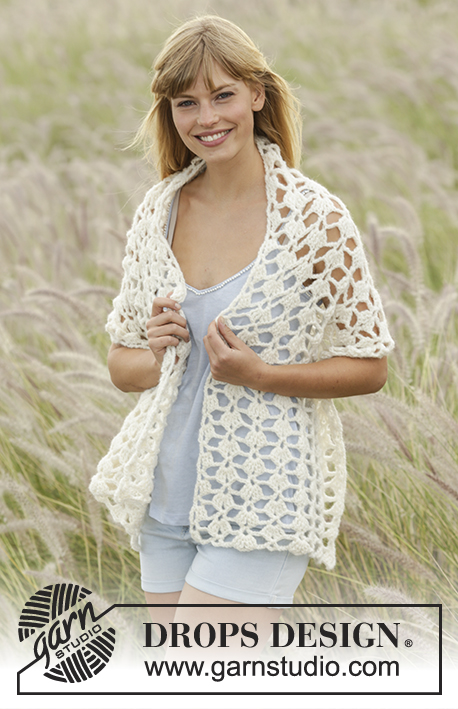
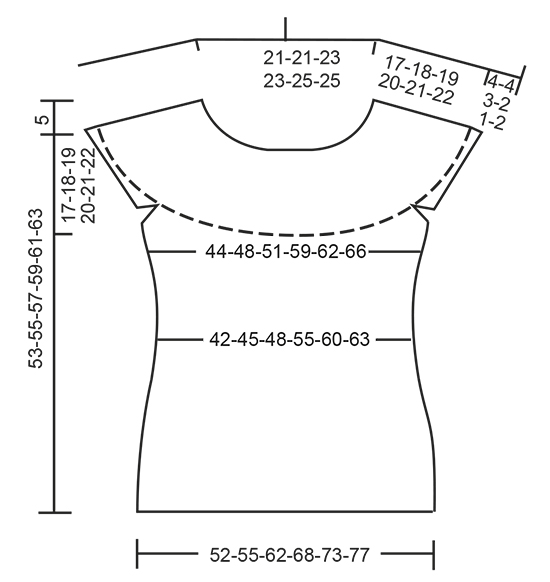
Crochet DROPS top with lace pattern and round yoke in ”Muskat”. The piece is worked top down. Size: S - XXXL.
DROPS 169-26 |
||||||||||||||||||||||||||||
|
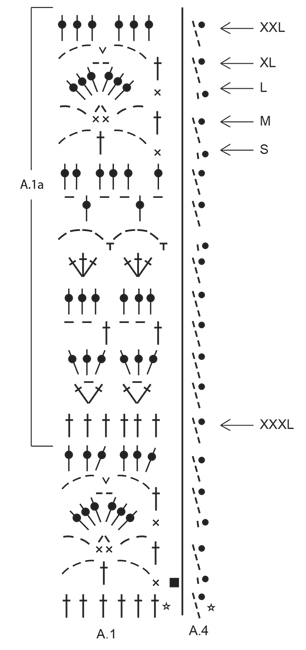
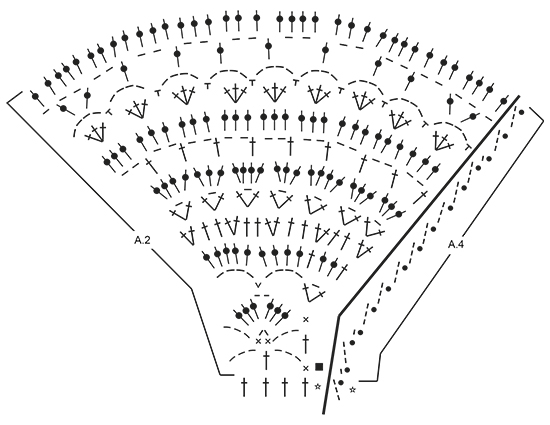
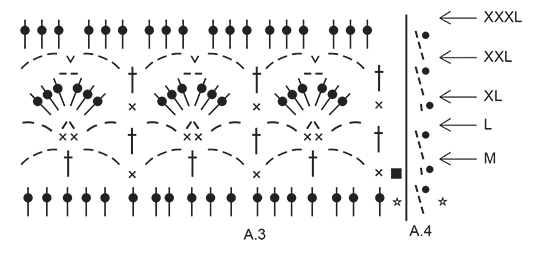
PATTERN: See diagrams A.1 to A.4. Diagram A.4 shows how round beg and ends. CROCHET INFO: Replace first dc at beg of every dc round with 3 ch. Finish round with 1 sl st in 3rd ch at beg of round. Replace first sc at beg of every sc round with 1 ch. Finish every round with 1 sl st in ch from beg of round. INCREASE TIP: Inc 1 dc by working 2 dc in same dc. DECREASE TIP: Dec 1 dc by working 2 dc tog as follows: Work 1 dc but wait with last pull through (= 2 sts on hook), then work next dc but on last pull through, pull yarn through all 3 sts on hook. TIP ARMHOLE: Size S, M and XL: In the last repeat of A.1 before marker 1 and marker 3 (= beginning of armhole), replace the last chain stitch with a double crochet in the last stitch of the same repeat on previous row. ---------------------------------------------------------- TOP: The piece is worked top down. NOTE: It is important to keep the crochet gauge vertically so that the measurements on yoke will be correct. YOKE: Work 108-108-117-117-124-124 ch on hook size 4 mm / G/6 with Muskat and form 1 ring with 1 sl st in first ch. Work first round as follows: Work 3 ch (= 1 dc) - READ CROCHET INFO, 1 dc in each of the next 3-3-5-5-5-5 ch, * skip ch 1, 1 dc in each of the next 6 ch *, repeat from *-* the entire row = 94-94-102-102-108-108 dc. Work 1 round with 1 dc in every dc and inc 18-18-22-22-28-40 dc evenly - READ INCREASE TIP = 112-112-124-124-136-148 dc. Work next round and insert 8 markers in the piece as follows: A.4 shows how round beg and ends. Insert 1st marker at beg of round, work A.2 over the first 4 dc, insert 2nd marker, A.1 over the next 12 dc (= 2 times in width), insert 3rd marker, A.2 over the next 4 dc, insert 4th marker, work A.1 over the next 36-36-42-42-48-54 dc (= 6-6-7-7-8-9 times in width), insert 5th marker, A.2 over the next 4 dc, insert 6th marker, A.1 over the next 12 dc (= 2 times in width), insert 7th marker, A.2 over the next 4 dc, insert 8th marker, A.1 over the last 36-36-42-42-48-54 dc (= 6-6-7-7-8-9 times in width). REMEMBER THE CROCHET GAUGE! SIZE XXL-XXXL: On 5th round (round with dc) in A.1 inc evenly as follows: Between 2nd and 3rd marker and 6th and 7th marker: Inc 6-6 dc. 12-12 dc have been inc in total on round (= 18-18 dc between 2nd and 3rd marker and 6th and 7th marker). Repeat A.1 3-3 times between 2nd and 3rd marker and between 6th and 7th marker: ALL SIZES: On 6th round (round with dc) in A.1 inc evenly as follows: Between 2nd and 3rd marker and 6th and 7th marker: Inc 0-0-6-6-6-6 dc (= 12-12-18-18-24-24 dc between these markers). Between 4th and 5th marker and 8th and 1st marker: Inc 0-6-6-6-6-6 dc (= 36-42-48-48-54-60 dc between each of these markers). Then repeat diagram A.1 2-2-3-3-4-4 times between 2nd and 3rd marker, 6-7-8-8-9-10 times between 4th and 5th marker, 2-2-3-3-4-4 times between 6th and 7th marker and 6-7-8-8-9-10 times between 8th and 1st marker. Work A.2 as before. SIZE XL-XXL-XXXL: On 8th round (round with dc) in A.1 inc evenly as follows: Between 4th and 5th marker and 8th and 1st marker: Inc 6-6-6 dc (= 54-60-66 dc between each of these markers). 12-12-12 dc have been inc in total on round. Repeat A.1 9-10-11 times between 4th and 5th marker and between 8th and 1st marker. Repeat inc on 10th round in A.1 (= 60-66-72 dc between each of these markers). Repeat diagram A.1 10-11-12 times between 4th and 5th marker and between 8th and 1st marker. ALL SIZES: On last round in A.2 insert 1 new marker in the middle of each A.2 (i.e. 18 dc on each side of marker in A.2 = 4 markers). Remove the old markers (= 4 markers remain in piece). Sts between markers are for sleeves (= 48-48-54-54-60-60 dc on each sleeve). When A.2 has been worked 1 time vertically, there are 240-252-276-300-324-336 dc on round. Yoke is now done in size S. SIZE M-L-XL-XXL-XXXL: Continue with pattern A.1 as before but over dc in A.2 (= 36 dc) work A.3 2 times in total in width (marker is in the middle of these repetitions). Work 1-2-3-4-5 rounds of A.3 (see arrow in diagram for correct size). Piece now measures 17-18-19-20-21-22 cm / 6¾"-7"-7½"-8"-8¼"-8¾" vertically. ALL SIZES: Work A.1a (see arrow on where pattern beg in the different sizes) 3 times in total in width until first marker - SEE ARMHOLE TIP, work 8-8-8-10-10-10 ch, skip sts between the 2 markers (= sleeve), work A.1a 12-13-14-16-17-18 times in total in width until next marker (= front piece), work 8-8-8-10-10-10 ch, skip sts between the 2 markers (= sleeve), work A.1a 9-10-11-13-14-15 times in total in width (= 160-172-184-212-224-236 sts). Fasten off. BODY: Beg round mid under sleeve as follows: Size S-L: Work 1 sl st in 5th ch, ch 1, work 1 sc in each of the next 3-3 ch, work A.1a as before until ch under 2nd sleeve, 1 sc in each of the 8-8 ch under sleeve, work A.1a as before the rest of round. Work the 8-8 sts under each sleeve as 1st st in A.1a. SIZE M-XL-XXL-XXXL: Work 1 sl st in 5th ch, ch 3, work 1 dc in each of the next 3-5-5-5 ch, work A.1a as before until ch under 2nd sleeve, 1 dc in each of the 8-10-10-10 ch under sleeve, work A.1a as before the rest of round. Work the 8-10-10-10 sts under each sleeve as 1st st in A.1a. ALL SIZES: Insert 1 marker in piece, NOW MEASURE PIECE FROM HERE. On first round with dc dec 4-4-4-2-2-2 dc evenly - READ DECREASE TIP = 156-168-180-210-222-234 dc. Then repeat A.1a 26-28-30-35-37-39 times in width. Repeat A.1a vertically. When piece measures 12 cm / 4¾", adjust so that next round is with dc, dec 6 dc evenly = 150-162-174-204-216-228 dc. Now repeat A.1a 25-27-29-34-36-38 times in width. SIZE XL: Repeat dec when piece measures 16 cm / 6¼" from marker = 198 dc. Now repeat A.1a 33 times in width. ALL SIZES: When piece measures 20-21-22-23-24-25 cm / 8"-8¼"-8¾"-9"-9½"-9¾" from marker – adjust so that next round is with dc, inc 6 dc evenly. Repeat inc every 2-2-1½-1½-1½-1½ cm / ¾"-¾"-½"-½"-½"-½ 5-5-7-7-7-7 more times = 186-198-222-246-264-276 dc. Repeat A.1a 1 more in width on every inc. When all inc are done, repeat A.1a 31-33-37-41-44-46 times in width. Work until piece measures 36-37-38-39-40-41 cm / 14¼"-14½"-15"-14¼"-15¾"-16⅛" from marker, adjust to finish nicely according to pattern. Fasten off. SLEEVE EDGE: SIZE S: Beg by working mid under sleeve as follows: Work 1 sl st in 4th ch of the 8 ch worked in armhole on body. Work 1 ch (= 1 sc). Then work with 1 sc in each of the next ch 4, work A.3 over the next 18 dc, work A.1 (adjust pattern according to A.3) 2 times in total in width as before, work A.3 over the next 18 dc, finish with 1 sc in each of the last 3 ch. Work as 1st st in A.3 in the 8 sts under sleeve. On last round in A.3 dec 10 dc evenly = 46 dc. SIZE M-XL-XXL: Beg by working mid under sleeve as follows: Work 1 sl st in 4th ch of the 8-10-10 ch worked in armhole on body. Work 3 ch (= 1 dc). Then work with 1 dc in each of the next 4-6-6 ch, work A.3 as before, work A.1 (adjust pattern according to A.3) 2-3-4 times in total in width as before, work A.3, finish with 1 dc in each of the last 3 ch. Work as 1st st in A.3 in the 8-10-10 sts under sleeve. On last round in A.3 dec 10 dc evenly = 46-54-60 dc. SIZE L: Beg by working mid under sleeve as follows: Work 1 sl st in 4th ch of the 8 ch worked in armhole on body. Work 1 ch (= 1 sc). Then work 1 sc in each of the next ch 4, work A.3 as before, work A.1 (adjust pattern according to A.3) 3 times in total in width as before, work A.3, finish with 1 sc in each of the last 3 ch. Work as 1st st in A.3 in the 8 sts under sleeve. On last round in A.3 dec 10 dc evenly = 52 dc. SIZE XXXL: Beg by working mid under sleeve as follows: Work 1 sl st in 4th ch of the 10 ch worked in armhole on body. Work 3 ch (= 1 dc). Then work 1 dc in each of the next ch 6, work 1 dc in each of the 60 dc, finish with 1 dc in each of the last 3 ch. Work 1 dc in every dc and dec 10 dc evenly = 60 dc. ALL SIZES: Work * 1 sc in first/next dc, 1 ch, skip approx. 1 cm / ⅜" *, repeat from *-* around the entire sleeve. Fasten off. Work the other sleeve the same way. NECK EDGE: Crochet an edge around the neck. Beg mid back. Work * 1 sc in first/next dc, ch 3, skip approx. 1 cm / ⅜" *, repeat from *-* around the entire neck. Make sure to avoid a tight neck edge, adjust to finish with 1 sl st in first ch. Fasten off. |
||||||||||||||||||||||||||||
Diagram explanations |
||||||||||||||||||||||||||||
|
||||||||||||||||||||||||||||
 |
||||||||||||||||||||||||||||
 |
||||||||||||||||||||||||||||
 |
||||||||||||||||||||||||||||
 |
||||||||||||||||||||||||||||
Have you finished this pattern?Tag your pictures with #dropspattern #seashoreblisstop or submit them to the #dropsfan gallery. Do you need help with this pattern?You'll find 10 tutorial videos, a Comments/Questions area and more by visiting the pattern on garnstudio.com. © 1982-2026 DROPS Design A/S. We reserve all rights. This document, including all its sub-sections, has copyrights. Read more about what you can do with our patterns at the bottom of each pattern on our site. |
||||||||||||||||||||||||||||


With over 40 years in knitting and crochet design, DROPS Design offers one of the most extensive collections of free patterns on the internet - translated to 17 languages. As of today we count 324 catalogs and 12290 patterns - 12280 of which are translated into English (US/in).
We work hard to bring you the best knitting and crochet have to offer, inspiration and advice as well as great quality yarns at incredible prices! Would you like to use our patterns for other than personal use? You can read what you are allowed to do in the Copyright text at the bottom of all our patterns. Happy crafting!
Post a comment to pattern DROPS 169-26
We would love to hear what you have to say about this pattern!
If you want to leave a question, please make sure you select the correct category in the form below, to speed up the answering process. Required fields are marked *.