
Popular categories
Looking for a yarn?


Comments / Questions (222)
![]() Bonnie Croteau wrote:
Bonnie Croteau wrote:
I am having trouble hitting the right amount of stitches for size L/XL on row 10, without increasing I have 163 stitches between chain spaces. Row 8 came out perfectly and row 9 doesn't leave much room for error. What am I doing wrong?? In row 10 should I decrease 8 stitches instead of increasing to get to the 155 stitches I am supposed to have?
11.08.2016 - 17:39DROPS Design answered:
Hi Bonnie. We have edited the pattern and added a diagram for the mesh pattern. Maybe this can help you further to get it right :) Sorry for the wait.
31.10.2016 - 14:59
![]() Veronica wrote:
Veronica wrote:
I have been practicing and think I now can crochet the pattern. Is it possible to use a cotton blend rather than 100% cotton? I was not sure if it would affect the drape.
08.08.2016 - 21:16DROPS Design answered:
Dear Veronica, remember that different yarns with different textures will give the garment different look - you are welcome to contact your DROPS store for any personnal assistance choosing a yarn. Happy crocheting!
09.08.2016 - 08:58
![]() Pashmina wrote:
Pashmina wrote:
Jeg har netop færdiggjort dette smukke sjal. Det er virkelig lækkert.
06.08.2016 - 11:32
![]() Bonnie Croteau wrote:
Bonnie Croteau wrote:
After completing the mesh pattern, are there 2 rows of double crochet, or am I misreading something?
05.08.2016 - 19:35DROPS Design answered:
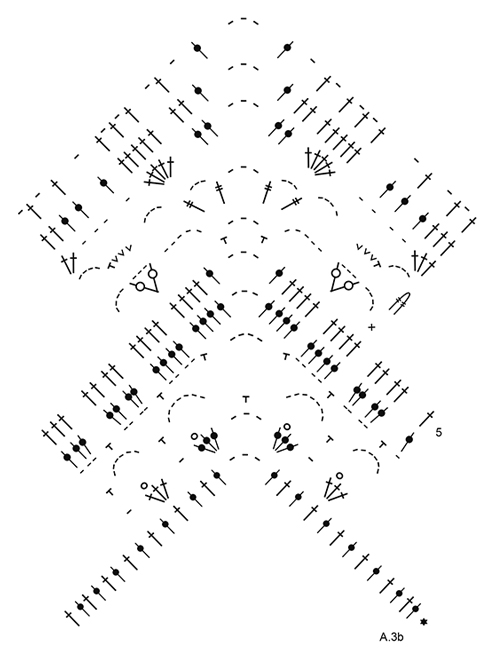
Dear Mrs Croteau, after the mesh pattern you are working diagrams A.1a, A.2a and A.3a, ie on 1st row in diagrams you are working dc (see also written pattern how to work this round), then continue with diagrams as explained. Happy crocheting!
08.08.2016 - 08:49
![]() Veronica wrote:
Veronica wrote:
I am sorry to bother you again I see the video does answer my question. I was taught that the treble crochet was made with two yarn overs, in your video it is made with 3 yarn overs. Is this because it is a double treble?
05.08.2016 - 15:38DROPS Design answered:
Dear Veronica, remember to check the language you are following (select language under picture by scrolling menu down). Crochet terminology can be different from UK-English and US-English. Happy crocheting!
05.08.2016 - 17:11
![]() Veronica wrote:
Veronica wrote:
The video didn't answer my question I haven't reached that section yet. I did figure out the slanted stitch was in one ch.or space. Now I am having difficulty with the flower row 7 I believe. Is there a video for that. It is joining the two together.
05.08.2016 - 15:22DROPS Design answered:
Dear Veronica, video shows how to work A.2 and A.3 from 1st row, then when you reach row 4 inc as explained in written pattern. Happy crocheting!
05.08.2016 - 17:10
![]() Claudia wrote:
Claudia wrote:
Hi, ich will jetzt mit 2b anfangen. in der ersten Reihe von 2b soll ich Stb. in Masche und Stb in LM Bogen arbeiten. Aber die vorige Reihe (letzte von 2a) hat laut Diagram gar keine LM Bögen sondern auch Stb in Masche und Stb um LMbogen der vorigen Reihe. Also in der ersten Reihe von 2a, muss es da nicht einfach nur Stb geben?
04.08.2016 - 22:49
![]() Claudia wrote:
Claudia wrote:
Hi, ich will nun 2b anfangen. Die letzte Reihe von 2a lautet Stb. in Masche und Stb. um Luftmasche im Wechsel. Nun steht als erste Reihe bei 2b ebenfalls Stb.in Masche und Stb um LM im Wechsel, aber da gibt es ja gar keine Luftmache??? Oder liest man das Diagram 2b von oben nach unten?
04.08.2016 - 22:33Claudia answered:
Ups, ich habs kapiert...keine Antwort mehr nötig, hatte nach diversen Häkelkämpfen einen Knoten im Hirn.
04.08.2016 - 23:48
![]() Rahel wrote:
Rahel wrote:
An Karl : Also lesen kann ich gerade noch so knapp "In der 10. Rd 8 Stb gleichmässig verteilt an beiden Seiten von A.3a zunehmen (= 16 Stb insgesammt in der Runde zugenommen)"
28.07.2016 - 20:59Karl wrote:
Es steht ja "abnehmen"
28.07.2016 - 18:47
|
|||||||||||||||||||||||||||||||||||||||||||||||||
Light's Embrace#lightsembraceponcho |
|||||||||||||||||||||||||||||||||||||||||||||||||
 |
 |
||||||||||||||||||||||||||||||||||||||||||||||||
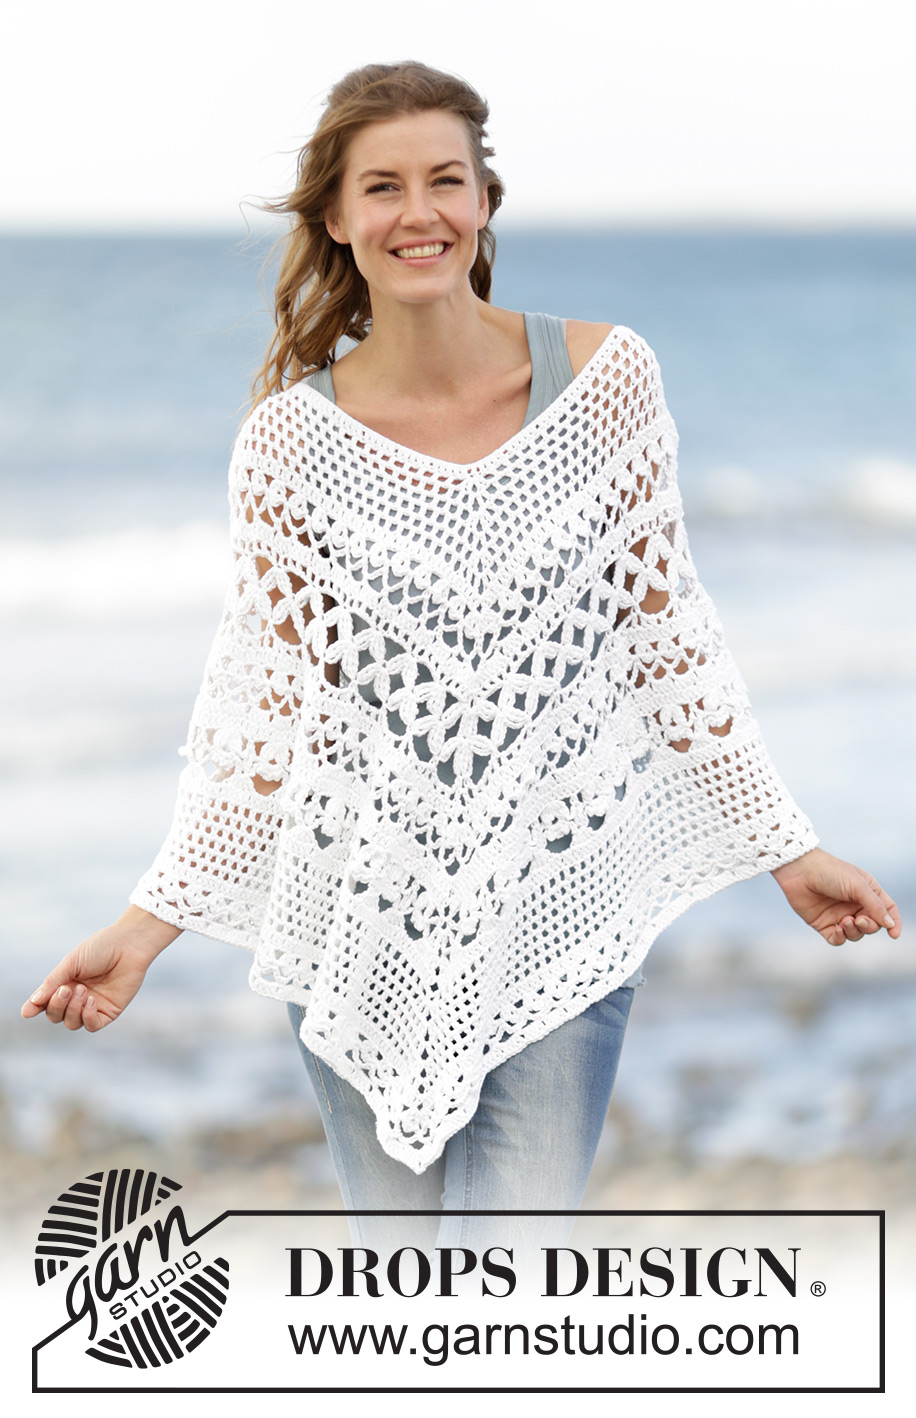
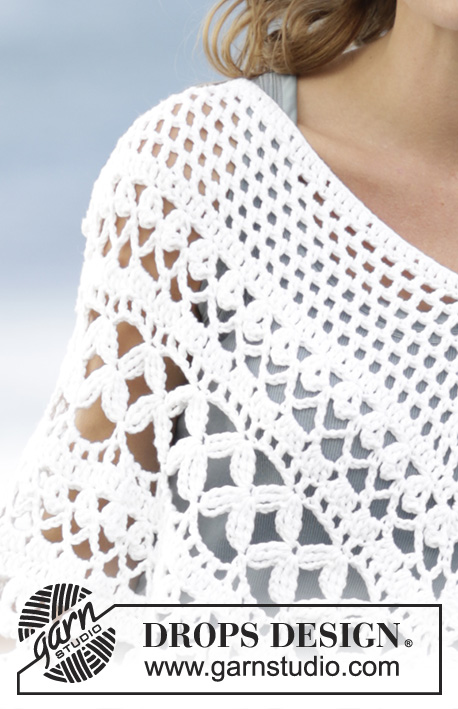
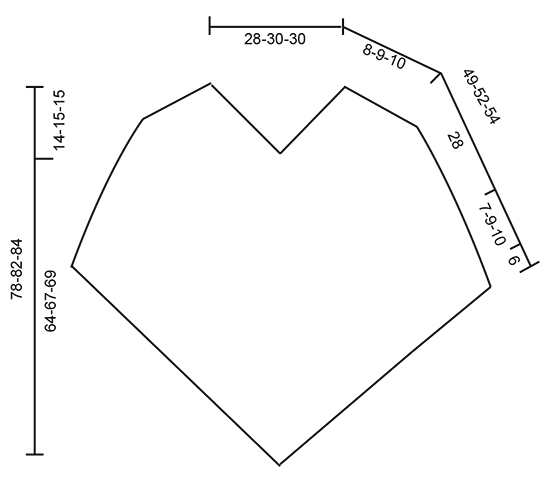
Crochet DROPS poncho with lace pattern, worked top down in ”Paris”. Size S-XXXL.
DROPS 169-4 |
|||||||||||||||||||||||||||||||||||||||||||||||||
|
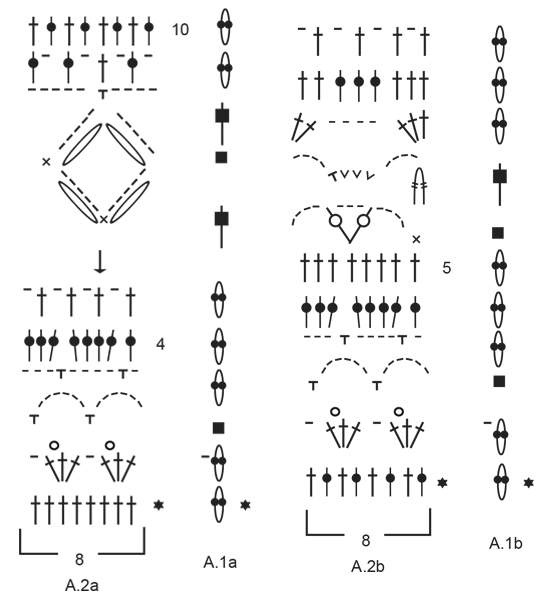
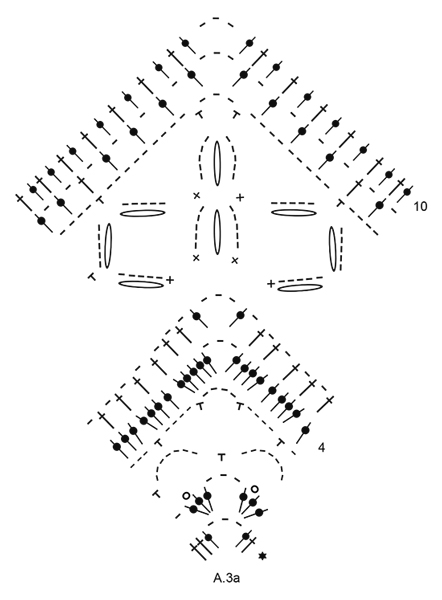
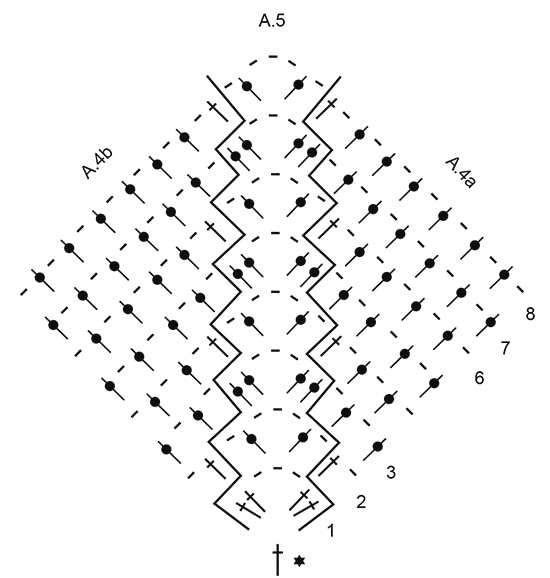
PATTERN: See diagrams A.1 to A.5. Diagrams A.1a and A.1b show how round beg and ends. CROCHET INFO: Beg every dc round with 3 ch (these ch do not replaces first dc). At the end of round work 1 sl st in 3rd ch at beg of round. NOTE: When working A.5 beg round with 3 ch. At the end of round work 1 dc in first st worked on round (i.e. st with the 3 ch in), then 1 sl st in 3rd ch at beg of round. WORK 2 TR TOG: Work 1 tr around ch-space below but wait with last pull through (= 2 loops on hook), skip 1 sc and work 1 tr around next ch-space but on last pull through, pull yarn through all loops on hook. WORK 3 TR TOG: Work 1 tr but wait with last pull through (= 2 sts on hook), work 1 more tr but wait with last pull through (= 3 loops on hook), work 1 more tr but on last pull through, pull yarn through all loops on hook. MESH PATTERN: ROUND 1: * Start with 1st row of A.5, work the 4 dc in first/next dc with marker, work (1 ch, ship 1 dc, 1 dc in next dc) until 1 dc remains before next marker, work 1 ch, skip next dc *, repeat from *-* 3 times more. There is now 4 repeats of A.5 on round. ROUND 2: * Work A.5 around first/next ch-space with marker, then work 1 dc in next dc, 1 ch, 1 dc around first ch-space, (1 ch, skip 1 dc, 1 dc in next ch-space) until 1 ch-space remains before next repeat of A.5, work 1 ch, 1 dc in next dc *, repeat from *-* 3 times more. ROUND 3: * Work A.5 around first/next ch-space with marker, then work (1 ch, skip 1 dc, 1 dc around next ch-space) until next repeat of A.5, 1 ch *, repeat from *-* 3 times more. ---------------------------------------------------------- PONCHO: Worked in the round, top down. First inc mid front, mid back and on each shoulder, then inc only mid front and mid back. Work 153-163-163 ch on hook size 4.5 mm/US 7 with Paris and form a ring with 1 sl st. Work 3 ch – see CROCHET INFO! Then work 1 dc in each of the next 3-1-1 ch, * skip ch 1, 1 dc in each of the next 5 ch *, repeat from *-* 24-26-26 more times on round = 128-136-136 dc + 3 ch on round. Now insert 4 markers from beg of round without working: Insert 1 marker in 1st dc on round (= mid back), skip 31-33-33 dc, insert 1 marker in next dc (= shoulder), skip 31-33-33 dc, insert 1 marker in next dc (= mid front), skip 31-33-33 dc, insert 1 marker in next dc (= shoulder), there are now 31-33-33 dc between last marker and beg of round. Now work MESH PATTERN - see explanation above. When 1st- 3rd round have been worked, repeat 2nd and 3rd round until 6-7-8 rounds with mesh pattern have been worked - see diagram A.4a and A.4b to see how to work the whole inc in each side of A.5. REMEMBER THE CROCHET GAUGE! Piece measures approx. 8-9-10 cm / 3"-3½"-4". Work next round as follows AT THE SAME TIME dec 0-8-8 dc evenly (= 0-4-4 dc dec on each side of mid back and mid front): *Work (2 dc, ch 3, 2 dc) around ch-space (= mid back on 1st repetition and mid front on 2nd repetition), then work 1 dc in every dc and 1 dc around every ch until next inc dc-group, work 3 dc around ch-space (= shoulder), work 1 dc in every dc and 1 dc around every ch until inc dc-group (mid front on 1st repetition and mid back on 2nd repetition)*, repeat from *-* 1 more time. There are now 117-125-133 dc between ch-space mid front and mid back (= 234-250-266 dc in total on round + 2 ch-space). Cut the yarn. NOTE: Then do not inc on each shoulder but only mid front and mid back on poncho. Work 1 sl st in 10th st from ch-space mid back and work pattern as follows: Work A.1a (shows how round beg and end, does not replace first st), A.2a (= 8 dc) 13-14-15 times in width, A.3a (= inc mid front), continue with A.2a 14-15-16 times in width, A.3a (= inc mid back) and A.2a 1 time in all sizes. On 4th round in A.3a there are 133-141-149 dc between ch-space mid front and mid back. Continue with pattern as before (there is now room for 16-17-18 repetitions A.2a on each side of A.3a). On 10th round inc 8 dc evenly on each side of A.3a (= 16 dc in total on round) = 163-171-179 dc on each side of ch-space mid front and mid back. Continue with pattern as before, but now work A.1b over A.1a, A.2b over A.2a and A.3b over A.3a (there is now room for 19-20-21 repetitions A.2 on each side of A.3). On 4th round inc 3 dc evenly between every repetitions of A.3 (i.e. 6 dc in total on round) = 169-177-185 dc between each ch-space mid front and mid back. Continue pattern (there is now room for 21-22-23 repetitions A.2 on each side of A.3). When entire diagram has been worked vertically, piece measures 36-37-38 cm / 14 ¼"-14½"-15". Cut the yarn. Now work mesh pattern as at beg of piece. Beg in ch-space mid back, and work mesh pattern from 3rd round in mesh pattern. Repeat 2nd and 3rd round until 6-8-10 rounds in total have been worked (includes last round in A.2 and A.3). Work next round as follows: * Work (2 dc, ch 3, 2 dc) around ch-space (= mid back), then work 1 dc in every dc and 1 dc around every ch until next rep of A.5 *, repeat from *-* 1 more time = 193-209-225 dc between ch-space mid front and mid back. Cut the yarn. Now work pattern A.1a, A.2a and A.3a as follows: Work 1 sl st in 12th dc from ch-space mid back and work pattern as follows: Work A.1a (shows how round beg and end, does not replace first st), A.2a until 2 dc remain before ch-space mid front, A.3a (= inc mid front), continue with A.2a until 2 dc remain before ch-space mid back, A.3a (= inc mid back) and A.2a 1 time in all sizes. When 4th row has been worked vertically, poncho measures 49-52-54 cm / 19 ¼"-20½"-21 ¼". Fasten off. |
|||||||||||||||||||||||||||||||||||||||||||||||||
Diagram explanations |
|||||||||||||||||||||||||||||||||||||||||||||||||
|
|||||||||||||||||||||||||||||||||||||||||||||||||
 |
|||||||||||||||||||||||||||||||||||||||||||||||||
 |
|||||||||||||||||||||||||||||||||||||||||||||||||
 |
|||||||||||||||||||||||||||||||||||||||||||||||||
 |
|||||||||||||||||||||||||||||||||||||||||||||||||
 |
|||||||||||||||||||||||||||||||||||||||||||||||||
Have you finished this pattern?Tag your pictures with #dropspattern #lightsembraceponcho or submit them to the #dropsfan gallery. Do you need help with this pattern?You'll find 13 tutorial videos, a Comments/Questions area and more by visiting the pattern on garnstudio.com. © 1982-2026 DROPS Design A/S. We reserve all rights. This document, including all its sub-sections, has copyrights. Read more about what you can do with our patterns at the bottom of each pattern on our site. |
|||||||||||||||||||||||||||||||||||||||||||||||||


With over 40 years in knitting and crochet design, DROPS Design offers one of the most extensive collections of free patterns on the internet - translated to 17 languages. As of today we count 324 catalogs and 12285 patterns - 12275 of which are translated into English (US/in).
We work hard to bring you the best knitting and crochet have to offer, inspiration and advice as well as great quality yarns at incredible prices! Would you like to use our patterns for other than personal use? You can read what you are allowed to do in the Copyright text at the bottom of all our patterns. Happy crafting!
Post a comment to pattern DROPS 169-4
We would love to hear what you have to say about this pattern!
If you want to leave a question, please make sure you select the correct category in the form below, to speed up the answering process. Required fields are marked *.