
Popular categories
Looking for a yarn?


Comments / Questions (65)
![]() Roelien wrote:
Roelien wrote:
Ja, het patroon klopt ook wel maar de foto geeft een ander beeld. Dank voor jullie reactie.
08.03.2016 - 10:10
![]() Roelien wrote:
Roelien wrote:
Volgens mij klopt de teltekening niet met de foto. In toer 3 van het vierkant moet je volgens de tekening haken een: stokjesgroep van 2 stokjes-3 lossen-stokjesgroep van 2 stokjes in de lossenboog van de vorige toer. De foto geeft aan, één 2 stokjesgroep in de lossenboog. Wat is nu juist??????
07.03.2016 - 13:40DROPS Design answered:
Hoi Roelien. Het patroon zou correct moeten zijn. Je hebt 1 stk-groep, 3 l, 1 stk-groep in elke 2 l van toer 2
07.03.2016 - 16:53
![]() Jessica wrote:
Jessica wrote:
Virkar detta mönster, har problem med rutan. Varv 3 där diagrammet anger att jag skall ha stolpgrupp med två stolpar med luftmask båge emellen. Dock när jag virkar detta blir rutan rund och när jag sedan tittar på bilden ser inte min ruta ut som på bilden utan varv 3 känns fel. Är det någon annan som har problem med detta mönster? Jessica
12.02.2016 - 08:12DROPS Design answered:
Hej Jessica, Jo men den är rund till sista varvet när du gör hörnen. Lycka till!
03.03.2016 - 13:29
![]() Nita Sands wrote:
Nita Sands wrote:
Really lovely. One of my favorite pieces.
22.12.2015 - 09:20Marie wrote:
Lovely - just right our mild Aussie evenings!
16.12.2015 - 08:29
|
|||||||||||||||||||||||||||||||||||||||||||
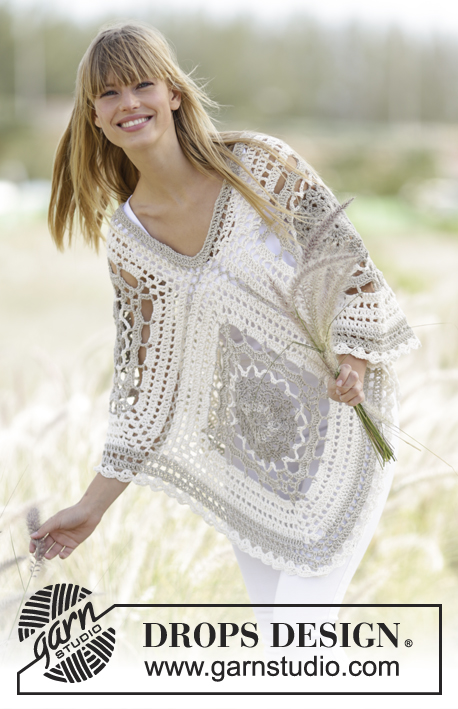
Sweet Martine#sweetmartineponcho |
|||||||||||||||||||||||||||||||||||||||||||
 |
 |
||||||||||||||||||||||||||||||||||||||||||
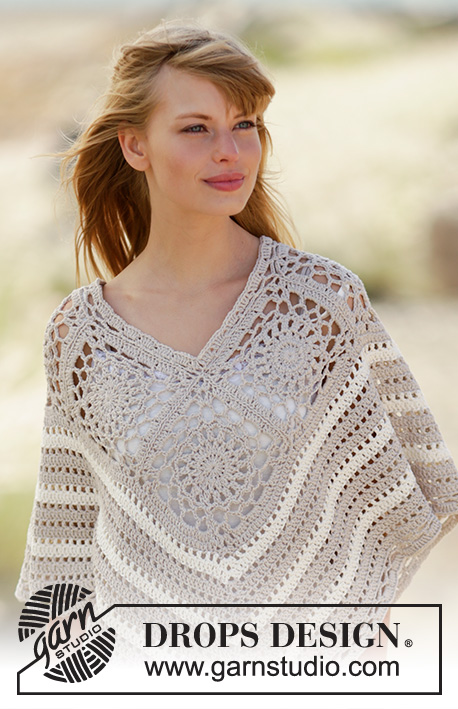
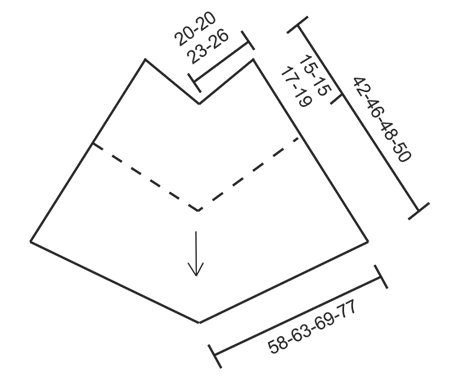
Crochet DROPS poncho with squares and lace pattern in ”Cotton Light”. The piece is worked top down. Size: S - XXXL.
DROPS 167-21 |
|||||||||||||||||||||||||||||||||||||||||||
|
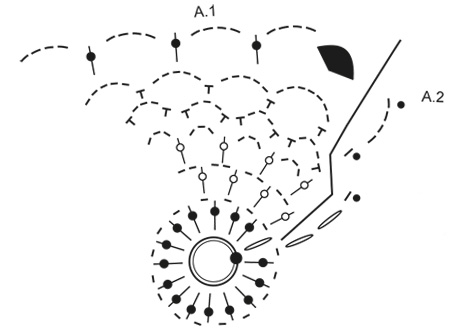
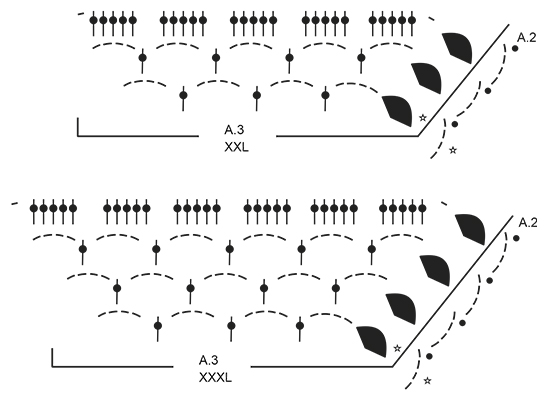
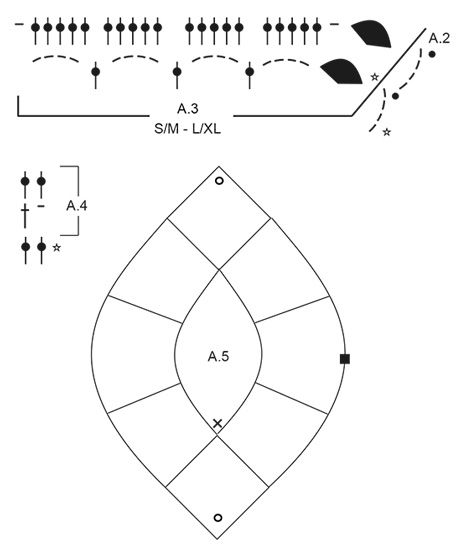
PATTERN: See diagrams A.1 to A.5. On diagram A.1 work first round in the entire round, then repeat A.1 and A.3 4 times in total on round. Diagram A.2 shows how every round beg and ends. A.5 shows how squares are assembled. CROCHET INFO: Beg every round with dc with 3 ch and finish with 1 sl st in 3rd ch. STRIPES: Work 0-4-4-4 rounds with light beige, then work * 2 rounds with off white, work 4 round with light beige *, repeat from *-* 3 times in total. INCREASE: On 1st round in A.4 (i.e. round with dc and ch) inc as follows: Work ch 1, around ch-space at the tip work as follows: 2 dc around ch-space, ch 3, 2 dc around same ch-space. On 2nd round in A.4 (i.e. round with dc) inc as follows: Work 1 dc around ch, around ch-space at the tip work as follows: 2 dc around ch-space, ch 3, 2 dc around same ch-space. ---------------------------------------------------------- PONCHO: The piece is worked from the neck down. First work squares as follows: SQUARE: Work 4 ch on hook size 4 mm / G/6 with light beige and form a ring with 1 sl st in first ch. Work A.1. Diagram A.2 shows how every round beg and ends. When first round of A.1 is worked, repeat A.1 4 times in total on round. When A.1 has been worked 1 time vertically, there are 16 ch-spaces and 4 corners. Work A.3 over A.1, i.e. repeat A.3 4 times in total on round (see diagram for correct size). NOTE: First round in A.3 is not worked, it only shows how next round is worked around sts. Diagram A.2 shows how every round beg and ends. When A.3 has been worked 1 time vertically, there are 80-80-100-120 dc and 4 corners. Fasten off. Square measures approx. 15-15-17-19 x 15-15-17-19 cm / 6"-6"-6¾"-7½" x 6"-6"-6¾"-7½". REMEMBER THE CROCHET GAUGE! Work 8 squares. ASSEMBLY: Sew squares tog edge to edge (see A.5) i.e. sew in outer loops of edge sts. These make up the upper part of poncho. Now work in the round from bottom edge of squares as follows: FROM SQUARES AND DOWN: ROUND 1: Beg in the side of square (see A.5), in the middle of the 1st square (i.e. 10-10-12-15 dc before corner). Work 3 ch – READ CROCHET INFO, work 1 dc in each of the first 10-10-12-15 dc, * over the 2 corners sewn tog work as follows: 1 dc in each of the next 2 dc, 2 dc around each of the next 2 corners, 1 dc in each of the next 2 dc *, then work 1 dc in every dc until next corner sewn tog (= over the next 20-20-25-30 dc), repeat from *-* over the next 2 corners sewn tog, 1 dc in each of the next 20-20-25-30 dc, over the next corner inc (see A.5) as follows: Work 1 dc around ch, around ch-space at the tip work as follows: 2 dc around ch-space, ch 3, 2 dc around same ch-space, 1 dc around next ch. Work 1 dc in every dc and from *-* over the next 8 corners sewn tog and the next 100-100-125-150 dc (i.e. 20-20-25-30 dc between each of the 2 corners sewn tog). Around next corner inc as follows: Work 1 dc around ch, around ch-space at the tip work as follows: 2 dc around ch-space, ch 3, 2 dc around same ch-space. Work 1 dc in every dc and from *-* the entire round, finish with 1 sl st in 3rd ch = 276-276-326-376 dc. ROUND 2: Work with off white - READ STRIPES. Work A.4 until 3 dc remain before ch-space in the tip, adjust to finish with 1 dc in last dc, work INCREASE – see explanation above. Repeat A.4 until next tip, work increase, work A.4 the rest of round. On every round inc 8 dc, i.e. inc 2 dc on each side of mid front/back. Repeat stripes and A.4 until finished measurements. When stripes have been worked, piece measures approx. 36-40-42-44 cm / 14¼"-15¾"-16½"-17¼" from the neck. EDGE AT THE BOTTOM: ROUND 1: Work with light beige. Work ch 1, work 1 sc in first dc, work * ch 5, skip 4 dc, 1 sc in next dc *, repeat from *-* until mid front/back, ** adjust so that last sc is worked around ch-space mid front/back, ch 5, 1 sc around same ch-space **, repeat from *-* until mid front/back, repeat from **-** around ch-space mid front/back, repeat from *-* the rest of round, finish with 1 sl st in first ch at beg of round. ROUND 2: Work ch 3, 1 sl st around first ch-space, 2 ch (= 1 hdc), work * ch 4, 1 hdc around next ch-space *, repeat from *-* until ch-space mid front/back, ** ch 4, around ch-space mid front/back work 1 hdc + 4 ch + 1 hdc **, repeat from *-* until mid front/back, repeat from **-** around ch-space mid front/back, repeat from *-* the rest of round, finish with 1 sl st in 2nd ch (= hdc) at beg of round. ROUND 3: Work 3 ch (= 1 dc), work 5 dc around every ch-space, around ch-space mid front/back work: ch 1, 2 dc around ch-space, ch 3, 2 dc around same ch-space, ch 1, finish round with 1 sl st in 3rd ch at beg of round. Fasten off. NECK EDGE: Beg mid front - see diagram and work with light beige on hook size 4 mm / G/6. Work as follows from RS: ROUND 1: Work 1 sc around ch-space in the middle (tip for the middle square), ** work ch 5, skip corner (i.e. 3 ch + 2 dc), 1 sc around ch, * ch 5, skip 5 dc, 1 sc between 2 dc *, repeat from *-* 2-2-3-4 more times, ch 5, skip 5 dc, 1 sc around ch, ch 5, 1 sc in seam between squares **, repeat from **-** around the entire neck, finish with 1 sl st in first sc. ROUND 2: Work ch 2, 1 sl st around first ch-space, 2 ch (= 1 hdc), * ch 4, 1 hdc around next ch-space *, repeat from *-* until 1 ch-space remains before mid back, work 1 hdc around the next 2 ch-spaces, repeat from *-* until 1 ch-space remains, work 1 hdc around last ch-space, finish with 1 sl st in 2nd ch (= 1 hdc) at beg of round. ROUND 3: Work 3 ch (= 1 dc), work 2 dc around first ch-space, work 5 dc around every ch-space until 1 ch-space remains before mid back, work 3 dc around each of the next 2 ch-spaces, work 5 dc around every ch-space until 1 ch-space remains, work 3 dc around last ch-space, finish with 1 sl st in first dc. Fasten off. |
|||||||||||||||||||||||||||||||||||||||||||
Diagram explanations |
|||||||||||||||||||||||||||||||||||||||||||
|
|||||||||||||||||||||||||||||||||||||||||||
 |
|||||||||||||||||||||||||||||||||||||||||||
 |
|||||||||||||||||||||||||||||||||||||||||||
 |
|||||||||||||||||||||||||||||||||||||||||||
 |
|||||||||||||||||||||||||||||||||||||||||||
Have you finished this pattern?Tag your pictures with #dropspattern #sweetmartineponcho or submit them to the #dropsfan gallery. Do you need help with this pattern?You'll find 11 tutorial videos, a Comments/Questions area and more by visiting the pattern on garnstudio.com. © 1982-2026 DROPS Design A/S. We reserve all rights. This document, including all its sub-sections, has copyrights. Read more about what you can do with our patterns at the bottom of each pattern on our site. |
|||||||||||||||||||||||||||||||||||||||||||


With over 40 years in knitting and crochet design, DROPS Design offers one of the most extensive collections of free patterns on the internet - translated to 17 languages. As of today we count 324 catalogs and 12290 patterns - 12280 of which are translated into English (US/in).
We work hard to bring you the best knitting and crochet have to offer, inspiration and advice as well as great quality yarns at incredible prices! Would you like to use our patterns for other than personal use? You can read what you are allowed to do in the Copyright text at the bottom of all our patterns. Happy crafting!
Post a comment to pattern DROPS 167-21
We would love to hear what you have to say about this pattern!
If you want to leave a question, please make sure you select the correct category in the form below, to speed up the answering process. Required fields are marked *.