
Popular categories
Looking for a yarn?


Comments / Questions (77)
![]() Pam wrote:
Pam wrote:
I am ready to work the left back piece with 38 stitches on the needles. I don't understand where to start the three edge sts in garter st for the armholes. My row looks like this: 5 garter st, 14 sts, the 6 st gap where I bound off for the ridges and then 19 sts.
04.06.2016 - 14:59DROPS Design answered:
Dear Pam, after decreasing, before casting off the 6 sts at each side for the armholes, you should have 41 sts before the first marker and after the second marker (back pieces); then you should cast off 3 sts and each side of the markers for the armholes (= 38 sts remaining for each back piece). Then you have to work each part separately, starting from the left back piece: you should have 5 band sts in garter st towards mid back and at the other side you have to work 3 edge sts in garter st towards the armhole next to the bound off sts. Happy knitting!
04.06.2016 - 20:49
![]() Karen Rickmers wrote:
Karen Rickmers wrote:
Thank for answer.. Have another one. Have sts separated 44-66-44 = 154 sts. When piece is 16 1/2" i work 2 ridges middle 12 sts but is that middle of the 44, thats what i did but when i go to front piece the 3 garter sts are not in the 66 sts of front piece, so i am not sure on where to do the 12 sts of ridges then the 3 edge sts in garter st for the armholes. Could you please clarify where to do the 12 st ridges and the 3 edge garter sts. Thanks
01.06.2016 - 15:37DROPS Design answered:
Dear Mrs Rickers, the 2 ridges over the middle 12 sts on the side will be for armholes, ie you will work 2 ridges over 6 sts before + 6 sts after each of markers on the sides (where you decreased). Then you bind off for armholes the middle 6 of these 12 sts = you will have 3 sts in garter st, 6 sts bound off (marker on the side is in the middle of these sts), 3 sts in garter sts. Happy knitting!
01.06.2016 - 16:24
![]() Karen Rickmers wrote:
Karen Rickmers wrote:
Do not understand the way to avoid cutting the yarn for the stripes (work alternately 2 rows from RS and 2 rows from WS and the band K from RS, P from RS, P from WS, K from WS) Can you please try to explain for me in a little easier way
28.05.2016 - 03:07DROPS Design answered:
Dear Mrs Rickmers, stripes are worked with 1 row in each colour, ie 1 row in stocking st with edge sts in garter st. To avoid cutting yarn, work as follows: *work 2 rows from RS: K 1 row with white knitting all sts, from RS again: work 1 row with light blue: P edge sts (to get garter sts) and K sts in stocking st, then work 2 rows from WS: Work 1 row with white P all sts, then work 1 row from WS with light blue knitting edge sts (to get garter st) and purling all sts in stocking sts)*, repeat these 4 rows. Happy knitting!
30.05.2016 - 09:00
![]() Anne Hassing wrote:
Anne Hassing wrote:
En fejl: venstre rygstk. "Fortsæt i striber" det er ikke korrekt. Det skal være i Hvidt. Garnmængden passer ikke. Var nødt til at bestille en ekstra blå og har 2 hvide nøgler tilbage. Det er ikke tilfredsstillende. Bestilte til str. L. Og bestilte 5 nøgler hvid og 6 nøgler lyseblå a 50 g. Angivet i opskr. 300 g blå og 250 g hvid. Har kontaktet Rito, men de afviser og beder mig kontakte jer.
25.05.2016 - 08:22
![]() Valencroix wrote:
Valencroix wrote:
Bonjour je suis arrivée aux rayures et je ne comprends rien du tout. Au secours !!!!!!
15.05.2016 - 09:58Valencroix answered:
J'ai réussi. Ne vous dérangez pas pour les explications. En fait on comprends mieux en tricotant 😊 Encore merci
15.05.2016 - 21:06
![]() Valencroix wrote:
Valencroix wrote:
Bonjour, Pouvez-vous m'indiquer à quelle taille correspond le S,M ou L. Je fais un 38/40. Merci de me dire quelle taille je dois faire. Bien cordialement
08.05.2016 - 08:48DROPS Design answered:
Bonjour Valencroix, vous trouverez plus d'informations sur les tailles ici. Bon tricot!
09.05.2016 - 10:41
![]() Lisa Hoffman wrote:
Lisa Hoffman wrote:
I love this sweater and have been working on it but have reached a point where I am confused. Where it says "FRONT PIECE" then it mentions 66-70-76 stitches etc. I am confused. I am making the large. At this point there is 182 stitches on my circular knitting needles. Am I just supposed to work the first 76 stitches? Or am I working all the stitches except 43? under LEFT BACK PIECE it says 38-40-43 stitches etc. Can you please help?
01.04.2016 - 21:33DROPS Design answered:
Dear Mrs Hoffman, before working front piece, you have to work the armhole when piece measures 44 cm: work 2 ridges over the 16 sts in each side (8 sts on each side of each marker), then on next row, bind off 10 sts on both sides (= 5 sts on each side of each marker) and finish front and back pieces separately: the middle 76 sts = front piece and 43 sts on each side = back pieces. Happy knitting!
02.04.2016 - 17:51
![]() Anna wrote:
Anna wrote:
Buongiorno, sono arrivata al punto in cui mi dice "lavorare 2 coste a punto legaccio sulle 12-14-16-20-24-28 m centrali ai lati", ma non capisco quali sono le 12 (taglia S) maglie centrali ai lati. Ho 38 m, segno, 78 m, segno, 38 m: devo considerare 6 m prima e 6 m dopo il segno? Aiutooooo!!! grazie
07.03.2016 - 07:49DROPS Design answered:
Buongiorno Anna. Sì esatto: deve lavorare a legaccio le 6 m che precedono e le 6 m che seguono il segno. Buon lavoro!
07.03.2016 - 08:35
![]() Gunda Poll wrote:
Gunda Poll wrote:
Einfach fantastisch, diese Kollektion, wo soll ich nur anfangen, eins schöner als das andere, herrlich, danke, tausendmal danke!!! schlicht und einfach, aber süß!
10.02.2016 - 09:25
![]() Mette wrote:
Mette wrote:
Kære Birgitte. Striberne strikkes således: Retsiden - strik en pind ret med farve 1 - skub maskerne tilbage og strik igen fra retsiden 1 pind ret med farve 2. Derefter en pind vrang med farve 1 - skub maskerne tilbage og strik igen en pind vrang med farve 2. Altså hele tiden 2 pinde fra samme side. Håber det giver mening. God fornøjelse. Strikkehilsen Mette
02.02.2016 - 07:15
|
|
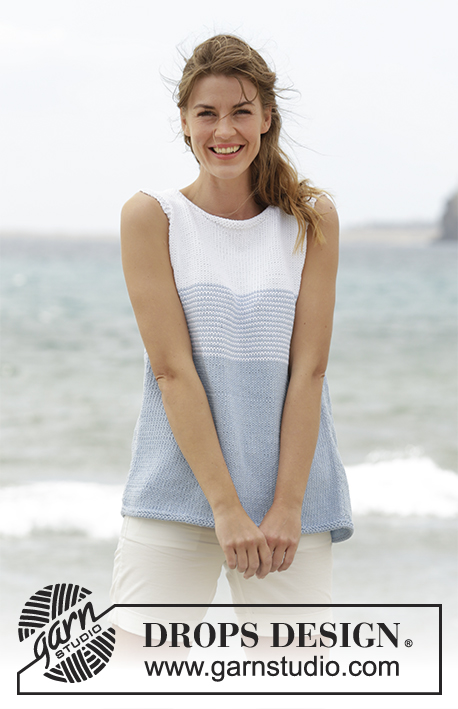
Sea Line#sealinetop |
|
 |
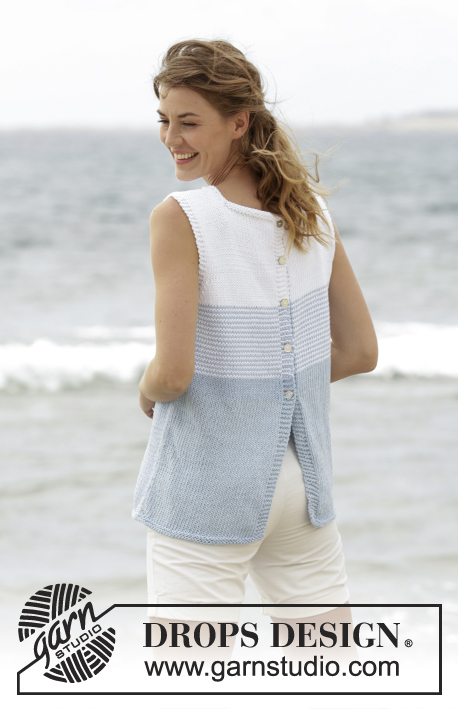 |
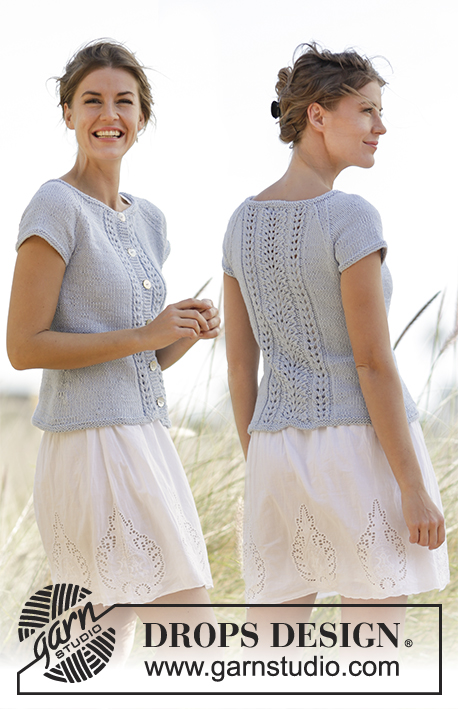
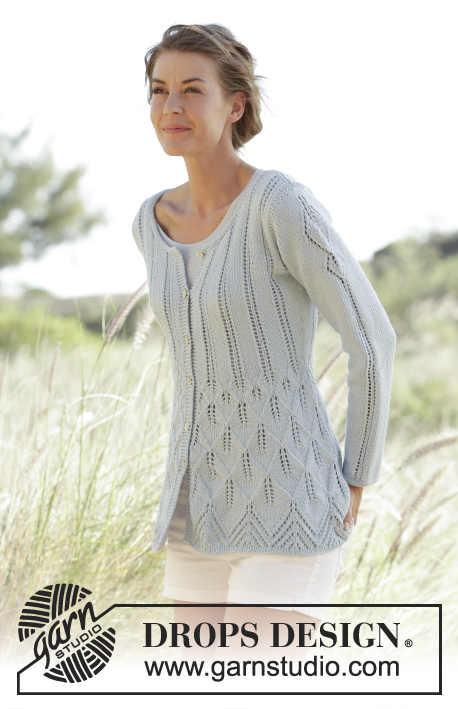
Knitted DROPS top with stripes and button band at the back in ”Paris”. Size: S - XXXL.
DROPS 168-4 |
|
|
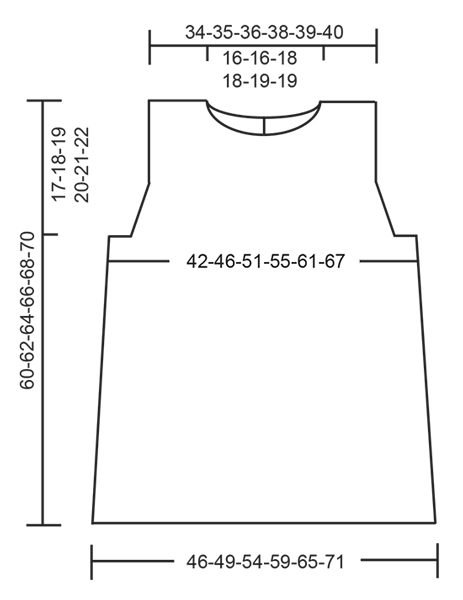
GARTER ST (back and forth): K all rows. 1 ridge = K2 rows. STRIPES: * 1 row white, 1 row light blue *, repeat from *-*. NOTE: To avoid cutting the yarn work alternately 2 rows from RS and 2 rows from WS but note that the band sts in garter sts on these rows are worked as follows: * K from RS, P from RS, P from WS, K from WS *, repeat from *-*. DECREASE TIP-1 (applies to body): All dec are done from RS! Beg 3 sts before marker and K 2 tog, K 2 (marker is between these 2 sts), slip 1 st as if to K, K 1, psso (= 2 sts dec). DECREASE TIP-2 (applies to armholes): Dec inside 3 edge sts in garter st. All dec are done from RS! Dec as follows after 3 edge sts: Slip 1 st as if to K, K 1, psso. Dec as follows before 3 edge st: K 2 tog. BUTTONHOLES: Dec for buttonholes on left back piece (seen from RS). 1 buttonhole = K tog second and third st from edge and make 1 YO. Dec for buttonholes when piece measures: SIZE S: 29, 35, 42, 48 and 55 cm SIZE M: 29, 36, 43, 51 and 57 cm SIZE L: 29, 36, 44, 52 and 59 cm SIZE XL: 29, 35, 42, 48, 55 and 61 cm SIZE XXL: 29, 35, 42, 49, 56 and 63 cm SIZE XXXL: 29, 37, 44, 51, 58 and 65 cm ---------------------------------------------------------- TOP: Worked back and forth on circular needle from mid back. Cast on 166-178-194-210-230-250 sts (includes 5 band sts in each side towards mid back) on circular needle size 4 mm / US 6 with light blue. Work 2 ridges in GARTER ST - see explanation above. Switch to circular needle size 5 mm / US 8 and insert a marker 44-47-51-55-60-65 sts in from each side (= 78-84-92-100-110-120 sts between markers on front piece). Then work in stockinette st with 5 band sts in garter st in each side towards mid back. REMEMBER THE KNITTING GAUGE When piece measures 12 cm / 4¾", dec 1 st on each side of both markers - READ DECREASE TIP-1 (= 4 sts dec). Repeat dec every 10-10-10-12-12-12 cm / 4"-4"-4"-4¾"-4¾"-4¾" 3 times in total = 154-166-182-198-218-238 sts. Remember BUTTONHOLES on left band - see explanation above. AT THE SAME TIME when piece measures 30-31-32-33-34-35 cm / 11¾"-12¼"-12½"-13"-13⅜"-13¾", work STRIPES over all sts - see explanation above! READ ALL OF THE FOLLOWING SECTION BEFORE CONTINUING: When piece measures 42-43-44-45-46-47 cm / 16½"-17"-17¼"-17¾"-18"-18½", continue with white until finished measurements - AT THE SAME TIME when piece measures 42-43-44-45-46-47 cm / 16½"-17"-17¼"-17¾"-18"-18½" work 2 ridges over the middle 12-14-16-20-24-28 sts in each side (work the other sts as before). On next row from RS after the ridges, bind off the middle 6-8-10-14-18-22 sts in each side for armholes and finish front and back pieces separately. FRONT PIECE: = 66-70-76-80-86-92 sts. Continue back and forth in stockinette st with 3 edge sts in garter st in each side. On first row from RS, dec 1 st more for armhole in each side - READ DECREASE TIP-2. Repeat dec every other row (i.e. every row from RS) 4-5-7-8-10-12 times in total = 58-60-62-64-66-68 sts. When piece measures 54-56-57-59-60-62 cm / 21¼"-22"-22½"-23¼"-23½"-24½", slip the middle 16-16-18-18-20-20 sts on a stitch holder for neck and finish each shoulder separately. Continue in stockinette st with 3 edge sts in garter st towards the armhole and bind off for neck at beg of every row from the neck as follows: bind off 2 sts 2 times and 1 st 2 times = 15-16-16-17-17-18 sts remain on shoulder. Continue until piece measures 60-62-64-66-68-70 cm / 23⅝"-24⅜"-25¼"-26"-26¾"-27½" and bind off. Repeat on the other shoulder. LEFT BACK PIECE: = 38-40-43-45-48-51 sts. Continue pattern back and forth with 5 band sts in garter st towards mid back and 3 edge sts in garter st towards armhole. AT THE SAME TIME bind off for armhole as on front piece = 34-35-36-37-38-39 sts remain on needle. When piece measures 55-57-59-60-62-64 cm / 21½"-22½"-23¼"-23½"-24½"-25¼", slip the first 15-15-16-16-17-17 sts seen from RS on a stitch holder for neck (1 row should be worked after last buttonhole) - NOTE: To avoid cutting the yarn being used, work the sts before slipping them on the stitch holder. Then bind off at beg of every row from neck as follows: bind off 2 sts 1 time and 1 st 2 times = 15-16-16-17-17-18 sts remain on shoulder. Continue until piece measures 60-62-64-66-68-70 cm / 23⅝"-24⅜"-25¼"-26"-26¾"-27½" and bind off. RIGHT BACK PIECE: Work as left but reversed. ASSEMBLY: Sew the shoulder seams. NECK EDGE: Pick up from RS approx. 90 to 110 sts around the neck on circular needle size 4 mm / US 6 with white (including all sts slipped on threads). K 1 row from WS, K 1 row from RS and K 1 row from WS before binding off with K from RS. Sew on buttons. |
|
 |
|
Have you finished this pattern?Tag your pictures with #dropspattern #sealinetop or submit them to the #dropsfan gallery. Do you need help with this pattern?You'll find 21 tutorial videos, a Comments/Questions area and more by visiting the pattern on garnstudio.com. © 1982-2026 DROPS Design A/S. We reserve all rights. This document, including all its sub-sections, has copyrights. Read more about what you can do with our patterns at the bottom of each pattern on our site. |
|


With over 40 years in knitting and crochet design, DROPS Design offers one of the most extensive collections of free patterns on the internet - translated to 17 languages. As of today we count 325 catalogs and 12298 patterns - 12288 of which are translated into English (US/in).
We work hard to bring you the best knitting and crochet have to offer, inspiration and advice as well as great quality yarns at incredible prices! Would you like to use our patterns for other than personal use? You can read what you are allowed to do in the Copyright text at the bottom of all our patterns. Happy crafting!
Post a comment to pattern DROPS 168-4
We would love to hear what you have to say about this pattern!
If you want to leave a question, please make sure you select the correct category in the form below, to speed up the answering process. Required fields are marked *.