
Popular categories
Looking for a yarn?


Comments / Questions (77)
![]() Manuela wrote:
Manuela wrote:
Buongiorno. Se volessi lavorare con i ferri dritti è possibile avere le istruzioni? Grazie
21.04.2021 - 16:54DROPS Design answered:
Buonasera Manuela, questo top è lavorato in piano quindi può seguire le istruzioni riportate. Buon lavoro!
21.04.2021 - 18:29
![]() Michelle wrote:
Michelle wrote:
Am doing the large size so do i cast on 194sts + 10 for edges so 204 altogether?
04.08.2020 - 19:18DROPS Design answered:
Dear Michelle, the 5 band sts are included, this means you cast on 194 sts (= 5 band sts, 184 sts, 5 band sts). Happy knitting!
05.08.2020 - 07:49
![]() Dixie wrote:
Dixie wrote:
Picked up some organic cotton yarn for this in March and finished it mid-July. It was easy to follow the pattern and I am really enjoying it in this summer weather.
22.07.2020 - 22:20
![]() MARY wrote:
MARY wrote:
Bonjour, je tricote la taille L. Avant la séparation DEVANT/DOS les 10 m à rabattre "après les côtes mousse.." je ne comprends pas. Sur l'endroit le rang commence par 5m mousse + 11 m jersey + 16 m mousse + 16 m jersey pour le côté puis les 86 m jersey pour le dos avant le 2ème côté. Où faut il rabattre les 10 m . Merci de votre éclairage. Cordialement
15.05.2020 - 15:31DROPS Design answered:
Bonjour Mary, vous tricotez la taille L, exact? à 44 cm vous tricotez comme avant mais en plus au point mousse sur les 16 mailles de chacun des 2 côtés (dessous des deux emmanchures). Après 2 côtes mousse tricotés sur ces 16 mailles (soit 4 rangs, les autres mailles se tricotent comme avant), vous rabattez les 10 m au milieu de ces 16 m, vous gardez ainsi: 3 m point mousse, vous rabattez les 10 m point mousse suivantes et gardez les 3 m point mousse suivantes, ces 3 m point mousse que vous gardez seront les mailles de bordure des emmanchures du devant et de chaque demi-dos. Bon tricot!
15.05.2020 - 16:33
![]() Linda Rasmussen wrote:
Linda Rasmussen wrote:
Jeg har strikket 18 cm af denne top og kan allerede nu se, at det oplyste garnforbrug er for lillie. I kommentarerne kan jeg se, at andre har gjort opmærksom på det, men I har ikke svaret, og det er tilsyneladende heller ikke ændret i opskriften. Jeg skal nu betale for 2 gange forsendelse, som koster næsten lige så meget som garnet, det er ikke rimeligt. Jeg imødeser jeres svar. Venlig hilsen Linda Rasmussen
04.05.2020 - 11:23DROPS Design answered:
Hej Linda, Vil du komme tilbage med hvilken størrelse du strikker, hvor mange masker du har på 10x10 cm og hvor meget garn du har brugt, så skal vi absolut kigge på garnforbruget igen. Der er rigtig mange som har strikket denne model og som har haft garn nok, så det må være specielt for én størrelse. På forhånd tak!
05.05.2020 - 09:15
![]() Michels Mireille wrote:
Michels Mireille wrote:
Bonjour, Je suis en train de faire les rayures, tout se passe bien, par contre là où je comprends pas c'est au dessus des rayures à 44cm deux lignes de points mousse cela serai déjà pour l'encolure, mais sur la photo c est bien plus tard ? Merci pour votre réponse. On peut aussi mettre la photo même si la laine n est pas de chez vous sur Facebook ? Cordialement
25.07.2019 - 19:56DROPS Design answered:
Bonjour Mme Michels, les côtes mousses tricotées à 44 cm (en taille L) sont pour les emmanchures, on va diviser l'ouvrage pour les 2 demi-dos et le devant juste après, ces côtes mousse sur les 16 m des côtés se tricotent donc juste après les rayures. Vous pouvez tout à fait montrer votre ouvrage sur notre groupe Facebook si vous le souhaitez. Bon tricot!
06.08.2019 - 10:15
![]() Amalia wrote:
Amalia wrote:
Arrivata ai 12 cm .... le diminuzioni vanno fatte dopo e prima del segnapunti? ... praticamente sul davanti?
07.06.2019 - 19:37DROPS Design answered:
Buongiorno Amalia. I segnapunti individuano i lati del top (sarebbe la cucitura se stesse lavorando in parti separate). Deve diminuire sia prima che dopo i segnapunti, quindi sia sul davanti che sui dietro. In tutto sul ferro diminuisce 4 m. Buon lavoro!
07.06.2019 - 19:45
![]() Amalia wrote:
Amalia wrote:
Il lavoro si sviluppa separatamente avanti e i due dietri e poi si assemblano o cosa ....
07.06.2019 - 14:51DROPS Design answered:
Buongiorno Amalia. Lavora in un pezzo unico fino agli scalfi, avanti e indietro. Chiude poi le maglie per gli scalfi e lavora il davanti e i due dietro separatamente. Unirà poi le spalle. Buon lavoro!
07.06.2019 - 17:24
![]() Linda wrote:
Linda wrote:
I am knitting the small size . Please can you clarify “ when piece measures 42cm work 2 ridges over the middle 12 sts on each side “ How many stitches from centre back should I work before starting the ridges?
08.03.2019 - 20:44DROPS Design answered:
Dear Linda, count the stitches you have on your needles, divide teh number in two. Now take out six stitches. You should knit this many stitches in the row, then 12 stitches with garter stitch and again the number of stitches you started your rows with. Happy Knitting.
10.03.2019 - 16:49
![]() Maria wrote:
Maria wrote:
Grazie! Mi può indicare almeno per grandi linee come fare? grazie grazie grazie! Maria
08.11.2018 - 09:11DROPS Design answered:
Buongiorno Maria. Purtroppo in questa sede non riusciamo a dare un aiuto di questo tipo. Può contattare il suo rivenditore Drops di fiducia che le darà sicuramente qualche indicazione utile. Buon lavoro!
08.11.2018 - 10:15
|
|
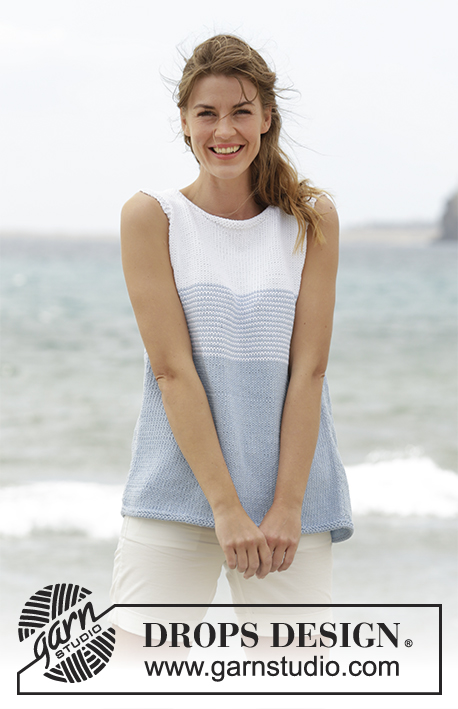
Sea Line#sealinetop |
|
 |
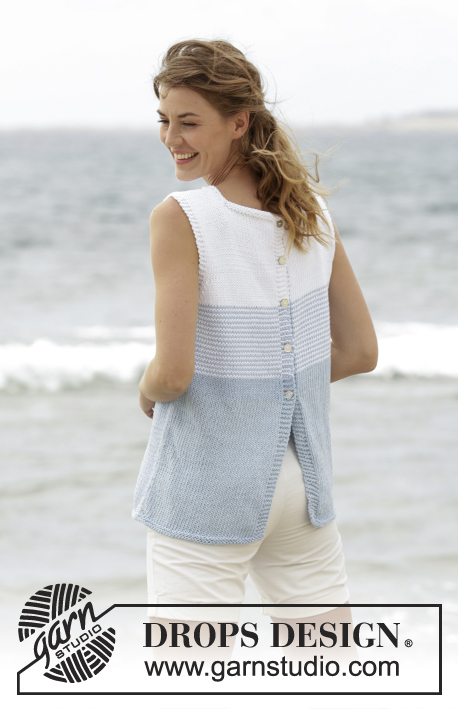 |
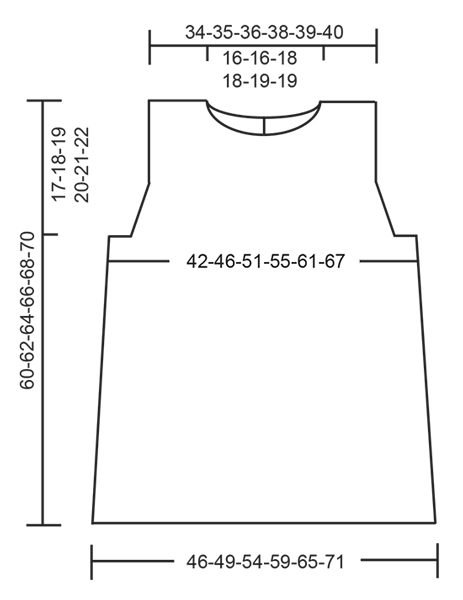
Knitted DROPS top with stripes and button band at the back in ”Paris”. Size: S - XXXL.
DROPS 168-4 |
|
|
GARTER ST (back and forth): K all rows. 1 ridge = K2 rows. STRIPES: * 1 row white, 1 row light blue *, repeat from *-*. NOTE: To avoid cutting the yarn work alternately 2 rows from RS and 2 rows from WS but note that the band sts in garter sts on these rows are worked as follows: * K from RS, P from RS, P from WS, K from WS *, repeat from *-*. DECREASE TIP-1 (applies to body): All dec are done from RS! Beg 3 sts before marker and K 2 tog, K 2 (marker is between these 2 sts), slip 1 st as if to K, K 1, psso (= 2 sts dec). DECREASE TIP-2 (applies to armholes): Dec inside 3 edge sts in garter st. All dec are done from RS! Dec as follows after 3 edge sts: Slip 1 st as if to K, K 1, psso. Dec as follows before 3 edge st: K 2 tog. BUTTONHOLES: Dec for buttonholes on left back piece (seen from RS). 1 buttonhole = K tog second and third st from edge and make 1 YO. Dec for buttonholes when piece measures: SIZE S: 29, 35, 42, 48 and 55 cm SIZE M: 29, 36, 43, 51 and 57 cm SIZE L: 29, 36, 44, 52 and 59 cm SIZE XL: 29, 35, 42, 48, 55 and 61 cm SIZE XXL: 29, 35, 42, 49, 56 and 63 cm SIZE XXXL: 29, 37, 44, 51, 58 and 65 cm ---------------------------------------------------------- TOP: Worked back and forth on circular needle from mid back. Cast on 166-178-194-210-230-250 sts (includes 5 band sts in each side towards mid back) on circular needle size 4 mm / US 6 with light blue. Work 2 ridges in GARTER ST - see explanation above. Switch to circular needle size 5 mm / US 8 and insert a marker 44-47-51-55-60-65 sts in from each side (= 78-84-92-100-110-120 sts between markers on front piece). Then work in stockinette st with 5 band sts in garter st in each side towards mid back. REMEMBER THE KNITTING GAUGE When piece measures 12 cm / 4¾", dec 1 st on each side of both markers - READ DECREASE TIP-1 (= 4 sts dec). Repeat dec every 10-10-10-12-12-12 cm / 4"-4"-4"-4¾"-4¾"-4¾" 3 times in total = 154-166-182-198-218-238 sts. Remember BUTTONHOLES on left band - see explanation above. AT THE SAME TIME when piece measures 30-31-32-33-34-35 cm / 11¾"-12¼"-12½"-13"-13⅜"-13¾", work STRIPES over all sts - see explanation above! READ ALL OF THE FOLLOWING SECTION BEFORE CONTINUING: When piece measures 42-43-44-45-46-47 cm / 16½"-17"-17¼"-17¾"-18"-18½", continue with white until finished measurements - AT THE SAME TIME when piece measures 42-43-44-45-46-47 cm / 16½"-17"-17¼"-17¾"-18"-18½" work 2 ridges over the middle 12-14-16-20-24-28 sts in each side (work the other sts as before). On next row from RS after the ridges, bind off the middle 6-8-10-14-18-22 sts in each side for armholes and finish front and back pieces separately. FRONT PIECE: = 66-70-76-80-86-92 sts. Continue back and forth in stockinette st with 3 edge sts in garter st in each side. On first row from RS, dec 1 st more for armhole in each side - READ DECREASE TIP-2. Repeat dec every other row (i.e. every row from RS) 4-5-7-8-10-12 times in total = 58-60-62-64-66-68 sts. When piece measures 54-56-57-59-60-62 cm / 21¼"-22"-22½"-23¼"-23½"-24½", slip the middle 16-16-18-18-20-20 sts on a stitch holder for neck and finish each shoulder separately. Continue in stockinette st with 3 edge sts in garter st towards the armhole and bind off for neck at beg of every row from the neck as follows: bind off 2 sts 2 times and 1 st 2 times = 15-16-16-17-17-18 sts remain on shoulder. Continue until piece measures 60-62-64-66-68-70 cm / 23⅝"-24⅜"-25¼"-26"-26¾"-27½" and bind off. Repeat on the other shoulder. LEFT BACK PIECE: = 38-40-43-45-48-51 sts. Continue pattern back and forth with 5 band sts in garter st towards mid back and 3 edge sts in garter st towards armhole. AT THE SAME TIME bind off for armhole as on front piece = 34-35-36-37-38-39 sts remain on needle. When piece measures 55-57-59-60-62-64 cm / 21½"-22½"-23¼"-23½"-24½"-25¼", slip the first 15-15-16-16-17-17 sts seen from RS on a stitch holder for neck (1 row should be worked after last buttonhole) - NOTE: To avoid cutting the yarn being used, work the sts before slipping them on the stitch holder. Then bind off at beg of every row from neck as follows: bind off 2 sts 1 time and 1 st 2 times = 15-16-16-17-17-18 sts remain on shoulder. Continue until piece measures 60-62-64-66-68-70 cm / 23⅝"-24⅜"-25¼"-26"-26¾"-27½" and bind off. RIGHT BACK PIECE: Work as left but reversed. ASSEMBLY: Sew the shoulder seams. NECK EDGE: Pick up from RS approx. 90 to 110 sts around the neck on circular needle size 4 mm / US 6 with white (including all sts slipped on threads). K 1 row from WS, K 1 row from RS and K 1 row from WS before binding off with K from RS. Sew on buttons. |
|
 |
|
Have you finished this pattern?Tag your pictures with #dropspattern #sealinetop or submit them to the #dropsfan gallery. Do you need help with this pattern?You'll find 21 tutorial videos, a Comments/Questions area and more by visiting the pattern on garnstudio.com. © 1982-2026 DROPS Design A/S. We reserve all rights. This document, including all its sub-sections, has copyrights. Read more about what you can do with our patterns at the bottom of each pattern on our site. |
|


With over 40 years in knitting and crochet design, DROPS Design offers one of the most extensive collections of free patterns on the internet - translated to 17 languages. As of today we count 325 catalogs and 12298 patterns - 12288 of which are translated into English (US/in).
We work hard to bring you the best knitting and crochet have to offer, inspiration and advice as well as great quality yarns at incredible prices! Would you like to use our patterns for other than personal use? You can read what you are allowed to do in the Copyright text at the bottom of all our patterns. Happy crafting!
Post a comment to pattern DROPS 168-4
We would love to hear what you have to say about this pattern!
If you want to leave a question, please make sure you select the correct category in the form below, to speed up the answering process. Required fields are marked *.