
Popular categories
Looking for a yarn?


Comments / Questions (77)
![]() Tina wrote:
Tina wrote:
Hej Jeg skal til at starte på denne opskrift - men mangler et overblik over hvordan arbejdet overordnet skal udføres, jeg forstår ikke hvad der menes med "top" som man skal starte med, når man samtidig skal lave både forstykke og to rygstykker?
12.03.2026 - 13:37DROPS Design answered:
Hei Tina. Top = beskrivelse av hvilket plagg du skal strikke ( ikke en genser, jakke eller bluse, men en top). Så er det beskrevet hvordan toppen strikkes (= Arb strikkes frem og tilbage på rundp fra midt bagpå). Forstykket og bakstykket strikkes sammen opp til ermhullet, deretter strikker man forstykket, venstre bakstykket og høyre bakstykket hver for seg. Og halskanten til slutt. mvh DROPS Design
27.03.2026 - 12:41
![]() Elwira wrote:
Elwira wrote:
Dzień dobry ! Nie mogę poradzić sobie z rozszyfrowaniem zamykania oczek na podkroje rękawów - kiedy zamykam przed 3 oczkiem sciegu a kiedy za 3 oczkiem ? Chodzi mi o lewy i prawy tył
04.08.2024 - 12:11DROPS Design answered:
Witaj Elwiro, na prawym tyle zamykasz za 3 oczkami (na początku rzędu), na lewym tyle zamykasz przed 3 oczkami (na końcu rzędu). Pozdrawiamy!
07.08.2024 - 10:51
![]() Christine Astoul Fauconnier wrote:
Christine Astoul Fauconnier wrote:
Bonjour, je ne comprends pas ce qu il faut faire quand à 44 cm de hauteur totale il faut tricoter 2 cotes mousse sur les 16 m au milieu des cotés et au rang suivant après les cotes mousse rabattre les 10 m au milieu des cotés pour les emmanchures merci de votre réponse bonne journée
10.03.2024 - 18:38DROPS Design answered:
Bonjour Mme Astoul Fauconnier, lorsque votre ouvrage mesure 44 cm, tricotez les 4 rangs suivants avec 16 mailles point mousse pour la bordure des emmanchures, soit 8 mailles point mousse avant et après chacun des 2 marqueurs des côtés; lorsque ces 4 rangs sont faits vous avez 2 côtes mousse pour la bordure des emmanchures. Au rang suivant sur l'endroit, rabattez les 10 mailles au milieu de ces 16 mailles ainsi: tricotez 3 m point mousse, rabattez 10 mailles et tricotez 3 mailles point mousse. Bon tricot!
11.03.2024 - 08:51
![]() Karen Zarse wrote:
Karen Zarse wrote:
I love this pattern but am older and need sleeves to cover up my upper arms. What other pattern could I use to add sleeves to this one?
29.03.2023 - 20:53DROPS Design answered:
Dear Karen, the straight shape worked here only allows to add sleeves that have been worked separately, with a sleeve cap. You could instead work the yoke differently; you can check here some tops with raglan or round yoke, which have a short sleeve, for example: https://www.garnstudio.com/pattern.php?id=10252&cid=19 or https://www.garnstudio.com/pattern.php?id=10251&cid=19 You could also work as indicated here, where the upper part is straight without the shape of the armholes, so it will have short sleeves: https://www.garnstudio.com/pattern.php?id=6875&cid=19. Happy knitting!
02.04.2023 - 16:31
![]() Estela wrote:
Estela wrote:
Me gustaría hacerla con mangas o sea una campera!!!!
23.11.2022 - 16:43
![]() Glesni OSullivan wrote:
Glesni OSullivan wrote:
I purchased the correct amount of yarn for this project but ran out of the blue colour before completing the stripes, as such had to buy extra ball and pay nearly £3 postage . Very annoying!
30.06.2022 - 17:18
![]() Louise Désilets wrote:
Louise Désilets wrote:
Bonjour! Est-il possible que le modèle illustré ne soit pas fait avec le fil Paris. J'ai commandé exactement ce qui était mentionné et le résultat est très décevant, le bleu beaucoup plus foncé. En plus, la quantité de bleu n'est pas suffisante même si mon échantillon était correct. Je ne le continue plus et j'aimerais savoir ce qui a été utilisé pour le faire avec le même fol. Merci!
12.04.2022 - 15:02DROPS Design answered:
Bonjour Mme Désilets, la couleur indiquée ainsi que les quantités sont exactes; les nuances peuvent varier en fonction des bains mais la perception de la couleur peut aussi varier en fonction des écrans; n'hésitez pas à demander conseil à votre magasin pour le choix de la couleur; pensez à bien vérifier votre tension en largeur mais également en hauteur (22 rangs jersey = 10 cm) et à bien conserver cette tension tout du long. Bon tricot!
19.04.2022 - 08:49
![]() Hélène wrote:
Hélène wrote:
Bonjour, Voilà 2 fois que je détricote la partie blanche après les rayures parce que je comprends mal les instructions… Pouvez-vous me préciser s’il vous plaît à combien de maille du début et de la fin du rang se tricotent les côtes mousses pour les emmanchures en taille L ? Et également si on doit vraiment tricoter les 76 mailles du devant de façon totalement indépendante des demi-dos je vous prie ? Merci…
13.03.2022 - 19:20DROPS Design answered:
Bonjour Hélène, après la division pour les emmanchures, vous terminez chaque pièce séparément: d'abord le devant puis chaque demi-dos; pour le devant, avez 76 mailles que vous tricotez ainsi: 3 m point mousse, jersey et 3 m point mousse ; en même temps, tous les rangs sur l'endroit, vous diminuez 1 m de chaque côté 7 fois tous les 2 rangs = il reste 62 mailles: 3 m point mousse, 56 m jersey, 3 m point mousse. En espérant que cela puisse vous aider. Bon tricot!
14.03.2022 - 12:09
![]() Hélène wrote:
Hélène wrote:
Bonjour, Après les 2 côtes mousses qui suivent les rayures, je me retrouve avec 47 mailles pour chaque demis-dos et 86 mailles pour le devant. Je tricote la taille L. Par conséquent, je ne me retrouve pas dans vos indications. Pouvez-vous m'aider je vous prie ? Merci. Hélène
19.01.2022 - 09:39DROPS Design answered:
Bonjour Hélène, avant de rabattre les mailles, vous devez avoir 48 mailles pour chaque demi-dos et 86 mailles pour le dos (soit 182 m au total) car vous avez diminué 3 mailles pour chaque demi-dos (51-3=48 m) et 6 mailles pour le devant (92-3=86 m). Vous rabattez ensuite 10 mailles pour les emmanchures soit 48-5 = 43 m pour chaque demi-dos et 86-10= 76 m pour le devant. Bon tricot!
19.01.2022 - 16:58
![]() Pauline wrote:
Pauline wrote:
Hi, is there a update for this pattern?
17.07.2021 - 13:00DROPS Design answered:
Dear Pauline, there is no corretion or update for this pattern. Happy Stitching!
17.07.2021 - 14:26
|
|
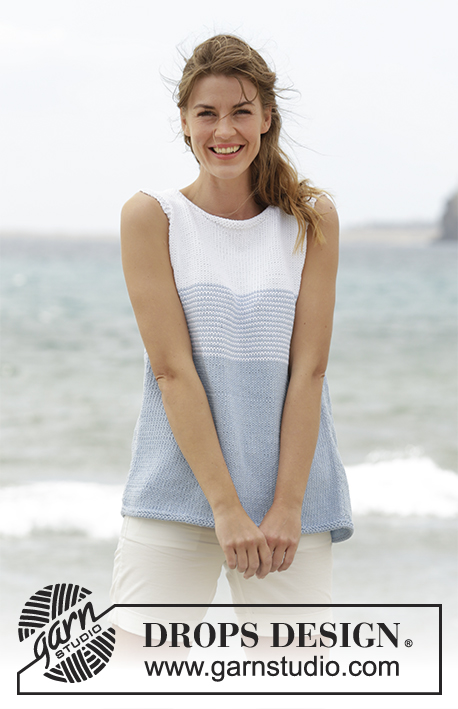
Sea Line#sealinetop |
|
 |
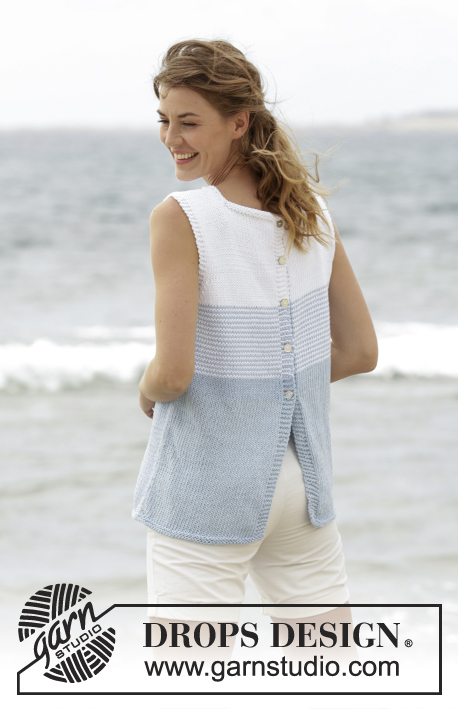 |
Knitted DROPS top with stripes and button band at the back in ”Paris”. Size: S - XXXL.
DROPS 168-4 |
|
|
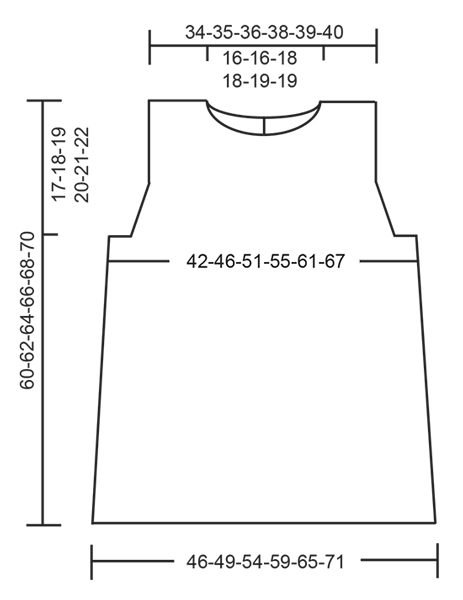
GARTER ST (back and forth): K all rows. 1 ridge = K2 rows. STRIPES: * 1 row white, 1 row light blue *, repeat from *-*. NOTE: To avoid cutting the yarn work alternately 2 rows from RS and 2 rows from WS but note that the band sts in garter sts on these rows are worked as follows: * K from RS, P from RS, P from WS, K from WS *, repeat from *-*. DECREASE TIP-1 (applies to body): All dec are done from RS! Beg 3 sts before marker and K 2 tog, K 2 (marker is between these 2 sts), slip 1 st as if to K, K 1, psso (= 2 sts dec). DECREASE TIP-2 (applies to armholes): Dec inside 3 edge sts in garter st. All dec are done from RS! Dec as follows after 3 edge sts: Slip 1 st as if to K, K 1, psso. Dec as follows before 3 edge st: K 2 tog. BUTTONHOLES: Dec for buttonholes on left back piece (seen from RS). 1 buttonhole = K tog second and third st from edge and make 1 YO. Dec for buttonholes when piece measures: SIZE S: 29, 35, 42, 48 and 55 cm SIZE M: 29, 36, 43, 51 and 57 cm SIZE L: 29, 36, 44, 52 and 59 cm SIZE XL: 29, 35, 42, 48, 55 and 61 cm SIZE XXL: 29, 35, 42, 49, 56 and 63 cm SIZE XXXL: 29, 37, 44, 51, 58 and 65 cm ---------------------------------------------------------- TOP: Worked back and forth on circular needle from mid back. Cast on 166-178-194-210-230-250 sts (includes 5 band sts in each side towards mid back) on circular needle size 4 mm / US 6 with light blue. Work 2 ridges in GARTER ST - see explanation above. Switch to circular needle size 5 mm / US 8 and insert a marker 44-47-51-55-60-65 sts in from each side (= 78-84-92-100-110-120 sts between markers on front piece). Then work in stockinette st with 5 band sts in garter st in each side towards mid back. REMEMBER THE KNITTING GAUGE When piece measures 12 cm / 4¾", dec 1 st on each side of both markers - READ DECREASE TIP-1 (= 4 sts dec). Repeat dec every 10-10-10-12-12-12 cm / 4"-4"-4"-4¾"-4¾"-4¾" 3 times in total = 154-166-182-198-218-238 sts. Remember BUTTONHOLES on left band - see explanation above. AT THE SAME TIME when piece measures 30-31-32-33-34-35 cm / 11¾"-12¼"-12½"-13"-13⅜"-13¾", work STRIPES over all sts - see explanation above! READ ALL OF THE FOLLOWING SECTION BEFORE CONTINUING: When piece measures 42-43-44-45-46-47 cm / 16½"-17"-17¼"-17¾"-18"-18½", continue with white until finished measurements - AT THE SAME TIME when piece measures 42-43-44-45-46-47 cm / 16½"-17"-17¼"-17¾"-18"-18½" work 2 ridges over the middle 12-14-16-20-24-28 sts in each side (work the other sts as before). On next row from RS after the ridges, bind off the middle 6-8-10-14-18-22 sts in each side for armholes and finish front and back pieces separately. FRONT PIECE: = 66-70-76-80-86-92 sts. Continue back and forth in stockinette st with 3 edge sts in garter st in each side. On first row from RS, dec 1 st more for armhole in each side - READ DECREASE TIP-2. Repeat dec every other row (i.e. every row from RS) 4-5-7-8-10-12 times in total = 58-60-62-64-66-68 sts. When piece measures 54-56-57-59-60-62 cm / 21¼"-22"-22½"-23¼"-23½"-24½", slip the middle 16-16-18-18-20-20 sts on a stitch holder for neck and finish each shoulder separately. Continue in stockinette st with 3 edge sts in garter st towards the armhole and bind off for neck at beg of every row from the neck as follows: bind off 2 sts 2 times and 1 st 2 times = 15-16-16-17-17-18 sts remain on shoulder. Continue until piece measures 60-62-64-66-68-70 cm / 23⅝"-24⅜"-25¼"-26"-26¾"-27½" and bind off. Repeat on the other shoulder. LEFT BACK PIECE: = 38-40-43-45-48-51 sts. Continue pattern back and forth with 5 band sts in garter st towards mid back and 3 edge sts in garter st towards armhole. AT THE SAME TIME bind off for armhole as on front piece = 34-35-36-37-38-39 sts remain on needle. When piece measures 55-57-59-60-62-64 cm / 21½"-22½"-23¼"-23½"-24½"-25¼", slip the first 15-15-16-16-17-17 sts seen from RS on a stitch holder for neck (1 row should be worked after last buttonhole) - NOTE: To avoid cutting the yarn being used, work the sts before slipping them on the stitch holder. Then bind off at beg of every row from neck as follows: bind off 2 sts 1 time and 1 st 2 times = 15-16-16-17-17-18 sts remain on shoulder. Continue until piece measures 60-62-64-66-68-70 cm / 23⅝"-24⅜"-25¼"-26"-26¾"-27½" and bind off. RIGHT BACK PIECE: Work as left but reversed. ASSEMBLY: Sew the shoulder seams. NECK EDGE: Pick up from RS approx. 90 to 110 sts around the neck on circular needle size 4 mm / US 6 with white (including all sts slipped on threads). K 1 row from WS, K 1 row from RS and K 1 row from WS before binding off with K from RS. Sew on buttons. |
|
 |
|
Have you finished this pattern?Tag your pictures with #dropspattern #sealinetop or submit them to the #dropsfan gallery. Do you need help with this pattern?You'll find 21 tutorial videos, a Comments/Questions area and more by visiting the pattern on garnstudio.com. © 1982-2026 DROPS Design A/S. We reserve all rights. This document, including all its sub-sections, has copyrights. Read more about what you can do with our patterns at the bottom of each pattern on our site. |
|


With over 40 years in knitting and crochet design, DROPS Design offers one of the most extensive collections of free patterns on the internet - translated to 17 languages. As of today we count 325 catalogs and 12298 patterns - 12288 of which are translated into English (US/in).
We work hard to bring you the best knitting and crochet have to offer, inspiration and advice as well as great quality yarns at incredible prices! Would you like to use our patterns for other than personal use? You can read what you are allowed to do in the Copyright text at the bottom of all our patterns. Happy crafting!
Post a comment to pattern DROPS 168-4
We would love to hear what you have to say about this pattern!
If you want to leave a question, please make sure you select the correct category in the form below, to speed up the answering process. Required fields are marked *.