
Popular categories
Looking for a yarn?


Comments / Questions (58)
![]() Nath09 wrote:
Nath09 wrote:
Il y a un problème entre le rg 4 et le rg 5 de la bordure. Elle est trop compliqué à faire, c'est vraiment pas clair !
17.10.2016 - 15:48
![]() Nath09 wrote:
Nath09 wrote:
Qu'est-ce que c'est qu'on voit sur la partie gauche du diagramme A.11? Moi je vois des surjets à chaque rangs ! C'est cette partie que je ne comprends pas. Merci pour votre aide précieuse.
17.10.2016 - 11:06DROPS Design answered:
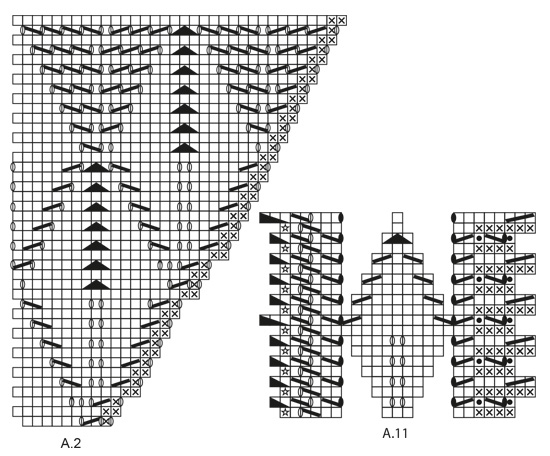
Bonjour Nath, effectivement, on a des surjets aussi sur l'envers :) Au 1er rang de A.11, tricotez ainsi (sur l'envers): glissez 1 m à l'env, 1 m env, 1 jeté, 1 surjet, 7 m env, 4 m end. Bon tricot!
17.10.2016 - 11:35
![]() Nath09 wrote:
Nath09 wrote:
J'en suis à la bordure mais je ne comprends pas comment lire le diagramme A.11 Je monte 15m, je fais les m. end puis le 1er rg sur l'envers et ensuite je patauge, je ne sais plus comment lire le diagramme, de gauche à droite ou droite à gauche. Par ex, quand on est sur le rg env, comment faire un surjet?
16.10.2016 - 20:22DROPS Design answered:
Bonjour Nath, le 1er rang de A.1 se fait sur l'envers = on lit de gauche à droite, puis à la fin du rang sur l'endroit, on va attacher la bordure au châle en tricotant ens à l'end la dernière m de A.11 avec la m suivante du châle (dernier symbole de la légende). Au rang suivant sur l'envers, tricotez le rang 3 de A.11 et à la fin du rang 4 = sur l'endroit, on tricote ens à l'end la dernière m de A.11 avec la m suivante en attente du châle. (les surjets ne se font que sur les rangs sur l'endroit, pas sur l'envers, rangs pairs ici = sur l'endroit). Bon tricot!
17.10.2016 - 10:30
![]() Mimi Verhagen wrote:
Mimi Verhagen wrote:
Kan ik Alpaca gebruiken voor deze sjaal en hoeveel heb ik dan nodig???
14.09.2016 - 21:50DROPS Design answered:
Hoi Mimi. Zeker, je kan vervangen door DROPS Alpaca. Lees hier hoe je de hoeveelheid kan berekenen
15.09.2016 - 11:49
![]() Bernadette wrote:
Bernadette wrote:
Ok I've translated some other questions and I think I see now it starts at 15 st cast on and knit edge with shawl stitches and there are increases that explain more than 15 stitches. If there is a video, a link would be nice. But I think I understand it now.
29.08.2016 - 11:52
![]() Bernadette wrote:
Bernadette wrote:
Ok I've translated some other questions and I think I see now it starts at 15 st cast on and knit edge with shawl stitches and there are increases that explain more than 15 stitches. If there is a video, a link would be nice. But I think I understand it now.
29.08.2016 - 11:50
![]() Bernadette wrote:
Bernadette wrote:
Is there a video showing how to work the edge? I understand the cast on stitches but it appears there are more stitches in A.11 A.12 so I'm a little confused. It is a beautiful shawl so far!! My first shawl but not the last!
29.08.2016 - 11:34DROPS Design answered:
Dear Bernadette, when working the 18th repeat in height in A.11 there are 15 sts left, work then the 15 sts in A.12 as shown in diagram. Happy knitting!
29.08.2016 - 12:32
![]() Birgit wrote:
Birgit wrote:
Hallo, auch nach mehreren Versuchen scheitere ich an Diagramm A11. Immer wieder passt die Maschenzahl nicht. A11 Hinr. in der 4.R die ersten 3M: Bedeutet dass 3 M zus. stricken? Dieses Symbol gibt es in der Zeichenerklärung so nicht. Oder sollte das Symbol anders herum sein und als Picot gestrickt werden? Danke für Ihre Antwort.
26.08.2016 - 16:57DROPS Design answered:
Liebe Birgit, ich sehe in der 4. Reihe von A.11 bei den ersten 3 Maschen das richtige Symbol für das Picot.
27.08.2016 - 15:01
![]() Pia Engelbæk wrote:
Pia Engelbæk wrote:
Jeg har fundet en fejl i opskriften: Sidste pind i A12 skal strikkes som sidste pind i A11, da maskeantallet ellers ikke passer. Dvs. der skal ikke strikkes 2 masker sammen ved dobbeltomslaget, men 2 enkeltmasker + omslag :) Ellers en god opskrift, er ved at strikke de sidste 18 bladranker i kanten efter midten.
17.07.2016 - 19:58
![]() Anne wrote:
Anne wrote:
Hej! Jag har kommit till kanten av sjalen men förstår inte hur jag ska komma vidare och sticka den här delen i mönstret. • Stickar man A11 över 15 maskor i taget eller över hela sjalen? • Stämmer verkligen den här delen av mönstret? • Dubbelomslaget som skall göras mellan 2 maskor på ena varvet och sen ska 1 omslag släppas!?...då stämmer inte maskantalet?...hur gör man? Verkar som om många behöver hjälp här. Går det att få en utförligare förklaring? Mvh Anne
12.07.2016 - 22:30DROPS Design answered:
Hej Anne. Naar du er faerdig med sjalet selv, saetter du 15 nye masker op for enden af pinden. Over disse 15 masker strikker du A.11 og paa hver p fra retten strikker du sammen den förste maske sammen med den förste maske fra sjalet (dvs, dus strikker kanten sammen med sjalet). Du fortsaetter til midten = spidsen af sjalet. Og den anden langside af sjalet strikker du iflg. A.12
14.10.2016 - 18:14
|
|||||||||||||||||||||||||||||||||||||||||||
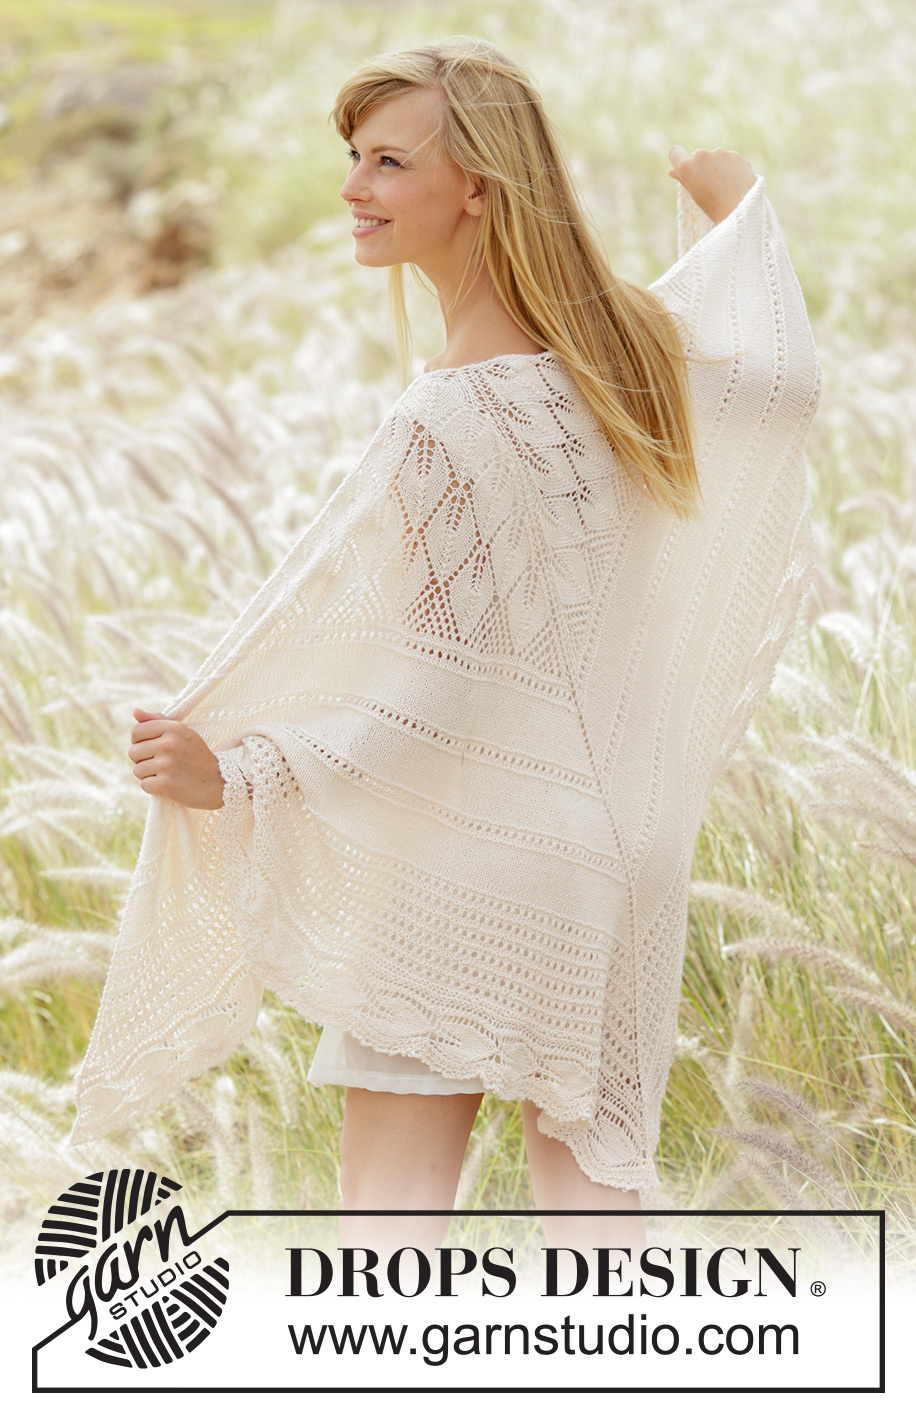
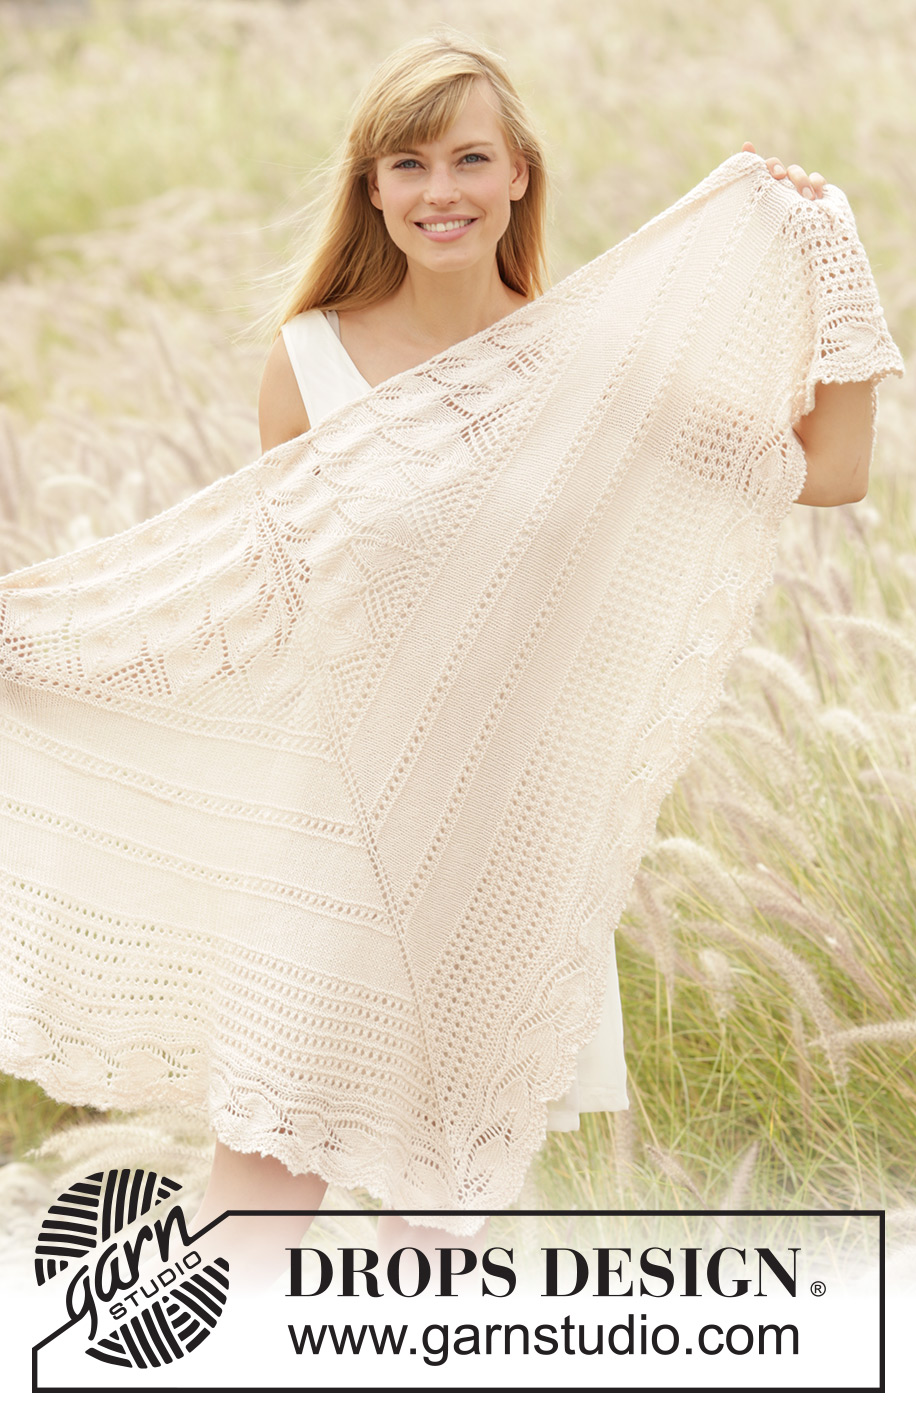
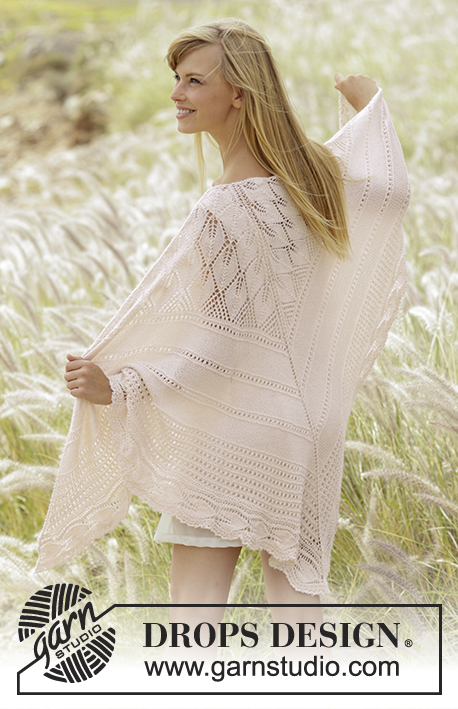
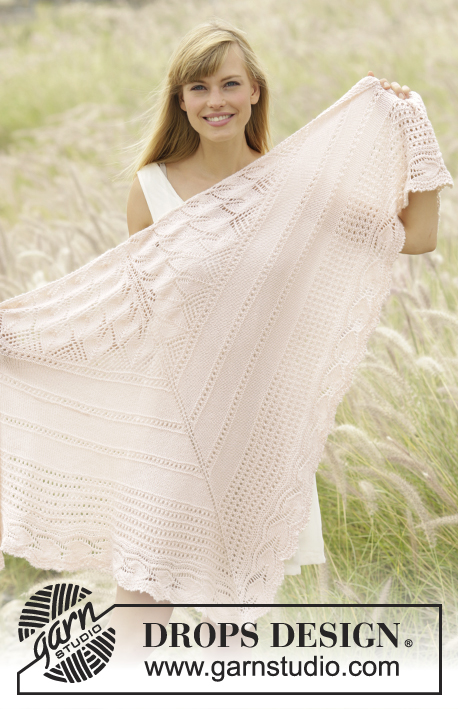
Sweet Leaves#sweetleavesshawl |
|||||||||||||||||||||||||||||||||||||||||||
 |
 |
||||||||||||||||||||||||||||||||||||||||||
Knitted DROPS shawl with lace pattern in ”BabyAlpaca Silk”.
DROPS 169-29 |
|||||||||||||||||||||||||||||||||||||||||||
|
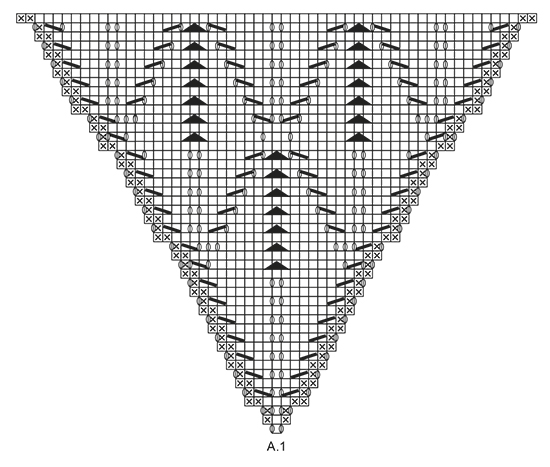
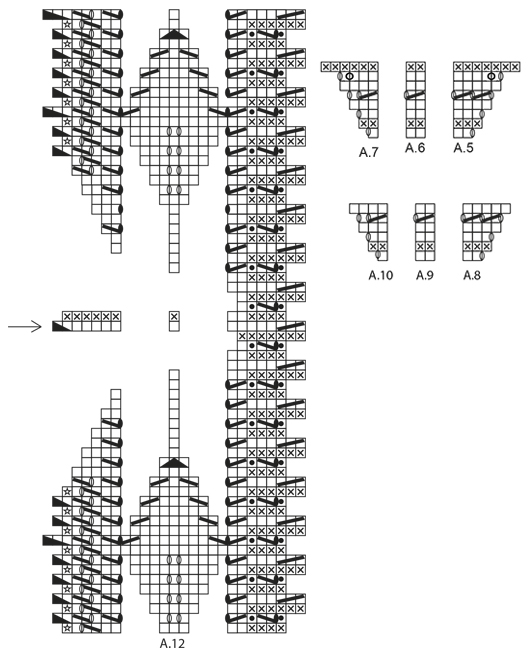
GARTER ST (back and forth): K all rows. 1 ridge = K2 rows. PATTERN: See diagrams A.1 to A.12. The diagrams show all rows in pattern seen from RS. ---------------------------------------------------------- SHAWL: Cast on 3 sts on circular needle size 3.5 mm / US 4 with BabyAlpaca Silk. ROW 1 (= RS): K all sts. ROW 2 (= WS): K 2 sts in first st, 1 YO, K 1, 1 YO, K 2 sts in last st = 7 sts. Then work as follows from RS: Work 2 sts in garter st - see explanation above, A.1 over the next st, 1 st in stockinette st (= mid st, insert 1 marker in this st, marks the middle), A.1 over the next st, finish with 2 sts in garter st. Continue pattern like this. REMEMBER THE KNITTING GAUGE When diagram A.1 has been worked 1 time vertically, there are 119 sts on needle (i.e. 59 sts on each side of mid st). Piece measures approx. 15 cm / 6'' measured along mid st. Then work as follows from RS: 2 edge sts in garter st, * A.2 over the next 9 sts, repeat A.3 over the next 36 sts (= 2 times in width), A.4 over the next 12 sts *, 1 st in stockinette st (= mid st), repeat from *-* 1 more time, finish with 2 edge sts in garter st. When A.2 to A.4 have been worked 1 time vertically, there are 215 sts on needle (i.e. 107 sts on each side of mid st). Piece measures approx. 29 cm / 11½'' measured along mid st. Then work as follows from RS: * 2 edge sts in garter st, A.5 over the next 2 sts, repeat A.6 until 1 st remains before mid st, A.7, 1 st in stockinette st (= mid st), A.5 over the next 2 sts, repeat A.6 until 3 sts remain, A.7, finish with 2 edge sts in garter st. Work 16 rows in stockinette st and inc with 1 YO inside 2 edge sts in garter st in each side piece and 1 YO on each side of mid st on every row from RS (= 4 sts inc on every row from RS) *, repeat pattern from *-* (= 26 sts inc on each side of mid st per repetition = 52 sts inc in total). After first repetition there are 267 sts on needle (= 133 sts on each side of mid st). Repeat from *-* 3 times in total = 371 sts on needle (= 185 sts on each side of mid st). Piece measures approx. 54 cm / 21 1/4''. Work next row as follows from RS: Work 2 edge sts in garter st, A.8, repeat A.9 until 1 st remains before mid st, A.10, 1 st in stockinette st (= mid st), A.8, repeat A.9 until 3 sts remain, A.10, finish with 2 edge sts in garter st (= 6 sts inc on each side of mid st per repetition = 12 sts inc). When A.8 to A.10 have been worked 6 times in total vertically, there are 443 sts on needle (i.e. 221 sts on each side of mid st). Piece measures approx. 66 cm / 26''. Then K 1 row from RS as follows: Work 2 edge sts in garter st, 1 YO (= 1 st inc), K 1, work until 1 st remains before mid st, 1 YO, K 1, 1 YO (= 2 sts inc), K 1 (= mid st), * 1 YO, K 1 *, repeat from *-* 2 more times (= 3 sts inc), work in stockinette st until 3 sts remain on needle, 1 YO, K 1, 1 YO (= 2 sts inc), finish with 2 edge sts in garter st (= 8 sts inc in total) = 451 sts on needle. K 1 row from WS, K YOs from previous row twisted to avoid holes. Then work the edge of shawl. EDGE: Do not turn piece, but cast on 15 new sts for shawl edge from WS. Turn piece, K 1 row over the 15 new sts. Turn piece. Then work according to diagram A.11 over these sts from WS (1st row = WS). Knit edge tog with shawl on every row from RS. On every row from WS slip 1st st as if to P. Repeat A.11 until 8 sts remain before mid st on shawl (= 18 times in total). Then work A.12 (1st row = WS). When all sts before mid st have been worked tog with shawl, work short rows, i.e. work 1 st less on every row from RS. When 5 sts remain from the edge (i.e. after a picot), work 1 ridge over all sts from the edge (first row is from RS and is worked tog with mid st on shawl - see arrow in diagram). Then work short rows, i.e. work 1 st more on every row from RS until all sts from edge are worked. When entire A.12 has been worked 1 time (i.e. 10 sts past mid st), repeat A.11 until all sts on shawl have been worked tog with edge (= 18 times) = 38 leaves along the edge. K 1 row from WS. Loosely bind off. |
|||||||||||||||||||||||||||||||||||||||||||
Diagram explanations |
|||||||||||||||||||||||||||||||||||||||||||
|
|||||||||||||||||||||||||||||||||||||||||||
 |
|||||||||||||||||||||||||||||||||||||||||||
 |
|||||||||||||||||||||||||||||||||||||||||||
 |
|||||||||||||||||||||||||||||||||||||||||||
 |
|||||||||||||||||||||||||||||||||||||||||||
Have you finished this pattern?Tag your pictures with #dropspattern #sweetleavesshawl or submit them to the #dropsfan gallery. Do you need help with this pattern?You'll find 17 tutorial videos, a Comments/Questions area and more by visiting the pattern on garnstudio.com. © 1982-2026 DROPS Design A/S. We reserve all rights. This document, including all its sub-sections, has copyrights. Read more about what you can do with our patterns at the bottom of each pattern on our site. |
|||||||||||||||||||||||||||||||||||||||||||


With over 40 years in knitting and crochet design, DROPS Design offers one of the most extensive collections of free patterns on the internet - translated to 17 languages. As of today we count 324 catalogs and 12290 patterns - 12280 of which are translated into English (US/in).
We work hard to bring you the best knitting and crochet have to offer, inspiration and advice as well as great quality yarns at incredible prices! Would you like to use our patterns for other than personal use? You can read what you are allowed to do in the Copyright text at the bottom of all our patterns. Happy crafting!
Post a comment to pattern DROPS 169-29
We would love to hear what you have to say about this pattern!
If you want to leave a question, please make sure you select the correct category in the form below, to speed up the answering process. Required fields are marked *.