
Popular categories
Looking for a yarn?


Comments / Questions (284)
![]() Diana Schut wrote:
Diana Schut wrote:
Ik heb 12 bollen lima gekocht voor maat L Ik heb nog 2 bollen over voor het voorpand. Hoeveel bollen moet ik nog kopen?
25.03.2023 - 21:31DROPS Design answered:
Dag Diana,
Misschien kun je het achterpand op de weegschaal leggen om op basis daarvan een inschatting te maken. Voor het achterpand gebruik je meestal ongeveer dezelfde hoeveelheid als voor het voorpand. Vaak kun je trouwens overgebleven bollen weer inleveren bij de winkel waar je ze hebt gekocht. Vraag je verkooppunt naar de voorwaarden.
27.03.2023 - 20:41
![]() Alice Hasseriis wrote:
Alice Hasseriis wrote:
I opskriften Finnley er jeg nået til sjalskraven. Der står at alle indtagninger foregår fra retsiden. Da man skal tage ind EFTER A1, giver sig selv, men der skal også tages ind FØR A 1, der er der jo først masker, når der er taget ud, og tager man ind lige efter, man har taget ud, bliver der jo ikke masker til sjalskrave. Spørgsmålet er så: Er det på vrangsiden, der skal tages ind FØR A 1?? Vh. Alice Hasseriis
11.03.2023 - 18:41DROPS Design answered:
Hei Alice. Under INDTAGNINGSTIPS står det at alle indtagninger sker fra retsiden og Tag ind således før A.1: Strik til 2 m før A.1, 2 m vr sammen. mvh DROPS Design
13.03.2023 - 13:00
![]() Gabriela wrote:
Gabriela wrote:
Hola, estoy haciendo la espalda para una talla M. Estoy en el paso en el que hay que disminuir 8 puntos en los 32 puntos de la sección central. En las instrucciones dice que debemos hacer las disminuciones en las secciones de revés pero solo tengo 6 secciones de revés en esos 32 puntos. No me queda claro cómo distribuir esas 8 disminuciones. Saludos
09.03.2023 - 21:45DROPS Design answered:
Hola Gabriela, puedes disminuir más de 1 revés en las secciones de revés. Solo dice que se disminuyan en secciones de revés, no necesariamente 1 punto en cada sección de revés.
12.03.2023 - 17:37
![]() Jacquie Stewart wrote:
Jacquie Stewart wrote:
Morning, I can’t seem to see a tension square for sizing, am I missing it or is it missing ? Thankyou
02.03.2023 - 08:09DROPS Design answered:
Dear Mrs Stewart, you will find the tension together with the size, yarn amount for each size and needle size, ie: DROPS CIRCULAR NEEDLE (60 cm) SIZE 4 mm - or size needed to get 21 sts x 28 rows in stocking st = 10 x 10 cm.. Happy knitting!
02.03.2023 - 11:09
![]() Jette Poulsen wrote:
Jette Poulsen wrote:
Vedr. drops extra 0-1132. Jeg skal begynde på forstk, men kan ikke få maskeantallet til at passe. Jeg skal slå 111 m op og strikke rib efter mønster, men med kantmasker er der kun 95 m i mønstret. Er det knaphulskantens masker der mangler eller hvad?
21.02.2023 - 17:02DROPS Design answered:
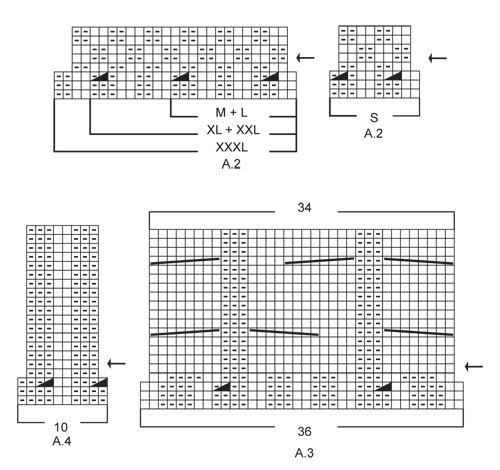
Hei Jette. I str. XXXL har du lagt opp 111 masker og skal strikke slik: A.1 (12 m) + A.2 (27 m) + 2 vr + A.3 (36 m) + A.4 (10 m) + A.5 (23) + 1 kantmaske = 12+27+2+36++10+23+1= 111 masker. mvh DROPS Design
28.02.2023 - 19:33
![]() Prunelle40 wrote:
Prunelle40 wrote:
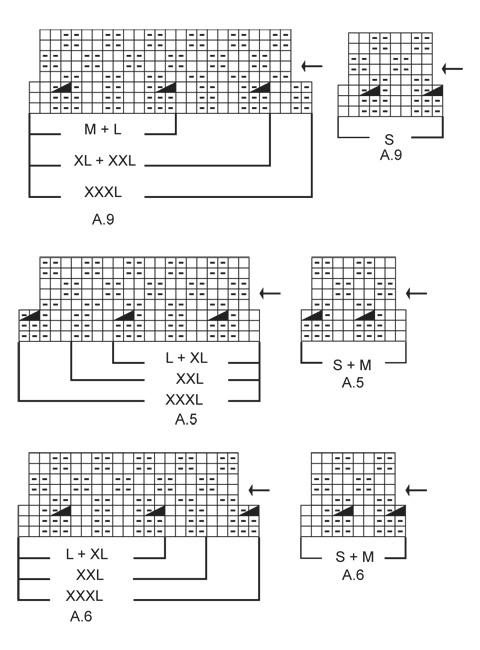
Bonsoir, Il me semble que pour la taille L, pour A6 après diminutions, il y a 13 m. Or dans une de vos réponses, je lis "A6 12 m". Qu'en est-il exactement ? Merci
19.01.2023 - 21:17DROPS Design answered:
Bonjour Prunelle40, effectivement il y a bien 13 m dans A.6 en taille L après les diminutions. Bon tricot!
20.01.2023 - 08:42
![]() Susan Martin wrote:
Susan Martin wrote:
Are the sleeve lengths correct as they get shorter the bigger the size being knit on both the pattern and the diagram
09.01.2023 - 14:41DROPS Design answered:
Dear Mrs Martin, yes they are correct, the sleeves are shorter in the larger sizes because the shoulders are wider. Feel free to check measurements from a similar garment (read more < a href="https://www.garnstudio.com/lesson.php?id=24&cid=19">here) and adjust length if necessary. Happy knitting!
09.01.2023 - 16:46
![]() Diana wrote:
Diana wrote:
Ik ben met het achter pand bezig Ik moet 158 st opzetten , en ik moet 8 steken minderen . Maar het patroon zegt dat ik dan 138 steken heb Kunt u dit uitleggen
06.09.2022 - 10:03DROPS Design answered:
Dag Diana,
Naast dat je 8 steken moet minderen, minder je ook door 2 averecht samen te breien, volgens het betreffende symbool in de telpatronen. De minderingen in het telpatroon zijn in totaal 12 waardoor je op 138 steken uitkomt.
14.09.2022 - 20:30
![]() Julie wrote:
Julie wrote:
Sorry for my previous question. I have enlarged the photo to see that it is a k2 p2 rib across!
10.05.2022 - 07:38DROPS Design answered:
Dear Julie, make sure to really follow the diagrams as explained to get the pattern follow the rib afterwards - you will work rib with K2 (from RS) but the Purl section might be either P3 or P2 (seen from RS). Happy knitting!
10.05.2022 - 08:57
![]() Julie wrote:
Julie wrote:
Hello from NZ! I have started on the rib at back and am confused with the centre panel. On every row, the pattern appears to instruct me to knit over the purl and purl over the knit stitches, with the result that the appearance is a bit like a moss stitch. Is this correct?
10.05.2022 - 07:19DROPS Design answered:
Dear Julie, when working K over K and P over P you will work for example the P3 , K2 at the beg of A.6 seen from RS: P2 and K3 when working from WS. Remember that the diagrams shows the stitches seen from RS, to get a P seen from RS you have to K from WS and to get a K seen from RS you have to P from WS. Happy knitting!
10.05.2022 - 08:53
|
|||||||||||||||||||
Finnley |
|||||||||||||||||||
 |
 |
||||||||||||||||||
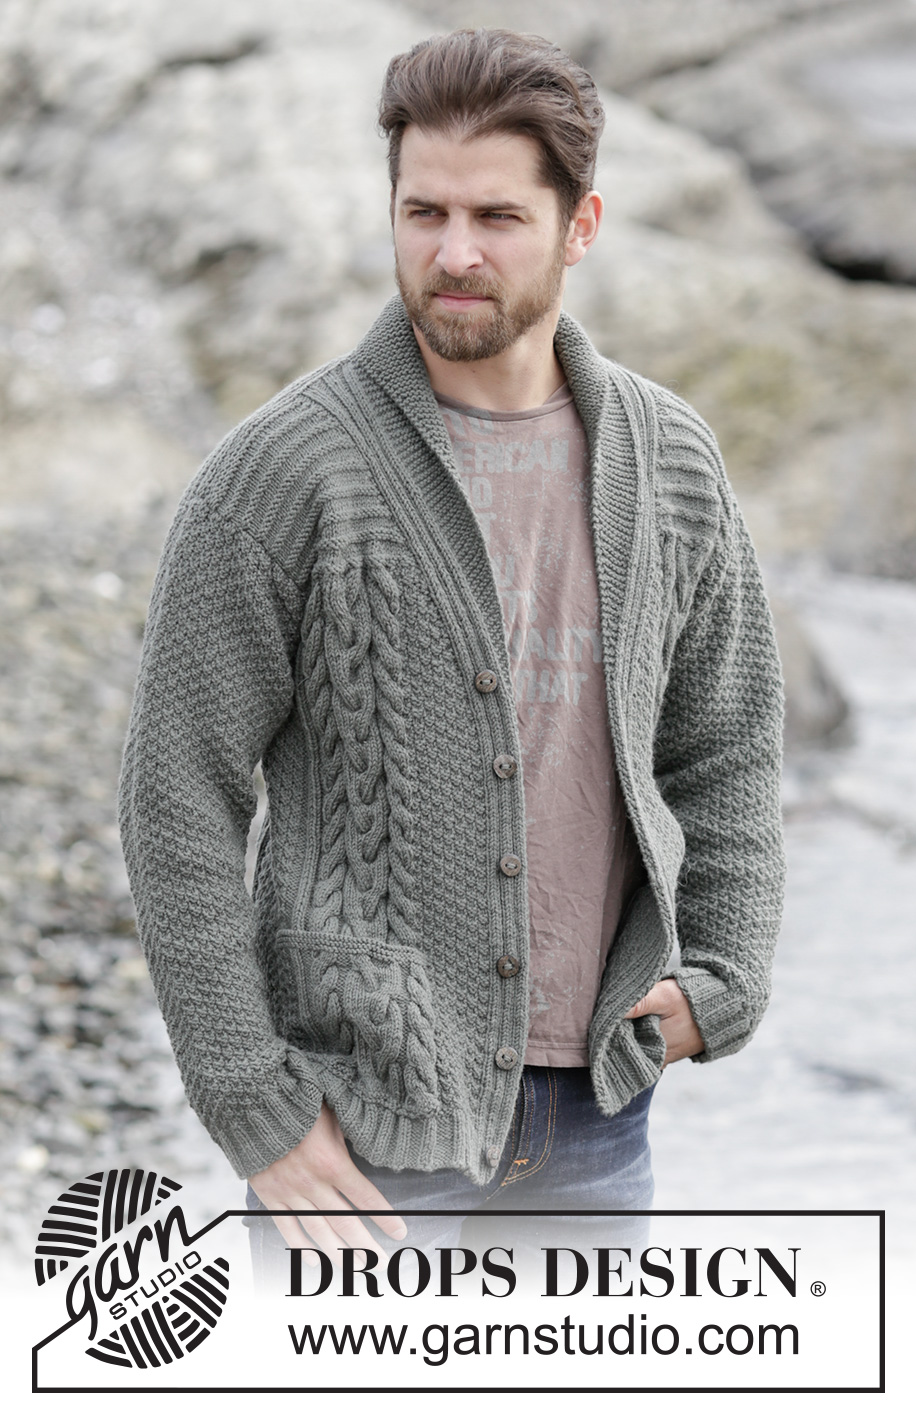
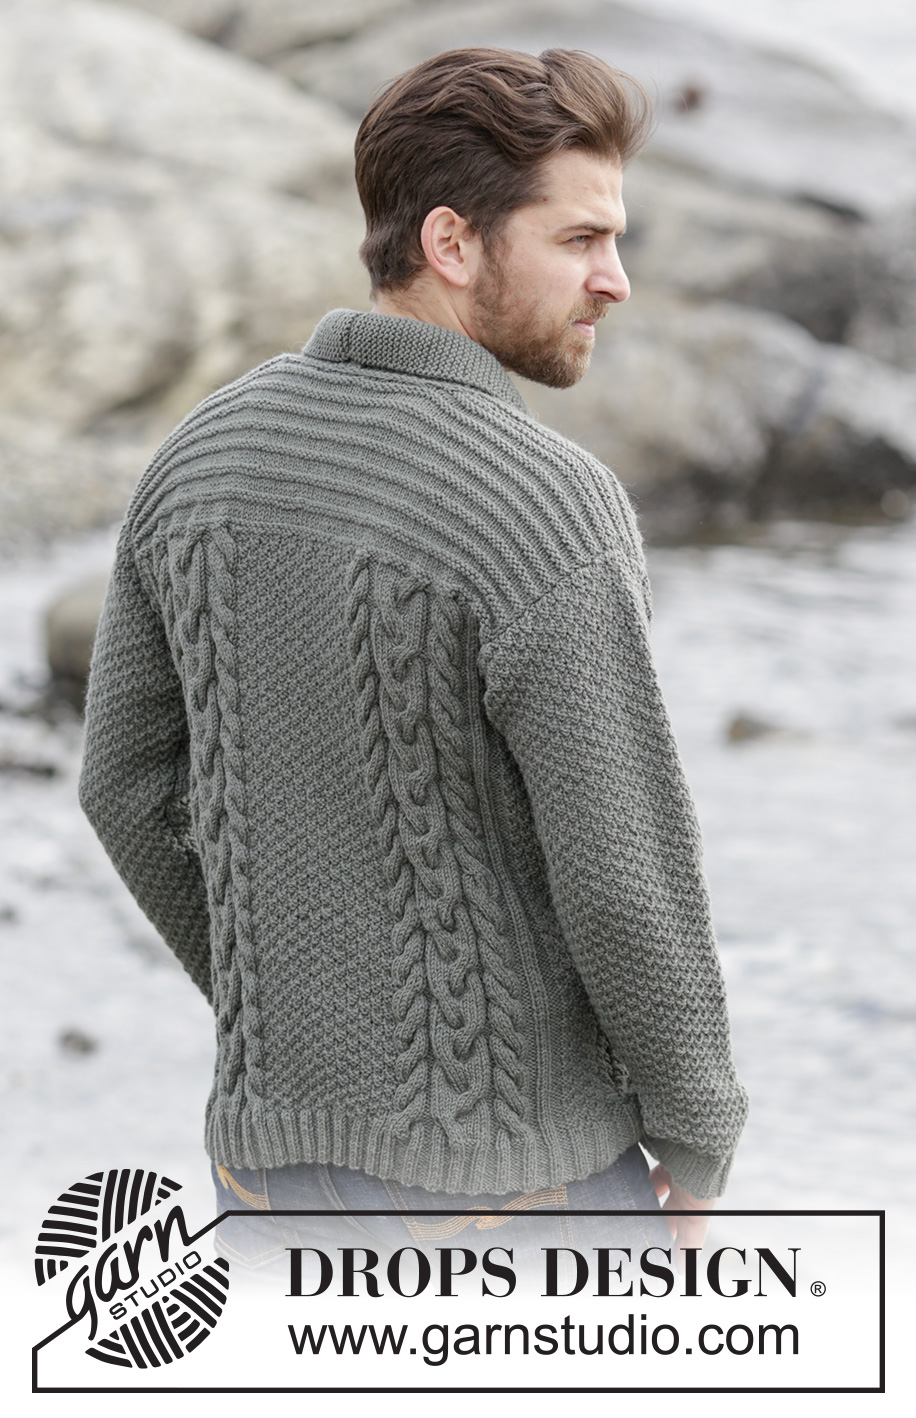
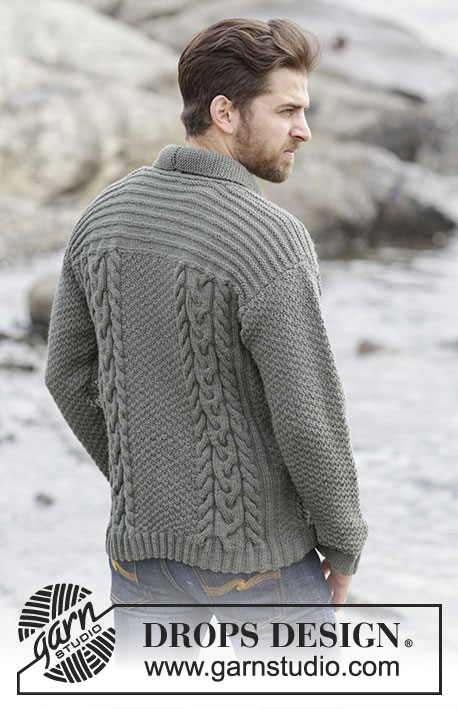
Men's knitted jacket in DROPS Lima, with cables and shawl collar. Size: S - XXXL.
DROPS Extra 0-1132 |
|||||||||||||||||||
|
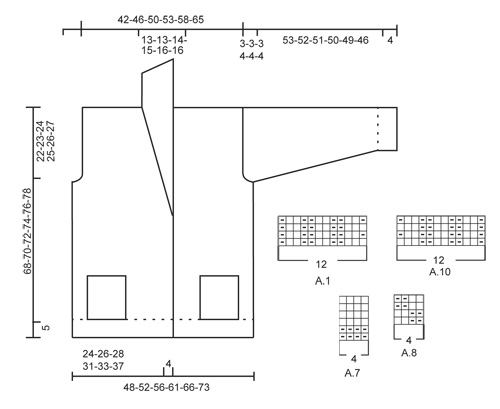
GARTER ST (back and forth): K all rows. 1 ridge = K2 rows. PATTERN: See diagrams A.1-A.10. The diagrams show all rows in pattern seen from RS. INCREASE TIP: Inc 1 st by making 1 YO, on next row work YO twisted (i.e. work in the back loop of st instead front) to avoid holes. DECREASE TIP: All dec are done from RS! Dec as follows after A.1: P 2 tog Dec as follows before A.1: Work until 2 sts remain before A.1, P 2 tog. BUTTONHOLES: Dec for buttonholes on left band. 1 buttonhole = K tog sixth and seventh st from edge and make 1 YO. Dec for buttonholes when piece measures: SIZE S: 2, 9, 17, 25, 33 and 41 cm / ¾",3½",6¾",9¾",13",16". SIZE M: 2, 10, 18, 26, 34 and 42 cm / ¾",4",7",10¼",13½",16½". SIZE L: 3, 11, 19, 27, 35 and 43 cm / 1⅛",4⅜",7½",10⅝",13¾",17". SIZE XL: 3, 12, 20, 28, 36 and 44 cm / 1⅛",4¾",8",11"14¼",17¼". SIZE XXL: 4, 13, 21, 29, 37 and 45 cm / 1½",5⅛",8¼",11⅜",14½",17¾". SIZE XXXL: 5, 14, 22, 30, 38 and 46 cm / 2",5½",8¾",11¾",15",18". SHORT ROWS (applies to shawl collar): Work short rows over sts in garter st from mid front as follows: For every 14th row work as follows (beg from RS): Work over all sts in garter st, turn piece, tighten yarn and K back, turn piece and work as before over all sts. That way the ridges in collar will not contract as much. On left front piece work reversed, i.e. beg short rows from WS. ---------------------------------------------------------- JACKET: Worked back and forth and sewn tog when finished. BACK PIECE: Cast on 145-150-158-178-186-206 sts on circular needle size 3.5 mm / US 4 with Lima. Work rib as follows: 1 edge st in GARTER ST - see explanation above, A.6 (find diagram for correct size), A.4, A.3, P 2, K 2, * P 3, K 2 *, repeat from *-* 4-5-5-9-9-11 more times, P 2, A.3, A.4, A.5 (find diagram for correct size), 1 edge st in garter st. Continue like this and repeat the first 2 rows in A.3-A.6 until 12 rows have been worked. Now continue pattern from 3rd row in diagram and work as follows: Work the first 59-59-63-63-67-72 sts as before, work the next 27-32-32-52-52-62 sts AT THE SAME TIME dec 11-8-8-12-12-14 sts evenly in sections with P, continue as before over the remaining 59-59-63-63-67-72 sts = 122-130-138-154-162-178 sts. Work 1 row. Now switch to circular needle size 4 mm / US 6 and continue with pattern but work A.8 over the middle 16-24-24-40-40-48 sts. NOTE: Now repeat A.3- A.6 from arrow in diagram. REMEMBER THE KNITTING GAUGE When piece measures 46-47-48-49-50-51 cm / 18"-18½"-19"-19¼"-19¾"-20", bind off 3-3-3-4-4-4 sts at beg of the next 4 rows for armholes = 110-118-126-138-146-162 sts on needle. When piece measures 53-54-55-56-57-58 cm / 21"-21¼"-21⅝"-22"-22½"-22¾", work A.7 over all sts inside 1 edge st in garter st in each side AT THE SAME TIME on first row dec 20-20-18-24-22-24 sts evenly in all sizes = 90-98-108-114-124-138 sts. Repeat A.7 until finished measurements. When piece measures 66-68-70-72-74-76 cm / 26"-26¾"-27½"-28⅜"-29⅛"-30", work as follows: Work the first 32-36-40-42-46-53 sts, bind off the next 26-26-28-30-32-32 sts and work the remaining 32-36-40-42-46-53 sts. Then finish each shoulder separately as follows: On next row from the neck, dec 1 st = 31-35-39-41-45-52 sts remain on each shoulder. When piece measures 68-70-72-74-76-78 cm / 26¾"-27½"-28⅜"-29⅛"-30"-30¾", work 1 ridge over all sts. Bind off. Work the other shoulder the same way. RIGHT FRONT PIECE: Cast on 81-85-89-98-102-111 sts on circular needle size 3.5 mm / US 4 with Lima. Work rib as follows: A.1 (= 12 sts), A.2 (find diagram for correct size), P 2, A.3, A.4, A.5 (find diagram for correct size), 1 edge st in garter st. Continue like this and repeat the first 2 rows in A.2-A.5 until 12 rows have been worked. Switch to circular needle size 4 mm / US 6 and continue with pattern = 73-77-81-89-93-101 sts. NOTE: Now repeat diagram from arrow. When piece measures 40-41-42-43-44-46 cm / 15¾"-16⅛"-16½"-17"-17¼"-18", beg shawl collar while AT THE SAME TIME working shoulder as explained below: READ ALL OF THE FOLLOWING SECTION BEFORE CONTINUING! SHAWL COLLAR: Work first st in A.1, 1 YO, work the remaining 11 sts in A.1, dec 1 st - READ DECREASE TIP, continue over the remaining sts on needle as before. Repeat displacement over A.1 every 1½ cm / ½" 0-2-3-3-3-4 times in total and every cm / ⅜" 26-24-23-24-25-24 times = 26-26-26-27-28-28 sts (includes the first st in A.1). Work the inc sts towards mid front in garter st, AT THE SAME TIME work SHORT ROWS - see explanation above. SHOULDER: When piece measures 46-47-48-49-50-51 cm / 18"-18½"-19"-19¼"-19¾"-20", bind off 3-3-3-4-4-4 sts at beg of the next 2 rows from WS = 67-71-75-81-85-93 sts on needle. When piece measures 53-54-55-56-57-58 cm / 21"-21¼"-21⅝"-22"-22½"-22¾", work collar sts in garter st and A.1 as before, then work A.7 over the remaining sts on needle, AT THE SAME TIME dec 10-10-10-13-12-13 sts evenly = 57-61-65-68-73-80 sts. Continue pattern until finished measurements. Then work as follows from RS: When piece measures 68-70-72-74-76-78 cm / 26¾"-27½"-28⅜"-29⅛"-30"-30¾" - adjust after back piece - work the first 26-26-26-27-28-28 sts before slipping them on a stitch holder, then work a ridge over the remaining 31-35-39-41-45-52 sts. Bind off. Slip sts back on needle. Then work short rows in garter st as follows, beg from WS: Work over all 26-26-26-27-28-28 sts, * 2 rows back and forth over the first 13-13-14-14-15-15 sts, 2 rows over all sts *, repeat from *-* until piece measures 7-7-7-8-8-8 cm / 2¾"-2¾"-2¾"-3⅛"-3⅛"-3⅛" on the shortest. Bind off. LEFT FRONT PIECE: Work as right front piece but reversed. I.e. work A.10 instead of A.1, A.9 instead of A.2 and A.6 instead of A.5. Remember BUTTONHOLES on left band - see explanation above. SLEEVE: The sleeve is worked back and forth on circular needle. Cast on 59-64-64-69-69-74 sts (includes 1 edge st in garter st in each side) on circular needle size 3.5 mm / US 4 with Lima. Work rib as follows: 1 edge st in garter st, * K 2, P 3 *, repeat from *-* until 3 sts remain, K 2, 1 edge st in garter st. Continue like this until rib measures 4 cm / 1½". Switch to circular needle size 4 mm / US 6 and work 1 row in stockinette st while AT THE SAME TIME dec 9-10-10-11-11-12 sts evenly = 50-54-54-58-58-62 sts. Continue with A.8 inside 1 edge st in garter st in each side. When piece measures 14-13-8-8-13-11 cm / 5½"-5"-3"-3"-5"-4½", inc 1 st inside edge st in garter st in each side - read INCREASE TIP. Repeat inc approx. every 2-2-1½-1½-1½-1½ cm / ¾"-¾"-½"-½"-½"-½" 20-20-22-22-25-25 more times = 92-96-100-104-110-114 sts. When piece measures 57-56-55-54-53-50 cm / 22½"-22"-21½"-21¼"-21"-19¾", bind off at beg of every row in each side: 3 sts 1-1-1-2-2-2 times, 2 sts 1 time and 3 st 2-2-2-3-3-3 times. Bind off. Sleeve measures approx. 60-59-58-58-57-54 cm / 23½"-23¼"-22¾"-22¾"-22½"-21¼". Make another sleeve. POCKETS: Worked back and forth on circular needle. Cast on 42 sts on circular needle size 4 mm / US 6 with Lima. Work 1 ridge in garter st AT THE SAME TIME inc 6 sts evenly on row from RS = 48 sts. On next row from RS work pattern as follows: NOTE: Beg and repeat pattern in A.3 and A.4 from 5th row in A.3 and A.4. 1 edge sts in garter st, A.3, A.4, A.8, 1 edge st in garter st. Continue like this back and forth until A.3 and A.4 have been worked 2 times vertically. Then continue with the first 6 rows from arrows in diagram 1 more time. Then work and dec as follows: 1 edge st in garter st, K the next 4 sts tog 2 by 2 (= 2 sts dec), continue as before over the next 7 sts, K the next 4 sts tog 2 by 2, continue with pattern as before over the next 15 sts, K the next 4 sts tog 2 by 2, work remaining sts as before and finish with 1 edge st in garter st. Then switch to needle 3.5 mm and work 2 ridges over all sts, beg from WS. Cast off from WS. Work another pocket the same way but reversed. ASSEMBLY: Sew the shoulder seams tog. Sew sleeves in body. Sew underarm and side seams in one inside 1 edge st in garter st. Sew the buttons on to the right band. Sew bind-off edge on collars tog mid back, sew collar to the back of neck. Fasten pockets on front pieces so that pattern on pocket is placed over pattern on front piece. Sew pocket neatly through both layers in edge st in garter st in each side and at the bottom of pocket. Cut the yarn and fasten. |
|||||||||||||||||||
Diagram explanations |
|||||||||||||||||||
|
|||||||||||||||||||
 |
|||||||||||||||||||
 |
|||||||||||||||||||
 |
|||||||||||||||||||
Have you finished this pattern?Tag your pictures with #dropspattern or submit them to the #dropsfan gallery. Do you need help with this pattern?You'll find 23 tutorial videos, a Comments/Questions area and more by visiting the pattern on garnstudio.com. © 1982-2026 DROPS Design A/S. We reserve all rights. This document, including all its sub-sections, has copyrights. Read more about what you can do with our patterns at the bottom of each pattern on our site. |
|||||||||||||||||||


With over 40 years in knitting and crochet design, DROPS Design offers one of the most extensive collections of free patterns on the internet - translated to 17 languages. As of today we count 325 catalogs and 12298 patterns - 12288 of which are translated into English (US/in).
We work hard to bring you the best knitting and crochet have to offer, inspiration and advice as well as great quality yarns at incredible prices! Would you like to use our patterns for other than personal use? You can read what you are allowed to do in the Copyright text at the bottom of all our patterns. Happy crafting!
Post a comment to pattern DROPS Extra 0-1132
We would love to hear what you have to say about this pattern!
If you want to leave a question, please make sure you select the correct category in the form below, to speed up the answering process. Required fields are marked *.