
Popular categories
Looking for a yarn?


Comments / Questions (17)
![]() Fay wrote:
Fay wrote:
Hei På slutten under venstre vante står det at man skal sette de første 19-21 på hånden på tråd, men hvor bør de første 19/21 begynne? Jeg vet visst ikke helt hvor “først” er :) Jeg strikker venstre nå.
12.10.2023 - 00:23DROPS Design answered:
Hej Fay, de første masker er dem efter tommelfingeren, som kommer ovenpå venstre hånd, når du har sat masker på trådene, starter du med maskerne til lillefinger (modsat side af tommelfingermaskerne ;) )
17.10.2023 - 13:59
![]() Dube wrote:
Dube wrote:
Bonjour moi c est pour le gant droit je ne comprend pas bien pour augmente avant et apres les 2 mailles de la 2 aiguilles mais moi je fait des aiguilles circulaire le gant gauche est fait merci de me repondre
11.03.2023 - 17:55DROPS Design answered:
Bonjour Mme Dube, pour le gant gauche vous avez augmenté pour le pouce de chaque côté de l'avant-dernière maille du tour, pour le gant droit, vous augmenterez de chaque côté de la 2ème maille du tour, le reste se fait de la même façon. Bon tricot!
13.03.2023 - 09:36
![]() Vial Christelle wrote:
Vial Christelle wrote:
Je peux tricoté ce modèle de gants avec deux aiguilles classiques car je n'est pas d'aiguilles circulaires ? Merci d'avance pour votre réponse. Cordialement Vial christelle
05.01.2023 - 12:17DROPS Design answered:
Bonjour Mme Vial, vous pouvez peut-être tricoter ces gants sur 2 aiguilles seulement, mais il vous faudra adapter les explications pour ajouter des coutures (côté + entre les doigts) - nous avons quelques modèles de mitaines à tricoter en rangs mais, sauf erreur, tous nos gants se tricotent en rond. N'hésitez pas à consulter nos vidéos pour apprendre à tricoter en rond, ce sera fort probablement plus simple. Bon tricot!
05.01.2023 - 15:14
![]() Mirella wrote:
Mirella wrote:
Buongiorno, quando dite di aumentare ogni 3 giri significa 3 giri senza aumenti poi uno con, oppure 2 giri senza aumenti e al terzo si fanno gli aumenti? Grazie
20.02.2020 - 15:46DROPS Design answered:
Buongiorno Mirella. Per aumentare ogni 3 giri, lavora così: aumenta su un giro, lavora due giri senza aumentare, al terzo giro aumenta e così via. Buon lavoro!
20.02.2020 - 16:08
![]() Sonja wrote:
Sonja wrote:
Entschuldigung 56 Maschen, hatte mich vertippt. Das sind aber immer noch zuviel.
19.01.2020 - 12:13DROPS Design answered:
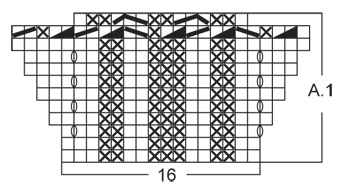
Liebe Sonja, bei der vorletzte Reihe in A.1 sollen Sie auch abnehmen (= 10 Abnahme insgesamt bei der vorletzte Reihe + 2 Abnahmen bei der letzte Reihe; bei der 10. Reihe in A.1 haben Sie 24 M dann nehmen Sie 10 Maschen ab = 14 Maschen, dann nehmen Sie 2 M ab = 12 Maschen x 4 Rapporte = 48 Maschen in allen Größen. Viel Spaß beim stricken!
20.01.2020 - 09:38
![]() Sonja wrote:
Sonja wrote:
Ich habe den Mustersatz genau nach Anleitung gestrickt und bei mir bleiben 64 Maschen übrig und nicht wie beschrieben 48 Maschen. Kann es sein dass in der Anleitung ein Fehler vorliegt ? Habe es inzwischen 3 mal gestrickt und komme immer wieder auf 14 M pro Nadel.
19.01.2020 - 12:09DROPS Design answered:
Liebe Sonja, die letzte Runde in A.1 stricken Sie über die 14 M wie folgt: 1 M re, 2 M li, 1 M auf eine Hilfsnadel vor die Arb legen, 2 M re zusstr, 1 M re von der Hilfsnadel str. (1 Abnahme), 2 M li, 1 M auf eine Hilfsnadel vor die Arb legen, 2 M re zusstr, 1 M re von der Hilfsnadel str. (= 1 Abnahme), 2 M li, 1 M re = 12 M bleiben x 4 = 48 M. Viel Spaß beim stricken!
20.01.2020 - 09:35
![]() M Van De Laar wrote:
M Van De Laar wrote:
Ik snap dit stukje niet. Meerder 1 st aan elke kant van de een na laatste st op de nld – ZIE TIP VOOR HET MEERDEREN (= 2 st gemeerderd). Herhaal dit meerderen elke 3e nld in totaal 5-6 keer = 11-13 duim st en 58-66 st in totaal. Ik kom elke keer op 68 steken uit. Waar komt die ene steek vandaan?
18.12.2018 - 22:53DROPS Design answered:
Dag M Van Der Laar
Je meerdert 1 steek vlak voor en vlak na de een na laatste steek. Dit meerderen herhaal je 3 naalden later weer. In totaal doe je dit 5-6 (afhankelijk van je maat: 5 keer voor maat S/M en 6 keer voor maat M/L.) Ik vermoed dat je 1 keer te vaak hebt gemeerderd.
22.12.2018 - 13:54
![]() HAEGEMAN Sylvie wrote:
HAEGEMAN Sylvie wrote:
Bonjour il faut monter 64 mailles mais après les augmentations ( 0 ou 6), on obtient moins de mailles, soit 48 ou 64. Je ne comprends pas . Y a t il une erreur? Merci de votre réponse Sylvie
25.11.2018 - 18:57DROPS Design answered:
Bonjour Mme Haegeman, vous montez 64 m et tricotez 4 fois A.1. Au début de A.1, on augmente, puis aux 2 derniers rangs, on va diminuer et il restera 12 m dans chaque A.1 soit 4 x 12 m = 48 m. Bon tricot!
26.11.2018 - 10:04
![]() Zenf wrote:
Zenf wrote:
Hei! Under "lillefinger" og de andre finger, står det "legg opp 1 ny m mot m på trådene", hva betyr det?Har dere noen video på det? Jeg lurer på akkurat hvor denne masken skal legges opp?
18.04.2017 - 00:36DROPS Design answered:
Hei Zenf, Det spiller ingen rolle om du legger opp på begynnelse eller slutten av de 11-12 maskene som skal strikkes til lillefingeren. Når den er lagt opp, strikker du rundt de 12-13 maskene og lager fingeren. Håper dette hjelper. Mvh, Deirdre
18.04.2017 - 15:15
![]() Nanna wrote:
Nanna wrote:
Jeg er forvirret over antallet af masker i tommelfingerkilen. Der står "Der tages 1 m ud på hver side af næst sidste m på omg (...) (= 2 m taget ud). Gentag udtagningen (...) totalt 5-6 gange = 11-13 tommelfinger-m og 58-66 m totalt.". Hvordan kan 2*5 nogensinde blive 11? Eller hvordan kan 48 + 11 blive 58? Har jeg misset noget?
12.08.2016 - 10:12DROPS Design answered:
Hej. Du tager ut 1 m på var sida av den näst sista m på omg (=2 m taget ut) totalt 5 gånger. Du har då tagit ut totalt 10 m, men även den m som du tog ut på var sida om är en tommelfinger-m. Totalt 11 tommelfinger-m. 48 m + 10 uttagna m = 58 m. Lycka till!
12.08.2016 - 10:40
|
|||||||||||||||||||||||||
Alpine Rose#alpinerosegloves |
|||||||||||||||||||||||||
|
|
|||||||||||||||||||||||||
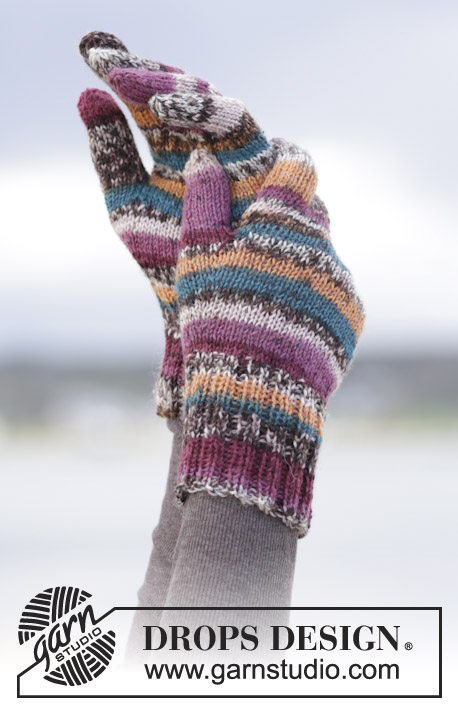
Knitted DROPS gloves with textured pattern on cuff in ”Fabel”.
DROPS 165-30 |
|||||||||||||||||||||||||
|
GARTER ST (worked in the round): * K 1 round and P 1 round *, repeat from *-*. 1 ridge = 2 rounds. PATTERN: See diagram A.1. INCREASE TIP: Inc 1 st by making 1 YO. To avoid holes K YO twisted on next round. ---------------------------------------------------------- LEFT GLOVE: Worked in the round on double pointed needles. Cast on 64 sts in both sizes on double pointed needles size 3 mm / US 2.5 with Fabel. Work 2 ridges in GARTER ST - see explanation above. Then work pattern according to diagram A.1 (= 4 repetitions of 16 sts). When A.1 has been worked, there are 48 sts on needle in both sizes and K 2/P 2 the entire round. Continue rib like this until piece measures 6-7 cm / 2½"-2 ¾". After rib K 1 round while inc 0-6 sts evenly - READ INCREASE TIP = 48-54 sts. Insert 1 marker, NOW MEASURE PIECE FROM HERE! Work in stockinette st. REMEMBER THE KNITTING GAUGE When piece measures 2 cm / 3/4", beg inc for thumb gusset. Inc 1 st on each side of the next to last st on round (i.e. on inside of hand) (= 2 sts inc). Repeat inc on each side of the last inc sts every 3rd round a total of 5-6 times = 11-13 thumb sts and 58-66 sts in total. When piece measures 6-7 cm / 2½"-2 ¾", slip thumb sts + 1 st on each side (= 13-15 sts) on 1 stitch holder. Cast on 3 new sts behind the thumb = 48-54 sts. Continue in stockinette st in the round until piece measures 10-11 cm / 4"-4 ¾". Now slip the first 19-21 sts on top of hand on a stitch holder, keep the next 11-12 sts on needle and slip the last 18-21 sts inside the hand on another stitch holder. PINKIE: = 11-12 sts, cast on 1 new st towards sts on stitch holders = 12-13 sts. Work in stockinette st in the round for approx. 5½-6½ cm / 2 ¼"-2½", then K all sts tog 2 by 2. Cut the yarn and pull it through the remaining sts, tighten tog and fasten. HAND: Slip sts from stitch holders back on the needles, pick in addition up 2 sts towards the little finger = 39-44 sts. Work 2 more rounds in stockinette st. Keep the 2 sts that were pick up towards the little finger + 6-6 sts on top of hand and 5-6 sts inside the hand on the needle. Slip the remaining sts back on the stitch holders (= 13-15 sts on top of hand and 13-15 sts inside the hand). RING FINGER: = 13-14 sts, cast on 1 new st towards sts on stitch holders = 14-15 sts. Work in stockinette st in the round for approx. 7-8 cm / 2 ¾"-3", then K all sts tog 2 by 2. Cut the yarn and pull it through the remaining sts, tighten tog and fasten. MIDDLE FINGER: Slip the next 6-7 sts from each stitch holder back on the needle, knit in addition up 2 sts towards the ring finger and cast on 1 new st towards sts on stitch holders = 15-17 sts. Work in stockinette st in the round for approx. 7½-8½ cm / 2 ⅞"-3 ¼", then K all sts tog 2 by 2. Cut the yarn and pull it through the remaining sts, tighten tog and fasten. INDEX FINGER: Slip the remaining 14-16 sts from stitch holders back on the needles, pick in addition up 2 sts towards the middle finger = 16-18 sts. Work in stockinette st in the round for approx. 6½-7½ cm / 2½"-2 ⅞", then K all sts tog 2 by 2. Cut the yarn and pull it through the remaining sts, tighten tog and fasten. THUMB: Slip the sts over thumb gusset on the needles and knit in addition up 3 sts along the edge behind the thumb sts = 16-18 sts. Work in stockinette st in the round for approx. 5½-6 cm / 2 ¼"-2½", then K all sts tog 2 by 2. Cut the yarn and pull it through the remaining sts, tighten tog and fasten. RIGHT GLOVE: Work as left but reversed, i.e. inc for thumb gusset on each side of second st on round (instead of each side of next to last st on round). |
|||||||||||||||||||||||||
Diagram explanations |
|||||||||||||||||||||||||
|
|||||||||||||||||||||||||
 |
|||||||||||||||||||||||||
Have you finished this pattern?Tag your pictures with #dropspattern #alpinerosegloves or submit them to the #dropsfan gallery. Do you need help with this pattern?You'll find 20 tutorial videos, a Comments/Questions area and more by visiting the pattern on garnstudio.com. © 1982-2026 DROPS Design A/S. We reserve all rights. This document, including all its sub-sections, has copyrights. Read more about what you can do with our patterns at the bottom of each pattern on our site. |
|||||||||||||||||||||||||


With over 40 years in knitting and crochet design, DROPS Design offers one of the most extensive collections of free patterns on the internet - translated to 17 languages. As of today we count 324 catalogs and 12290 patterns - 12280 of which are translated into English (US/in).
We work hard to bring you the best knitting and crochet have to offer, inspiration and advice as well as great quality yarns at incredible prices! Would you like to use our patterns for other than personal use? You can read what you are allowed to do in the Copyright text at the bottom of all our patterns. Happy crafting!
Post a comment to pattern DROPS 165-30
We would love to hear what you have to say about this pattern!
If you want to leave a question, please make sure you select the correct category in the form below, to speed up the answering process. Required fields are marked *.