
Popular categories
Looking for a yarn?


Comments / Questions (33)
![]() Malene Bloch-Jørgensen wrote:
Malene Bloch-Jørgensen wrote:
Jeg synes den er flot
03.06.2020 - 13:56
![]() Carmen wrote:
Carmen wrote:
Rumpfteil.: 1 mark. Setzen = 4 neue m. Beidseitig je. Markr. Glatt rechts stricken muss ich 4 maschen zunehmen? Die arb.hat 4 cm beidseitig j. Mark. . Je 1 m abnehmen
24.05.2019 - 17:46DROPS Design answered:
Liebe Carmen, ja genau, nach 4 cm nehmen Sie 1 Masche beidseitig beider Markierungen zu = 4 Zunahmen bei jeder Zunahmenrunde - siehe ZUNAHMETIPP-2. Viel Spaß beim stricken!
27.05.2019 - 08:22
![]() Carmen wrote:
Carmen wrote:
Der vorgang verstehe ich nicht, wie ich es arbeiten muss , muss ich zuerst das mut dem lochmuster arbeiten und dan in der andere runde die masche zunehmen? Weil sonnst das lochmuster nicht aufgeht,
29.03.2019 - 10:16DROPS Design answered:
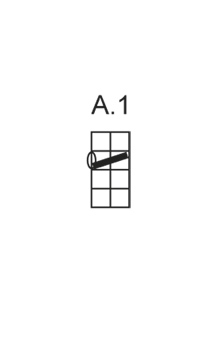
Liebe Carmen, ganz am Anfang der Passe nehmen Sie regelmäßig bei der 1. Reihe in A.1 zu, dh mit Nadeln 5 die 1. Reihe in A.1 stricken, gleichzeitig 12-20M (siehe Grösse) gleichmässig verteilt zunehmen = 104-132 M, dann A.1 bis zur Ende (= die 3 letzten Reihen) stricken. Viel Spaß beim stricken!
01.04.2019 - 10:30
![]() Matilda wrote:
Matilda wrote:
Hej! Det står i mönstret när man stickar OK:et att man ska sticka ( för stl M) 14 varv rätst efter första A1 och när arbetet mäter ca 7 cm ska man börja med resårstickning- jag antar att de 7 cm är för de 14 v rätst och inte totalt uppifrån ( för det måste ju bli mer än 7 cm; ( 4v + 4v A1 + 14v )? Och - på bilden ser det ut som resårdelen är betydligt längre än rätstickningsdelen ( 7 cm) men den ska enligt mönstret (stl M) vara 6 cm?
10.05.2016 - 08:33DROPS Design answered:
Hej. Arbetet ska då mäta ca 7 cm totalt. Lycka till!
16.05.2016 - 14:19
![]() Susanne wrote:
Susanne wrote:
Hej, kan man lave denne top i Big merino med et lige så godt resultat, som med Paris? Jeg tænker at løbelængden jo, er den samme på begge garner :-)
01.04.2016 - 03:00DROPS Design answered:
Hej Susanne. Du kan sagtens erstatte med Big Merino (samme garnkategori), men vaer opmaerksom paa at Big Merino er merino uld og det er mere elastisk end Paris som er et 100% bomuldsgarn, og husk at strikke en pröve först og kontroller din strikkefasthed. God fornöjelse.
01.04.2016 - 10:09
![]() Nathalie Ménard wrote:
Nathalie Ménard wrote:
Merci beaucoup pour votre réponse rapide et la vidéo!
15.06.2015 - 13:56
![]() Irmelin wrote:
Irmelin wrote:
"Gjenta fellingen når arb måler 11-10-9-8-7-6 cm = 128-144-156-172-196-216 m. Når arb måler 18-17-16-15-14-13 cm økes det 1 m på hver side av hvert merke" Er tallene skrevet i riktig rekkefølge?
01.05.2015 - 17:50DROPS Design answered:
Hei Irmelin. Ja, det er korrekt.
04.05.2015 - 16:28
![]() Gabi wrote:
Gabi wrote:
Habe den Pulli 161-11 nachgestrickt und war von der kinderleichten Anleitung so begeistert, dass ich mir den Pulli gleich in anderer Farbe und mit langen Ärmeln noch mal gestrickt habe. Alles perfekt die Rundpasse sowie die Ärmel sitzen einfach nur TOP !!!
29.04.2015 - 19:30
![]() JILL M wrote:
JILL M wrote:
Hi, When I click on the link you mentioned I go straight back to where I started. Jill
29.03.2015 - 19:28DROPS Design answered:
Dear Jill, please check that your browser allows pop up windows and all settings to your printer, test has been done succesfully, it should work. Happy knitting!
30.03.2015 - 15:54
![]() JILL M wrote:
JILL M wrote:
I am having trouble printing this pattern, each time I click on the link it takes me to an advert for 25% off sock yarn in March, I then click to continue & end up back where I started. Any help please, I am using an iPad which I regularly print from.
29.03.2015 - 15:38DROPS Design answered:
Hi Jill. At the top of the advert (right), there should be a link "continue to print pattern". Click there to preoceed.
29.03.2015 - 15:53
|
|||||||
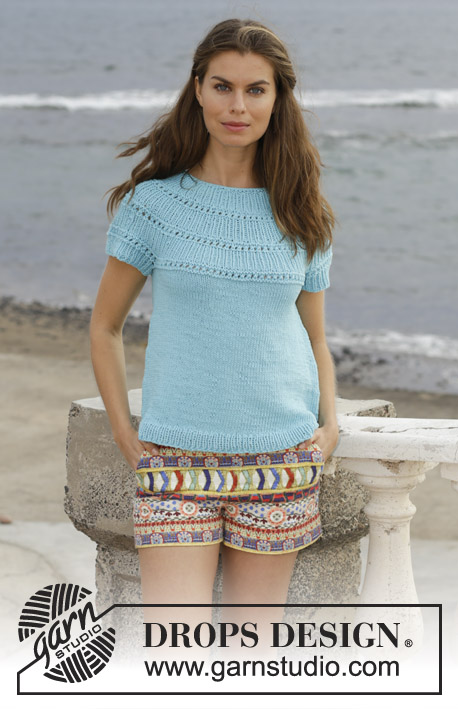
Athena#athenatop |
|||||||
 |
 |
||||||
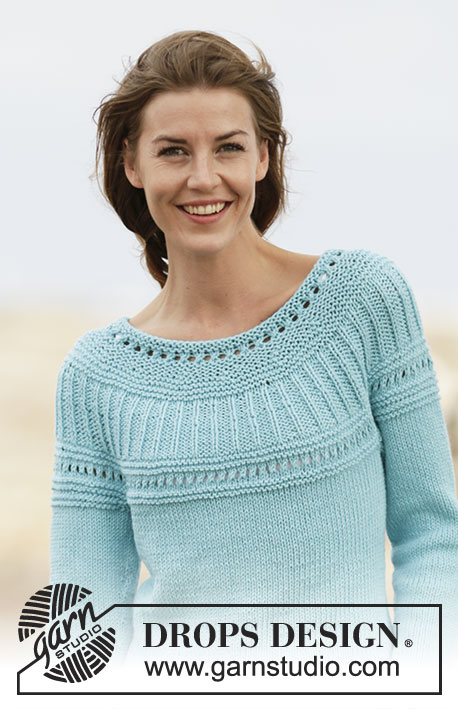
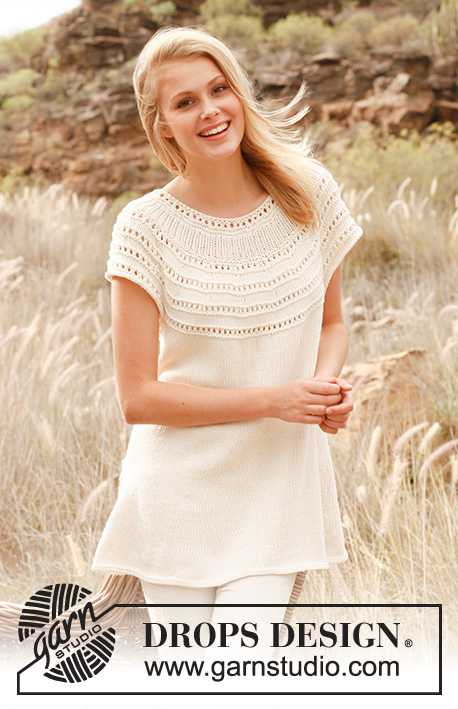
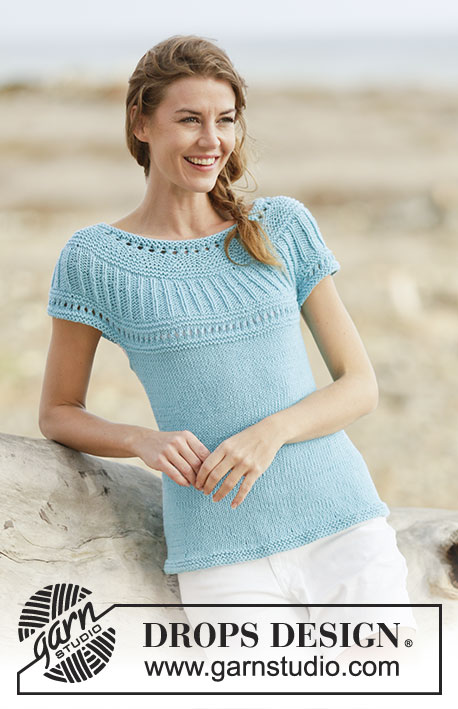
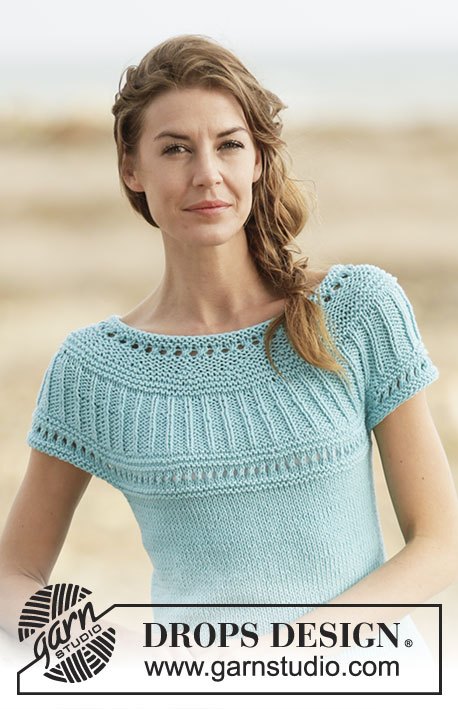
Knitted DROPS top with round yoke,in stockinette st, garter st with lace pattern, worked top down in ”Paris”. Size: S - XXXL.
DROPS 161-11 |
|||||||
|
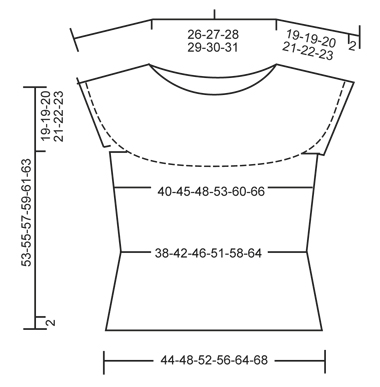
GARTER ST (worked in the round): 1 ridge = 2 rounds. * K 1 round and P 1 round *, repeat from *-*. PATTERN: See diagram A.1. INCREASE TIP 1: Inc 1 st by making 1 YO, on next round work YO twisted (i.e. work in back loop of st instead front) to avoid holes. INCREASE TIP 2: Inc with YO on each side of 2 sts in each side (the marker sits inbetween these sts). Knit YO twisted on next round. DECREASE TIP: Dec as follows before 1 st in stockinette st and marker: K 2 tog. Dec after marker and 1 st in stockinette st as follows: Slip 1 st as if to K, K 1, psso. ---------------------------------------------------------- TOP: Worked in the round on circular needle, top down. Rounds start mid back. YOKE: Cast on 92-96-100-104-108-112 sts on circular needle size 4.5 mm / US 7 with Paris. Work 2 ridges in GARTER ST - see explanation above. Switch to circular needle size 5 mm / US 8 and work A.1, AT THE SAME TIME on first round in diagram inc 12-16-18-18-20-20 sts evenly - READ INCREASE TIP 1 = 104-112-118-122-128-132 sts. When A.1 has been worked vertically, switch back to circular needle size 4.5 mm / US 7. Work in garter st AT THE SAME TIME inc 10 sts evenly on 2nd ridge and 6-7-13-15-21-26 sts evenly on 5th ridge (NOTE: Inc on a round with K) = 120-129-141-147-159-168 sts. REMEMBER THE KNITTING GAUGE When 7-7-8-8-8-10 ridges have been worked in total, piece measures approx. 7-7-8-8-8-9 cm / 2¾"-2¾"-3"-3"-3"-3½", switch to circular needle size 5 mm / US 8. Work 2 rounds in stockinette st. Now work rib as follows: * K 1, P 2 *, repeat from *-* the entire round. When rib measures 2 cm / ¾", inc by making 1 YO before K st in every section P the entire round (= 40-43-47-49-53-56 sts inc) = 160-172-188-196-212-224 sts. On next round P YOs twisted (i.e. work in back loop of st instead of front) to avoid holes. Continue with K 1/P 3. Repeat inc before every st with K when rib measures 4-4-4-5-6-6 cm / 1½"-1½"-1½"-2"-2½"-2½" = 200-215-235-245-265-280 sts. Continue with K 1/P 4 until rib measures 6-6-6-7-8-8 cm / 2½"-2½"-2½"-2¾"-3"-3" in total. Work 2 rounds in stockinette st. Now switch to circular needle size 4.5 mm / US 7. Work 2 ridges while AT THE SAME TIME on first round inc 8-11-11-15-21-28 sts evenly = 208-226-246-260-286-308 sts. Switch to circular needle size 5 mm / US 8 and continue with A.1. When A.1 has been worked vertically, switch to circular needle size 4.5 mm / US 7. Work 2 ridges while AT THE SAME TIME on first round inc 8-10-10-16-22-28 sts evenly = 216-236-256-276-308-336 sts. Now continue on circular needle size 5 mm / US 8 as follows: Work the first 30-34-37-41-47-52 sts (= back piece), slip the next 48-50-54-56-60-64 sts on a stitch holder (= sleeve), cast on 8 new sts under sleeve, work the next 60-68-74-82-94-104 sts (= front piece), slip the next 48-50-54-56-60-64 sts on a stitch holder (= sleeve), cast on 8 new sts under sleeve, work the remaining 30-34-37-41-47-52 sts (= back piece) on round. BODY: There are now 136-152-164-180-204-224 sts for body. Insert a marker in each side of body where new sts were cast on under sleeves (= 4 new sts on each side of marker). MEASURE PIECE FROM HERE. Continue in stockinette st. When piece measures 4 cm / 1½", dec on each side of each markers (= 4 sts dec) - READ DECREASE TIP! Repeat dec when piece measures 11-10-9-8-7-6 cm / 4½"-4"-3½"-3"-2¾"-2½" = 128-144-156-172-196-216 sts. When piece measures 18-17-16-15-14-13 cm / 7"-6¾"-6¼"-6"-5½"-5", inc 1 st on each side of each marker - READ INCREASE TIP 2 (= 4 sts inc). Repeat inc every 2-2½-3-3-3½-4 cm / ¾"-⅞"-1⅛"-1⅛"-1¼"-1½" 4 more times = 148-164-176-192-216-236 sts. When piece measures 32-33-34-35-36-37 cm / 12½"-13½"-13⅜"-13¾"-14¼"-14½", inc 10-8-11-10-14-8 st evenly = 158-172-187-202-230-244 sts. Switch to circular needle size 4.5 mm / US 7 and work 3 ridges. Loosely bind off. SLEEVE EDGE: Slip sts from stitch holder back on double pointed needles size 4.5 mm / US 7 (= 48-50-54-56-60-64 sts). Pick up 1 st in each of the 8 sts cast on under sleeve = 56-58-62-64-68-72 sts. Loosely bind off all sts. Repeat on the edge of the other sleeve. |
|||||||
Diagram explanations |
|||||||
|
|||||||
 |
|||||||
 |
|||||||
Have you finished this pattern?Tag your pictures with #dropspattern #athenatop or submit them to the #dropsfan gallery. Do you need help with this pattern?You'll find 23 tutorial videos, a Comments/Questions area and more by visiting the pattern on garnstudio.com. © 1982-2026 DROPS Design A/S. We reserve all rights. This document, including all its sub-sections, has copyrights. Read more about what you can do with our patterns at the bottom of each pattern on our site. |
|||||||


With over 40 years in knitting and crochet design, DROPS Design offers one of the most extensive collections of free patterns on the internet - translated to 17 languages. As of today we count 325 catalogs and 12298 patterns - 12288 of which are translated into English (US/in).
We work hard to bring you the best knitting and crochet have to offer, inspiration and advice as well as great quality yarns at incredible prices! Would you like to use our patterns for other than personal use? You can read what you are allowed to do in the Copyright text at the bottom of all our patterns. Happy crafting!
Post a comment to pattern DROPS 161-11
We would love to hear what you have to say about this pattern!
If you want to leave a question, please make sure you select the correct category in the form below, to speed up the answering process. Required fields are marked *.