
Popular categories
Looking for a yarn?


Comments / Questions (34)
![]() Daria wrote:
Daria wrote:
A couple of questions regarding the sleeve edge. Do you have any videos you can point me to that show picking up stitches in the armhole? And what bind off do you recommend for the bottom of the sweater and sleeves? Your help is greatly appreciated.
20.05.2024 - 16:21DROPS Design answered:
Dear Daria, in this video we show (from time code approx. 09:38) how to work the sleeves/pick up sts; and in this lesson how to pick up stitches (picture 18B) - in this other video we show 3 different ways to cast off loosely, there are even more technique, explore our videos. Happy knitting!
21.05.2024 - 13:44
![]() Daria wrote:
Daria wrote:
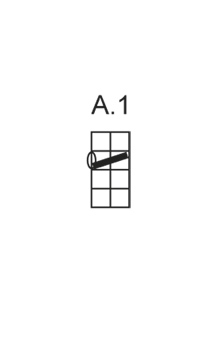
Is A1 to be repeated throughout the row, as in knit the first row, knit the second row, knit two together yarn over third row the full row and then, knit all the fourth row? Or is A1 for only the first two stitches at the BOR? Thank you!
12.05.2024 - 18:02DROPS Design answered:
Dear Daria, in the yoke, when it says "Switch to circular needle size 5 mm and work A.1" it means that A.1 is repeated the whole round. So you work the first round of A.1 over all stitches. In the next round, knit the 2nd round of A.1 over all stitches. For more information you can read the following lesson: https://www.garnstudio.com/lesson.php?id=68&cid=19. Happy knitting!
12.05.2024 - 22:52
![]() Denine wrote:
Denine wrote:
I'm confused about the initial 18 stitch increase in the beginning; is there a knit before the A.1 :K2 tog? It seems that the increase row will interfere with the following A1 rowxwith more YO.
07.04.2024 - 04:55DROPS Design answered:
Dear Denine, according to the pattern, you should do the increases in the first row, when setting up the pattern. (Set up the pattern according to the already increased numbers). Happy Knitting!
07.04.2024 - 13:49
![]() Mireille wrote:
Mireille wrote:
Bonjour Peut-on réhausser le dos pour qu’il soit moins décolleté que le devant ?
09.10.2023 - 23:02DROPS Design answered:
Bonjour Mireille, probablement, vous pouvez vous aider d'un modèle de tension similaire pour tricoter une réhausse. Bon tricot!
10.10.2023 - 09:12
![]() Jade wrote:
Jade wrote:
A magyar fordítás hibás. Azt írja, a vállon 5 mm-s tűre váltás után lustakötéssel kell folytatni, de az angol szerint az A1-es mintával.
07.07.2023 - 16:54
![]() Sabine wrote:
Sabine wrote:
Muster A. 1 \r\n2 M re zusstr, 1 Umschlag zwischen 2 M?
13.01.2022 - 19:54DROPS Design answered:
Liebe Sabine, bei der 3. Reihe in A.1 stricken Sie: *2 Maschen rechts zusammen, 1 Umschlag*, von *-* wiederholen. Viel Spaß beim stricken!
14.01.2022 - 09:10
![]() Christa wrote:
Christa wrote:
Ich möchte ein ein duenneres Garn stricken, wie kann ich das umrechnen .Danke für Ihre Hilfe.
19.06.2021 - 17:25DROPS Design answered:
Liebe Christa, dieses Top ist ähnlich und mit einem Garn der Garngruppe B gestrickt - leider können wir jeder Anleitung nach jedem individuellen Frage anpassen und einzelne Modelle auf individuellen Wunsch hin umrechnen. Wenn sie Hilfe damit brauchen, wenden Sie sich bitte an dem Laden wo Sie die Wolle gekauft haben, dort hilft man Ihnen gerne weiter. Danke im voraus für Ihr Verständnis. Viel Spaß beim stricken!
21.06.2021 - 07:30
![]() Marilena wrote:
Marilena wrote:
Posso avere la spiegazione della maglia top down in italiano? Grazie mille
18.02.2021 - 14:33DROPS Design answered:
Buonasera Marilena, nel menù a tendina sotto la foto può trovare le lingue in cui è stato tradotto il modello: a questo link può trovare la versione in italiano. Buon lavoro!
18.02.2021 - 21:47
![]() Liv Torunn Gullstein Torpe wrote:
Liv Torunn Gullstein Torpe wrote:
Eg opplever at dei store str er gedigne. Med litt chunky garn må eg strikke s/m istaden for xxl, ellers holder garnet kunn til bærestykke og litt til. Kvifor er det slik?
06.08.2020 - 09:19DROPS Design answered:
Hej Liv, hvis du overholder strikkefastheden ifølge opskriften, så vil du få de mål som står, ud for den størrelse du har valgt, i måleskitsen. God fornøjelse!
06.08.2020 - 10:25
![]() Malene Bloch-Jørgensen wrote:
Malene Bloch-Jørgensen wrote:
Jeg synes den er flot
03.06.2020 - 13:56
|
|||||||
Athena#athenatop |
|||||||
 |
 |
||||||
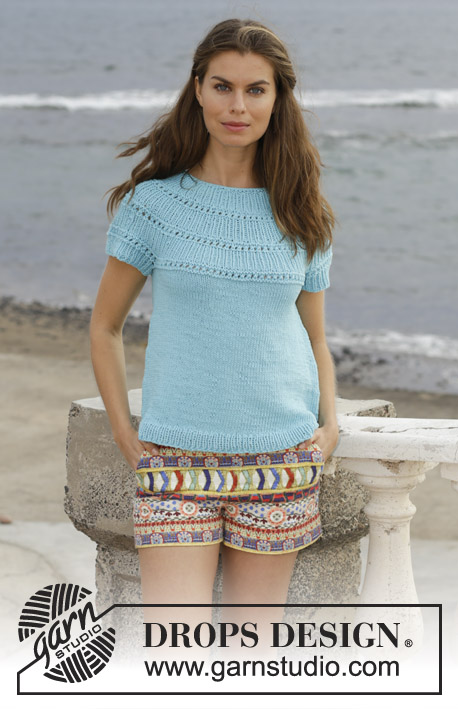
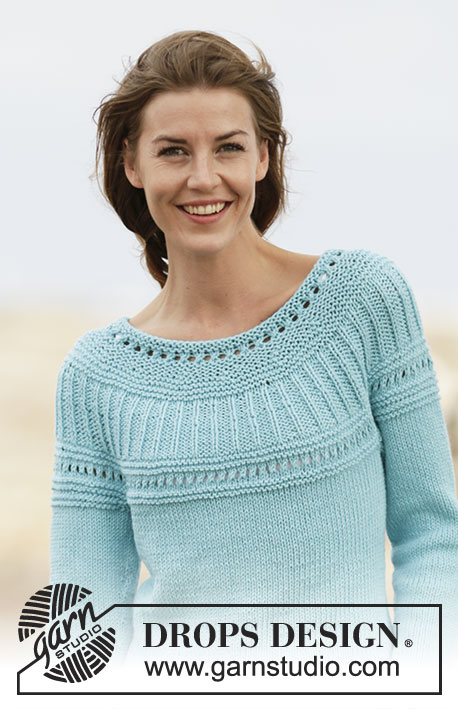
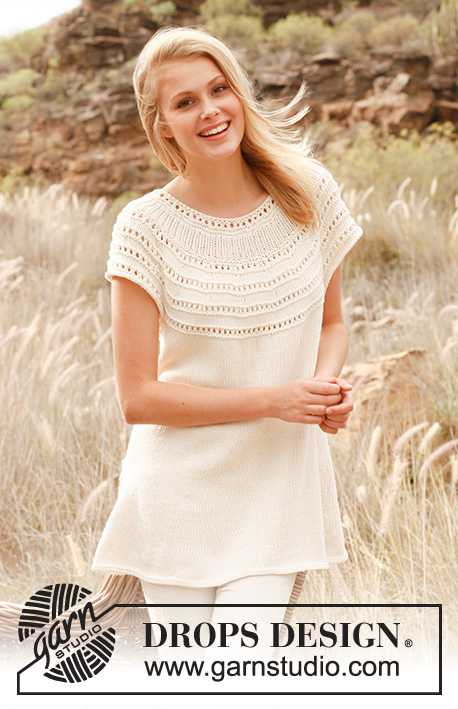
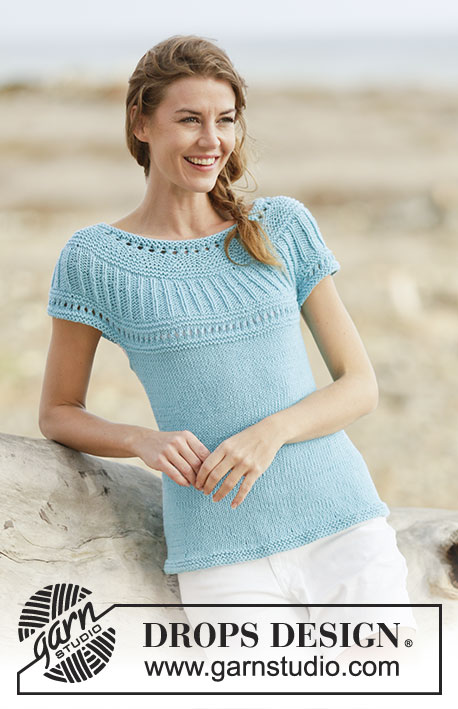
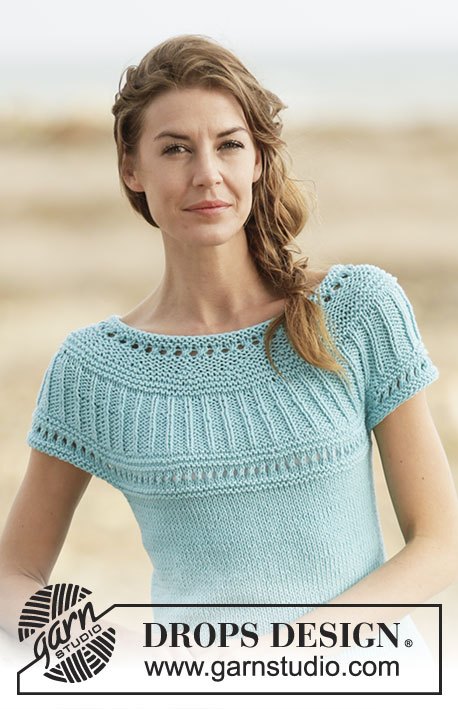
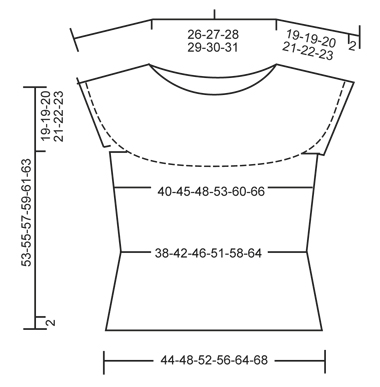
Knitted DROPS top with round yoke,in stocking st, garter st with lace pattern, worked top down in ”Paris”. Size: S - XXXL.
DROPS 161-11 |
|||||||
|
GARTER ST (worked in the round): 1 ridge = 2 rounds. * K 1 round and P 1 round *, repeat from *-*. PATTERN: See diagram A.1. INCREASE TIP 1: Inc 1 st by making 1 YO, on next round work YO twisted (i.e. work in back loop of st instead front) to avoid holes. INCREASE TIP 2: Inc with YO on each side of 2 sts in each side (the marker sits inbetween these sts). Knit YO twisted on next round. DECREASE TIP: Dec as follows before 1 st in stocking st and marker: K 2 tog. Dec after marker and 1 st in stocking st as follows: Slip 1 st as if to K, K 1, psso. ---------------------------------------------------------- TOP: Worked in the round on circular needle, top down. Rounds start mid back. YOKE: Cast on 92-96-100-104-108-112 sts on circular needle size 4.5 mm with Paris. Work 2 ridges in GARTER ST - see explanation above. Switch to circular needle size 5 mm and work A.1, AT THE SAME TIME on first round in diagram inc 12-16-18-18-20-20 sts evenly - READ INCREASE TIP 1 = 104-112-118-122-128-132 sts. When A.1 has been worked vertically, switch back to circular needle size 4.5 mm. Work in garter st AT THE SAME TIME inc 10 sts evenly on 2nd ridge and 6-7-13-15-21-26 sts evenly on 5th ridge (NOTE: Inc on a round with K) = 120-129-141-147-159-168 sts. REMEMBER THE KNITTING TENSION When 7-7-8-8-8-10 ridges have been worked in total, piece measures approx. 7-7-8-8-8-9 cm, switch to circular needle size 5 mm. Work 2 rounds in stocking st. Now work rib as follows: * K 1, P 2 *, repeat from *-* the entire round. When rib measures 2 cm, inc by making 1 YO before K st in every section P the entire round (= 40-43-47-49-53-56 sts inc) = 160-172-188-196-212-224 sts. On next round P YOs twisted (i.e. work in back loop of st instead of front) to avoid holes. Continue with K 1/P 3. Repeat inc before every st with K when rib measures 4-4-4-5-6-6 cm = 200-215-235-245-265-280 sts. Continue with K 1/P 4 until rib measures 6-6-6-7-8-8 cm in total. Work 2 rounds in stocking st. Now switch to circular needle size 4.5 mm. Work 2 ridges while AT THE SAME TIME on first round inc 8-11-11-15-21-28 sts evenly = 208-226-246-260-286-308 sts. Switch to circular needle size 5 mm and continue with A.1. When A.1 has been worked vertically, switch to circular needle size 4.5 mm. Work 2 ridges while AT THE SAME TIME on first round inc 8-10-10-16-22-28 sts evenly = 216-236-256-276-308-336 sts. Now continue on circular needle size 5 mm as follows: Work the first 30-34-37-41-47-52 sts (= back piece), slip the next 48-50-54-56-60-64 sts on a stitch holder (= sleeve), cast on 8 new sts under sleeve, work the next 60-68-74-82-94-104 sts (= front piece), slip the next 48-50-54-56-60-64 sts on a stitch holder (= sleeve), cast on 8 new sts under sleeve, work the remaining 30-34-37-41-47-52 sts (= back piece) on round. BODY: There are now 136-152-164-180-204-224 sts for body. Insert a marker in each side of body where new sts were cast on under sleeves (= 4 new sts on each side of marker). MEASURE PIECE FROM HERE. Continue in stocking st. When piece measures 4 cm, dec on each side of each markers (= 4 sts dec) - READ DECREASE TIP! Repeat dec when piece measures 11-10-9-8-7-6 cm = 128-144-156-172-196-216 sts. When piece measures 18-17-16-15-14-13 cm, inc 1 st on each side of each marker - READ INCREASE TIP 2 (= 4 sts inc). Repeat inc every 2-2½-3-3-3½-4 cm 4 more times = 148-164-176-192-216-236 sts. When piece measures 32-33-34-35-36-37 cm, inc 10-8-11-10-14-8 st evenly = 158-172-187-202-230-244 sts. Switch to circular needle size 4.5 mm and work 3 ridges. Loosely cast off. SLEEVE EDGE: Slip sts from stitch holder back on double pointed needles size 4.5 mm (= 48-50-54-56-60-64 sts). Pick up 1 st in each of the 8 sts cast on under sleeve = 56-58-62-64-68-72 sts. Loosely cast off all sts. Repeat on the edge of the other sleeve. |
|||||||
Diagram explanations |
|||||||
|
|||||||
|
|||||||
|
|||||||
Have you finished this pattern?Tag your pictures with #dropspattern #athenatop or submit them to the #dropsfan gallery. Do you need help with this pattern?You'll find 23 tutorial videos, a Comments/Questions area and more by visiting the pattern on garnstudio.com. © 1982-2025 DROPS Design A/S. We reserve all rights. This document, including all its sub-sections, has copyrights. Read more about what you can do with our patterns at the bottom of each pattern on our site. |
|||||||


With over 40 years in knitting and crochet design, DROPS Design offers one of the most extensive collections of free patterns on the internet - translated to 17 languages. As of today we count 314 catalogues and 11822 patterns translated into English (UK/cm).
We work hard to bring you the best knitting and crochet have to offer, inspiration and advice as well as great quality yarns at incredible prices! Would you like to use our patterns for other than personal use? You can read what you are allowed to do in the Copyright text at the bottom of all our patterns. Happy crafting!
Post a comment to pattern DROPS 161-11
We would love to hear what you have to say about this pattern!
If you want to leave a question, please make sure you select the correct category in the form below, to speed up the answering process. Required fields are marked *.