
Popular categories
Looking for a yarn?


Comments / Questions (184)
![]() Joslami Torres wrote:
Joslami Torres wrote:
En el patrón piden hacer la muestra con aguja del 2,5 pero el patrón se teje con aguja del 3. Soy nueva haciendo ganchillo comencé con el cal actual y quiero intentar hacer este patrón. Gracias
05.06.2016 - 12:06DROPS Design answered:
Hola Joslami. Ha sido una errata, ya está corregido, la aguja correcta es de 2.5 mm
07.06.2016 - 22:16
![]() Dorien wrote:
Dorien wrote:
Hoi Als ik ga meerdere aan zij en achterkant moet ik dat tussen de 5 stokjes doen. Als ik dan aan nieuwe toer begin met patroon a1 komen ze toch niet meer boven elkaar???
16.05.2016 - 12:50DROPS Design answered:
Hoi Dorien. Jawel, je hebt alleen meer stokjes tussen de herhalingen van A.1. A.1 komt steeds boven elkaar op dezelfde plek - je verschuift niet het patroon.
17.05.2016 - 11:48
![]() Jennie wrote:
Jennie wrote:
Är så besviken, har virkat exakt efter mönstret och virkat stramt, och shortsen är enorma. Jag har frågat i ett onlineforum och andra har upplevt samma sak, och jag ser ju i andra kommentarer här att de fått samma resultat. Man får ju en stor påse på magen, ska det vara så verkligen??
11.04.2016 - 19:34Marisol wrote:
Drops Desing muchas gracias por la explicación, ya entendí perfectamente lo que tengo que hacer. muy amable de su parte aclarar mí duda.
29.03.2016 - 02:12Marisol wrote:
Según lo que yo entiendo se deben colocar 7 marcapuntos en (en el centro de la espalda, después de la 7a 8a 9a 21a 24 a 27a repetición del patrón A1. lo realize pero no me fue posible tejerlo de esta forma. no entiendo bien las instrucciones. sería tan amable de acarme este punto por favor.
26.03.2016 - 18:45DROPS Design answered:
Hola Marisol. Solo tienes que colocar dos MP (marcapuntos): uno en el 3er p.a después de la 7ª repetición de A.1 (para la talla S/M)- de la 8ª (para la talla L) - de la 9ª (para la talla XL/XXL) y otro en el 3er p.a después de la 21ª-24ª o 27ª repetición de A.1 (dependiendo tambíen de la talla)
26.03.2016 - 20:41Marisol wrote:
Cuantos marcapuntos se deben colocar en la labor?
26.03.2016 - 18:41DROPS Design answered:
Hola Marisol. Son 2 marcapuntos. (Ver la respuesta completa arriba).
26.03.2016 - 22:34
![]() Paradis Sylvie wrote:
Paradis Sylvie wrote:
J'ai oublié de vs mentionné la laine que j'ai acheté Phildar détente 93% acrilique et 7% élasthanne avec un crochet no: 2.5
03.03.2016 - 18:06DROPS Design answered:
Bonjour Mme Paradis, nous sommes en mesure de fournir des modèles gratuits grâce à nos fils à tricoter vendus dans le monde entier, dont en France. Pour toute assistance individuelle, merci de bien vouloir contacter le magasin où vous avez acheté votre fil. Bon crochet!
04.03.2016 - 11:27
![]() Paradis Sylvie wrote:
Paradis Sylvie wrote:
Je veux faire ce short pour ma petite fille de 13 ans mais les mesures ne conviennent pas donc je ne suis pas capable d'après le diagramme du modèle. La taille est de 31 ( j'aurais 184 ou 186 mailles) là où c'est 43 elle à 35 qu'est que je fais s'il vs plait elle adore ce modèle. Merci à l'avance.
03.03.2016 - 18:01DROPS Design answered:
Bonjour Mme Paris, nous ne sommes malheureusement pas en mesure d'adapter chacun de nos modèles à chaque demande individuelle. Vous pouvez vous aider du schéma des mesures, des explications et de vos propres mesures pour ajuster. Pour toute aide personnalisée, merci de bien vouloir contacter votre magasin DROPS. Bon crochet!
04.03.2016 - 10:17
![]() Matilda wrote:
Matilda wrote:
En annan fråga: Sen undrar jag hur man gör första varvet med "3 st, A.1 (= motsvarar 3 st), * 5 st, A.1*, upprepa *-* " osv, eftersom man ju då inte har några lm-bågar att virka A.1 i. Tack på förhand!
11.02.2016 - 22:08DROPS Design answered:
Hej Matilda, till höger för bilden hittar du "videoknappen" här ser du 2 videos med de olika diagrammerna. Lycka till!
03.03.2016 - 13:42
![]() Klara Weishaupt wrote:
Klara Weishaupt wrote:
Liebes Dropsteam, ich kann es nicht einmal genauer beschreiben. Ich verstehe einfach nicht wie eine Häkelschrift funktioniert und bei der zweiten Reihe der Bordüre verstehe ich nicht wie die kleinen Knubbelchen gemacht werden. Ich hoffe sie können mir helfen! Liebe Grüsse Klara
06.02.2016 - 00:42DROPS Design answered:
Schauen Sie sich doch einfach einmal die Hilfsvideos im Kopf neben dem Foto an, insbesondere die zu den Diagrammen, vielleicht hilft Ihnen das schon weiter. Ansonsten lassen Sie sich in Ihrem Wollladen vielleicht grundsätzlich einmal erklären, wie eine Häkelschrift funktioniert.
06.02.2016 - 09:26
|
||||||||||||||||||||||||||||
Elly May#ellymayshorts |
||||||||||||||||||||||||||||
 |
 |
|||||||||||||||||||||||||||
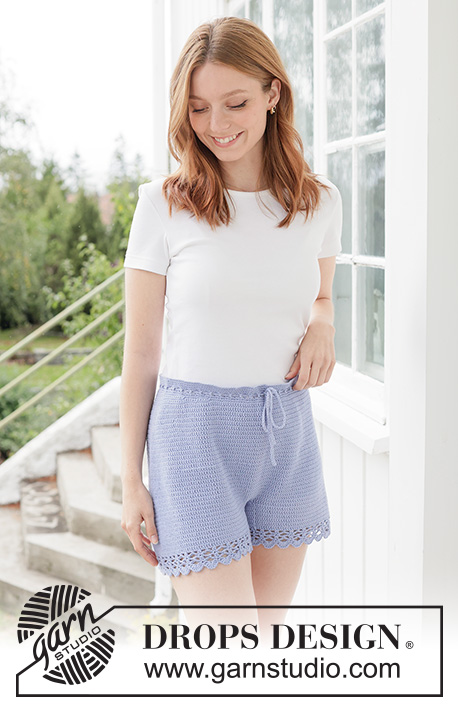
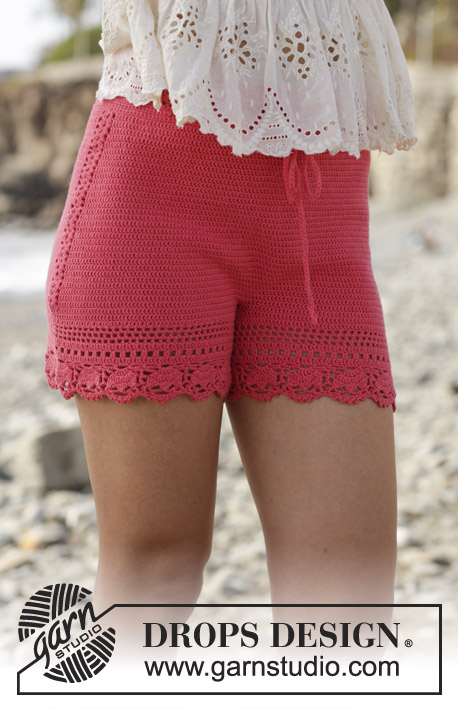
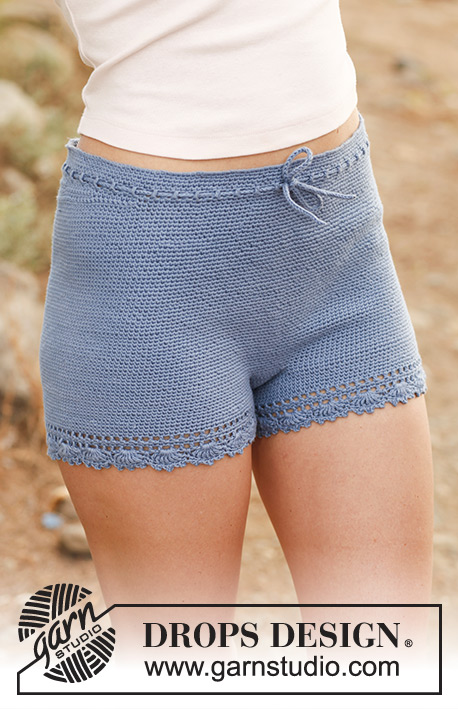
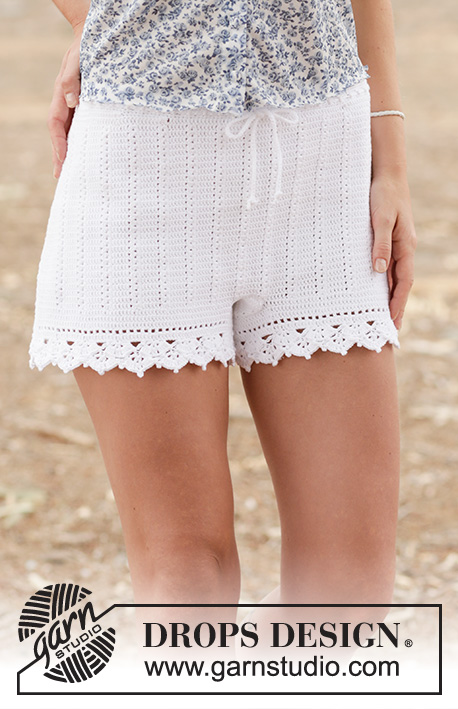
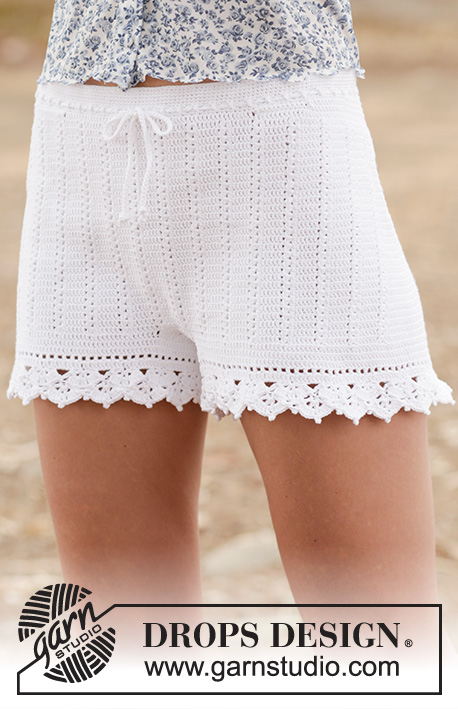
Crochet DROPS shorts with double crochet and lace pattern in ”Safran”. Size: S - XXL.
DROPS 162-19 |
||||||||||||||||||||||||||||
|
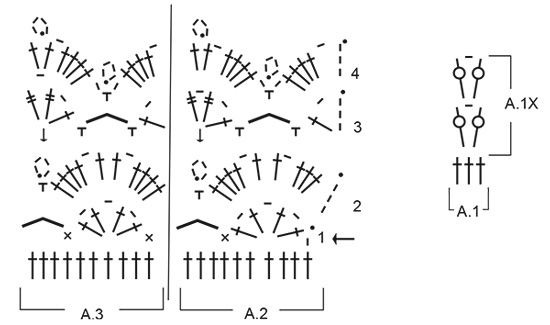
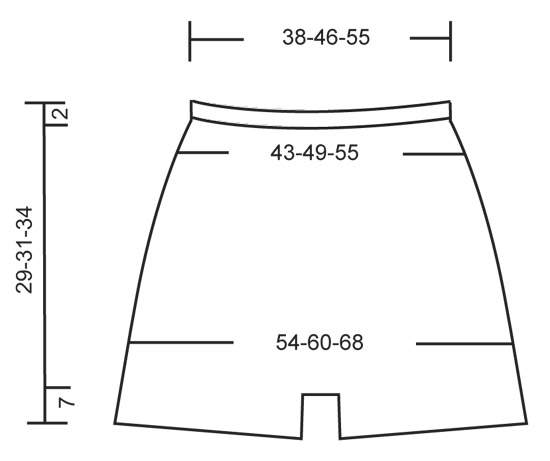
CROCHET INFO: Replace first sc at beg of every sc round with 1 ch. Finish round with 1 sl st in 1st ch at beg of round. Replace first dc at beg of every dc round with 3 ch. Finish round with 1 sl st in 3rd ch at beg of round. PATTERN: See diagrams A.1 to A.3. INCREASE TIP 1: Inc 2 dc mid back as follows: Work until 2 dc remain before marker mid back, work 2 dc in first dc, 1 dc in each of the next 2 dc (marker is between these) and 2 dc in next dc (= 2 dc inc). Inc 4 dc mid back as follows: Work until 4 dc remain before marker mid back, work 2 dc in first dc, 1 dc in next dc, 2 dc in next dc, 1 dc each of the next 2 dc (marker is between these) and 2 dc in next dc, 1 dc in next dc, 2 dc in next dc (= 4 dc inc). INCREASE TIP 2: Work until 1 dc remains before marker in the side, work 2 dc in first dc, 1 dc in next dc (marker is in this dc) and 2 dc in next dc (= 2 dc inc). Repeat the same inc in the other side = 4 sts inc on round. ---------------------------------------------------------- SHORTS: The piece is worked top down. Work 224-274-326 ch on hook size 2.5 mm / C with Safran and form a ring with 1 sl st in first ch. Insert 1 marker at beg of round = mid back. Work first round as follows: ch 1, * skip ch 1, 1 sc in each of the next 7 ch *, repeat from *-* until 0-2-6 ch remain, work 1 sc in each of these ch = 196-240-286 sc. READ CROCHET TIP! Continue working 1 sc in every sc until piece measures 2 cm / ¾". REMEMBER THE CROCHET GAUGE! Now work an eyelet row as follows: ch 4, skip 1 sc, * 1 dc in next sc, ch 1, skip 1 sc *, repeat from *-* the entire round, finish with 1 sl st in 3rd ch from beg of round. On next round work 1 sc in every dc and every ch. Then work the shorts higher in the back as follows: Work 11-12-13 sc past the marker mid back, turn and work 1 sl st in first st, then 1 sc in each of the next 21-23-25 sc, turn and work 1 sl st in first st, then 1 sc in each of the next 32-35-38 sts (sl sts are also worked). Continue like this by working 11-12-13 sts more on every turn until a total of 154-192-208 sts have been worked. Turn again and work until marker mid back. Continue to work 1 round with sc while AT THE SAME TIME inc 28-16-2 sc evenly = 224-256-288 sc. Then work pattern (and insert markers) as follows from mid back: 3 dc, A.1 (= 3 dc), * 5 dc, A.1*, repeat from *-* until 2 dc remain, 2 dc, AT THE SAME TIME insert a marker in each side as follows: Insert a marker in the 3rd dc after 7th-8th-9th repetition A.1, and insert a marker in 3rd dc after 21th-24th-27th repetition with A.1 (i.e. 1 marker in each side). When A.1 has been worked 1 time vertically, continue pattern A.1X - AT THE SAME TIME inc mid back and in the sides as follows: SIDES: Inc on each side of dc with marker, in each side as follows - READ INCREASE TIP 2. Repeat inc every 4th round 7-7-8 times in total = 28-28-32 dc inc. MID BACK: AT THE SAME TIME when piece measures 15-17-19 cm / 6"-6¾"-7½" (measured mid front), inc mid back as follows – Read INCREASE TIP-1. Repeat inc with 2 dc mid back every round 10 times in total, and repeat inc with 4 dc every round 2-2-3 times = 28-28-32 dc inc. There are now 280-312-352 dc on round. Now piece measures approx. 22-24-27 cm / 8¾"-9½"-10½" mid front and 27-29-32 cm / 10½"-11½"-12½" mid back. Now divide for legs as follows: Work 1 sl st in each of the first 5-6-6 dc on round, turn and work 1 dc in each of the first 10-12-12 dc (i.e. 5-6-6 sts on each side of marker mid back). These 10-12-12 dc = gusset. Work dc back and forth over these dc. When piece measures 4-5-6 cm / 1½"-2"-2½", dec 1 dc in each side, repeat dec when piece measures 8-9-10 cm / 3"-3½"-4" = 6-8-8 dc. Continue with 1 dc in every dc until gusset measures 11-12-13 cm / 4½"-4¾"-5", cut the yarn. Fasten gusset edge to edge to the middle 6-8-8 sts towards mid front. Then work the legs. LEG: Work 1 dc in each of the 132-146-166 dc around one leg (i.e. work 1 dc in every dc in A.1X and 1 dc in ch-space = 3 dc), in addition work 28-31-34 dc along the gusset = 160-177-200 dc. Work 2 rounds with dc AT THE SAME TIME on last round inc 0-3-0 dc evenly by working 2 dc in 1 dc = 160-180-200 dc. Continue to work as follows: ROUND 1: 3 ch (= 1 dc), * ch 1, skip 1 dc, 1 dc in next dc * , repeat from *-* until 1 dc remains, ch 1, skip 1 dc, 1 sl st in 3rd ch at beg of round. ROUND 2: 3 ch (= 1 dc), * 1 dc in ch-space, 1 dc in next dc *, repeat from *-* the entire round until 1 ch-space remains, 1 dc in ch-space, finish with 1 sl st in 3rd ch on round. ROUND 3: Now work pattern as follows: Work pattern according to diagram A.2 over the first 10 dc, continue with A.3 the entire round. Finish every round with 1 sl st at beg of round. REMEMBER CROCHET INFO! Continue like this until pattern A.2-A.3 have been worked vertically. Fasten off. Work the other leg the same way. TIES: Work 130-140-150 cm / 51"-55"-60" with LOOSE ch, turn and work 1 sl st in every ch. Thread the tie in the row with eyelet holes at the top of shorts – start mid front. |
||||||||||||||||||||||||||||
Diagram explanations |
||||||||||||||||||||||||||||
|
||||||||||||||||||||||||||||
 |
||||||||||||||||||||||||||||
 |
||||||||||||||||||||||||||||
Have you finished this pattern?Tag your pictures with #dropspattern #ellymayshorts or submit them to the #dropsfan gallery. Do you need help with this pattern?You'll find 13 tutorial videos, a Comments/Questions area and more by visiting the pattern on garnstudio.com. © 1982-2026 DROPS Design A/S. We reserve all rights. This document, including all its sub-sections, has copyrights. Read more about what you can do with our patterns at the bottom of each pattern on our site. |
||||||||||||||||||||||||||||


With over 40 years in knitting and crochet design, DROPS Design offers one of the most extensive collections of free patterns on the internet - translated to 17 languages. As of today we count 325 catalogs and 12298 patterns - 12288 of which are translated into English (US/in).
We work hard to bring you the best knitting and crochet have to offer, inspiration and advice as well as great quality yarns at incredible prices! Would you like to use our patterns for other than personal use? You can read what you are allowed to do in the Copyright text at the bottom of all our patterns. Happy crafting!
Post a comment to pattern DROPS 162-19
We would love to hear what you have to say about this pattern!
If you want to leave a question, please make sure you select the correct category in the form below, to speed up the answering process. Required fields are marked *.