
Popular categories
Looking for a yarn?


Comments / Questions (29)
![]() Rita wrote:
Rita wrote:
Non riesco a ritrovarmi nel seguire le correzioni della manica...che peraltro mi sembrano uguali al testo originale....in pratica...quando io riprendo la manica, mi trovo ad aver già fatto le coste di legaccio... Volevo anche ringraziarvi per la gestione di questo sito ...mi trovo benissimo e mi avete fatto riappassionare al lavoro a maglia....grazie!
29.03.2019 - 08:29DROPS Design answered:
Buongiorno Rita. Quando riprende le maglie delle maniche, deve lavorare altre due coste a legaccio. Se riesce ad ingradire la fotografia, potrebbe esserle più chiaro. Le correzioni sono sempre già inserite nelle spiegazioni. Buon lavoro!
29.03.2019 - 08:41
![]() Céline wrote:
Céline wrote:
Bonjour, Pouvez-vous m'expliquer plus précisément la réalisation des côtes 1 maille endroit 2 mailles envers ? de quel côté faut-il commencer ? faut-il continuer ainsi sur l'envers et sur l'endroit ou alterner avec un rang endroit sur le 2ème rang ? Merci d'avance pour ces précisions et pour vos modèles, très jolis et toujours bien expliqués (une tricoteuse autodidacte débutante à qui il manque parfois les bases…)
14.12.2018 - 10:25DROPS Design answered:
Bonjour Céline et merci. Les côtes 1 m end/2 m env vont se tricoter au début de l'empiècement (après A.1 et 2 rangs jersey) ainsi sur l'endroit: 4 m de bordure devant, *1 m end, 2 m env*, répétez de *-* jusqu'à ce qu'il reste 5 m, terminez par 1 m end, 4 m de bordure devant. Vous augmenterez ensuite dans les sections en mailles envers des côtes (= 1 m end, 3 m env puis 1 m end/4 m env). Bon tricot!
14.12.2018 - 12:37
![]() Tina Saxtorph wrote:
Tina Saxtorph wrote:
Inden man strikker A1 nederst på ærmet, skal der strikkes en omgang vrang. Dette står der intet om i opskriften.
09.01.2018 - 11:41Sheila wrote:
En el canesu después de cambiar a la aguja número 5 dice trabajar como sigue, pero como sigue como? Dice punto nuevo en 4 puntos de la cenefa, pero no está explicado bien el como sigue. Gracias
17.07.2016 - 05:45DROPS Design answered:
Hola Sheila, después de cambiar a la aguja circular de 5.00 mm comenzamos a trabajar el patrón como sigue: 4 puntos de la cenefa en pt musgo A.1( ver el diagrama), al mismo tiempo, en la primera fila del diagrama aumentar 12-16-18-18-20-20 puntos repartidos y finalizar la fila con 4 pt de la cenefa en pt musgo. Espero que se te haya aclarado la duda.
22.07.2016 - 20:39
![]() Fatmonica wrote:
Fatmonica wrote:
I can't find any explanation to the measurements of your sizes. Just spent all day knitting medium and had to pull it back. Where can I find measurements
29.07.2015 - 22:35DROPS Design answered:
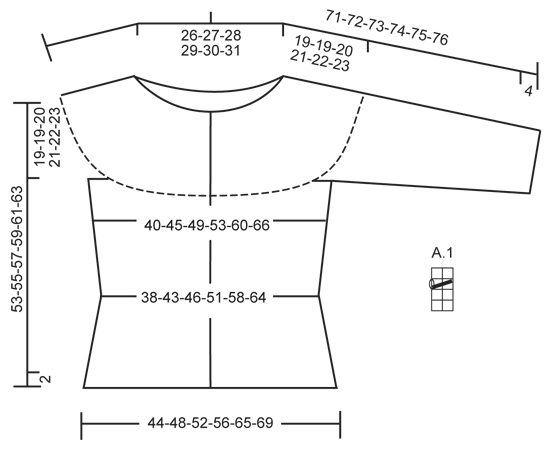
Dear Fatmonica, you will find at the bottom of the pattern a measurement chart with all measures for each size in cm taken flat from side to side. Compare these to a similar garment you have and like the shape to find out the matching size. We have learned this is the most accurate way. Happy knitting!
30.07.2015 - 11:02
![]() Maria wrote:
Maria wrote:
Föreslår att man, när det är dags att sticka ärmar respektive fram- och bakstycket sätter alla maskor utom till en ärm, på tråd och så börjar sticka ena ärmen. Man kan då sticka fram o tillbaka på vanliga rundstickan vilket ger en snygg snabb o jämn stickning och man slipper krånglet med strumpstickor. Man slipper oxå de hål som lätt uppstår mellan maskorna i "stickbytet". När ena ärmen klar stickas den andra o så tillsist fram- och bakstycket.
16.07.2015 - 07:27
![]() Karin wrote:
Karin wrote:
Nach A1 werden 2 Krausrippen gestrickt. Der Ärmel wird von oben nach unten gestrickt.
28.04.2015 - 15:24
![]() Anka wrote:
Anka wrote:
In der Beschreibung für die Ärmel ist ein Fehler. Bevor das Muster A1 gestrickt wird müssten doch zwei Krausrippen gestrickt werden, oder? Ansonsten tolles Muster. Ich freue mich schon auf die fertige Jacke.
28.04.2015 - 13:28DROPS Design answered:
Liebe Anka, Antwort siehe oben, Karins Bemerkung ist korrekt. Viel Spaß beim Stricken!
28.04.2015 - 22:12
![]() Rascol Marie-claude wrote:
Rascol Marie-claude wrote:
Bonjour!souhaitant réaliser le modèle drops design n°w-552,j'ai imprimé les explications et je ne trouve pas le diagramme dont j'ai besoin pour réaliser le point fantaisie;Est ce normal,ou bien ai je oublié une manipulation lors de l'impression?Merci de me répondre car j'ai hâte de réaliser ce joli modèle;
14.03.2015 - 16:47DROPS Design answered:
Bonjour Mme Rascol, vous trouverez le diagramme A.1 à côté du schéma des mesures (sous la manche), c'est un motif qui se tricote sur 2 m et 4 rangs. Bon tricot!
16.03.2015 - 08:49
![]() Maria wrote:
Maria wrote:
Jättesnygg modell! En favorit i sommar!
23.01.2015 - 07:36
|
|||||||
Athena Cardigan#athenacardigan |
|||||||
 |
 |
||||||
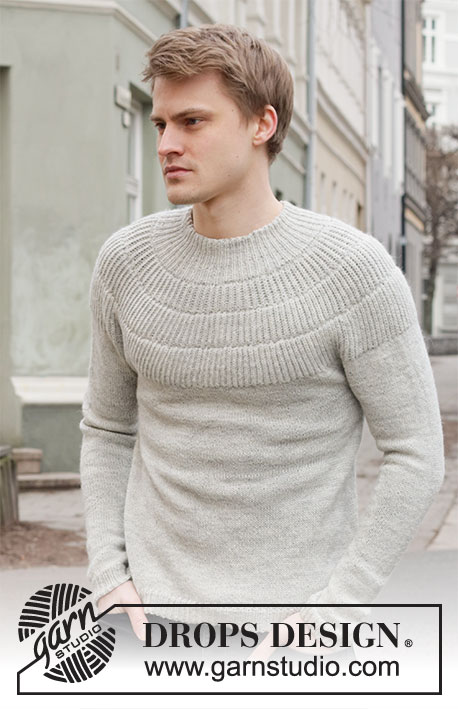
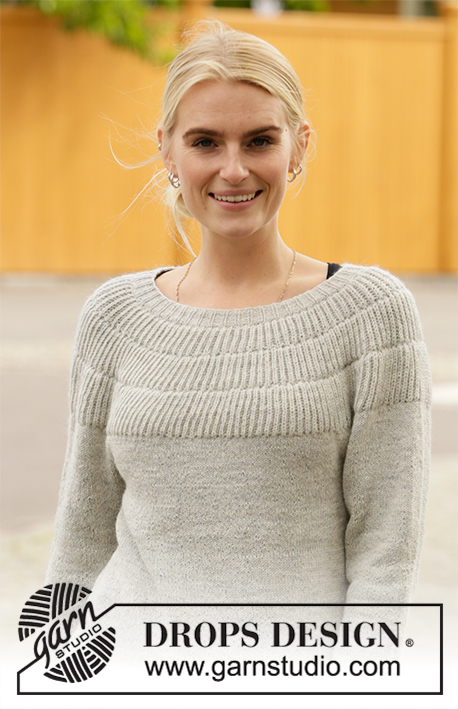
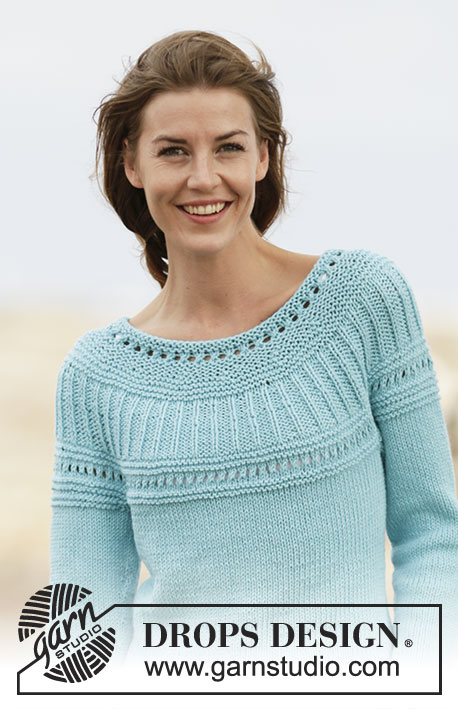
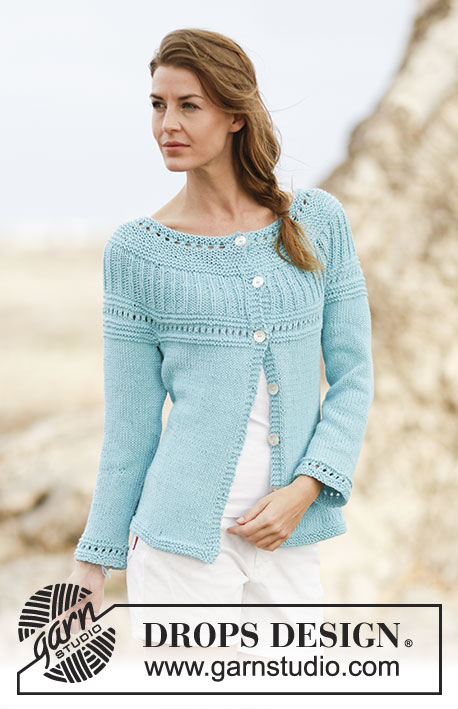
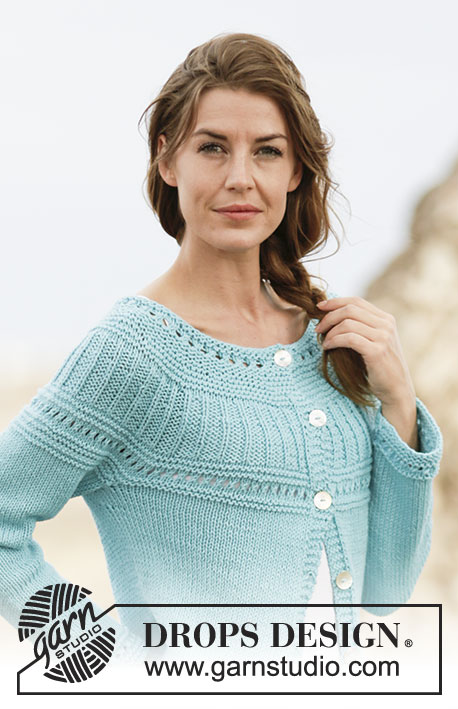
Knitted DROPS jacket in stockinette st, garter st with lace pattern and round yoke, worked top down in ”Paris”. Size: S - XXXL.
DROPS 161-10 |
|||||||
|
GARTER ST (back and forth): K all rows. 1 ridge = K2 rows. GARTER ST (worked in the round): * K 1 round and P 1 round *, repeat from *-*. 1 ridge = 2 rounds. PATTERN: See diagram A.1. The diagrams show all rows in pattern seen from RS. INCREASE TIP 1: Inc 1 st by making 1 YO, on next row work YO twisted (i.e. work in the back loop of st instead front) to avoid holes. INCREASE TIP 2: Inc with YO on each side of 2 sts in each side (the marker sits inbetween these sts). Purl YO twisted on next row. DECREASE TIP: All dec are done from RS! Dec as follows before 1 st in stockinette st and marker: K 2 tog. Dec after marker and 1 st in stockinette st as follows: Slip 1 st as if to K, K 1, psso. BUTTONHOLES: Dec for buttonholes on right band. 1 buttonhole = K tog third and fourth st from edge and make 1 YO. Dec for buttonholes when piece measures: SIZE S: 2, 10, 18, 26, 34, 42 and 51 cm / 3/4", 4", 7", 10¼", 13⅜", 16½", 20" SIZE M: 2, 10, 18, 26, 34, 43 and 52 cm / 3/4", 4", 7", 10¼", 13⅜", 17", 20½" SIZE L: 2, 10, 18, 26, 35, 44 and 53 cm / 3/4", 4", 7", 10¼", 13¾", 17¼", 21" SIZE XL: 2, 11, 20, 29, 38, 47 and 56 cm / 3/4", 4⅜", 8", 11⅜", 15", 18½", 22" SIZE XXL: 2, 11, 20, 29, 38, 48 and 58 cm / 3/4", 4⅜", 8", 11⅜", 15", 19", 22¾" SIZE XXXL: 2, 11, 20, 29, 39, 49 and 59 cm / 3/4", 4⅜", 8", 11⅜", 15¼", 19¼", 23¼" ---------------------------------------------------------- JACKET: Worked back and forth on circular needle, top down. YOKE: Cast on 101-105-109-113-117-121 sts on circular needle size 4.5 mm / US 7 with Paris. Work 2 ridges in GARTER ST - see explanation above. Switch to circular needle size 5 mm / US 8 and work like this inside 4 band sts in garter st in each side (continue until finished measurements): A.1, AT THE SAME TIME on first row in diagram inc 12-16-18-18-20-20 sts evenly - READ INCREASE TIP 1 = 113-121-127-131-137-141 sts (on 3rd row in A.1 K last st before band sts). When A.1 has been worked vertically, switch back to circular needle size 4.5 mm / US 7. Work in garter st AT THE SAME TIME inc 10 sts evenly on 2nd ridge and 6-7-13-15-21-26 sts on 5th ridge (NOTE: Inc on a row from RS. Do not inc over band sts) = 129-138-150-156-168-177 sts. REMEMBER THE KNITTING GAUGE When 7-7-8-8-8-10 ridges have been worked in total, piece measures 7-7-8-8-8-9 cm / 2¾"-2¾"-3"-3"-3"-3½", switch to circular needle size 5 mm / US 8. Work 2 rows in stockinette st. Now work rib as follows: * K 1, P 2 *, repeat from *-* (K last st before band sts). When rib measures 2 cm / ¾", inc by making 1 YO before K st in every section P on row (= 40-43-47-49-53-56 sts inc) = 169-181-197-205-221-233 sts. On next round K YO twisted (i.e. work in the back loop of st instead of front) to avoid holes. Continue with K 1/P 3. Repeat inc before every st with K when rib measures 4-4-4-5-6-6 cm / 1½"-1½"-1½"-2"-2½"-2½" = 209-224-244-254-274-289 sts. Continue with K 1/P 4 until rib measures 6-6-6-7-8-8 cm / 2½"-2½"-2½"-2¾"-3"-3" in total. Work 2 rows in stockinette st. Now switch to circular needle size 4.5 mm / US 7. Work 2 ridges while AT THE SAME TIME on first row inc 8-11-11-15-21-28 sts evenly = 217-235-255-269-295-317 sts. Switch to circular needle size 5 mm / US 8, and continue with A.1 (on 3rd row in A.1 work last st before band sts in stockinette st). When A.1 has been worked vertically, switch to circular needle size 4.5 mm / US 7. Work 2 ridges while AT THE SAME TIME on first round inc 8-10-10-16-22-28 sts evenly = 225-245-265-285-317-345 sts. Now continue on circular needle size 5 mm / US 8 as follows: Work the first 34-38-41-45-51-56 sts (= front piece), slip the next 48-50-54-56-60-64 sts on a stitch holder (= sleeve), cast on 8 new sts under sleeve, work the next 61-69-75-83-95-105 sts (= back piece), slip the next 48-50-54-56-60-64 sts on a stitch holder (= sleeve), cast on 8 new sts under sleeve, work the remaining 34-38-41-45-51-56 sts (= front piece). BODY: There are now 145-161-173-189-213-233 sts for body. Insert a marker in each side of body where new sts were cast on under sleeve (= 4 new sts on each side of marker). MEASURE PIECE FROM HERE. Continue in stockinette st. When piece measures 4 cm / 1½", dec 1 st on each side of each markers (= 4 sts dec) - READ DECREASE TIP! Repeat dec when piece measures 11-10-9-8-7-6 cm / 4½"-4"-3½"-3"-2¾"-2½" = 137-153-165-181-205-225 sts. When piece measures 18-17-16-15-14-13 cm / 7"-6¾"-6¼"-6"-5½"-5", inc 1 st on each side of each marker - READ INCREASE TIP 2! (= 4 sts inc). Repeat inc every 2-2½-3-3-3½-4 cm / ¾"-⅞"-1⅛"-1⅛"-1¼"-1½" 4 more times = 157-173-185-201-225-245 sts. When piece measures 32-33-34-35-36-37 cm / 12½"-13½"-13⅜"-13¾"-14¼"-14½", inc 10-8-11-10-14-8 sts evenly = 167-181-196-211-239-253 sts. Switch to circular needle size 4.5 mm / US 7 and work 3 ridges. Bind off. SLEEVE: Work sleeve in stockinette st in the round on circular needle/double pointed needles. There are 48-50-54-56-60-64 sts for each sleeve. Slip sts from stitch holder back on circular needle/double pointed needles size 5 mm / US 8 and cast on 8 new sts under sleeve = 56-58-62-64-68-72 sts. First work 2 ridges and continue hereafter in stockinette st, AT THE SAME TIME insert a marker in the middle of the new sts under sleeve. NOW MEASURE THE PIECE FROM HERE. When piece measures 4 cm / 1½", dec 1 st on each side of marke - READ DECREASE TIP! Repeat dec every 4-3½-3-2½-2½-2 cm / 1½"-1¼"-1⅛"-⅞"-⅞"-¾" 7-8-9-9-11-12 more times = 40-40-42-44-44-46 sts. When sleeve measures 35-35-35-34-34-34 cm = 13¾"-13¾"-13¾"-13⅜"-13⅜"-13⅜", work 1 ridge over all sts and then work A.1. When A.1 has been worked vertically, switch to double pointed needles size 4.5 mm / US 7 and inc 1-1-3-3-3-3 sts evenly = 41-41-45-47-47-49 sts. Work 2 ridges and bind off, sleeve measures approx. 39-39-39-38-38-38 cm / 15¼"-15¼"-15¼"-15"-15"-15". Make another sleeve the same way. ASSEMBLY: Sew the openings under the sleeves. Sew the buttons on to left band. |
|||||||
Diagram explanations |
|||||||
|
|||||||
 |
|||||||
Have you finished this pattern?Tag your pictures with #dropspattern #athenacardigan or submit them to the #dropsfan gallery. Do you need help with this pattern?You'll find 24 tutorial videos, a Comments/Questions area and more by visiting the pattern on garnstudio.com. © 1982-2026 DROPS Design A/S. We reserve all rights. This document, including all its sub-sections, has copyrights. Read more about what you can do with our patterns at the bottom of each pattern on our site. |
|||||||


With over 40 years in knitting and crochet design, DROPS Design offers one of the most extensive collections of free patterns on the internet - translated to 17 languages. As of today we count 324 catalogs and 12290 patterns - 12280 of which are translated into English (US/in).
We work hard to bring you the best knitting and crochet have to offer, inspiration and advice as well as great quality yarns at incredible prices! Would you like to use our patterns for other than personal use? You can read what you are allowed to do in the Copyright text at the bottom of all our patterns. Happy crafting!
Post a comment to pattern DROPS 161-10
We would love to hear what you have to say about this pattern!
If you want to leave a question, please make sure you select the correct category in the form below, to speed up the answering process. Required fields are marked *.