
Popular categories
Looking for a yarn?


Comments / Questions (186)
Claudia wrote:
Hola, la parte delantera no lleva sisa, ¿verdad? Entonces, ¿cómo se unen la parte delantera y trasera y las mangas? Es que me queda un vacío en la parte de atrás, a la altura de la manga. No sé qué hice mal. Agradeceré infinitamente la ayuda.
02.07.2018 - 20:39DROPS Design answered:
Hola Claudia. La parte del delantero también tiene sisa, se trabaja de la misma manera que en la espalda. Tienes que leer las explicaciones para la espalda cuando trabajas el delantero excepto para la parte del escote.
08.07.2018 - 17:41
![]() Gisèle wrote:
Gisèle wrote:
Bonjour, j'habite au nord-est du Nouveau-Brunswick, au Canada. Vos produits sont-ils disponibles près de chez moi? Merci
01.07.2018 - 02:01DROPS Design answered:
Bonjour Gisèle, vous trouverez ici liste des magasins DROPS au Canada et/ou qui expédient au Canada. Bon tricot!
02.07.2018 - 09:51Gloria Smith wrote:
THANK YOU.
29.05.2018 - 22:39
![]() Nicky wrote:
Nicky wrote:
Ach jeetje en ik had het alweer uitgehaald 🤐 Dank voor het antwoord. Dan maar weer opnieuw beginnen.
16.05.2018 - 17:49
![]() Nicky wrote:
Nicky wrote:
Ik lees nu bij de vragen dat je in het voorpand niet hoeft te minderen voor de armsgaten. Ik heb dat wel gedaan. Dacht dat als ik niet hoefde te minderen dat dat dan wel beschreven zou worden. Kan ik weer uithalen. Sorry hoor, maat ik vind het een onduidelijk patroon.
15.05.2018 - 21:06DROPS Design answered:
Dag Nicky, Excuses, ik heb het patroon nog een keer doorgelezen en ik heb een denkfout gemaakt. je mindert dus wel op het voorpand (net als op het achterpand).
16.05.2018 - 16:24
![]() Petra wrote:
Petra wrote:
Buongiorno, è possibile sostituire il filato Drops Cotton Light con Drops Alpaca? grazie mille!
11.05.2018 - 16:10DROPS Design answered:
Buongiorno Petra, DROPS Cotton light appartiene al gruppo filati B, mentre Alpaca appartiene al gruppo filati A. Per provare a sostituire il filato, può leggere questo tutorial oppure provare il nostro convertitore di filati . Buon lavoro!
11.05.2018 - 17:38
![]() Hennita wrote:
Hennita wrote:
Ik zie in de beschrijving van het voorpand niets over het minderen voor de armsgaten?? Toch zie ik armsgaten op de tekening. Graag hoor ik waarom dat niet genoemd wordt! Groet Hennita
11.05.2018 - 16:08DROPS Design answered:
Dag Hennita, Dat klopt, je hoeft niet te minderen voor de armsgaten op de panden. EDIT: Excuses, ik heb het patroon nog een keer doorgelezen en ik heb een denkfout gemaakt. je mindert dus wel op het voorpand (net als op het achterpand).
11.05.2018 - 22:09
![]() Bicky wrote:
Bicky wrote:
Ik had niet gezien dat ik opmerking had ingevuld 😊 als ik bij een mindering ben, dan heb ik een paar keer een grote opening bij de hals bij de 2 stokjes overslaan volgens het patroon. Als ik de stokjes doorhaak , dan heb ik een paar këer 5 stokjes achter elkaar en dan bij de volgende toer voor het minderen kan ik die stokjes samen haken. Heb het al 3 keer uutgehaald. Echt een gepuzzel. Zou fijn zijn als ik een foto kan plaatsen 😊 hartelijk dank voor uw antwoord.
10.05.2018 - 15:35DROPS Design answered:
Hallo Bicky, Het kan inderdaad soms wat een gepuzzel zijn als je aan het minderen bent in combinatie met een patroon, maar probeer zoveel mogelijk het patroon door te laten lopen, want het zit op een opvallende plek; bij de halslijn.
12.05.2018 - 17:02
![]() Nicky wrote:
Nicky wrote:
Waarom heb ik nog geen antwoord gehad op mijn vraag van 26-4 over de halslijn?
08.05.2018 - 16:48DROPS Design answered:
Dag Nicky, Je vraag stond bij algemene opmerkingen en niet bij de vragen, vandaar dat ik hem in eerste instantie over het hoofd had gezien. De vraag is nu beantwoord. Veel haakplezier!
10.05.2018 - 11:01
![]() Sandrine wrote:
Sandrine wrote:
Bonjour, je voudrais savoir s'il est possible de réaliser ce modèle avec 2 fils 1 fil fabel et 1 fil kid silk. Est-ce que 2 fils de catégorie A correspondent à 1 fil de catégorie B ? Si oui, quelle quantité commander pour une taille M ? cordialement Sandrine
06.05.2018 - 13:31
|
|||||||||||||
Just Me#justmesweater |
|||||||||||||
 |
 |
||||||||||||
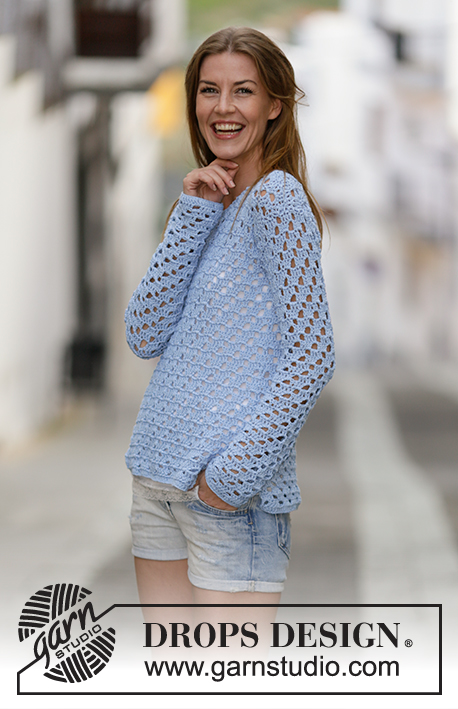
Crochet DROPS jumper with lace pattern in ”Cotton Light”. Size: S - XXXL.
DROPS 162-3 |
|||||||||||||
|
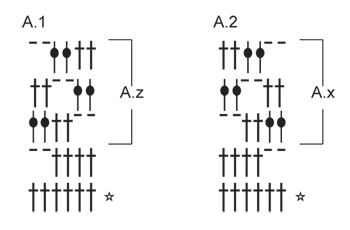
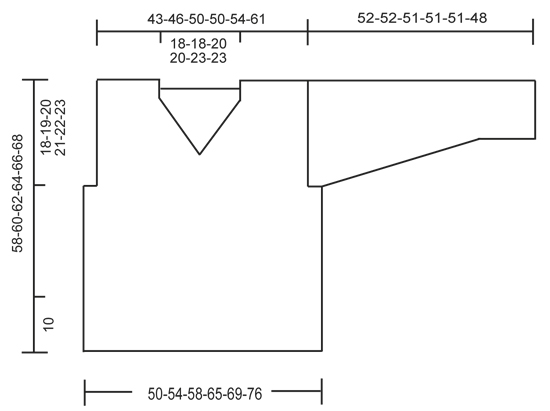
PATTERN: See diagrams A.1-A.2. CROCHET INFO: Replace first dc at beg of every dc row with 3 ch. 3 DC TOG: Work 3 dc into 1 dc as follows: * Work 1 dc but wait with last pull through (= 2 strands on hook) *, repeat from *-* 1 more time, then work next dc but on last pull through, pull yarn through all sts on hook. ---------------------------------------------------------- BACK PIECE: Work back and forth. Work 94-101-108-122-129-143 ch on hook size 4.5 mm/US 7 with Cotton Light. Work 1 dc in 4th ch from hook (= 2 dc), 1 dc in each of the next ch 5, * 1 dc in each of the next ch 6, skip 1 ch *, repeat from *-* until 1 ch remains, 1 dc in last ch = 80-86-92-104-110-122 dc. Then work as follows: 3 ch - READ CROCHET INFO, skip 1 dc (replaced by the 3 ch), A.1 (= 6 sts) 13-14-15-17-18-20 times in total, finish with 1 dc in last dc. Continue pattern like this. Eyelet holes in A.1 goes diagonally towards the left 2 sts on every row (seen from RS) until hole meets the one dc in left side of piece. REMEMBER THE CROCHET GAUGE! When A.1 has been worked 1 time vertically, repeat A.z until finished measurements. Fasten off when piece measures 40-41-42-43-44-45 cm / 15¾"-16⅛"-16½"-17"-17¼"-17¾". Now work pattern as before over the middle 68-74-80-80-86-98 sts (= 6-6-6-12-12-12 sts in each side for armhole). When piece measures 54-56-58-60-62-64 cm / 21¼"-22"-22¾"-23⅝"-24⅜"-25¼", adjust so that next row is from RS. Work over the first 20-23-24-24-24-31 sts (= shoulder) as follows: Work 1 dc in every dc and 2 dc in every ch-space = 20-23-24-24-24-31 dc. Work 2 rows with 1 dc in every dc. Fasten off. Do the same on the other shoulder FRONT PIECE: Work as back piece but work A.2 instead of A.1, i.e. eyelet holes goes diagonally towards the right (seen from RS). Repeat A.x until finished measurements. When piece measures 45-47-48-50-51-53 cm / 17¾"-18½"-19"-19¾"-20"-21", adjust after a whole repetition of A.x dec for neck (next row is from WS) as follows: Work as before over the first 31-34-37-37-40-46 dc, work 3 dc TOG - see explanation above. Turn piece. Repeat this dec on every row toward mid-front 7-7-8-8-9-9 times in total = 20-23-24-24-25-31 sts remain for shoulder. Then work 1 row with 1 dc in every dc and 2 dc in every ch-space. Work 2 rows with 1 dc in every dc. Fasten off. Do the same on the other shoulder SLEEVE: Work back and forth. Work 45-45-49-49-52-52 ch on hook size 4.5 mm/US 7 with Cotton Light. Work 1 dc in 4th ch from hook (= 2 dc), 1 dc in each of the next 5-5-7-7-5-5 ch, * 1 dc in each of the next ch 6, skip 1 ch *, repeat from *-* until 1-1-3-3-1-1 ch remains, 1 dc in the last 1-1-3-3-1-1 ch = 38-38-42-42-44-44 dc. Work 1 dc in each of the first 1-1-3-3-1-1 dc, A.2 until 1-1-3-3-1-1 dc remain, (= 6-6-6-6-7-7 times in width), 1 dc in each of the last 1-1-3-3-1-1 dc. When A.2 has been worked 1 time vertically, repeat A.x until finished measurements. When piece measures 8-8-8-10-10-10 cm / 4", inc 1 dc by working 2 dc in first and last dc on row (= 2 dc inc). Repeat inc every 4½-4-4-3-3-2½ cm / 1¾"-1½"-1½"-1"-1"-⅞" 9-10-10-12-12-14 more times = 58-60-64-68-70-74 sts. Work the inc sts in pattern. NOTE: There is always 1 dc (or 3 ch = 1 dc) in each side of piece. Fasten off when piece measures 52-52-51-51-51-48 cm / 20½"-20½"-20"-20"-20"-19" (shorter measurements in the larger sizes because of wider shoulders). Work another sleeve the same way. ASSEMBLY: Work the shoulder seams tog from WS as follows through both layers: 1 sc in first dc, * ch 1, skip 1 dc, 1 sc in next dc *, repeat from *-*. Sew in sleeves. Work the under arm seams and side seams tog from WS as follows through both layers: * 1 sc in outer loop, ch 3, skip 1 row *, repeat from *-* until approx. 10 cm / 4" remain on body for vent in each side. Fasten off. NECK EDGE: Work an edge around the neck as follows from mid on top of shoulder: 1 sc, * ch 3, skip approx. 1 cm / ½", 1 sc *, repeat from *-* around the entire neck and finish with 1 sl st in first sc on round. Fasten off. |
|||||||||||||
Diagram explanations |
|||||||||||||
|
|||||||||||||
 |
|||||||||||||
 |
|||||||||||||
Have you finished this pattern?Tag your pictures with #dropspattern #justmesweater or submit them to the #dropsfan gallery. Do you need help with this pattern?You'll find 5 tutorial videos, a Comments/Questions area and more by visiting the pattern on garnstudio.com. © 1982-2026 DROPS Design A/S. We reserve all rights. This document, including all its sub-sections, has copyrights. Read more about what you can do with our patterns at the bottom of each pattern on our site. |
|||||||||||||


With over 40 years in knitting and crochet design, DROPS Design offers one of the most extensive collections of free patterns on the internet - translated to 17 languages. As of today we count 325 catalogs and 12298 patterns - 12288 of which are translated into English (US/in).
We work hard to bring you the best knitting and crochet have to offer, inspiration and advice as well as great quality yarns at incredible prices! Would you like to use our patterns for other than personal use? You can read what you are allowed to do in the Copyright text at the bottom of all our patterns. Happy crafting!
Post a comment to pattern DROPS 162-3
We would love to hear what you have to say about this pattern!
If you want to leave a question, please make sure you select the correct category in the form below, to speed up the answering process. Required fields are marked *.