
Looking for a yarn?


Comments / Questions (44)
![]() Adéla wrote:
Adéla wrote:
I´d like to see pattern for this hat. :-)
18.06.2020 - 19:14
![]() Dorina Stähle wrote:
Dorina Stähle wrote:
Wie drücke ich die Anleitungen aus?wenn ich auf das "Drucker"Zeichen geh wird nicht gedruckt.....
05.05.2020 - 19:17DROPS Design answered:
Liebe Frau Stähle, wenn Sie auf das "Drucker" Zeichen klicken, wählen Sie dann "Anleitung" - prüfen Sie mal die Drucker-Einstellungen, wir könnten diese Anleitung gerade erfolgreich drucken - Sie können auch mal versuchen den Cache zu leeren, oder mit einem anderen Browser zu versuchen, die Update von Browser mal schauen, etc... Die Anleitung sollte auf jeden Fall drucken. Sollten Sie nicht drucken können, sagen Sie uns bitte welches Material Sie benutzen (Betriebssytem, Browser, Version etc..). Viel Spaß beim häkeln!
06.05.2020 - 10:16
![]() Lynn wrote:
Lynn wrote:
Dear Drops, I love your yarns, however I am having trouble with this pattern. Would it be possible to get a tutorial video on the center portion of this pattern 162- 2? I have twin nieces and one fell in love with this poncho and other my other niece fell in love with "A Wistful Dream". I would love to make these for my nieces. Thank You for your assistance.
11.01.2019 - 18:01DROPS Design answered:
Dear Lynn, you can find the tutorial videos related to this pattern right below the picture of the pice, and there od one on how to start the piece. Happy crafting!
12.01.2019 - 15:37
![]() Kathy wrote:
Kathy wrote:
I have been reading crochet pattern directions for 50 years and this is the WORST SET OF WRITTEN DIRECTIONS I have ever seen!. You need to give e VALID CORRECT DIRECTIONS not diagrams no one can understand. I finally got rows 1-6 looking OK. Rows 7-16 -- I made up myself based on stitches used in first 6 rows.
11.11.2018 - 16:35DROPS Design answered:
Dear Kathy, we are sorry to hear you have troubles to understand diagrams - each symbol is matching a stitch as explained under diagram key. Work the first 3 rounds in diagram starting with the 3 ch in the middle of 1st round and readh towards the left in the round. Then repeat the diagram as shown to make a square (A.1) - for any further individual assistance reading diagrams, please contact the store where you bought the yarn - even per mail or telephone. Happy crocheting!
12.11.2018 - 10:58
![]() Karen wrote:
Karen wrote:
You have very beautiful items. That being said, after trying a few I now dont even look if it is a drops pattern.
23.07.2018 - 02:14Heather wrote:
After frogging the first three rounds with a lot of difficulty, I cannot fathom out round 4! I have read the comments above and the general feeling is that it is a VERY DIFFICULT pattern! WHY is there no video instruction for this pattern? I think it is very much needed.
29.08.2017 - 11:54DROPS Design answered:
Dear Heather, we will add your wish on our todolist, but remember you can always contact your DROPS store for any individual assistance when working on our patterns. Happy crocheting!
29.08.2017 - 12:40
![]() Rita Rockhold wrote:
Rita Rockhold wrote:
Round 13 is my nemesis!!!! But after making this once and nearly growling at someone who requested another, I think I may have successfully fugded it!!!
22.04.2017 - 19:41
![]() Judy wrote:
Judy wrote:
Could you please tell me what the dimensions are for each square. I am a size XL so need it larger probably
27.03.2017 - 10:04DROPS Design answered:
Dear Judy, a square measures approx. 38x38 cm (see under tab "Materials"). Happy crocheting!
27.03.2017 - 10:06
![]() Cori Lopez wrote:
Cori Lopez wrote:
I did this, but u need to make up ur own rows for 90 percent. This is only really an idea, definitely not a pattern to follow. Please don't try and don't erase my comment so others r warned. Thx
03.10.2016 - 18:55
![]() Cori Lopez wrote:
Cori Lopez wrote:
Row 5...skip 3 in between all, not 2. Don't use diagram until 12 only written, after 11 use diagram only. That will do it if you are advanced enough to look over the other minor mistakes. Thought I'd help until it's all corrected☺️
29.09.2016 - 00:05
|
|||||||||||||||||||||||||||||||||||||
Bohemian Blues#bohemianbluesponcho |
|||||||||||||||||||||||||||||||||||||
 |
 |
||||||||||||||||||||||||||||||||||||
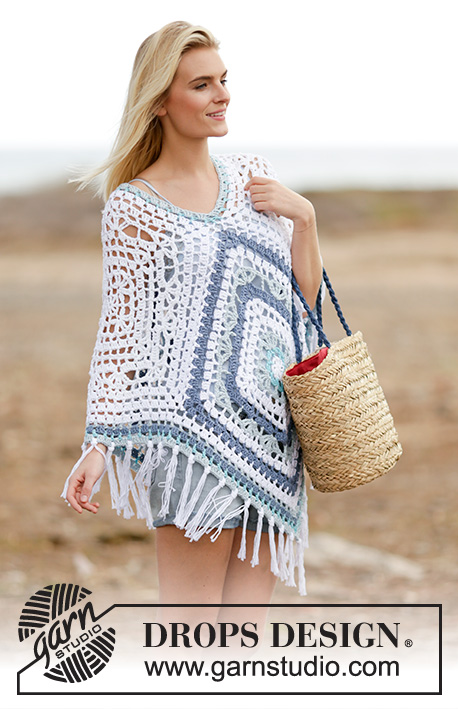
Crochet DROPS poncho in "Paris". One-size
DROPS 162-2 |
|||||||||||||||||||||||||||||||||||||
|
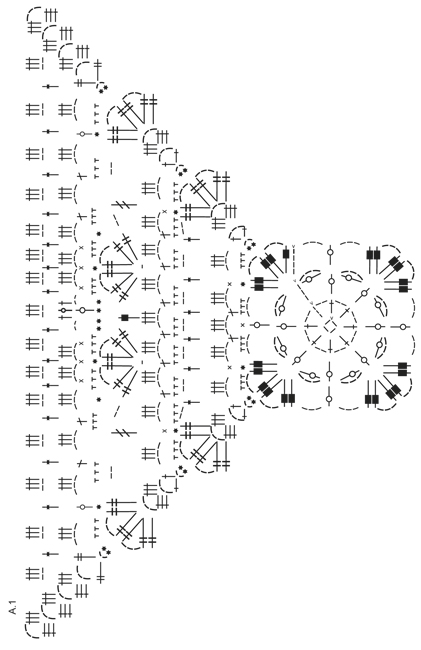
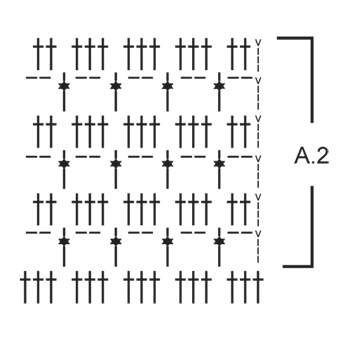
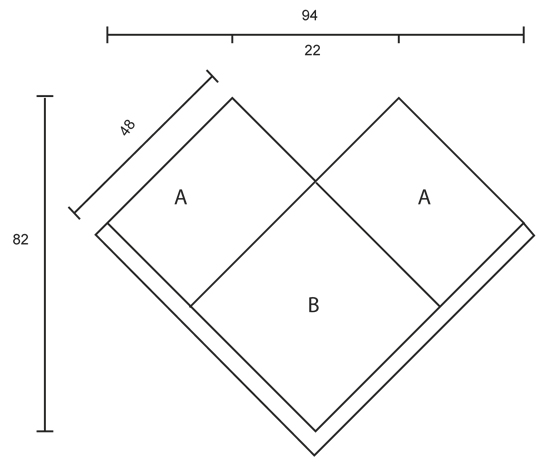
STRIPES SQUARE: ROUND 1: white ROUND 2: light turquoise ROUND 3-4: light ice blue ROUND 5-8: white ROUND 9-10: gray blue ROUND 11-12: light ice blue ROUND 13-14: white ROUND 15-16: gray blue STRIPES-EDGE: 2 rounds white, 1 round light ice blue, 1 round gray blue, 1 round light turquoise, 1 round light ice blue (= 6 rounds in total). PATTERN: See diagrams A.1 and A.2. YARN CHANGE TIP: On the 2 squares worked in stripes it might be wise to finish round entire with color from last stripe, cut the yarn and beg new round with new color. ---------------------------------------------------------- PONCHO: Work 4 large squares as explained below. Then work squares tog into a poncho. Finish by working a neck edge and a border along bottom edge before fastening fringes at the bottom around the entire poncho. Work 2 squares in white (= square A) and 2 squares in STRIPES SQUARE – see explanation above (= square B). SQUARE !1: Work 4 ch on hook size 5 mm / H/8 with white and form a ring with 1 sl st in first ch. Then work according to diagram A.1, i.e. work as follows: ROUND 1: 5 ch (= 1 dc + 2 ch), * 1 dc in ch-ring, 2 ch *, repeat from *-* a total of 7 times, finish with 1 sl st in 3rd ch from beg of round (= 8 dc with 2 ch between each). ROUND 2: 6 ch (= 1 dc + 3 ch), work 1 dc in 3rd ch worked, * work 1 dc in next dc, ch 3, 1 dc in the first of the 3 ch *, repeat from *-* 7 times in total, finish with 1 sl st in 3rd ch from beg of round (= 8 dc with a space between each). ROUND 3: 4 ch (= 1 tr), work 1 tr + 3 ch + 2 tr + 3 ch + 2 tr in same st (= corner), * ch 3, 1 dc in next dc, ch 3, in next dc work 2 tr + 3 ch + 2 tr + 3 ch + 2 tr (= corner) *, repeat from *-* 3 times in total, ch 3, 1 dc in next dc, 3 ch and 1 sl st in 4th ch from beg of round. ROUND 4: Work sl st to 2nd tr in corner, ch 1, 1 sc between the middle 2 tr in corner, 3 sc in space, * 1 sc between the next 2 tr, 3 sc in space, 1 sc in next dc, 3 sc in space, 1 sc between the first 2 tr in corner, 3 sc in space, 1 sc between the next 2 tr, ch 2, 1 sc between the same 2 tr, 3 sc in space *, repeat from *-* 3 times in total, 1 sc between the next 2 tr, 3 sc in next space, 1 sc in next dc, 3 sc in next space, 1 sc between the first 2 tr, 3 sc in space and finish with 1 sl st in first ch from beg of round. ROUND 5: 1 sl st in space in corner, 6 ch (= 1 dc + 3 ch), 1 dc in same space, * ch 3, skip 3 sc, 1 sc in next st, ch 3, skip 2 sc, 1 hdc in next st, ch 3, skip 1 sc, 1 hdc in next st, ch 3, skip 2 sc, 1 sc in next st, ch 3, 1 dc + 3 ch + 1 dc in ch-space in corner *, repeat from *-* 3 times in total, ch 3, skip 3 sc, 1 sc in next st, ch 3, skip 2 sc, 1 hdc in next st, ch 3, skip 1 sc, 1 hdc in next st, ch 3, skip 2 sc, 1 sc in next st, 3 ch and finish with 1 sl st in 3rd ch from beg of round. ROUND 6: 1 sl st in ch-space in corner, 3 ch (= 1 dc), 2 dc + 3 ch + 3 dc in same ch-space, * work 3 dc in every ch-space until corner, work 3 dc + 3 ch + 3 dc in ch-space in corner *, repeat from *-* 3 times in total, work 3 dc in every ch-space until corner and finish with 1 sl st in 3rd ch from beg of round. ROUND 7: Work sl sts until ch-space in corner, 4 ch (= 1 tr), work 1 tr + 3 ch + 2 tr + 3 ch + 2 tr in same ch-space (= corner), ** (2 ch, skip 1 dc-group, 1 dc before next dc-group = between 2 dc-groups), repeat from (-) 6 times in total, ch 2, 2 tr + 3 ch + 2 tr + 3 ch + 2 tr in ch-space in corner **, repeat from **-** 3 times in total, repeat from (-) 6 times in total and finish with 2 ch and 1 sl st in 4th ch from beg of round. ROUND 8: Work sl sts until the middle of the 2 tr in corner, 3 ch (= 1 sc + 2 ch), 1 sc between the same middle tr in corner, * 3 sc in space, 1 sc between the next 2 tr, then work 3 sc in every ch-space until tr in corner, 1 sc between the first 2 tr, 3 sc in next ch-space, 1 sc + 2 ch + 1 sc between the middle 2 tr in corner *, repeat from *-* 3 times in total, 3 sc in space, 1 sc between the next 2 tr, then work 3 sc in every ch-space until tr in corner, 1 sc between the first 2 tr, 3 sc in ch-space and finish with 1 sl st in first ch from beg of round. ROUND 9: Work sl st in ch-space in corner, 6 ch (= 1 dc + 3 ch), 1 dc in same ch-space, * ch 3, skip 3 sc, 1 sc in next st, (3 ch, skip 2 sc, 1 hdc in next st), repeat from (-) 6 times in total, ch 3, skip 3 sc, 1 sc in next st, ch 3, 1 dc + 3 ch + 1 dc in ch-space in corner *, repeat from *-* the entire round, but finish with 1 sl st in 3rd ch from beg of round (instead of 1 dc + 3 ch + 1 dc in corner). ROUND 10: 1 sl st in ch-space in corner, 3 ch (= 1 dc), 2 dc + 3 ch + 3 dc in same ch-space, * work 3 dc in each of the first 3 ch-space, ch 1, 3 dc in each of the next 3 ch-spaces, ch 1, 3 dc in each of the next 3 ch-spaces, in corner work 3 dc + 3 ch + 3 dc in ch-space *, repeat from *-* the entire, but finish with 1 sl st in 3rd ch from beg of round (instead 3 dc + 3 ch + 3 dc in corner). ROUND 11: Work sl st until ch-space in corner, 4 ch (= 1 tr), work 1 tr + 3 ch + 2 tr + 3 ch + 2 tr in same ch-space (= corner), * ch 2, skip 2 dc-groups, 1 tr before next dc-group, ch 2, skip 2 dc-groups, in ch before next dc-group work 2 tr + 3 ch + 2 tr + 3 ch + 2 tr, skip 1 dc-group, 1 tr in the middle dc in next dc-group, skip 1 dc-group, in ch before next dc-groups work 2 tr + 3 ch + 2 tr + 3 ch + 2 tr, ch 2, skip 2 dc-groups, 1 tr before next dc-group, ch 2, in ch-space in corner work 2 tr + 3 ch + 2 tr + 3 ch + 2 tr *, repeat from *-* the entire round, but finish with 1 sl st in 4th ch from beg of round (instead of tr-groups in corner). ROUND 12: Work sl sts until the middle of the 2 tr in corner, 3 ch (= 1 sc + 2 ch), 1 sc between the same middle tr in corner,then work: * 3 sc in next 2 ch-spaces, 1 sc between next 2 tr, 3 sc in next ch-space, 1 sc between next 2 tr, 3 sc in ch-space, 1 sc in next 2 tr, skip next tr, 1 sc in next 2 tr, 3 sc in ch-space, 1 dc between next 2 tr, 3 sc in ch-space, 1 sc between next 2 tr, 3 sc in next 2 ch-space until first tr in corner, 1 sc between the first 2 tr, 3 sc around next ch-space, 1 sc + 2 ch + 1 sc between the middle 2 tr in corner *, repeat from *-* 3 times in total. Finish with 1 sc between the first 2 tr, 3 sc around ch-space and finish with 1 sl st in first ch from beg of round. ROUND 13: Work sl st in ch-space in corner, 7 ch (= 1 tr + 3 ch), 1 tr in same ch-space, * ch 3, skip 3 sc, 1 dc in next st, ch 3, skip 2 sc, 1 hdc in next st, ch 3, skip 1 sc, 1 hdc in next st, ch 3, skip 3 sc, 1 sc in next st, ch 3, skip 1 sc, 1 sc in next st, ch 3, skip 1 sc, 1 sc in next st, ch 2, skip 2 sc, 1 dc in next st, ch 2, skip 3 sc, 1 sc in next st, ch 3, skip 1 sc, 1 sc in next st, ch 3, skip 1 sc, 1 sc in next st, ch 3, skip 3 sc, 1 hdc in next st, ch 3, skip 1 sc, 1 hdc in next st, ch 3, skip 2 sc, 1 dc in next st, ch 3, skip 3 sc and work 1 tr + 3 ch + 1 tr in ch-space in corner *, repeat from *-* the entire round but finish with 1 sl st in 4th ch from beg of round (instead of 1 tr + 3 ch + 1 tr in ch-space in corner). ROUND 14: 1 sl st in ch-space in corner, 3 ch (= 1 dc), 2 dc + 3 ch + 3 dc in same ch-space, * work 3 dc in each of the first 6 ch-spaces, 1 dc in 2-ch-space, 1 dc in dc, 1 dc in 2-ch-space, work 3 dc in each of the next 6 ch-spaces, in corner work 3 dc + 3 ch + 3 dc in ch-space *, repeat from *-* the entire round but finish with 1 sl st in 3rd ch from beg of round (instead of 3 dc + 3 ch + 3 dc in corner). ROUND 15: 1 sl st in ch-space in corner, 3 ch (= 1 dc), 2 dc + 3 ch + 3 dc in same ch-space, * (2 ch, 1 dc before next dc-group), repeat from (-) until corner, ch 2, in ch-space in corner work 3 dc + 3 ch + 3 dc *, repeat from *-* the entire round, but finish with 1 sl st in 3rd ch from beg of round (instead of dc-group in corner). ROUND 16: 1 sl st in ch-space in corner, 3 ch (= 1 dc), 2 dc + 3 ch + 3 dc in same ch-space, * work 3 dc in every ch-space until corner, work 3 dc + 3 ch + 3 dc in ch-space in corner *, repeat from *-* 3 times in total, work 3 dc in every ch-space until corner and finish with 1 sl st in 3rd ch from beg of round. The square is finished. Fasten off. NOTE: If you want a bigger poncho repeat ROUND 15-16 until desired measurements. ASSEMBLY: Place squares as shown on chart so that a colored square is mid front and mid back and a white square in each side. Place 2 squares on top of each other WS against WS, and crochet them tog with white as follows: ** Work 1 sc in ch-space in corner on 1st square, ch 1, 1 sc in ch-space in corner on 2nd square, * ch 3, 1 sc in next ch-space on 1st square, ch 1, 1 sc in next ch-space on 2nd square *, repeat from *-* until next corner, finish with 3 ch for transition to next square **, repeat from **-**. NECK EDGE: Work a finishing edge around the neck on hook size 5 mm / H/8 as follows: Beg with light turquoise and work first round in A.2 but adjust in the corner mid front and mid back so that neck edge lies nicely mid front. Switch to light ice blue and work 2nd round of A.2 the same way. Fasten off. EDGE AROUND THE BOTTOM OF PONCHO: Work a finishing edge around the bottom of poncho on hook size 5 mm / H/8 as follows: Beg with white and work pattern according to A.2 AT THE SAME TIME work STRIPES-EDGE - see explanation above. NOTE: To continue the edge into a nice tip as on squares it is important to continue inc mid front and mid back, i.e. in the middle ch-space mid front and mid back work 3 dc + 3 ch + 3 dc on every round. When edge is done, fasten off. FRINGES: 1 fringe = 6 threads of approx. 40 cm / 16''. Fold the threads double, thread the loop through the opening between 2 dc-groups and pull the yarn ends through the loop (so that 12 strands hang down in every fringe). Beg with 1 fringe in ch-space in the tip mid front and mid back, then insert fringes along the diagonal edge on poncho between every other dc-group. |
|||||||||||||||||||||||||||||||||||||
Diagram explanations |
|||||||||||||||||||||||||||||||||||||
|
|||||||||||||||||||||||||||||||||||||
|
|||||||||||||||||||||||||||||||||||||
|
|||||||||||||||||||||||||||||||||||||
|
|||||||||||||||||||||||||||||||||||||
Have you finished this pattern?Tag your pictures with #dropspattern #bohemianbluesponcho or submit them to the #dropsfan gallery. Do you need help with this pattern?You'll find 9 tutorial videos, a Comments/Questions area and more by visiting the pattern on garnstudio.com. © 1982-2025 DROPS Design A/S. We reserve all rights. This document, including all its sub-sections, has copyrights. Read more about what you can do with our patterns at the bottom of each pattern on our site. |
|||||||||||||||||||||||||||||||||||||


With over 40 years in knitting and crochet design, DROPS Design offers one of the most extensive collections of free patterns on the internet - translated to 17 languages. As of today we count 314 catalogs and 11822 patterns - 11812 of which are translated into English (US/in).
We work hard to bring you the best knitting and crochet have to offer, inspiration and advice as well as great quality yarns at incredible prices! Would you like to use our patterns for other than personal use? You can read what you are allowed to do in the Copyright text at the bottom of all our patterns. Happy crafting!
Post a comment to pattern DROPS 162-2
We would love to hear what you have to say about this pattern!
If you want to leave a question, please make sure you select the correct category in the form below, to speed up the answering process. Required fields are marked *.