
Popular categories
Looking for a yarn?


Comments / Questions (186)
![]() Margreet wrote:
Margreet wrote:
Ik begrijp de beschrijving van het begin van de mouw niet want als ik het doe zo als het beschreven staat kom ik totaal niet uit. ik haak met 42 st (L) zou u het misschien uit kunne leggen? groetjes margreet
07.04.2019 - 20:33DROPS Design answered:
Dag Margreet,
Kan je uitleggen waar je precies tegenaan loopt? Je haakt eerst 49 lossen, dan keer je het werk en haak je 1 stokje in de 4e losse op de haaknaald en 1 stokje in elk van de volgende 7 losse. Vervolgens herhaal je steeds wat tussen de sterretjes staat. Dit betekent dat je af en toe geen stokje haakt in een losse, dus die sla je over. Op die manier heb je op het eind 42 stokjes op de toer.
09.04.2019 - 21:12
![]() Susan Wold wrote:
Susan Wold wrote:
Hei, jeg er ferdig med bakstykket, og nesten ferdig med forstykket til genseren, men skal forstykket være lengre enn bakstykket?
23.03.2019 - 21:56DROPS Design answered:
Hei Susan. Forstykket og bakstykket skal være like lange: 58-60-62-64-66-68 cm. God fornøyelse
28.03.2019 - 09:23
![]() Varsha wrote:
Varsha wrote:
Nice pattern
26.02.2019 - 19:00
![]() Gwen Decloux wrote:
Gwen Decloux wrote:
Bonjour, j’ai fait l’échantillon comme demandé qui était bon en brides, presque bon pour les rangs. J’ai donc commencé le dos en taille L et malheureusement la largeur de la pièce est plus petite que la taille indiquée sur le schéma 58 cm contre 52/53 chez moi. Que faire ?? Merci
11.02.2019 - 21:34DROPS Design answered:
Bonjour Mme Decloux, quand vous crochetez le point fantaisie A.1 et A.2, veillez bien à ce que vos mailles en l'air soient aussi large qu'une bride, si elles sont trop serrées, elles vont resserrer votre ouvrage en largeur. Bon crochet!
12.02.2019 - 09:21
![]() Mieke wrote:
Mieke wrote:
1e x dat ik een patroon voor kledij haak en dus allemaal nieuw. Ik ben bezig met het achterpand en zit daar bijna tot aan het einde. Enkel het stuk waarin staat dat je over de eerste 20 (S) 1stokje en elk stokje moet haken en 2 stokjes in elke l lus snap ik niet helemaal. Over welk stuk gaat dit dan precies? Waar beginnen die 1e 20 stokjes? alvast bedankt
26.01.2019 - 11:30DROPS Design answered:
Dag Mieke
Dit zijn de eerste 20 stokjes op de toer en je haakt alleen over deze stokjes (= schouder), dus je haakt alleen over deze stokjes heen en weer en je laat de rest van de toer rusten. Daarna doe je de andere schouder.
27.01.2019 - 13:35
![]() Shyanha wrote:
Shyanha wrote:
I'm in the US, not Canada - it switched back to Canada when it told me my comment was too long (I had 38 characters left, weird). Thank you, again, for the support and patterns. Now I need to order more yarn to crochet this pattern, too!
19.11.2018 - 19:44
![]() Shyanha wrote:
Shyanha wrote:
Google Translate has helped immensely! It looks like the shoulder shaping question has been asked several times in different languages and it's funny to see the translations. "Air stitches" and "sticks" are common and those sound silly. :) I love the DROPs patterns - they're a great way to learn how to read charts, and questions are answered quickly so we can keep hooking. I just finished "Cameron" and started "Miles Away."
19.11.2018 - 19:41
![]() Judith wrote:
Judith wrote:
Hallo, ich habe jetzt 2x angefangen, weil mir die 94 LM viel zu viele vorkommen. Ich möchte den Pullover in s machen und selbst bei der kleineren Nadelstärke von 3,5 komme ich auf 60 cm . Die Breite soll doch aber am unteren Ende 50 cm ergeben. Oder mache ich einen Denkfehler? Viele Grüße Judith
30.08.2018 - 23:42DROPS Design answered:
Liebe Judith, in der Größe S beginnen Sie mit 94 Lm, aber bei der 1. Reihe werden Sie regelmäßig Luftmaschen überspringen und dann 80 Stb am Ender der 1. Reihe bekommen (es wird mehr Lm angeschlagen damit die Kante nicht zu eng wird). Sollte Ihre Maschenprobe stimmen, dann bekommen Sie die 50 cm mit den 80 Stb. Viel Spaß beim häkeln!
04.09.2018 - 11:53
![]() Linda wrote:
Linda wrote:
I have finished the tunic. As I was sewing it together I realized that the sleeve opening was not nearly wide enough to fit in the armhole. I had to adjust the side seams in order to make the sleeve fit. I was reading the instructions to Drops pattern 187-2 and in that pattern in the sleeve section it explains that a marker has to be placed where the sewing will stop and how the sleeve is then sewn in. I think these instructions need to be put into the Drops 162-3 pattern.
29.07.2018 - 18:31
![]() Linda Manhartsberger wrote:
Linda Manhartsberger wrote:
I am beginning the decrease at the neck on the front and I have a couple questions: 1. Is there no adjustment for the armhole on the front piece? 2. If I work only the first 31 stitches on each side that leaves quite a few stitches unworked in the middle. Is that correct???
25.07.2018 - 14:46DROPS Design answered:
Dear Mrs Manhartsberger, you will shape the armholes on front piece as on back piece. Then crochet each shoulder separately will shape the neck, after the first shoulder has been worked, cut the yarn and work the 2nd shoulder. Happy crocheting!
25.07.2018 - 15:53
|
|||||||||||||
Just Me#justmesweater |
|||||||||||||
 |
 |
||||||||||||
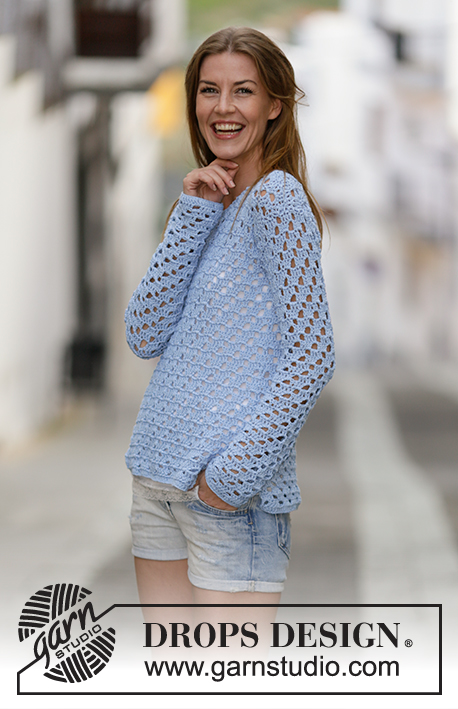
Crochet DROPS jumper with lace pattern in ”Cotton Light”. Size: S - XXXL.
DROPS 162-3 |
|||||||||||||
|
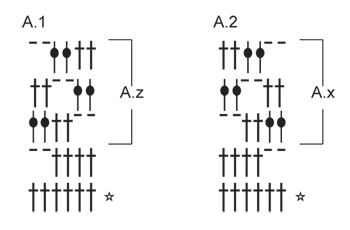
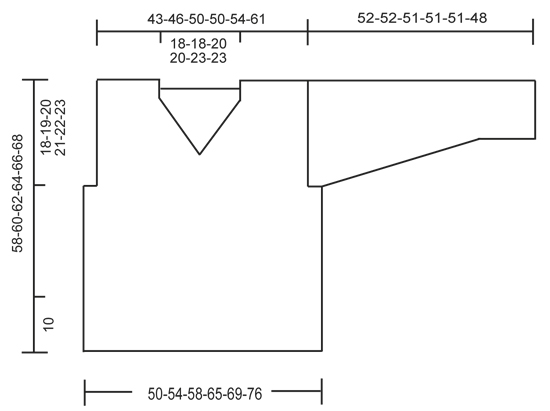
PATTERN: See diagrams A.1-A.2. CROCHET INFO: Replace first dc at beg of every dc row with 3 ch. 3 DC TOG: Work 3 dc into 1 dc as follows: * Work 1 dc but wait with last pull through (= 2 strands on hook) *, repeat from *-* 1 more time, then work next dc but on last pull through, pull yarn through all sts on hook. ---------------------------------------------------------- BACK PIECE: Work back and forth. Work 94-101-108-122-129-143 ch on hook size 4.5 mm/US 7 with Cotton Light. Work 1 dc in 4th ch from hook (= 2 dc), 1 dc in each of the next ch 5, * 1 dc in each of the next ch 6, skip 1 ch *, repeat from *-* until 1 ch remains, 1 dc in last ch = 80-86-92-104-110-122 dc. Then work as follows: 3 ch - READ CROCHET INFO, skip 1 dc (replaced by the 3 ch), A.1 (= 6 sts) 13-14-15-17-18-20 times in total, finish with 1 dc in last dc. Continue pattern like this. Eyelet holes in A.1 goes diagonally towards the left 2 sts on every row (seen from RS) until hole meets the one dc in left side of piece. REMEMBER THE CROCHET GAUGE! When A.1 has been worked 1 time vertically, repeat A.z until finished measurements. Fasten off when piece measures 40-41-42-43-44-45 cm / 15¾"-16⅛"-16½"-17"-17¼"-17¾". Now work pattern as before over the middle 68-74-80-80-86-98 sts (= 6-6-6-12-12-12 sts in each side for armhole). When piece measures 54-56-58-60-62-64 cm / 21¼"-22"-22¾"-23⅝"-24⅜"-25¼", adjust so that next row is from RS. Work over the first 20-23-24-24-24-31 sts (= shoulder) as follows: Work 1 dc in every dc and 2 dc in every ch-space = 20-23-24-24-24-31 dc. Work 2 rows with 1 dc in every dc. Fasten off. Do the same on the other shoulder FRONT PIECE: Work as back piece but work A.2 instead of A.1, i.e. eyelet holes goes diagonally towards the right (seen from RS). Repeat A.x until finished measurements. When piece measures 45-47-48-50-51-53 cm / 17¾"-18½"-19"-19¾"-20"-21", adjust after a whole repetition of A.x dec for neck (next row is from WS) as follows: Work as before over the first 31-34-37-37-40-46 dc, work 3 dc TOG - see explanation above. Turn piece. Repeat this dec on every row toward mid-front 7-7-8-8-9-9 times in total = 20-23-24-24-25-31 sts remain for shoulder. Then work 1 row with 1 dc in every dc and 2 dc in every ch-space. Work 2 rows with 1 dc in every dc. Fasten off. Do the same on the other shoulder SLEEVE: Work back and forth. Work 45-45-49-49-52-52 ch on hook size 4.5 mm/US 7 with Cotton Light. Work 1 dc in 4th ch from hook (= 2 dc), 1 dc in each of the next 5-5-7-7-5-5 ch, * 1 dc in each of the next ch 6, skip 1 ch *, repeat from *-* until 1-1-3-3-1-1 ch remains, 1 dc in the last 1-1-3-3-1-1 ch = 38-38-42-42-44-44 dc. Work 1 dc in each of the first 1-1-3-3-1-1 dc, A.2 until 1-1-3-3-1-1 dc remain, (= 6-6-6-6-7-7 times in width), 1 dc in each of the last 1-1-3-3-1-1 dc. When A.2 has been worked 1 time vertically, repeat A.x until finished measurements. When piece measures 8-8-8-10-10-10 cm / 4", inc 1 dc by working 2 dc in first and last dc on row (= 2 dc inc). Repeat inc every 4½-4-4-3-3-2½ cm / 1¾"-1½"-1½"-1"-1"-⅞" 9-10-10-12-12-14 more times = 58-60-64-68-70-74 sts. Work the inc sts in pattern. NOTE: There is always 1 dc (or 3 ch = 1 dc) in each side of piece. Fasten off when piece measures 52-52-51-51-51-48 cm / 20½"-20½"-20"-20"-20"-19" (shorter measurements in the larger sizes because of wider shoulders). Work another sleeve the same way. ASSEMBLY: Work the shoulder seams tog from WS as follows through both layers: 1 sc in first dc, * ch 1, skip 1 dc, 1 sc in next dc *, repeat from *-*. Sew in sleeves. Work the under arm seams and side seams tog from WS as follows through both layers: * 1 sc in outer loop, ch 3, skip 1 row *, repeat from *-* until approx. 10 cm / 4" remain on body for vent in each side. Fasten off. NECK EDGE: Work an edge around the neck as follows from mid on top of shoulder: 1 sc, * ch 3, skip approx. 1 cm / ½", 1 sc *, repeat from *-* around the entire neck and finish with 1 sl st in first sc on round. Fasten off. |
|||||||||||||
Diagram explanations |
|||||||||||||
|
|||||||||||||
 |
|||||||||||||
 |
|||||||||||||
Have you finished this pattern?Tag your pictures with #dropspattern #justmesweater or submit them to the #dropsfan gallery. Do you need help with this pattern?You'll find 5 tutorial videos, a Comments/Questions area and more by visiting the pattern on garnstudio.com. © 1982-2026 DROPS Design A/S. We reserve all rights. This document, including all its sub-sections, has copyrights. Read more about what you can do with our patterns at the bottom of each pattern on our site. |
|||||||||||||


With over 40 years in knitting and crochet design, DROPS Design offers one of the most extensive collections of free patterns on the internet - translated to 17 languages. As of today we count 325 catalogs and 12298 patterns - 12288 of which are translated into English (US/in).
We work hard to bring you the best knitting and crochet have to offer, inspiration and advice as well as great quality yarns at incredible prices! Would you like to use our patterns for other than personal use? You can read what you are allowed to do in the Copyright text at the bottom of all our patterns. Happy crafting!
Post a comment to pattern DROPS 162-3
We would love to hear what you have to say about this pattern!
If you want to leave a question, please make sure you select the correct category in the form below, to speed up the answering process. Required fields are marked *.