
Popular categories
Looking for a yarn?


Comments / Questions (186)
![]() Nicky wrote:
Nicky wrote:
Ik bedoel voor de 37 stokjes om de mindering voor de hals te maken 😊
05.07.2017 - 10:14
![]() Nicky wrote:
Nicky wrote:
Toch nog een vraag, als ik de 37 st. heb gedaan voor maat xxl, dan moet ik daarna 3 stokjes samen haken. Het 1e stokje van de 3 stokjes samen haken klopt volgens het patroon, maar voor de volgende 2 stokjes om samen te haken ben ik aangekomen bij het patroon waar ik 2 losssen moet haken om een gaatje te maken voor het patroon. Hoe los ik dat op? Moet ik dan in het 3e en 4e stokje doorhaken om de 3 stokjes samen te kunnen haken? Hoop dat ik het duidelijk heb uitgelegd
04.07.2017 - 21:00DROPS Design answered:
Hoi Nicky, Dat klopt inderdaad, je haakt in de stokjes door zodat je de stokjes samen kunt haken. Na het samenhaken pak je het patroon weer op.
05.07.2017 - 16:10
![]() Nicky wrote:
Nicky wrote:
Sorry, ik zie nu bij het patroon dat er nog een rand gehaakt wordt voor de afwerking van de hals 😊
04.07.2017 - 12:04
![]() Nicky wrote:
Nicky wrote:
Ik doe voor de hals na 37 stokjes voor maat xxl 3 stokjes samen haken en doe dat stteds richting midden voor. Op de foto zie ik bij de hals een brede rand gehaakt, maar dat krijg ik niet.
04.07.2017 - 12:02DROPS Design answered:
Hoi Nicky, Als het werk klaar is haak je nog een rand rondom de hals. Dit staat onderaan het patroon beschreven, vandaar dat je nu nog niet de brede rand krijgt :)
04.07.2017 - 15:34
![]() Katrine wrote:
Katrine wrote:
Jeg vil gerne høre om der er en fejl i opskriften da jeg ikke kan få diagrammet til at passe på 6 masker. Hullerne ligger ikke pænt forskudt når jeg hækler det men bliver forskudt hele tiden så hullerne tilsidst ligger over hinanden. Mvh Katrine
01.07.2017 - 21:31DROPS Design answered:
Hej Katrine, om du hver gang hækler 2 st i st og 2 st om lm-buen, så bliver det som du ser på billedet. Vælg det billeder hvor du kun ser mønsteret og gør det større, så ser du tydeligt hvordan det skal se ud. Lav gerne en lille hækleprøve først så du bliver sikker på mønsteret. God fornøjelse!
05.07.2017 - 08:56
![]() Haas wrote:
Haas wrote:
Bonjour pour une taille 50 est-ce que 129 mailles chainette est correct
05.06.2017 - 15:21DROPS Design answered:
Bonjour Haas, 122 ou 129, mais je vous conseille de faire une echantillon pour etre sure. Bon travail!
05.06.2017 - 19:00
![]() Sara Pastore wrote:
Sara Pastore wrote:
Buonasera. Sto lavorando questo bellissimo modello in taglia XXL ma ho dei dubbi. Voi scrivete : "Chiudere e affrancare quando il lavoro misura 40-41-42-43-44-45 cm. Ora lavorare il motivo come prima sulle 68-74-80-80-86-98 m centrali (= 6-6-6-12-12-12 m a ogni lato per lo scalfo)." Ma le maglie totali sono 129 e se lavoro le 86 centrali, non ne avanzano 24 (12 per parte), ma ne avanzano 43. Come mi devo comportare? Quante maglie lascio per gli scalfi? Grazie Sara
27.04.2017 - 23:10DROPS Design answered:
Buongiorno Sara. Le maglie alte su cui lavora sono 110 (129 sono le catenelle avviate). In questo modo quando lavora sulle 86 maglie centrali, rimangono 110-86=24 maglie (12 per parte) per gli scalfi. Buon lavoro!
28.04.2017 - 01:01
![]() Judith wrote:
Judith wrote:
Hallo, heb het inmiddels gevonden in de andere antwoorden, was ook de armsgaten in het voorpand vergeten :) Groetjes, Judith
05.04.2017 - 12:11Judith wrote:
Hallo, ik ben bezig aan het voorpand, maat medium, zit nu op een hoogte van 47cm en begrijp de volgende stap niet. Ik haak eerst 34 steken zoals de rest van het werk en dan haak ik 3 stokjes samen en keer ik zoals anders met 3 lossen? Er wordt niet geminderd voor de armsgaten? Groetjes, Judith
05.04.2017 - 10:32DROPS Design answered:
Hoi Judith, De beschrijving vanaf 47 cm op het voorpand gaat over de minderingen voor de halslijn (waarbij je het linker en rechter voorpand apart van elkaar verder haakt) Tot 47 cm, zou je, als het goed is, gehaakt moeten hebben volgens het achterpand, waarbij je dus ook de minderingen voor de armsgaten moest maken op 41 cm. Voor wat betreft je vraag over de 3 stokjes samen haken; in de link hieronder vind je een video waarin wordt uitgelegd hoe je 2 stokjes samen haakt. Dit kun je ook met 3 stokjes doen. video 2 stokjes samen haken
05.04.2017 - 12:03Rebecca wrote:
Hi, I'm slightly confused about how to joint the underarm seams and side seams. 1sc in outer loops, ch3, skip1 row. Does this mean I am only joining the pieces together with one stich for every other row?
04.04.2017 - 11:52DROPS Design answered:
Dear Rebecca, you crochet 3 ch between 2 sc, and skip 1 row, the 3 ch will have the same height as 1 row, and the sc have to be crocheted in the first/last st on each row, with 3 ch between each sc. Happy crocheting!
04.04.2017 - 13:36
|
|||||||||||||
Just Me#justmesweater |
|||||||||||||
 |
 |
||||||||||||
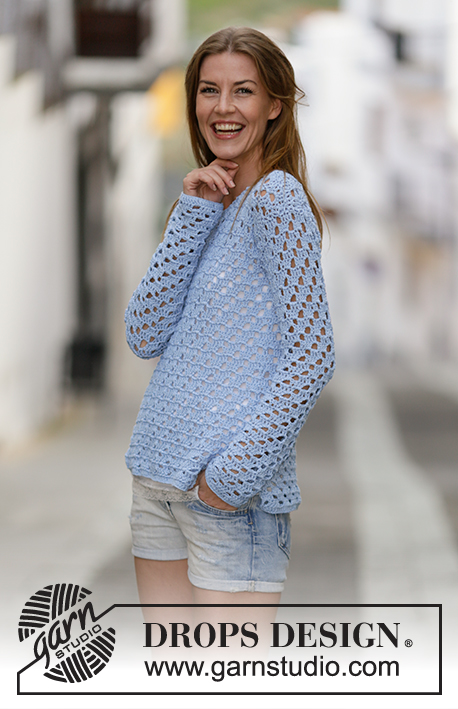
Crochet DROPS jumper with lace pattern in ”Cotton Light”. Size: S - XXXL.
DROPS 162-3 |
|||||||||||||
|
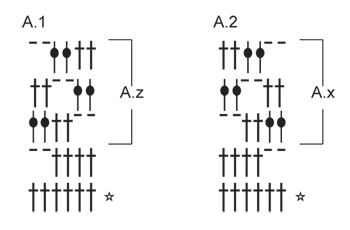
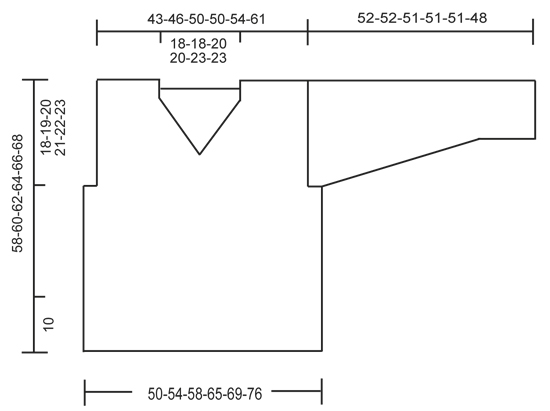
PATTERN: See diagrams A.1-A.2. CROCHET INFO: Replace first dc at beg of every dc row with 3 ch. 3 DC TOG: Work 3 dc into 1 dc as follows: * Work 1 dc but wait with last pull through (= 2 strands on hook) *, repeat from *-* 1 more time, then work next dc but on last pull through, pull yarn through all sts on hook. ---------------------------------------------------------- BACK PIECE: Work back and forth. Work 94-101-108-122-129-143 ch on hook size 4.5 mm/US 7 with Cotton Light. Work 1 dc in 4th ch from hook (= 2 dc), 1 dc in each of the next ch 5, * 1 dc in each of the next ch 6, skip 1 ch *, repeat from *-* until 1 ch remains, 1 dc in last ch = 80-86-92-104-110-122 dc. Then work as follows: 3 ch - READ CROCHET INFO, skip 1 dc (replaced by the 3 ch), A.1 (= 6 sts) 13-14-15-17-18-20 times in total, finish with 1 dc in last dc. Continue pattern like this. Eyelet holes in A.1 goes diagonally towards the left 2 sts on every row (seen from RS) until hole meets the one dc in left side of piece. REMEMBER THE CROCHET GAUGE! When A.1 has been worked 1 time vertically, repeat A.z until finished measurements. Fasten off when piece measures 40-41-42-43-44-45 cm / 15¾"-16⅛"-16½"-17"-17¼"-17¾". Now work pattern as before over the middle 68-74-80-80-86-98 sts (= 6-6-6-12-12-12 sts in each side for armhole). When piece measures 54-56-58-60-62-64 cm / 21¼"-22"-22¾"-23⅝"-24⅜"-25¼", adjust so that next row is from RS. Work over the first 20-23-24-24-24-31 sts (= shoulder) as follows: Work 1 dc in every dc and 2 dc in every ch-space = 20-23-24-24-24-31 dc. Work 2 rows with 1 dc in every dc. Fasten off. Do the same on the other shoulder FRONT PIECE: Work as back piece but work A.2 instead of A.1, i.e. eyelet holes goes diagonally towards the right (seen from RS). Repeat A.x until finished measurements. When piece measures 45-47-48-50-51-53 cm / 17¾"-18½"-19"-19¾"-20"-21", adjust after a whole repetition of A.x dec for neck (next row is from WS) as follows: Work as before over the first 31-34-37-37-40-46 dc, work 3 dc TOG - see explanation above. Turn piece. Repeat this dec on every row toward mid-front 7-7-8-8-9-9 times in total = 20-23-24-24-25-31 sts remain for shoulder. Then work 1 row with 1 dc in every dc and 2 dc in every ch-space. Work 2 rows with 1 dc in every dc. Fasten off. Do the same on the other shoulder SLEEVE: Work back and forth. Work 45-45-49-49-52-52 ch on hook size 4.5 mm/US 7 with Cotton Light. Work 1 dc in 4th ch from hook (= 2 dc), 1 dc in each of the next 5-5-7-7-5-5 ch, * 1 dc in each of the next ch 6, skip 1 ch *, repeat from *-* until 1-1-3-3-1-1 ch remains, 1 dc in the last 1-1-3-3-1-1 ch = 38-38-42-42-44-44 dc. Work 1 dc in each of the first 1-1-3-3-1-1 dc, A.2 until 1-1-3-3-1-1 dc remain, (= 6-6-6-6-7-7 times in width), 1 dc in each of the last 1-1-3-3-1-1 dc. When A.2 has been worked 1 time vertically, repeat A.x until finished measurements. When piece measures 8-8-8-10-10-10 cm / 4", inc 1 dc by working 2 dc in first and last dc on row (= 2 dc inc). Repeat inc every 4½-4-4-3-3-2½ cm / 1¾"-1½"-1½"-1"-1"-⅞" 9-10-10-12-12-14 more times = 58-60-64-68-70-74 sts. Work the inc sts in pattern. NOTE: There is always 1 dc (or 3 ch = 1 dc) in each side of piece. Fasten off when piece measures 52-52-51-51-51-48 cm / 20½"-20½"-20"-20"-20"-19" (shorter measurements in the larger sizes because of wider shoulders). Work another sleeve the same way. ASSEMBLY: Work the shoulder seams tog from WS as follows through both layers: 1 sc in first dc, * ch 1, skip 1 dc, 1 sc in next dc *, repeat from *-*. Sew in sleeves. Work the under arm seams and side seams tog from WS as follows through both layers: * 1 sc in outer loop, ch 3, skip 1 row *, repeat from *-* until approx. 10 cm / 4" remain on body for vent in each side. Fasten off. NECK EDGE: Work an edge around the neck as follows from mid on top of shoulder: 1 sc, * ch 3, skip approx. 1 cm / ½", 1 sc *, repeat from *-* around the entire neck and finish with 1 sl st in first sc on round. Fasten off. |
|||||||||||||
Diagram explanations |
|||||||||||||
|
|||||||||||||
 |
|||||||||||||
 |
|||||||||||||
Have you finished this pattern?Tag your pictures with #dropspattern #justmesweater or submit them to the #dropsfan gallery. Do you need help with this pattern?You'll find 5 tutorial videos, a Comments/Questions area and more by visiting the pattern on garnstudio.com. © 1982-2026 DROPS Design A/S. We reserve all rights. This document, including all its sub-sections, has copyrights. Read more about what you can do with our patterns at the bottom of each pattern on our site. |
|||||||||||||


With over 40 years in knitting and crochet design, DROPS Design offers one of the most extensive collections of free patterns on the internet - translated to 17 languages. As of today we count 325 catalogs and 12298 patterns - 12288 of which are translated into English (US/in).
We work hard to bring you the best knitting and crochet have to offer, inspiration and advice as well as great quality yarns at incredible prices! Would you like to use our patterns for other than personal use? You can read what you are allowed to do in the Copyright text at the bottom of all our patterns. Happy crafting!
Post a comment to pattern DROPS 162-3
We would love to hear what you have to say about this pattern!
If you want to leave a question, please make sure you select the correct category in the form below, to speed up the answering process. Required fields are marked *.