
Popular categories
Looking for a yarn?


Comments / Questions (30)
![]() Marj Setters wrote:
Marj Setters wrote:
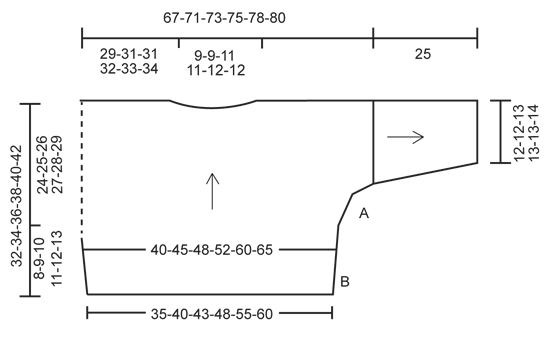
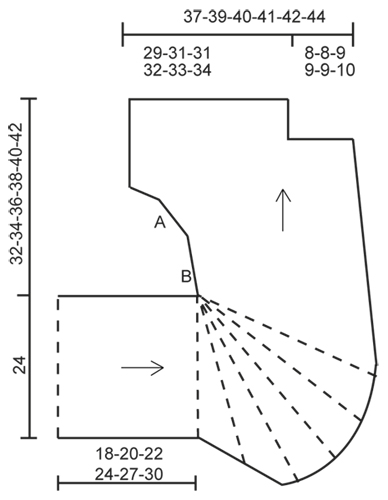
I can't work out from the schematic drawing how the pieces fit together. Is the first drawing the back? How do the two front pieces fit to it? I have knitted the back and part of the right front (completed the short row section) but I cant tell from the schematic how they fit together and therefore I dont know where in the rows to position the button holes. I dint want to give up but I am on the brink of doing so!
17.05.2021 - 17:44DROPS Design answered:
Dear Marj, yes, the first drawing is the upper part of the back, the second is the front, and the lower part of the back. The piece left from the short row section (on the drawing), from point B to the left, is the lower part of the back. I hope this helps. Happy Knitting!
17.05.2021 - 22:00Chris wrote:
What are the body measurements for the sizes of this pattern?
07.03.2015 - 15:17DROPS Design answered:
Dear Chris, you will find at the bottom of the pattern measurement charts to back piece and right edge /front piece (with bottom of back piece) - they are taken flat from side to side, compare these to a similar garment you have and like the shape to find out the matching size. Happy knitting!
07.03.2015 - 17:54
![]() Lorenza wrote:
Lorenza wrote:
Salve. Ho iniziato a realizzare questo modello seguendo le indicazioni per la taglia XL, ma i problemi sono iniziati con i ferri accorciati. Alla fine della prima ripetizione avevo il numero di maglie giuste, cioè 47. Poi se faccio le altre 4 ripetizioni e quindi aumento una maglia alla fine di ogni ferro rovescio, mi ritrovo con molte maglie in più di quelle richieste.Cordiali saluti. Lorenza P.S. DROPS 158-30 MODELLO de-122
20.01.2015 - 17:48DROPS Design answered:
Buonasera Lorenza. Mentre lavora le ripetizioni dei ferri accorciati successive alla prima, aumenta alla fine dei ferri sul rovescio, solo fino a quando non avrà avviato 33 m (per la taglia XL) dall’inizio della prima ripetizione. Quindi quando sui ferri ci sono 69 m, continuerà a lavorare a ferri accorciati, ma senza aumentare più. Buon lavoro!
20.01.2015 - 18:44
![]() Lisa Messina wrote:
Lisa Messina wrote:
øv jeg har problemer med maske antallet ved vendingerne ... strikker en str L men kan ikke finde ud af om jeg bare stopper når jeg når de 63 masker eller om jeg skal lave 5 rapporter og så ende med flere masker?? håber på et svar så jeg kan få den færdig inden jul. Hilsen Lisa
01.12.2014 - 23:44DROPS Design answered:
Hej Lisa, Jo du fortsætter vendingerne ifølge opskriften, men du stopper med at tage ud når du når de 63 masker. God fornøjelse!
05.12.2014 - 09:19
![]() Petra wrote:
Petra wrote:
Okay, vielen Dank für die schnelle Antwort.
08.11.2014 - 08:57
![]() Petra wrote:
Petra wrote:
Hallo, ich bin am Vorderteil am Anfang des 4. Rapports und hab schon 76 M. auf der Nadel. Wenn der 4. R. und der 5.R. gestrickt sind hab ich sicher mehr als 81 M. auf der Nadel - was mach ich falsch?
07.11.2014 - 16:07DROPS Design answered:
Liebe Petra, Sie dürfen nur so lange neue M anschlagen, bis die erforderliche M-Zahl erreicht ist, danach schlagen Sie am Ende der Rück-R keine neuen M mehr an: "... bis insgesamt 15-21-27-33-39-45 neue M ab dem Beginn des 1. Rapports angeschlagen wurden (= 51-57-63-69-75-81 M)".
07.11.2014 - 21:12
![]() GUNILLA wrote:
GUNILLA wrote:
JAG HAR BÖRJAT STICKA DENNA KOFTA. SNYGGARE EFFEKT OM MAN BÖRJAR MED MÖNSTERRADEN FRÅN AVIGAN.
04.08.2014 - 12:59
![]() Peltier wrote:
Peltier wrote:
Je l'adore, attends juste vos explications pour commander la laine :)
05.07.2014 - 13:14
![]() Kari-Mette wrote:
Kari-Mette wrote:
Dette er min favoritt...Nydelige farger og fasong...:)
26.06.2014 - 00:33
![]() Antje wrote:
Antje wrote:
Wunderschööön! Ich kann mich nur anschließen. Großes Lob den Designern.
16.06.2014 - 17:11
|
||||
Now and Then#nowandthencardigan |
||||
 |
 |
|||
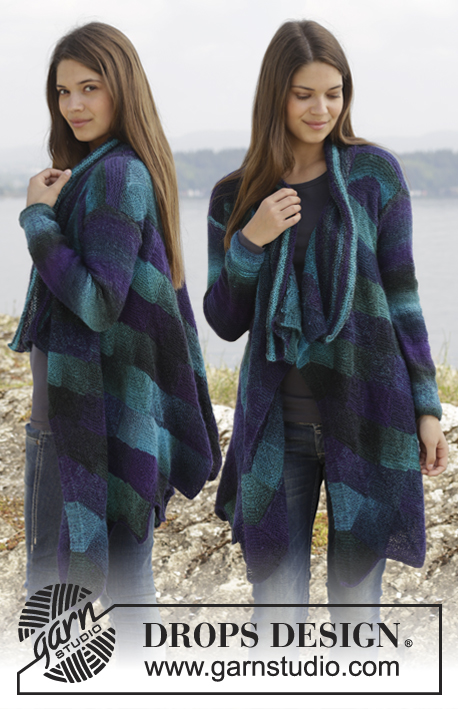
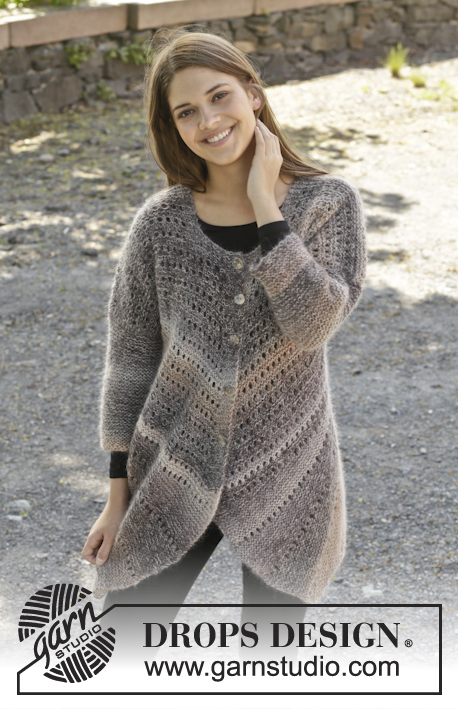
Knitted DROPS jacket in garter st with lace pattern in ”Delight” and ”Kid-Silk”. Size: S - XXXL.
DROPS 158-30 |
||||
|
GARTER ST (back and forth on circular needle): K all rows. 1 ridge = K2 rows. PATTERN: ROW 1 (= RS): K 1, * K 2 tog, 1 YO *, repeat from *-* until 1 st remains and finish with K 1. ROW 2 (= WS): K all sts and YO. SHORT ROWS: 1ST REPETITION: Work short rows on front piece to get a rounded edge on the piece as follows: ROW 1 (= RS): Work until 3 sts (= 33 sts) remain, turn piece. ROW 2 and rows from WS: Work back and cast on 1 new st at the end of row. ROW 3: Work until 6 sts remain, turn piece. ROW 5: Work until 9 sts remain, turn piece. ROW 7: Work until 12 sts remain, turn piece. ROW 9: Work until 15 sts remain, turn piece. Continue like this by working 3 sts less on every turn, AT THE SAME TIME cast on 1 new st at the end of every row from WS until 11 ridges have been worked at the outer edge = 47 sts. Then work 2 rows PATTERN - see explanation above, over all sts. 11 ridges + 2 rows pattern have been worked at the outer edge and 2 rows pattern at the inner edge. Continue to cast on 1 new st at the end of every row from WS until 15-21-27-33-39-45 new sts have been cast on in total from beg of 1st repetition = 51-57-63-69-75-81 sts. AT THE SAME TIME continue with short rows as explained below: 2ND AND 3RD REPETITION: Work as 1st repetition but work 1st row over 45-47-41-41-41-41 sts before turning. Continue by working 4 sts less for every turn until 12-14-14-14-14-14 ridges + 2 row in pattern have been worked at the outer edge and 2 rows pattern at the inner edge. 4TH AND 5TH REPETITION: Work as 1st repetition but work 1st row over 48-52-56-60-68-72 sts. Continue by working 4 sts less for every turn until 12-13-14-15-16-17 ridges + 2 row in pattern have been worked at the outer edge and 2 rows pattern at the inner edge. BUTTONHOLES: Dec for buttonholes on right band. 1 buttonhole = K tog second and third st from mid front and make 1 YO. Dec for buttonholes when piece measures (measured from the marker in the side): SIZE S: 6, 11, 16, 21 and 26 cm / 2⅜",4⅜",6¼", 8¼",10¼" SIZE M: 6, 12, 17, 23 and 28 cm / 2⅜",4¾",6¾",9",11" SIZE L: 6, 12, 18, 24 and 30 cm / 2⅜",4¾",7",9½",11¾" SIZE XL: 7, 14, 20, 26 and 32 cm / 2¾",5½",8",10¼",12½" SIZE XXL: 7, 14, 20, 27 and 34 cm / 2¾",5½",8",10⅝",13⅜" SIZE XXXL: 8, 15, 22, 29 and 36 cm / 3⅛",6",8¾",11⅜",14¼" DECREASE TIP: Dec 1 st by K 2 sts tog. ---------------------------------------------------------- JACKET: Worked back and forth on circular needle. BACK PIECE: Cast on 46-52-56-62-72-78 sts on circular needle size 6 mm / US 10 with 1 strand Delight and 1 strand Kid-Silk (= 2 strands). Work 2 RIDGES in garter st - see explanation above (1st row = RS). Then work as follows: * 2 rows PATTERN – see explanation above, 2 ridges *, repeat from *-* until finished measurements. REMEMBER THE GAUGE! AT THE SAME TIME when piece measures 2-3-3-3-3-4 cm / ¾"-1⅛"-1⅛"-1⅛"-1⅛"-1½", inc 1 st in each side every 2-2-2-2-3-3 cm / ¾"-¾"-¾"-¾"-1⅛"-1⅛" 3 times in total = 52-58-62-68-78-84 sts. Work the inc sts gradually in the pattern. K the sts that do not fit the pattern. When piece measures 8-9-10-11-12-13 cm / 3⅛"-3½"-4"-4⅜"-4¾"-5⅛", cast on new sts for sleeves in each side as follows: 1 sts 8 times and 10-9-8-7-4-2 sts 1 time = 88-92-94-98-102-104 sts. When piece measures 27-29-31-33-35-37 cm / 10⅝"-11⅜"-12¼"-13"-13 ¾"-14½", continue with pattern as before, AT THE SAME TIME work in garter st over the middle 20-20-22-22-24-24 sts. Continue to work like this until piece measures 29-31-33-35-37-39 cm / 11⅜"-12¼"-13"-13 ¾"-14½"-15¼". On next row bind off the middle 12-12-14-14-16-16 sts for neck = 38-40-40-42-43-44 sts remain on shoulder/sleeve. Then finish each shoulder separately. Continue with the outermost 4 sts in towards the neck in garter st. Work until piece measures approx. 32-34-36-38-40-42 cm / 12½"-13⅜"-14¼"-15"-15¾"-16½" - adjust so that 1 ridge have been worked after 2 rows with pattern and then LOOSELY bind off. Work the other shoulder the same way but reversed. RIGHT EDGE PIECE/FRONT PIECE: Work sideways from mid back, work short rows to get a rounded front edge, then work front piece with dec inside band. Cast on 36 sts in all sizes on circular needle size 6 mm / US 10 with 1 strand Delight and 1 strand Kid-Silk (= 2 strands). Work in garter st back and forth (1st row = RS). When piece measures 1-3-3-5-8-2 cm / ⅜"-1⅛"-1⅛"-2"-3⅛"-¾", continue as follows: * 2 rows pattern, 7-7-8-8-8-8 cm / 2¾"-2¾"-3⅛"-3⅛8"-3⅛"-3⅛" in garter st *, repeat from *-* 2-2-2-2-2-3 time in total, then work 2 rows pattern. Piece now measures approx. 18-20-22-24-27-30 cm / 7"-8"-8¾"-9½"-10⅝"-11¾". Then work SHORT ROWS – see explanation above (1st row = RS). After short rows there are 51-57-63-69-75-81 sts on needle. Insert 1 marker in the side – NOW MEASURE PIECE FROM HERE! READ ALL OF THE FOLLOWING SECTION BEFORE CONTINUING! Work 2 ridges, then work as follows: * 2 rows in pattern but work the outermost 5 sts towards mid front in garter st (= band), 2 ridges over all sts *, repeat from *-* until finished measurements, AT THE SAME TIME dec 1 st inside the 5 band sts – READ DECREASE TIP! Repeat dec approx. every 1-1-1-½-½-½ cm / ⅜"-⅜"-⅜"-¼"-¼"-¼" 22-25-29-32-34-36 more times (= 23-26-30-33-35-37 dec in total towards band). AT THE SAME TIME when piece measures 2-3-3-3-3-4 cm / ¾"-1⅛"-1⅛"-1⅛"-1⅛"-1½", inc 1 st in the side (i.e. at the end of row from RS) every 2-2-2-2-3-3 cm / ¾"-¾"-¾"-¾"-1⅛"-1⅛" 3 times in total. Remember BUTTONHOLES on band - see explanation above. When piece measures 8-9-10-11-12-13 cm / 3⅛"-3½"-4"-4⅜"-4¾"-5⅛", cast on new sts for sleeve at the end of row from RS as follows: 1 st 8 times and 10-9-8-7-4-2 sts 1 time. NOTE: K the sts that do not fit the pattern towards the sleeve. When all inc and dec are done, there are 49-51-52-54-55-57 sts on needle. When piece measures 26-28-30-32-34-36 cm/10¼"-11"-11¾"-12½"-13½"-14¼", work in garter st over the first 15-15-16-16-16-17 sts. When piece measures 28-30-32-34-36-38 cm / 11"-11¾"-12½"-13⅜"-14¼"-15", bind off the first 11-11-12-12-12-13 sts from RS. Continue with 4 sts in garter st in towards the neck and pattern over the remaining 34-36-36-38-39-40 sts on shoulder/sleeve as before. Work until piece measures approx. 32-34-36-38-40-42 cm / 12½"-13⅜"-14¼"-15"-15¾"-16½" - adjust according to back piece and LOOSELY bind off. LEFT EDGE PIECE/FRONT PIECE: Cast on and work as right edge piece/front piece but reversed. I.e. before short rows beg, K 1 row from RS, then work short rows, beg from WS (instead of RS). After short rows inc in the side as of right front piece but at the end of row from WS (instead of at the end of row from RS). Do not dec for buttonholes. Cast on new sts for sleeve at the end of row from WS. ASSEMBLY: Sew the shoulder seams. Sew underarm and side seams (front pieces and back piece) in one in outer loops of edge sts (sew A against A and B against B – see chart). Sew cast-on edge on right and left edge piece tog mid back in outer loops of cast-on edge. Then sew them to bottom edge on back piece. Sew the buttons on to the left band. SLEEVE: The sleeves are worked back and forth on circular needle. Beg at the top of side seam and pick up 46-48-52-55-57-60 sts on circular needle size 6 mm / US 10 with 1 strand Delight and 1 strand Kid-Silk (= 2 strands) around the sleeve opening. Work in GARTER ST back and forth - see explanation above! When piece measures 4 cm / 1½", dec 1 st inside 1 edge st in each side of piece by K 2 tog. Repeat dec every 3-3-2½-2-2-1½ cm / 1⅛"-1⅛"-⅞"-¾"-¾"-½" 5-5-6-7-8-9 more times = 34-36-38-39-39-40 sts. Loosely bind off when sleeve measures 25 cm / 9¾". Sew underarm seam inside 1 edge st. Make another sleeve the same way. |
||||
Diagram explanations |
||||
|
||||
 |
||||
 |
||||
Have you finished this pattern?Tag your pictures with #dropspattern #nowandthencardigan or submit them to the #dropsfan gallery. Do you need help with this pattern?You'll find 16 tutorial videos, a Comments/Questions area and more by visiting the pattern on garnstudio.com. © 1982-2026 DROPS Design A/S. We reserve all rights. This document, including all its sub-sections, has copyrights. Read more about what you can do with our patterns at the bottom of each pattern on our site. |
||||


With over 40 years in knitting and crochet design, DROPS Design offers one of the most extensive collections of free patterns on the internet - translated to 17 languages. As of today we count 324 catalogs and 12290 patterns - 12280 of which are translated into English (US/in).
We work hard to bring you the best knitting and crochet have to offer, inspiration and advice as well as great quality yarns at incredible prices! Would you like to use our patterns for other than personal use? You can read what you are allowed to do in the Copyright text at the bottom of all our patterns. Happy crafting!
Post a comment to pattern DROPS 158-30
We would love to hear what you have to say about this pattern!
If you want to leave a question, please make sure you select the correct category in the form below, to speed up the answering process. Required fields are marked *.