
Popular categories
Looking for a yarn?


Comments / Questions (56)
![]() Heike wrote:
Heike wrote:
"Nach 16 cm 5 Markierungen setzen" - bedeutet das 16cm ab kraus rechts oder 16cm einschließlich der 6cm rand? die Baskenmütze sollte ja nicht zu hoch werden - danke für die antwort wird ne tolle mütze
05.11.2014 - 08:12DROPS Design answered:
Liebe Heike, bei uns bezieht sich "nach" + cm-Angabe immer auf die Gesamthöhe ab Anschlag (es sei denn, es ist etwas anderes erwähnt). Der Rand wird also mitgerechnet. Viel Spaß beim Stricken!
05.11.2014 - 11:59
![]() Heike wrote:
Heike wrote:
Danke für die antwort werde nochmal sehr locker die maschen stricken bzw. dann eben mehr maschen aufnehmen - ein sehr schönes mütze / tuch set - ich will es verschenken
30.10.2014 - 08:40
![]() Heike wrote:
Heike wrote:
Die maschenanzahl für die mütze mit 45 maschen kann nicht stimmen?? ich habe die dropswolle die Rundnadel aber das passt nicht für den kopfumfang
29.10.2014 - 11:52DROPS Design answered:
Antwort siehe unten! :-)
29.10.2014 - 14:22
![]() Heike wrote:
Heike wrote:
Die maschenanzahl für die mütze mit 45 maschen kann nicht stimmen?? ich habe die dropswolle die Rundnadel aber das passt nicht für den kopfumfang
29.10.2014 - 11:52DROPS Design answered:
Haben Sie die Maschenprobe eingehalten? Außerdem müssen Sie die M sehr locker anschlagen. Der kraus re gestrickte Rand dehnt sich beim Tragen noch und er muss ja relativ eng anliegen, damit die Mütze nicht verrutscht. Wenn Ihnen der Mützenumfang aber dennoch nicht passt, können Sie mehr M anschlagen und dann nach den Krausrippen auf 90 M zunehmen und wie beschrieben weiterstricken.
29.10.2014 - 14:21
![]() Darlene Yack wrote:
Darlene Yack wrote:
For the beret, after casting on which is your first row, does the start of the garter stitch on the 2nd row begin with a purl row, or a knit row?
19.09.2014 - 17:37DROPS Design answered:
Dear Mrs Yack, after casting on sts for beret, you join to work in the round in garter st, ie work *K1 round, P1 round*, repeat from *-* until piece measures 6 cm from cast on row. Happy knitting!
20.09.2014 - 09:38
![]() Elli wrote:
Elli wrote:
Hallo, ich würde gerne diese wundervolle Mütze stricken, doch an welcher Stelle wird denn eigentlich von der Rundnadel Nr. 6 auf das Nadelspiel Nr. 6 gewechselt? Herzliche Grüße
15.09.2014 - 19:56DROPS Design answered:
Liebe Elli, das bleibt Ihnen überlassen - Sie stricken so lange auf der Rundnadel, wie die Abnahmen es zulassen geht, und wechseln dann zum Nadelspiel. Sie stricken ja dadurch einfach weiter in Runden, können aber mit einer kleineren Maschenzahl rundstricken, als das bei einer 40cm-Nadel möglich ist.
15.09.2014 - 20:32
![]() Silvia wrote:
Silvia wrote:
Buongiorno, il cappello è molto bello, ma 45 maglie di avvio mi sembrano molto poche. E' corretto? grazie
09.09.2014 - 10:10DROPS Design answered:
E' giusto. DROPS Eskimo è un filato grosso e si lavora con ferri grossi.
11.09.2014 - 16:29
![]() Erna wrote:
Erna wrote:
Het zou zo fijn zijn als jullie prachtige patronen ook worden beschreven op rechte breinaalden. Ik kan niet uit de voeten met een rondbreinaald. Hartelijke groet, erna
17.08.2014 - 08:05Mara Contras Rodriguez wrote:
Quisiera saber de este patrón que significa MP o como se realiza un MP de las instrucciones de la boina
10.08.2014 - 03:53DROPS Design answered:
Hola Mara Los Marcapuntos no se hacen, son unas piezas generalmente de plástico que enganchamos o insertamos en alguna parte de la labor para marcar un punto de referencia.
10.08.2014 - 12:26Mara Contras Rodriguez wrote:
Quisiera saber de este patrón que significa MP o como se realiza un MP de las instrucciones de la boina
10.08.2014 - 03:51DROPS Design answered:
Hola Mara Los Marcapuntos no se hacen, son unas piezas generalmente de plástico que enganchamos o insertamos en alguna parte de la labor para marcar un punto de referencia.
10.08.2014 - 12:29
|
|
Winter Blush#winterblushset |
|
 |
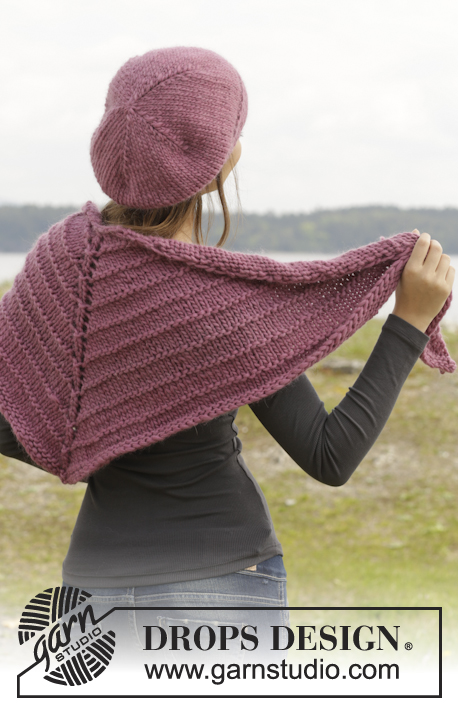 |
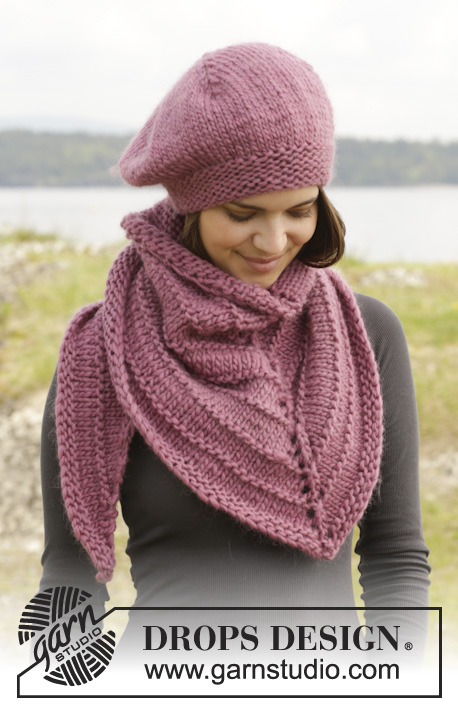
Knitted DROPS beret and shawl in garter st and stockinette st in ”Snow” or "Andes".
DROPS 156-49 |
|
|
TIP FOR CHANGING YARN: When changing ball, divide the old strand in two the last 15 cm / 6" – cut one part off, do the same on the new thread. Place the first and last 15 cm / 6" over each other to get normal thickness of yarn and continue working - do this to avoid visible yarn change. GARTER ST (in the round on circular needle): * K 1 round and P 1 round *, repeat from *-*. 1 ridge = 2 rounds. INCREASE TIP: Inc 1 st by working 2 sts in 1 st. I.e. work in back and front loop of st. DECREASE TIP: Dec 1 st before marker as follows: Work until 2 sts remain before marker, slip 1 st as if to K, K 1, psso. Dec 1 st after marker as follows: K 2 tog. ---------------------------------------------------------- BERET: Worked in the round on circular needle and double pointed needles. Loosely cast on 45 sts on circular needle size 6 mm / US 10 with Snow. Work in GARTER ST – see explanation above – until piece measures 6 cm / 2⅜". REMEMBER THE GAUGE! On next round inc 1 st in every st - see INCREASE TIP = 90 sts on needle. Continue in stockinette st. When piece measures 16 cm / 6¼", insert 5 markers in the piece as follows: Insert 1st marker at the beg of the round. Then insert 1 marker for every 18 sts = 5 markers. Then continue in stockinette st while AT THE SAME TIME dec every other round as follows: Dec 1 st on each side of every marker 8 times in total - see DECREASE TIP = 10 sts remain. Pull yarn through the remaining 10 sts, tighten tog and fasten. ----------------------------------------------------------- SHAWL: Worked back and forth on circular needle. READ TIP FOR CHANGING YARN! Cast on 9 sts on circular needle size 8 mm / US 11 with Snow. Work as follows: ROW 1 (= RS): K 1, 1 YO, K 3, 1 YO, K 1 (= mid st) insert a marker in this st, 1 YO, K 3, 1 YO and K 1 = 13 sts. ROW 2 (= WS): P 1, 1 YO, P until 1 st remains, 1 YO and P 1 = 2 sts inc. ROW 3: K 1, 1 YO, K until mid st, 1 YO, K 1 (= mid st), 1 YO, K until 1 st remains, 1 YO and K 1 = 4 sts inc. REMEMBER THE GAUGE! ROW 4: P 1, 1 YO, P until 1 st remains, 1 YO and P 1 = 2 sts inc. ROW 5: K 1, 1 YO, K until mid st, 1 YO, K 1 (= mid st), 1 YO, K until 1 st remains, 1 YO and K 1 = 4 sts inc. ROW 6: K 1, 1 YO, K until 1 st remains, 1 YO and K 1 = 2 sts inc. ROW 7: K 1, 1 YO, K until mid st, 1 YO, K 1 (= mid st), 1 YO, K until 1 st remains, 1 YO and K 1 = 4 sts inc. Repeat rows 2 - 7 until piece measures approx. 45 cm = 17¾" over mid st – adjust so that last row is 7th row with K sts and inc. K 1 row from wrong side and bind off loosely on next row from right side. |
|
Have you finished this pattern?Tag your pictures with #dropspattern #winterblushset or submit them to the #dropsfan gallery. Do you need help with this pattern?You'll find 19 tutorial videos, a Comments/Questions area and more by visiting the pattern on garnstudio.com. © 1982-2026 DROPS Design A/S. We reserve all rights. This document, including all its sub-sections, has copyrights. Read more about what you can do with our patterns at the bottom of each pattern on our site. |
|


With over 40 years in knitting and crochet design, DROPS Design offers one of the most extensive collections of free patterns on the internet - translated to 17 languages. As of today we count 324 catalogs and 12290 patterns - 12280 of which are translated into English (US/in).
We work hard to bring you the best knitting and crochet have to offer, inspiration and advice as well as great quality yarns at incredible prices! Would you like to use our patterns for other than personal use? You can read what you are allowed to do in the Copyright text at the bottom of all our patterns. Happy crafting!
Post a comment to pattern DROPS 156-49
We would love to hear what you have to say about this pattern!
If you want to leave a question, please make sure you select the correct category in the form below, to speed up the answering process. Required fields are marked *.