
Popular categories
Looking for a yarn?


Comments / Questions (178)
![]() Ellen Van Hoeydonck wrote:
Ellen Van Hoeydonck wrote:
Hey! Ik ben aan de pas gekomen en ben helemaal verloren. (De eerste keer dat ik me aan een trui waag!) Brei ik de pas gewoon verder aan het deel van de kap of zet ik de kap af? Als ik verder aan de kap brei moet ik dan na de ronding nog terug keren met averechts - rechts - averechts? Of begin ik meteen aan de slechte kant? En ik kom maar uit op 280 steken (8 X21). Graag uitleg bij heel het pas gedeelte. Dank je wel! Ellen
20.08.2016 - 22:59DROPS Design answered:
Hoi Ellen. Je kant geen steken af maar breit verder op de pas. Je had eerst de meerdering voor de raglan (+8 st) gemaakt 1 keer in elke nld en daarna meerder je in elke nld op de goede kant (elke 2e nld) 21 keer: in totaal 22 keer 8 st meerderen: 176 + 112 = 288 st.
25.08.2016 - 15:48
![]() Eva wrote:
Eva wrote:
Hallo, ich finde diese Anleitung, ähnlich wie viele vor mir, wirklich toll. Allerdingt würde ich sie gern ohne Kaputze stricken. Haben Sie da vielleicht einen Ansatz für mich? würde mich wirklich sehr darüber freuen. Liebste Grüße!
01.08.2016 - 23:31
![]() Davesne wrote:
Davesne wrote:
Bonjour j'ai finis cette veste que j'ai tricoté avec le fil air il correspond bien à l'échantillon et est superbe mais je remarque que sur la photo les boutons sont disposé à chaque extrémité du point de bambou mais avec ma veste les deux pans du devant ne se croise pas autant, à peine 10cm. Ou est l'erreur ?
13.06.2016 - 18:39DROPS Design answered:
Bonjour Mme Davesne, avez-vous tricoté le bon nombre de mailles au point de bambou de chaque côté, soit 30-48 m (cf taille) + les 8 premières augmentations des devants (cf empiècement). Bon tricot!
14.06.2016 - 08:51
![]() Natalie Liedtke wrote:
Natalie Liedtke wrote:
Alles klar, ich glaube das Problem mit der Kapuze verstanden zu haben. Ich benötige keine Antwort auf meine Frage von gestern.
25.04.2016 - 15:51
![]() Natalie Liedtke wrote:
Natalie Liedtke wrote:
Hallo, ich bin mir nicht so sicher, aber muss ich 2 Kapuzenteile stricken? Ich werde aus der Anleitung nicht so schlau. LG, Natalie
23.04.2016 - 08:11Natalie Liedtke answered:
Alles klar, ich glaube das Problem mit der Kapuze verstanden zu haben. Ich benötige keine Antwort auf meine Frage von gestern.
24.04.2016 - 10:27
![]() Pia wrote:
Pia wrote:
Wanneer ik begin met de ronding van de hals staat er, brei in ribbel tot er 48 over zijn. Nu ben ik klaar na alle keertoeren en kom ik erachter dat ik de eerste 48 wel in patroon bamboe had moeten doen. Jammer, er staat een fout in het patroon dus. Uithalen dus weer. Begint de pas daarna aan de goede kant?
18.04.2016 - 01:52DROPS Design answered:
Hoi Pia. In ons model wordt de verhoging gebreid in ribbelsteken niet in patroon. Het is geen fout.
26.04.2016 - 14:01Milsa wrote:
Buenas: Tengo dudas al comenzar la manga, tengo listo los aumentos y un total de 288 puntos (estoy tejiendo talla S), tejo los primeros 52 puntos con punto bambú, deslizo los siguientes 61 puntos a un gancho auxiliar.... y aquí tengo duda, ¿cómo continúo el hilo de la lana desde el último de los 52 puntos tejido en bambú para montar los siguientes 10 puntos? o ¿dónde debo realmente montar esos 10 puntos? De antemano gracias :)
14.04.2016 - 03:41DROPS Design answered:
Hola Milsa, después de pasar los 61 pts al gancho aux montamos 10 pts seguido de los 52 pts en la ag y continuamos con los pts de la espalda.
17.04.2016 - 10:12
![]() Hanne wrote:
Hanne wrote:
Hoi! Ik wil beginnen aan de capuchon maar snap niet goed hoe ik dit werk moet opzetten. Bij de 116 st die moeten worden opgezet staat dat dit inclusief 2 kantsteken in ribbelsteek is aan beide kanten van het werk. Wil dit dan zeggen dat die 4 steken in totaal op een andere manier worden opgezet dan de andere 112? Alvast bedankt voor het antwoord!
02.04.2016 - 18:56DROPS Design answered:
Hoi Hanne. Nee, je zet gewoon de 116 st op - je hoeft die kantsteken niet op een andere manier op te zetten. Veel breiplezier.
05.04.2016 - 16:51
![]() Laetitia wrote:
Laetitia wrote:
Bonjour, je suis au niveau de l'empiecement et je voulais savoir si pendant les augmentations, on augmente egalement le point fantaisie de chaque côté? Merci
26.03.2016 - 15:59DROPS Design answered:
Bonjour Laetitia, les 8 premières augmentations du raglan sur les devants se font au point de bambou, puis elles se tricotent ensuite toutes en jersey. Bon tricot!
29.03.2016 - 09:22
![]() Janina wrote:
Janina wrote:
Ich verstehe folgende Formulierung nicht: "Die zugenommenen M am Rückenteil und an den Ärmeln glatt re stricken und die ersten 8 zugenommenen M an den Vorderteilen im Bambusmuster stricken (d.h. es müssen 2 M zugenommen worden sein, damit 1 Bambusmusterrapport aufgeht), die restlichen zugenommenen M glatt re stricken". Ich stricke doch die Kapuze und weiss leider nicht wie das mit den Ärmeln gemeint ist. Das ist sehr verwirrend. Viele Grüße Janina
20.03.2016 - 10:33DROPS Design answered:
Liebe Janina, diese Stelle bezieht sich nicht mehr auf die Kapuze sondern ist unter der Überschrift PASSE zu finden und beschreibt auch diesen Teil. Die Maschen der Kapuze werden in Vorderteile, Ärmel und Rückenteil aufgeteilt.
21.03.2016 - 10:56
|
|
Snow Princess#snowprincessjacket |
|
 |
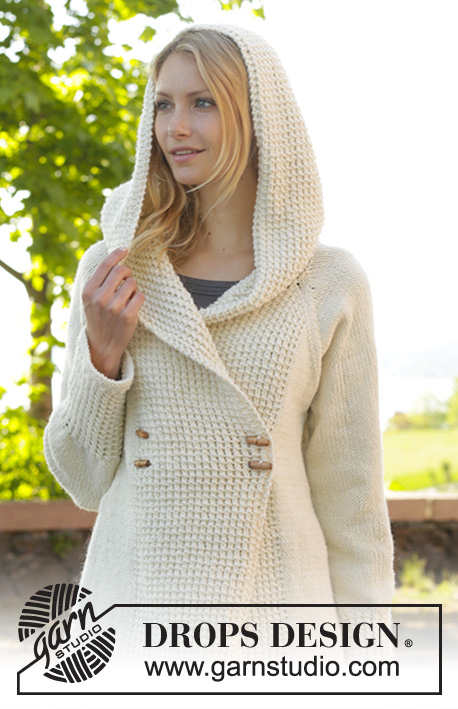 |
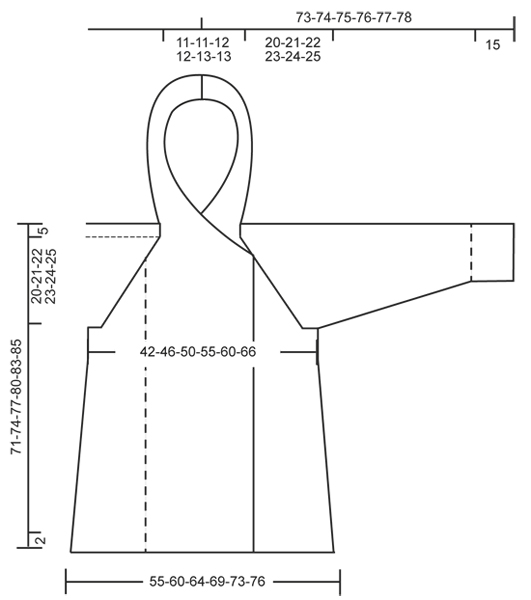
Knitted DROPS jacket with raglan, hood and bamboo pattern, worked top down in ”Nepal”. Size: S - XXXL.
DROPS 156-1 |
|
|
GARTER ST (back and forth on needle): K all rows. 1 ridge = K2 rows. GARTER ST (in the round on double pointed needles): * K 1 round and P 1 round *, repeat from *-*. 1 ridge = 2 rounds. BAMBOO PATTERN (back and forth on needle): Row 1 (= RS): * 1 YO, K 2, pass YO over 2 K sts *, repeat from *-*. Row 2 (= WS): P all sts. Repeat rows 1 and 2. BAMBOO PATTERN (in the round on double pointed needles): Round 1: * 1 YO, K 2, pass YO over 2 K sts *, repeat from *-*. Round 2: K all sts. Repeat rounds 1 and 2. DECREASE TIP: Dec 1 st before marker as follows: Work until 2 sts remain before marker, slip 1 st as if to K, K 1, psso. Dec 1 st after marker as follows: K 2 tog. RAGLAN: Inc as follows at every marker: Work until 1 st remains before marker, 1 YO, K 2, 1 YO = 2 sts inc. Repeat at the remaining markers in piece = 8 sts inc on needle. On next row work YOs twisted (i.e. work in back loop of st instead of front) to avoid holes. ---------------------------------------------------------- JACKET: Worked back and forth, top down on circular needle/double pointed needles. HOOD: Cast on 116 sts in all sizes (includes 2 edge sts in GARTER ST – see explanation above, in each side of piece) on circular needle size 5 mm / US 8 with Nepal. Work 1 ridge in garter st. Then work BAMBOO PATTERN back and forth – see explanation above, with 2 edge sts in garter st in each side (continue the 2 edge sts in garter st in each side until finished measurements). REMEMBER THE GAUGE! When piece measures 38 cm / 15", work as follows from RS: Pattern as before over the first 30-32-36-40-44-48 sts, garter st over the next 56-52-44-36-28-20 sts AT THE SAME TIME dec 12-11-10-6-4-0 sts evenly, pattern over the remaining 30-32-36-40-44-48 sts = 104-105-106-110-112-116 sts. Continue back and forth until 3 ridges have been worked over the middle sts, AT THE SAME TIME on 2nd row from RS inc 4-8-14-19-25-32 sts evenly over sts in garter st, and on 3rd row from RS inc 4-7-13-18-25-31 sts evenly over sts in garter st = 112-120-133-147-162-179 sts. Now work an elevation in back of neck in garter st as follows from RS: Work until 30-32-36-40-44-48 sts remain, turn, work until 30-32-36-40-44-48 sts remain, turn, work until 40-42-46-50-55-58 sts remain, turn, work until 40-42-46-50-55-58 sts remain, turn, work until 50-52-56-60-65-68 sts remain, turn, work until 50-52-56-60-65-68 sts remain, turn, work until 55-57-61-65-70-73 sts remain, turn, work until 55-57-61-65-70-73 sts remain, turn and work the rest of row (pattern over the last 30-32-36-40-44-48 sts). YOKE: Now work pattern as before over the first 30-32-36-40-44-48 sts, 1 st in stockinette st, insert 1st marker here, stockinette st over the next 15 sts, insert 2nd marker here, stockinette st over the next 20-24-29-35-42-51 sts, insert 3rd marker here, stockinette st over the next 15 sts, insert 4th marker here, 1 st in stockinette st, pattern as before over the remaining 30-32-36-40-44-48 sts. Now start inc for RAGLAN – see explanation above! Repeat inc every row 1-1-4-6-8-10 times (i.e. from RS and WS), and every row from RS 21-22-20-19-18-17 times = 288-304-325-347-370-395 sts. NOTE: Work the new inc sts on back piece and sleeves in stockinette st, and work the first 8 new inc sts on front piece in bamboo pattern (i.e. inc 2 sts before there is enough sts to work bamboo pattern), then work the remaining inc sts in stockinette st. Piece now measures 20-21-22-23-24-25 cm / 8"-8¼"-8¾"-9"-9½"-9¾" (measure from 1st row after edge in garter st at the back). Now work next row as follows: Work the first 52-55-60-65-70-75 sts, slip the next 61-63-65-67-69-71 sts on a stitch holder for sleeve, cast on 10 new sts under sleeve (insert a marker in the middle of the new sts), work the next 62-68-75-83-92-103 sts, slip the next 61-63-65-67-69-71 sts on a stitch holder for sleeve, cast on 10 new sts under sleeve (insert a marker in the middle of the new sts), work the remaining 52-55-60-65-70-75 sts. There are now 186-198-215-233-252-273 sts for body. NOW MEASURE PIECE FROM HERE! BODY: Continue back and forth with pattern as before. Work the new sts under sleeve in stockinette st. When piece measures 4 cm / 1½" from marker under sleeves, inc 1 st on each side of each marker as follows: Work until 1 st before first marker, 1 YO, 2 sts in stockinette st, 1 YO, repeat at the other marker = 190-202-219-237-256-277 sts. Repeat inc every 3½-3½-3½-4-4½-6 cm / 1¼"-1¼"-1¼"-1½"-1¾"-2½" 11-12-12-12-11-8 more times = 234-250-267-285-300-309 sts. When piece measures 46-48-50-52-54-55 cm / 18"-19"-19¾"-20½"-21¼"-21½" from marker under sleeves, work 3 ridges. Loosely bind off. SLEEVE: Worked in the round on double pointed needles. Slip sts from stitch holder back on double pointed needles size 5 mm / US 8. Work 1 row from RS and cast on 10 new sts under sleeve (insert a marker in the middle of the new sts) = 71-73-75-77-79-81 sts. NOW MEASURE THE PIECE FROM HERE. When piece measures 4 cm / 1½", beg dec on each side of marker - READ DECREASE TIP. Repeat dec every 2-2-2-1½-1½-1½ cm/ ¾"-¾"-¾"-½"-½"-½" 12-13-13-14-14-15 more times = 45-45-47-47-49-49 sts. When piece measures 32-32-32-32-31-31 cm / 12½"-12½"-12½"-12½"-12¼"-12¼", inc 3 sts evenly in all sizes = 48-48-50-50-52-52 sts. Now work BAMBOO PATTERN in the round on double pointed needles - see explanation above. When piece measures 47-47-47-47-48-48 cm / 18½"-18½"-18½"-18½"-19"-19", dec 4 sts in all sizes = 44-44-46-46-48-48 sts. Work 3 ridges in GARTER ST in the round on double pointed needles - see explanation above. Bind off. ASSEMBLY: Sew the holes under the sleeves. Sew tog hood st by st in cast-on edge. Sew on buttons on section with bamboo pattern on left front piece as follows: Sew 1 button approx. 2 cm / ¾" in from edge and 43-45-47-49-51-53 cm / 17"-17¾"-18½"-19¼"-20"-21" from bind-off edge and 1 button 47-49-51-53-55-57 cm / 18½"-19¼"-20"-21"-21⅝"-22½" from bind-off edge. Repeat in the other side of section with bamboo pattern. Button through a hole in bamboo texture. |
|
 |
|
Have you finished this pattern?Tag your pictures with #dropspattern #snowprincessjacket or submit them to the #dropsfan gallery. Do you need help with this pattern?You'll find 27 tutorial videos, a Comments/Questions area and more by visiting the pattern on garnstudio.com. © 1982-2026 DROPS Design A/S. We reserve all rights. This document, including all its sub-sections, has copyrights. Read more about what you can do with our patterns at the bottom of each pattern on our site. |
|


With over 40 years in knitting and crochet design, DROPS Design offers one of the most extensive collections of free patterns on the internet - translated to 17 languages. As of today we count 325 catalogs and 12298 patterns - 12288 of which are translated into English (US/in).
We work hard to bring you the best knitting and crochet have to offer, inspiration and advice as well as great quality yarns at incredible prices! Would you like to use our patterns for other than personal use? You can read what you are allowed to do in the Copyright text at the bottom of all our patterns. Happy crafting!
Post a comment to pattern DROPS 156-1
We would love to hear what you have to say about this pattern!
If you want to leave a question, please make sure you select the correct category in the form below, to speed up the answering process. Required fields are marked *.