
Popular categories
Looking for a yarn?


Comments / Questions (179)
![]() Christina wrote:
Christina wrote:
Jag har två frågor/anmärkningar: I mönster för framstycke gör man 4 lm innan man gör 4 dst (när man börjar varv med en "halv halvmåne") medan man i bakstyckets mönster gör 4 lm och sen 3 dst. Sen får jag inte riktigt ihop det på bakstycket vad som är rätsida och inte, enl. mönster ska första varvet dst vara rätsidan, men då kommer dst i "halvmånarna" med avigan på rätsidan..? Snälla, rätta mig om jag har fel! :)
12.07.2014 - 00:35
![]() Maria wrote:
Maria wrote:
Hej. Jag har nu virkat vänster framstycket. Har försökt många gånger med höger nu, men får inte ihop det. Jag vill ju ha dubbelstolparna med rätsidan utåt och så lite det inte. Får inte heller ihop rätt antal lm-bågar. Vad gör jag för fel?
08.07.2014 - 17:13
![]() Inge-Lise Jacobsen wrote:
Inge-Lise Jacobsen wrote:
Jeg har købt garn til denne model, men jeg går allerede død i begyndelsen Hækl 54-66-79-92 lm med Cotton Merino på nål 3. Fortsæt med 1 dbl-st i 4.lm fra nålen = 2 dbl-st. hvordan kan 1 dbl-st være 2 dbl skal der stå to stangmasker ?
07.07.2014 - 13:36DROPS Design answered:
Hej Inge-Lise. De 3 lm i begyndelsen af omgangen er lig med 1 dbl-st. Så det giver 2 dbl-st når du har hæklet 1 dbl-st i 4. lm
16.07.2014 - 17:48
![]() Claudia wrote:
Claudia wrote:
Ich habe noch eine Frage: die Vorderteile fangen mit einer Reihe Doppelstäbchen an, aber das Rückenteil mit zwei. Ist das richtig? Wegen dem Anpassen an das Muster vom Vorderteil.
06.07.2014 - 18:20DROPS Design answered:
Liebe Claudia, die Vorderteile haben auch 2 R Doppel-Stb - die 1. R ist in der Anleitung beschrieben, die 2. R arbeiten Sie dann ja als 1. R der Diagramme A.6-A.4. Beim Rückenteil ist die 2. Doppel-Stb-R die, die Sie auch im Diagramm sehen, Sie müssen also beim Rückenteil nach den beiden D-Stb-R direkt mit der Lm-Bögen-R weiterarbeiten.
21.07.2014 - 11:02
![]() Claudia wrote:
Claudia wrote:
Das rechte Vorderteil gegengleich häkeln, heißt das, dann mit A4 beginnen oder wie ist das gemeint? Gruß Claudia
05.07.2014 - 17:36DROPS Design answered:
Liebe Claudia, entschuldigen Sie bitte die späte Rückmeldung. Ja genau, Sie beginnen dann in der Rück-R mit A.4.
21.07.2014 - 10:51
![]() Ulrike Boss wrote:
Ulrike Boss wrote:
Hallo, habe Probleme mit der Anleitung, 1.Runde. zw.*1 LM überspringen,je 1 DST in die nächsten 6 LM* soweit klar, insgesamt 7xarbeiten. Nur wie soll A5 gearbeitet werden? Lt. Zeichnung funktioniert das bei mir überhaupt nicht. Können sie mir das nochmals erklären?
04.07.2014 - 16:28
![]() Astrid wrote:
Astrid wrote:
Bedankt voor de snelle reactie! Het ziet er nu een stuk beter uit, en meer als op de foto :)
19.06.2014 - 22:58
![]() Astrid wrote:
Astrid wrote:
Goedenavond. In de toeren met dstk moeten er steeds 7 dstk op een lus van 5 lossen worden gehaakt. Betekent dit dat er in sommige lossen 2 dstk moeten worden gehaakt? Of dat de overige 2 op de vaste voor en achter de lus komen? Dan kom ik namelijk ook uit, maar begin me af te vragen of het wel goed is... Ik hoop dat jullie me kunnen helpen! Alvast bedankt!
17.06.2014 - 22:44DROPS Design answered:
Hoi Astrid. Je moet alleen in/om de lossen haken. Je kan 2 dstk in 1 losse haken, of je kan gewoon de dstk OM de l-boog haken - wat jezelf het mooiste en prettigste vindt. Veel haakplezier verder.
19.06.2014 - 13:36
![]() Jaussent wrote:
Jaussent wrote:
En faisant le montage du devant gauche, et en continuant en point fantaisie, le tricot ondule au départ et ne reste pas plat. Est ce que c'est normal ? Pourriez-vous me renseigner ? Avec mes remerciements. Bien cordialement. Danielle
14.06.2014 - 07:46DROPS Design answered:
Bonjour Danielle, vérifiez bien votre échantillon si vous avez le bon nombre de motifs pour 10 cm, mais en même temps vous pourrez aussi vérifier que votre ouvrage ne gondole pas avec le point fantaisie A.5/A.6. Bon crochet!
14.06.2014 - 09:25Marit wrote:
Veldig fin heklet jakke, men jeg ga opp da höyre forstykke skulle hekles - speilvendt av det venstre. Hadde värt lettere aa forstaa om man hadde spandert aa illustrere mönsteret for begge forstykkene - slik det er gjort i deres hekleoppskrift nr. 153-14.
09.06.2014 - 22:34
|
||||||||||||||||||||||||||||
Summer Blush#summerblushcardigan |
||||||||||||||||||||||||||||
|
|
||||||||||||||||||||||||||||
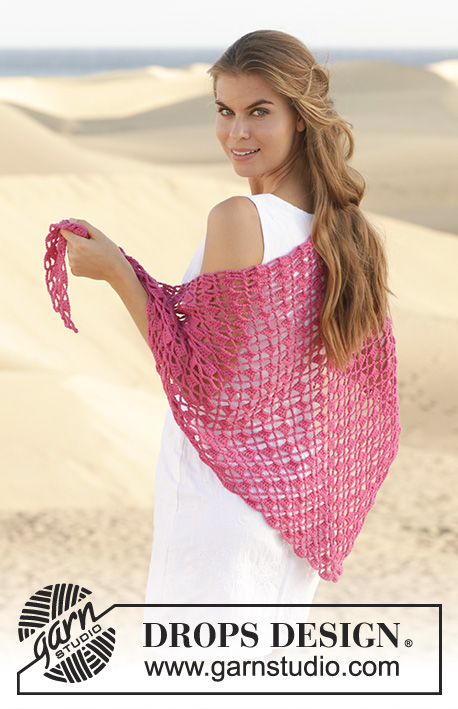
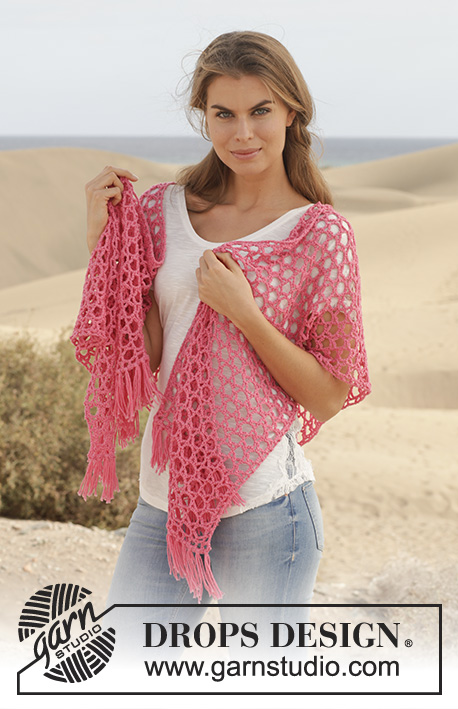
Crochet DROPS jacket with lace pattern in ”Cotton Merino”. Size S-XXXL.
DROPS 154-1 |
||||||||||||||||||||||||||||
|
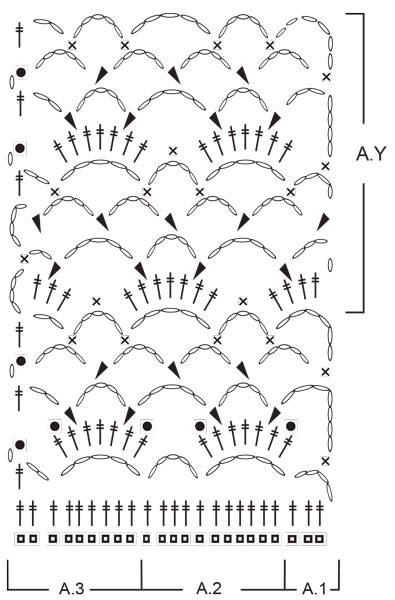
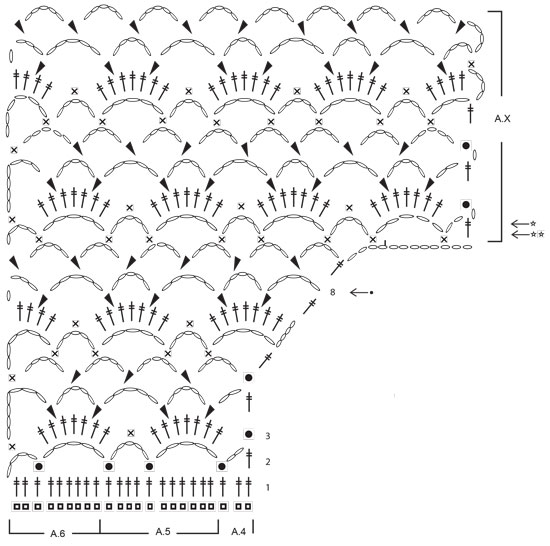
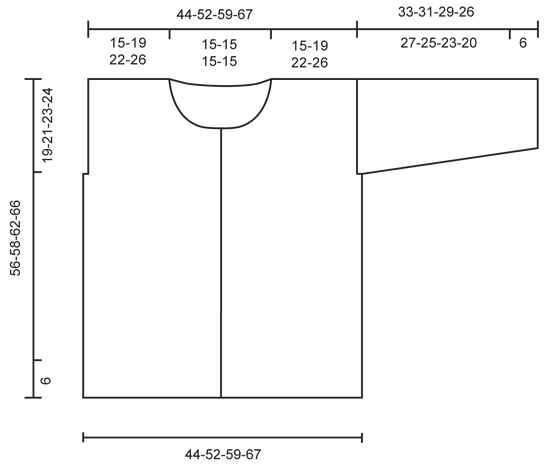
PATTERN: See diagrams A.1-A.8. CROCHET TIP: Ch-spaces will contract more than crochet pattern at the upper part of body. The jacket will thus be naturally rounded without dec in pattern. BUTTONHOLES: Measure from neck edge at the front and sew buttons on left band: SIZE S/M: 1, 7, 14, 21, 28, 35 and 41 cm / ⅜",2¾",5½",8¼",11",13¾",16⅛" SIZE L: 1, 7, 15, 22, 29, 36 and 43 cm / ⅜",2¾",6",8¾",11⅜",14¼",17" SIZE XL/XXL: 1, 8, 15, 21, 27, 33, 40 and 47 cm / ⅜",3⅛",6",8¼",10⅝",13",15¾",18½" SIZE XXXL: 1, 8, 15, 22, 29, 36, 43 and 50 cm / ⅜",3⅛",6",8¾",11⅜",14¼",17",19¾" --------------------------------------------------------- JACKET: Worked in parts, top down and worked tog when finished. LEFT FRONT PIECE: Work 54-66-79-92 ch with Cotton Merino on hook size 3 mm / C. Continue with 1 tr in 4th ch from hook = 2 tr. Continue to work as follows: 1 tr in each of the next 1-6-5-4 ch, * skip ch 1, 1 tr in each of the next 6 ch *, repeat from *-* 7-8-10-12 times in total = 45-56-67-78 tr. (= 1ST ROW in diagrams A.4, A.5 and A.6). Continue to work as follows: ROW 2 (= WS): Work A.6, then work A.5 3-4-5-6 times in total, and finish with A.4. Turn piece. ROW 3: Work A.6, then work A.5 3-4-5-6 times in total, and finish with A.4. Continue back and forth with this pattern, AT THE SAME TIME inc for neck in right side of piece (seen from RS) from 6th row in diagram. When 8th row in diagram has been worked from WS, cut the yarn. Then work 12 loose ch, before working as follows from RS (= 9th row): 1 tr in last tr on 8TH ROW. Continue with pattern according to diagram A.4, A.5 and A.6 as before. When piece measures 19-21-23-24 cm / 7½"-8¼"-9"-9½", insert a marker for armhole in the side, AT THE SAME TIME when A.4, A.5 and A.6 have been worked 1 time vertically, repeat A.x until piece measures approx. 27-29-31-33 cm / 10½"-11½"-12¼"-13". Adjust so that pattern is finished on a row with ch-spaces from WS. Then work ch-spaces with 5 ch in every space as follows from RS: Continue with 1ST ROW in A.Z. Repeat the 4 rows in A.Z until piece measures 51-55-57-61 cm / 10½"-11½"-12¼"-13" in total – Read CROCHET TIP! Work an edge as follows, beg from WS: Beg on 1st row in A.X. Work A.6, A.5 3-4-5-6 times in width, A.4. Continue back and forth until 2nd row in A.X with tr-groups has been worked (i.e. until 6th row in A.X has been worked). Piece measures approx. 56-58-62-66 cm / 22"-22¾"-24½"-26". Fasten off. Put piece aside and work right front piece. RIGHT FRONT PIECE: Beg and work as left front piece but reversed. Adjust according to left front piece. BACK PIECE: First work right shoulder as follows: Work 52-64-77-90 ch with Cotton Merino on hook size 3 mm / C. Cut the yarn and put piece aside. Then work left shoulder as follows: Work 54-66-79-92 ch with Cotton Merino on hook size 3 mm / C. Continue with 1 tr in 4th ch from hook = 2 tr. Continue to work as follows: 1 tr in each of the next 1-6-5-4 ch, * skip ch 1, 1 tr in each of the next 6 ch *, repeat from *-* 7-8-10-12 times in total = 45-56-67-78 tr for left shoulder. Then work 43 LOOSE ch before continuing over right shoulder (i.e. the ch-row): Continue with 1 tr in the first 2 ch on row = 2 tr. Continue to work as follows: 1 tr in each of the next 1-6-5-4 ch, * skip ch 1, 1 tr in each of the next 6 ch *, repeat from *-* 7-8-10-12 times in total = 45-56-67-78 tr for right shoulder. Turn piece (= WS), and work 1 tr in each of the 45-56-67-78 next tr, then work 1 tr in each of the next 43 ch, and finish with 1 tr in each of the next 45-56-67-78 tr = 133-155-177-199 tr. NOTE! This row is the 1st row in diagram A.1, A.2 and A.3. On next row work as follows (= RS): A.1, then work A.2 11-13-15-17 times in total, and finish with A.3. Continue as follows. When piece measures 19-21-23-24 cm / 7½"-8¼"-9"-9½", insert a marker each side to mark armholes, AT THE SAME TIME when A.1, A.2 and A.3 have been worked 1 time vertically, repeat A.Y until piece measures approx. 27-29-31-33 cm / 10½"-11½"-12¼"-13". Adjust pattern according to front pieces. Then work ch-spaces with 5 ch in every space as follows from RS: Continue with 1ST ROW in A.Z. Repeat the 4 rows in A.Z until piece measures 51-55-57-61 cm / 10½"-11½"-12¼"-13" in total – adjust according to front pieces. Work an edge at the bottom of body as on front pieces. Fasten off. Put piece aside. Piece measures approx. 56-58-62-66 cm / 22"-22¾"-24½"-26". Sew shoulder seams on front pieces and back piece tog. SLEEVE: Worked back and forth from body and outwards. ROW 1: Beg at one of the markers, and work ch-spaces along armhole as follows: * ch 5, skip approx. 1½ cm / ½", 1 sc *, repeat from *-* until there are 22-26-27-28 ch-spaces in total between the two markers. Continue with pattern from 2nd row in diagram A.Z, AT THE SAME TIME at beg of the next 2 rows dec 1 ch-space in the side – See diagram A.7 for left side of sleeve, and A.8 for right side of sleeve. 20-24-25-26 ch-spaces remain. Repeat the same dec at beg of the next 2-4-4-4 rows = 18-20-21-22 ch-spaces remain. Continue with ch-spaces as before, AT THE SAME TIME dec as follows: for S/M dec 1 ch-space in each side of sleeve when piece measures 15 cm / 6", and for sizes L - XL/XXL – XXXL dec 1 ch-space in each side of sleeve when piece measures 13-12-11 cm / 5"-4¾"-4½" and 1 ch-space in each side when piece measures 19-18-15 cm / 7½"-7"-6" = 16-16-17-18 ch-spaces remain. Continue until sleeve measures 27-25-23-20 cm / 10½"-9¾"-9"-8" (shorter measurements in the larger sizes because of wider shoulders), and adjust to finish on next to last row in A.Z (i.e. a row with whole ch-spaces in each side of piece). Then work an edge as follows: Beg on 1st row in A.X (= row with ch-spaces, and half ch-spaces in each side of piece) and work this pattern over all ch-spaces at the bottom of sleeve. Continue back and forth until 6th row in A.X has been worked (i.e. 2nd row in with tr-groups). Fasten off. ASSEMBLY: Work underarm seams and side seams in one as follows: 1 sc in front piece, ch 3, 1 sc in back piece, * ch 3, skip approx. 1 cm / ⅜", 1 sc in front piece, ch 3, skip 1 cm / ⅜", 1 sc in back piece *, repeat from *-* and continue the same way for sleeve. NECK EDGE AND BAND: Then work an edge along the band and neck. Beg at the bottom on right front piece, and work as follows: Fasten yarn with one sc, * ch 3, skip 1 cm / ⅜", 1 sc *, repeat from *-* along right band, neck and left band. Sew buttons on to the left band - see explanation above. Button through a hole in right front piece. |
||||||||||||||||||||||||||||
Diagram explanations |
||||||||||||||||||||||||||||
|
||||||||||||||||||||||||||||
 |
||||||||||||||||||||||||||||
 |
||||||||||||||||||||||||||||
 |
||||||||||||||||||||||||||||
 |
||||||||||||||||||||||||||||
Have you finished this pattern?Tag your pictures with #dropspattern #summerblushcardigan or submit them to the #dropsfan gallery. Do you need help with this pattern?You'll find 3 tutorial videos, a Comments/Questions area and more by visiting the pattern on garnstudio.com. © 1982-2026 DROPS Design A/S. We reserve all rights. This document, including all its sub-sections, has copyrights. Read more about what you can do with our patterns at the bottom of each pattern on our site. |
||||||||||||||||||||||||||||


With over 40 years in knitting and crochet design, DROPS Design offers one of the most extensive collections of free patterns on the internet - translated to 17 languages. As of today we count 324 catalogs and 12290 patterns - 12280 of which are translated into English (US/in).
We work hard to bring you the best knitting and crochet have to offer, inspiration and advice as well as great quality yarns at incredible prices! Would you like to use our patterns for other than personal use? You can read what you are allowed to do in the Copyright text at the bottom of all our patterns. Happy crafting!
Post a comment to pattern DROPS 154-1
We would love to hear what you have to say about this pattern!
If you want to leave a question, please make sure you select the correct category in the form below, to speed up the answering process. Required fields are marked *.