
Popular categories
Looking for a yarn?


Comments / Questions (179)
![]() Fifi wrote:
Fifi wrote:
Svp..alors les premiers rangs du diagramme A4 A5 A6 du devant gauche c'est l'épaule avec la moitier de l'avant bras c'est bien ça ? Merci
26.02.2015 - 12:56DROPS Design answered:
Bonjour Fifi, les diagrammes A.4, A.5 et A.6 commencent en bas (= milieu en haut de l'épaule) et les 12 ml montées à droite correspondent à l'encolure. Bon crochet!
26.02.2015 - 14:53
![]() Fifi wrote:
Fifi wrote:
Bonjour, s' il vous plaît dans le devant gauche apres avoir fait la chaînette de 12mailles on continue avec le A4 A5 A6 dès le debut et sans depasser la flèche avec une seule étoile ou bien on continuant avec Ax? Merci
26.02.2015 - 10:51DROPS Design answered:
Bonjour Fifi, après la chaînette de 12 ml, crochetez A.4, A.5 et A.6 comme avant (comme dans le diagramme) et répétez ensuite A.X (pensez bien au marqueur à 1-24 cm - cf taille) jusqu'à 27-31 cm en ajustant après un rang d'arceaux sur l'envers. Bon crochet!
26.02.2015 - 11:21Sarah Wael wrote:
Continue back and forth with this pattern, AT THE SAME TIME inc for neck in right side of piece (seen from RS) from 6th row in diagram can you please explain this for me ?? and how to do the inc
02.02.2015 - 04:27DROPS Design answered:
Dear Mrs Wael, diagram A.4 shows how to inc in the side of piece, just follow diagram to inc for neckline. Happy crocheting!
02.02.2015 - 13:20
![]() Lone wrote:
Lone wrote:
Jeg er i tvivl om forstykkerne og rygstykket skal starte med stangmasker eller dobbeltstangmasker i første række. Diagrammet siger dobbeltstangmaske, men i teksten i kataloget står der blot stangmaske.
30.12.2014 - 12:07DROPS Design answered:
Hej Lone. Du skal haekle dobbeltstangmaske. Mönstret i kataloget er forkert. Hvis du vil vaere helt sikker, saa gaa ud fra mönstret her online, det bliver altid opdateret ved fejl og eventuelle rettelser tilföjet under RETTELSER.
15.01.2015 - 16:32Kimberly Ellefson wrote:
Just want to say I am excited to start this project.
17.12.2014 - 19:48Ale wrote:
Trate de todas las maneras de seguir el diagrama en la linea 2 como se indica, pero se iba a haciendo mas chico... termine dejando solo 3 p.a.d en cada espacio y tejiendo 5 cadenetas. Ahora en la línea 3 tengo 5 grupos de 7 p.a.d, es correcto???
06.12.2014 - 21:12DROPS Design answered:
Hola Ale! Es dificil contestar a la pregunta sin saber la talla que estás tejiendo. El nº de grupos depende de la talla y efectivamente dentro de cada grupo hay 7 p.a.d.
13.12.2014 - 10:27
![]() Almudena wrote:
Almudena wrote:
Empece la labor con talla L Hice los primeros p.a.d pero la tercer vuelta no se como se sigue, no lo entiendo No se leer patrones, y con las explicaciones escritas me guio muy bien, pero no se si hay que seguir con p.a.d, cadenetas..... Un saludo
25.11.2014 - 11:26DROPS Design answered:
Hola Almudena! Debido al espacio limitado de la web no podemos escribir el patrón línea a línea. La 3ª fila efectivamente es de p.a.d. Los símbolos están en la parte de arriba del diagrama explicados. Si tienes dudas también puedes acercarte con la labor a tu tienda DROPS más cercana.
30.11.2014 - 19:51Anne-Kristin Hamm wrote:
Jakke m pt design bomullsgarn
16.09.2014 - 23:38Marisol Cancino wrote:
¿cómo se hace el MP Marca puntos' de la sisa.
27.08.2014 - 23:52DROPS Design answered:
Hola Marisol, el MP o marcapuntos no es una técnica ni un punto, es una pieza generalmente de plástico a modo de imperdible o arito que enganchamos en un pt concreto para tener una referencia para trabajar, ya sea para tomar las medidas desde ese punto, para hacer aumentos o disminuciones antes o después de ese punto etc...
30.08.2014 - 20:11
![]() Tone wrote:
Tone wrote:
Hei! Jeg har heklet ferdig venstre, og skal til å begynne med høyre forstykke, og har som flere her sier et lite problem med å speilvende mønsteret. Har dere mønster for høyre forstykke også, eller eventuelt noen tips om hvordan det skal speilvendes?
19.08.2014 - 23:29DROPS Design answered:
Hei Tone. Paa venstre forstykke har du taget ud til forkanten i venstre side. Paa höjre gör du det i höjre side. Det vil sige du skal spejlvende mönstret, saa venstre side bliver höjre og höjre side venstre. Det kan evt hjaelpe at du tager diagrammet her og spejlvender det paa din pc og printer. Haaber min forklaring hjaelper dig.
21.08.2014 - 16:14
|
||||||||||||||||||||||||||||
Summer Blush#summerblushcardigan |
||||||||||||||||||||||||||||
|
|
||||||||||||||||||||||||||||
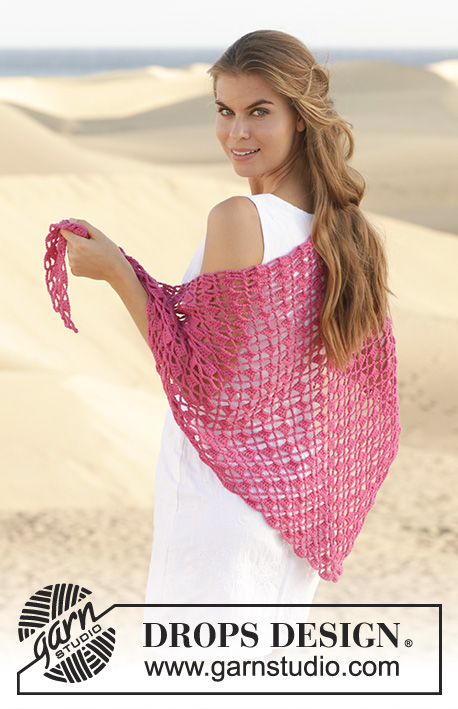
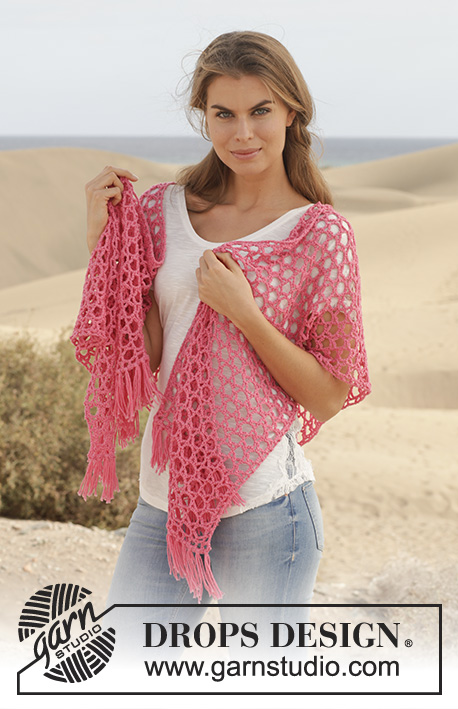
Crochet DROPS jacket with lace pattern in ”Cotton Merino”. Size S-XXXL.
DROPS 154-1 |
||||||||||||||||||||||||||||
|
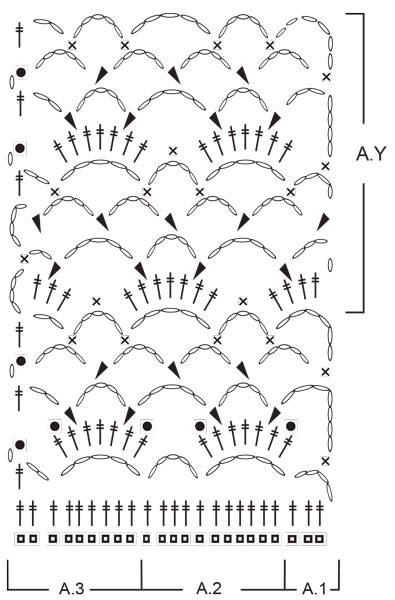
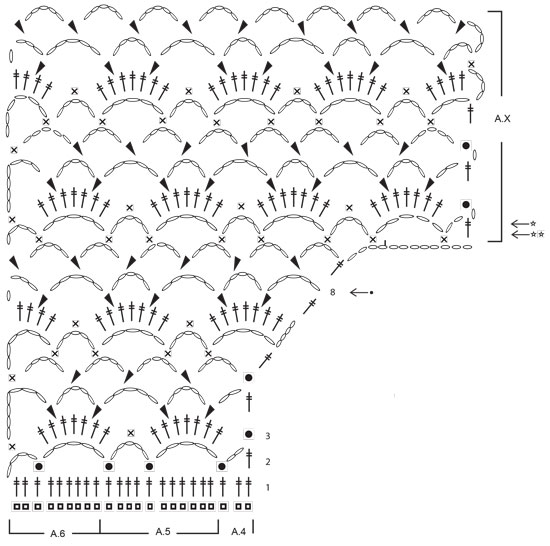
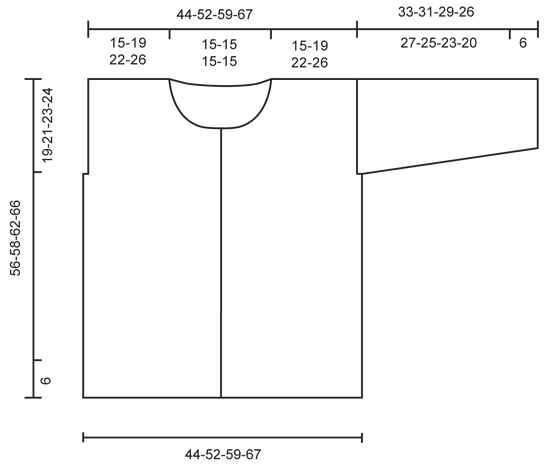
PATTERN: See diagrams A.1-A.8. CROCHET TIP: Ch-spaces will contract more than crochet pattern at the upper part of body. The jacket will thus be naturally rounded without dec in pattern. BUTTONHOLES: Measure from neck edge at the front and sew buttons on left band: SIZE S/M: 1, 7, 14, 21, 28, 35 and 41 cm / ⅜",2¾",5½",8¼",11",13¾",16⅛" SIZE L: 1, 7, 15, 22, 29, 36 and 43 cm / ⅜",2¾",6",8¾",11⅜",14¼",17" SIZE XL/XXL: 1, 8, 15, 21, 27, 33, 40 and 47 cm / ⅜",3⅛",6",8¼",10⅝",13",15¾",18½" SIZE XXXL: 1, 8, 15, 22, 29, 36, 43 and 50 cm / ⅜",3⅛",6",8¾",11⅜",14¼",17",19¾" --------------------------------------------------------- JACKET: Worked in parts, top down and worked tog when finished. LEFT FRONT PIECE: Work 54-66-79-92 ch with Cotton Merino on hook size 3 mm / C. Continue with 1 tr in 4th ch from hook = 2 tr. Continue to work as follows: 1 tr in each of the next 1-6-5-4 ch, * skip ch 1, 1 tr in each of the next 6 ch *, repeat from *-* 7-8-10-12 times in total = 45-56-67-78 tr. (= 1ST ROW in diagrams A.4, A.5 and A.6). Continue to work as follows: ROW 2 (= WS): Work A.6, then work A.5 3-4-5-6 times in total, and finish with A.4. Turn piece. ROW 3: Work A.6, then work A.5 3-4-5-6 times in total, and finish with A.4. Continue back and forth with this pattern, AT THE SAME TIME inc for neck in right side of piece (seen from RS) from 6th row in diagram. When 8th row in diagram has been worked from WS, cut the yarn. Then work 12 loose ch, before working as follows from RS (= 9th row): 1 tr in last tr on 8TH ROW. Continue with pattern according to diagram A.4, A.5 and A.6 as before. When piece measures 19-21-23-24 cm / 7½"-8¼"-9"-9½", insert a marker for armhole in the side, AT THE SAME TIME when A.4, A.5 and A.6 have been worked 1 time vertically, repeat A.x until piece measures approx. 27-29-31-33 cm / 10½"-11½"-12¼"-13". Adjust so that pattern is finished on a row with ch-spaces from WS. Then work ch-spaces with 5 ch in every space as follows from RS: Continue with 1ST ROW in A.Z. Repeat the 4 rows in A.Z until piece measures 51-55-57-61 cm / 10½"-11½"-12¼"-13" in total – Read CROCHET TIP! Work an edge as follows, beg from WS: Beg on 1st row in A.X. Work A.6, A.5 3-4-5-6 times in width, A.4. Continue back and forth until 2nd row in A.X with tr-groups has been worked (i.e. until 6th row in A.X has been worked). Piece measures approx. 56-58-62-66 cm / 22"-22¾"-24½"-26". Fasten off. Put piece aside and work right front piece. RIGHT FRONT PIECE: Beg and work as left front piece but reversed. Adjust according to left front piece. BACK PIECE: First work right shoulder as follows: Work 52-64-77-90 ch with Cotton Merino on hook size 3 mm / C. Cut the yarn and put piece aside. Then work left shoulder as follows: Work 54-66-79-92 ch with Cotton Merino on hook size 3 mm / C. Continue with 1 tr in 4th ch from hook = 2 tr. Continue to work as follows: 1 tr in each of the next 1-6-5-4 ch, * skip ch 1, 1 tr in each of the next 6 ch *, repeat from *-* 7-8-10-12 times in total = 45-56-67-78 tr for left shoulder. Then work 43 LOOSE ch before continuing over right shoulder (i.e. the ch-row): Continue with 1 tr in the first 2 ch on row = 2 tr. Continue to work as follows: 1 tr in each of the next 1-6-5-4 ch, * skip ch 1, 1 tr in each of the next 6 ch *, repeat from *-* 7-8-10-12 times in total = 45-56-67-78 tr for right shoulder. Turn piece (= WS), and work 1 tr in each of the 45-56-67-78 next tr, then work 1 tr in each of the next 43 ch, and finish with 1 tr in each of the next 45-56-67-78 tr = 133-155-177-199 tr. NOTE! This row is the 1st row in diagram A.1, A.2 and A.3. On next row work as follows (= RS): A.1, then work A.2 11-13-15-17 times in total, and finish with A.3. Continue as follows. When piece measures 19-21-23-24 cm / 7½"-8¼"-9"-9½", insert a marker each side to mark armholes, AT THE SAME TIME when A.1, A.2 and A.3 have been worked 1 time vertically, repeat A.Y until piece measures approx. 27-29-31-33 cm / 10½"-11½"-12¼"-13". Adjust pattern according to front pieces. Then work ch-spaces with 5 ch in every space as follows from RS: Continue with 1ST ROW in A.Z. Repeat the 4 rows in A.Z until piece measures 51-55-57-61 cm / 10½"-11½"-12¼"-13" in total – adjust according to front pieces. Work an edge at the bottom of body as on front pieces. Fasten off. Put piece aside. Piece measures approx. 56-58-62-66 cm / 22"-22¾"-24½"-26". Sew shoulder seams on front pieces and back piece tog. SLEEVE: Worked back and forth from body and outwards. ROW 1: Beg at one of the markers, and work ch-spaces along armhole as follows: * ch 5, skip approx. 1½ cm / ½", 1 sc *, repeat from *-* until there are 22-26-27-28 ch-spaces in total between the two markers. Continue with pattern from 2nd row in diagram A.Z, AT THE SAME TIME at beg of the next 2 rows dec 1 ch-space in the side – See diagram A.7 for left side of sleeve, and A.8 for right side of sleeve. 20-24-25-26 ch-spaces remain. Repeat the same dec at beg of the next 2-4-4-4 rows = 18-20-21-22 ch-spaces remain. Continue with ch-spaces as before, AT THE SAME TIME dec as follows: for S/M dec 1 ch-space in each side of sleeve when piece measures 15 cm / 6", and for sizes L - XL/XXL – XXXL dec 1 ch-space in each side of sleeve when piece measures 13-12-11 cm / 5"-4¾"-4½" and 1 ch-space in each side when piece measures 19-18-15 cm / 7½"-7"-6" = 16-16-17-18 ch-spaces remain. Continue until sleeve measures 27-25-23-20 cm / 10½"-9¾"-9"-8" (shorter measurements in the larger sizes because of wider shoulders), and adjust to finish on next to last row in A.Z (i.e. a row with whole ch-spaces in each side of piece). Then work an edge as follows: Beg on 1st row in A.X (= row with ch-spaces, and half ch-spaces in each side of piece) and work this pattern over all ch-spaces at the bottom of sleeve. Continue back and forth until 6th row in A.X has been worked (i.e. 2nd row in with tr-groups). Fasten off. ASSEMBLY: Work underarm seams and side seams in one as follows: 1 sc in front piece, ch 3, 1 sc in back piece, * ch 3, skip approx. 1 cm / ⅜", 1 sc in front piece, ch 3, skip 1 cm / ⅜", 1 sc in back piece *, repeat from *-* and continue the same way for sleeve. NECK EDGE AND BAND: Then work an edge along the band and neck. Beg at the bottom on right front piece, and work as follows: Fasten yarn with one sc, * ch 3, skip 1 cm / ⅜", 1 sc *, repeat from *-* along right band, neck and left band. Sew buttons on to the left band - see explanation above. Button through a hole in right front piece. |
||||||||||||||||||||||||||||
Diagram explanations |
||||||||||||||||||||||||||||
|
||||||||||||||||||||||||||||
 |
||||||||||||||||||||||||||||
 |
||||||||||||||||||||||||||||
 |
||||||||||||||||||||||||||||
 |
||||||||||||||||||||||||||||
Have you finished this pattern?Tag your pictures with #dropspattern #summerblushcardigan or submit them to the #dropsfan gallery. Do you need help with this pattern?You'll find 3 tutorial videos, a Comments/Questions area and more by visiting the pattern on garnstudio.com. © 1982-2026 DROPS Design A/S. We reserve all rights. This document, including all its sub-sections, has copyrights. Read more about what you can do with our patterns at the bottom of each pattern on our site. |
||||||||||||||||||||||||||||


With over 40 years in knitting and crochet design, DROPS Design offers one of the most extensive collections of free patterns on the internet - translated to 17 languages. As of today we count 324 catalogs and 12290 patterns - 12280 of which are translated into English (US/in).
We work hard to bring you the best knitting and crochet have to offer, inspiration and advice as well as great quality yarns at incredible prices! Would you like to use our patterns for other than personal use? You can read what you are allowed to do in the Copyright text at the bottom of all our patterns. Happy crafting!
Post a comment to pattern DROPS 154-1
We would love to hear what you have to say about this pattern!
If you want to leave a question, please make sure you select the correct category in the form below, to speed up the answering process. Required fields are marked *.