
Popular categories
Looking for a yarn?


Comments / Questions (179)
![]() Josephina Cretier wrote:
Josephina Cretier wrote:
Dank je Linda, Ik ben eigenlijk nederlands. Had verkeerd aangevinkt. Ik wacht ook op een antwoord. Maar er kan natuurlijk even wat tussen zijn gekomen. Laten we maar even afwachten.
11.06.2015 - 22:19
![]() Linda wrote:
Linda wrote:
Goedemiddag, Ik vind het zeer jammer dat zowel ik als Josephina (die ook in het Nederlands schreef) Geen antwoord krijgen. Dan heeft de categorie "Opmerkingen en vragen" eigenlijk voor ons geen zin. Dit wilde ik gewoon even kwijt, omdat ik een paar keer per dag kijk of er al antwoord is en dit dus voor ons geen nut heeft.
11.06.2015 - 15:14
![]() Camilla wrote:
Camilla wrote:
Avrei bisogno di alcune spiegazioni. Dopo aver lavorato la riga 9, si continua con il diagramma A.X (righe 10-17)? Nella riga 18, costituita da archi di 5 cat. intervallate da m.b. , da quante cat. è costituito l'ultimo arco? Qual è l'ultimo punto per chiudere la riga 18? Di conseguenza, come si comincia la riga 19? Il diagramma A.X si ripeterà fino alla misura desiderata e terminerà come la riga 16 (rov. del lavoro)? Ringrazio infinitamente.
08.06.2015 - 20:51DROPS Design answered:
Buonasera Camilla, dopo la riga 9 deve continuare a lavorare il diagramma A.X, la riga 18 ha 5 cat in ogni arco. Deve continuare a lavorare A.X fino alla misura indicata assicurandosi che il motivo finisca con una riga di archi di cat, sul rovescio del lavoro. Buon lavoro!
08.06.2015 - 21:57
![]() Linda wrote:
Linda wrote:
Ook ik ben met dit vestje bezig en had geen idee hoe ik moest eindigen in toer 18. Heb het zelf maar een beetje uitgezocht, maar is niet duidelijk in het patroon. Vanaf welke toer moet je nou steeds herhalen als je 17 toeren hebt gehaakt? bvd en groet, Linda
06.06.2015 - 11:02DROPS Design answered:
Hoi Linda. Er staat letterlijk in het patroon: "herhaal TEGELIJKERTIJD als A.4, A.5 en A.6 een keer in de hoogte zijn gehaakt A.X tot het werk ongeveer 27-29-31-33 cm meet." Dus je herhaalt na 17e toer steeds A.X (gemarkeerd aan de rechterkant) tot de beschreven hoogte. Ga daarna door zoals beschreven.
12.06.2015 - 12:40Olga wrote:
Hello. I have a problem making the mirrored right side of the jacket. Could you please explain to me how to make the 9th row (that starts with 12 loose ch). For left side it is the beginning of row, but for right side it is the ending, otherwise the sides have differente WS and RS and the pattern doesn't match. Thank you in advance.
25.05.2015 - 21:50DROPS Design answered:
Dear Olga, to help you to follow diagram mirrored, you can print it mirrored with your computer, so that you will start with A.6, then A.5 and A.4 from RS. Happy crocheting!
26.05.2015 - 10:52
![]() Marge Dondero wrote:
Marge Dondero wrote:
Hello. I am unsure of making the back section. Why do I do separate left, right and middle sections? Why not just make 133 chs with triple crochets? How do I join the 52 ch right shoulder piece to the 43 loose chs??? (from 1st & 2nd paragraph on page 3) Thank you.
20.05.2015 - 05:02DROPS Design answered:
Dear Mrs Dondero, working as in pattern will shape a neckline on back piece. First crochet the ch for right shoulder and keep aside. Crochet then left shoulder: fundation ch and first row, work then a ch for neckline on back piece and crochet the first row in the ch on right shoulder. Happy crocheting!
20.05.2015 - 10:08
![]() Sjoeke wrote:
Sjoeke wrote:
Bedankt. Dan doe ik het goed.
12.05.2015 - 20:22
![]() Sjoeke wrote:
Sjoeke wrote:
Dat klopt, zo heb ik het ook gedaan. Maar er staat in het patroon dat de laatste stokjes-toer de eerste toer in telpatroon A1, A2 en A3 is. Zoals ik het lees moet ik dan met de toer met lossen beginnen op de goede kant en komen de boogjes met stokjes toch op de verkeerde kant. Of moet ik wel met de 1e toer van patroon A1, A2, A3 beginnen door eerst nog een toer met stokjes te haken. Dan komen er 3 toer stokjes op de schouders.
09.05.2015 - 16:07DROPS Design answered:
Hoi Sjoeke. De laatste toer stk in het patroon is de eerste 1e toer in het telpatroon: LET OP! Deze toer is de 1e toer in telpatroon A.1, A.2 en A.3.. Daarna begin je met toer 2 van de telpatronen op de goede kant.
11.05.2015 - 16:08
![]() Sjoeke wrote:
Sjoeke wrote:
Ik ben met het achterpand begonnen en als ik het goed lees begin ik met de 2e toer (na de 2 stokjes toeren) op de goede kant met de boogjes. Maar dan komt de toer met stokjes aan de verkeerde kant van het werk. Lees ik dit goed, of doe ik iets fout?
08.05.2015 - 10:24DROPS Design answered:
Hoi Sjoeke. De eerste toer met lossen voor elke schouder telt als verkeerde kant. Vervolgens haak je stk voor de linkerschouder, lossen voor de hals en stk voor rechterschouder = goede kant. Tweede toer stokjes is verkeerde kant zoals ook vermeld in het patroon. Daarna begin je met patronen A.1/2 en 3 op de goede kant.
08.05.2015 - 18:19
![]() Julia wrote:
Julia wrote:
Hallo Drops Team! Ich habe gerade angefangen und bin unsicher, ob ich das Diagramm richtig interpretiere. Zu Reihe 3 habe ich folgende Frage: 7 Doppelstäbe scheinen sich auf 5 Luftmaschen zu verteilen - häkel ich drei Stäbe in dieselbe Masche in der Mitte? Und werden die Loops in der Reihe danach IN eine Masche oder UM den Luftmaschenbogen herum gehäkelt?
17.03.2015 - 18:43DROPS Design answered:
Die 7 D-Stb häkeln Sie alle UM den Lm-Bogen aus 5 Lm, dann haben Sie das Problem nicht, wie Sie die 7 Stb auf 5 M verteilen müssen und die Abstände bleiben gleichmäßig. Die Loops in der R direkt darüber werden zwischen 2 D-Stb gehäkelt. Sie häkeln also die 1. fM des Loops zwischen 2 Stb, dann die Lm des Loops und dann die 2. fM des Loops ebenso zwischen die gleichen 2 D-Stb. In der darauffolgenden R und allen anderen entsprechenden R werden die Loops immer UM den Lm-Bogen gehäkelt.
19.03.2015 - 10:45
|
||||||||||||||||||||||||||||
Summer Blush#summerblushcardigan |
||||||||||||||||||||||||||||
|
|
||||||||||||||||||||||||||||
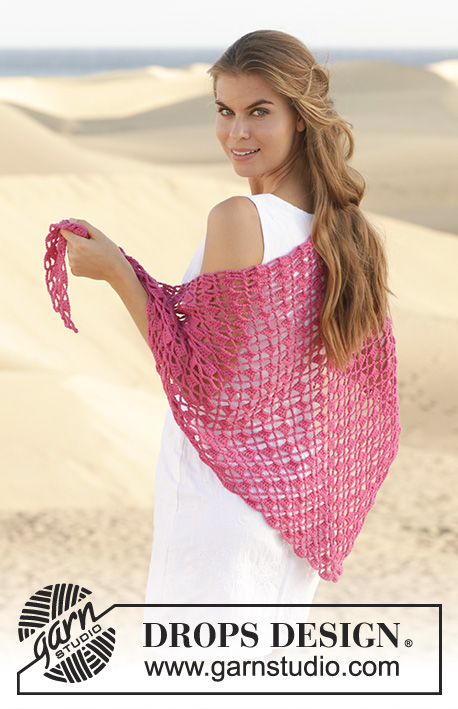
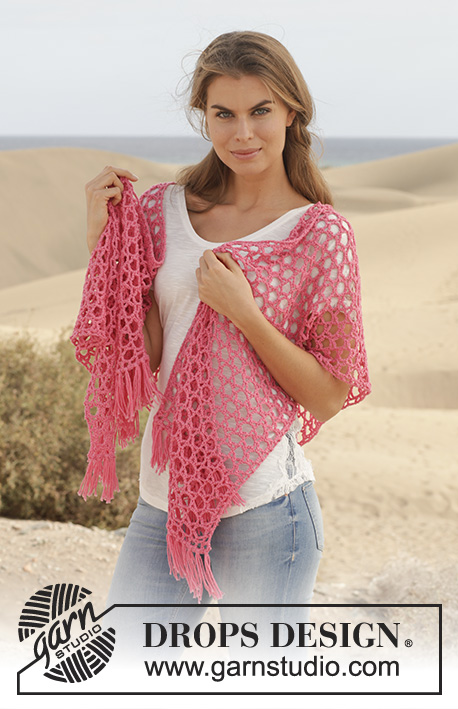
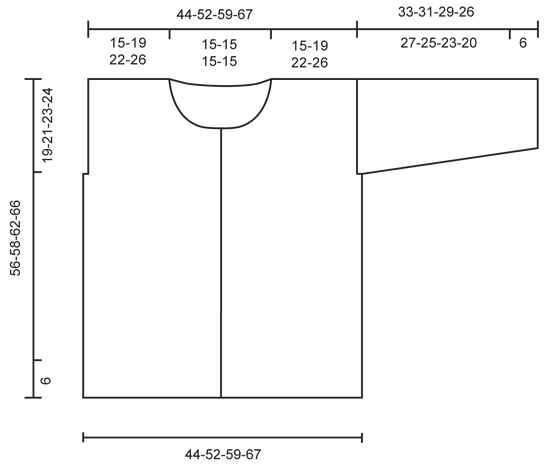
Crochet DROPS jacket with lace pattern in ”Cotton Merino”. Size S-XXXL.
DROPS 154-1 |
||||||||||||||||||||||||||||
|
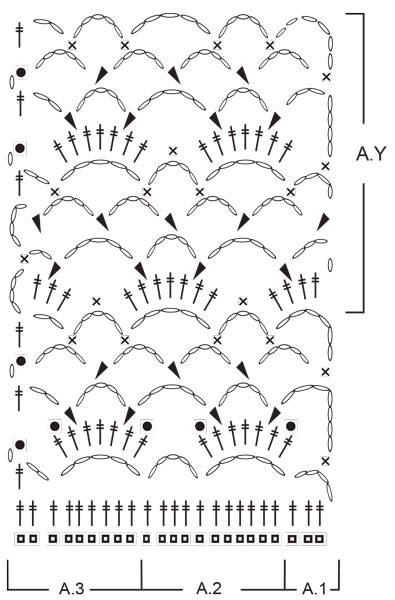
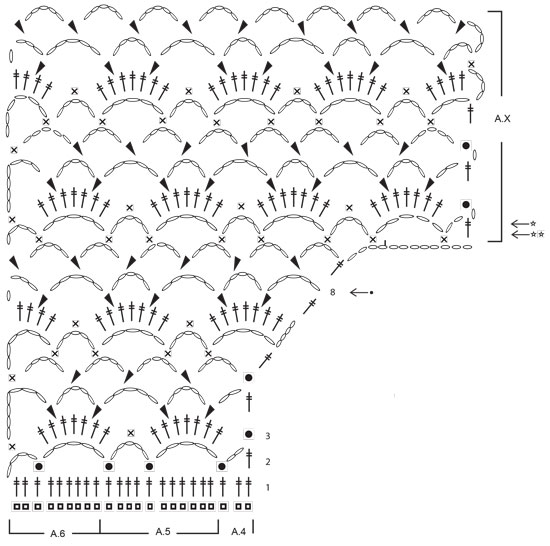
PATTERN: See diagrams A.1-A.8. CROCHET TIP: Ch-spaces will contract more than crochet pattern at the upper part of body. The jacket will thus be naturally rounded without dec in pattern. BUTTONHOLES: Measure from neck edge at the front and sew buttons on left band: SIZE S/M: 1, 7, 14, 21, 28, 35 and 41 cm / ⅜",2¾",5½",8¼",11",13¾",16⅛" SIZE L: 1, 7, 15, 22, 29, 36 and 43 cm / ⅜",2¾",6",8¾",11⅜",14¼",17" SIZE XL/XXL: 1, 8, 15, 21, 27, 33, 40 and 47 cm / ⅜",3⅛",6",8¼",10⅝",13",15¾",18½" SIZE XXXL: 1, 8, 15, 22, 29, 36, 43 and 50 cm / ⅜",3⅛",6",8¾",11⅜",14¼",17",19¾" --------------------------------------------------------- JACKET: Worked in parts, top down and worked tog when finished. LEFT FRONT PIECE: Work 54-66-79-92 ch with Cotton Merino on hook size 3 mm / C. Continue with 1 tr in 4th ch from hook = 2 tr. Continue to work as follows: 1 tr in each of the next 1-6-5-4 ch, * skip ch 1, 1 tr in each of the next 6 ch *, repeat from *-* 7-8-10-12 times in total = 45-56-67-78 tr. (= 1ST ROW in diagrams A.4, A.5 and A.6). Continue to work as follows: ROW 2 (= WS): Work A.6, then work A.5 3-4-5-6 times in total, and finish with A.4. Turn piece. ROW 3: Work A.6, then work A.5 3-4-5-6 times in total, and finish with A.4. Continue back and forth with this pattern, AT THE SAME TIME inc for neck in right side of piece (seen from RS) from 6th row in diagram. When 8th row in diagram has been worked from WS, cut the yarn. Then work 12 loose ch, before working as follows from RS (= 9th row): 1 tr in last tr on 8TH ROW. Continue with pattern according to diagram A.4, A.5 and A.6 as before. When piece measures 19-21-23-24 cm / 7½"-8¼"-9"-9½", insert a marker for armhole in the side, AT THE SAME TIME when A.4, A.5 and A.6 have been worked 1 time vertically, repeat A.x until piece measures approx. 27-29-31-33 cm / 10½"-11½"-12¼"-13". Adjust so that pattern is finished on a row with ch-spaces from WS. Then work ch-spaces with 5 ch in every space as follows from RS: Continue with 1ST ROW in A.Z. Repeat the 4 rows in A.Z until piece measures 51-55-57-61 cm / 10½"-11½"-12¼"-13" in total – Read CROCHET TIP! Work an edge as follows, beg from WS: Beg on 1st row in A.X. Work A.6, A.5 3-4-5-6 times in width, A.4. Continue back and forth until 2nd row in A.X with tr-groups has been worked (i.e. until 6th row in A.X has been worked). Piece measures approx. 56-58-62-66 cm / 22"-22¾"-24½"-26". Fasten off. Put piece aside and work right front piece. RIGHT FRONT PIECE: Beg and work as left front piece but reversed. Adjust according to left front piece. BACK PIECE: First work right shoulder as follows: Work 52-64-77-90 ch with Cotton Merino on hook size 3 mm / C. Cut the yarn and put piece aside. Then work left shoulder as follows: Work 54-66-79-92 ch with Cotton Merino on hook size 3 mm / C. Continue with 1 tr in 4th ch from hook = 2 tr. Continue to work as follows: 1 tr in each of the next 1-6-5-4 ch, * skip ch 1, 1 tr in each of the next 6 ch *, repeat from *-* 7-8-10-12 times in total = 45-56-67-78 tr for left shoulder. Then work 43 LOOSE ch before continuing over right shoulder (i.e. the ch-row): Continue with 1 tr in the first 2 ch on row = 2 tr. Continue to work as follows: 1 tr in each of the next 1-6-5-4 ch, * skip ch 1, 1 tr in each of the next 6 ch *, repeat from *-* 7-8-10-12 times in total = 45-56-67-78 tr for right shoulder. Turn piece (= WS), and work 1 tr in each of the 45-56-67-78 next tr, then work 1 tr in each of the next 43 ch, and finish with 1 tr in each of the next 45-56-67-78 tr = 133-155-177-199 tr. NOTE! This row is the 1st row in diagram A.1, A.2 and A.3. On next row work as follows (= RS): A.1, then work A.2 11-13-15-17 times in total, and finish with A.3. Continue as follows. When piece measures 19-21-23-24 cm / 7½"-8¼"-9"-9½", insert a marker each side to mark armholes, AT THE SAME TIME when A.1, A.2 and A.3 have been worked 1 time vertically, repeat A.Y until piece measures approx. 27-29-31-33 cm / 10½"-11½"-12¼"-13". Adjust pattern according to front pieces. Then work ch-spaces with 5 ch in every space as follows from RS: Continue with 1ST ROW in A.Z. Repeat the 4 rows in A.Z until piece measures 51-55-57-61 cm / 10½"-11½"-12¼"-13" in total – adjust according to front pieces. Work an edge at the bottom of body as on front pieces. Fasten off. Put piece aside. Piece measures approx. 56-58-62-66 cm / 22"-22¾"-24½"-26". Sew shoulder seams on front pieces and back piece tog. SLEEVE: Worked back and forth from body and outwards. ROW 1: Beg at one of the markers, and work ch-spaces along armhole as follows: * ch 5, skip approx. 1½ cm / ½", 1 sc *, repeat from *-* until there are 22-26-27-28 ch-spaces in total between the two markers. Continue with pattern from 2nd row in diagram A.Z, AT THE SAME TIME at beg of the next 2 rows dec 1 ch-space in the side – See diagram A.7 for left side of sleeve, and A.8 for right side of sleeve. 20-24-25-26 ch-spaces remain. Repeat the same dec at beg of the next 2-4-4-4 rows = 18-20-21-22 ch-spaces remain. Continue with ch-spaces as before, AT THE SAME TIME dec as follows: for S/M dec 1 ch-space in each side of sleeve when piece measures 15 cm / 6", and for sizes L - XL/XXL – XXXL dec 1 ch-space in each side of sleeve when piece measures 13-12-11 cm / 5"-4¾"-4½" and 1 ch-space in each side when piece measures 19-18-15 cm / 7½"-7"-6" = 16-16-17-18 ch-spaces remain. Continue until sleeve measures 27-25-23-20 cm / 10½"-9¾"-9"-8" (shorter measurements in the larger sizes because of wider shoulders), and adjust to finish on next to last row in A.Z (i.e. a row with whole ch-spaces in each side of piece). Then work an edge as follows: Beg on 1st row in A.X (= row with ch-spaces, and half ch-spaces in each side of piece) and work this pattern over all ch-spaces at the bottom of sleeve. Continue back and forth until 6th row in A.X has been worked (i.e. 2nd row in with tr-groups). Fasten off. ASSEMBLY: Work underarm seams and side seams in one as follows: 1 sc in front piece, ch 3, 1 sc in back piece, * ch 3, skip approx. 1 cm / ⅜", 1 sc in front piece, ch 3, skip 1 cm / ⅜", 1 sc in back piece *, repeat from *-* and continue the same way for sleeve. NECK EDGE AND BAND: Then work an edge along the band and neck. Beg at the bottom on right front piece, and work as follows: Fasten yarn with one sc, * ch 3, skip 1 cm / ⅜", 1 sc *, repeat from *-* along right band, neck and left band. Sew buttons on to the left band - see explanation above. Button through a hole in right front piece. |
||||||||||||||||||||||||||||
Diagram explanations |
||||||||||||||||||||||||||||
|
||||||||||||||||||||||||||||
 |
||||||||||||||||||||||||||||
 |
||||||||||||||||||||||||||||
 |
||||||||||||||||||||||||||||
 |
||||||||||||||||||||||||||||
Have you finished this pattern?Tag your pictures with #dropspattern #summerblushcardigan or submit them to the #dropsfan gallery. Do you need help with this pattern?You'll find 3 tutorial videos, a Comments/Questions area and more by visiting the pattern on garnstudio.com. © 1982-2026 DROPS Design A/S. We reserve all rights. This document, including all its sub-sections, has copyrights. Read more about what you can do with our patterns at the bottom of each pattern on our site. |
||||||||||||||||||||||||||||


With over 40 years in knitting and crochet design, DROPS Design offers one of the most extensive collections of free patterns on the internet - translated to 17 languages. As of today we count 324 catalogs and 12290 patterns - 12280 of which are translated into English (US/in).
We work hard to bring you the best knitting and crochet have to offer, inspiration and advice as well as great quality yarns at incredible prices! Would you like to use our patterns for other than personal use? You can read what you are allowed to do in the Copyright text at the bottom of all our patterns. Happy crafting!
Post a comment to pattern DROPS 154-1
We would love to hear what you have to say about this pattern!
If you want to leave a question, please make sure you select the correct category in the form below, to speed up the answering process. Required fields are marked *.