
Popular categories
Looking for a yarn?


Comments / Questions (179)
![]() Marge Dondero wrote:
Marge Dondero wrote:
Continuing with sleeve instructions: After decreasing to 18 chain spaces. The instructions say: "Continue with ch-spaces as before,..." ?? See charts. ? Do I follow A.7 and A.8 (seven chains on both sides of sleeve) OR A.Z (7 chains on left side & 3 chains and the triple crochets on the right side of chart and sleeve ?) Thank you.
15.08.2015 - 03:42DROPS Design answered:
Dear Mrs Dondero, you continue working following A.Z as before, and when you have to dec (see size), then work A.7 and A.8 each side of A.Z. Happy crocheting!
17.08.2015 - 09:11
![]() Marge Dondero wrote:
Marge Dondero wrote:
Not sure about sleeve instructions. 2nd paragraph: "Continue with pattern from 2nd row in diagram A.Z., AT THE SAME TIME at beg of the next 2 rows dec 1 ch-space in the side. A.7 for left side, A.8 for right side" Question: Do I start the decrease in the 2nd row? or 3rd and 4th row? And how do I know which is the right and left side of sleeve? Does right and wrong side of crochet matter? Thank you.
08.08.2015 - 21:57DROPS Design answered:
Dear Mrs Dondero, dec start from 2nd row (row 2 is from WS= read from left towards the right from WS), ie work A.7 for left side of sleeve, 2nd row of A.Z, and finish row with A.8 for right side of sleeve. On next row (row 3) from RS read diag from the right towards the left and work: A.8, 3rd row in A.Z and finish with A.7. Happy crocheting!
10.08.2015 - 10:28
![]() Heike wrote:
Heike wrote:
Hallo, ich habe 2 Fragen zu der Anleitung, gleich zu Anfang... Wie startet Reihe 3 (und Reihe 5)? Da steht 1 feste Masche. Aber vorher keine Wendeluftmasche?? Soll man 1 Wendeluftmasche arbeiten und dann 1 feste Masche dort hinein häkeln? Und: in Reihe 9 des Vorderteils ist eine längere LM-Kette zu sehen.. wie arbeite ich die? Wo fängt die an? Ich stehe ein bißchen auf dem Schlauch... können Sie mir weiterhelfen? Vielen Dank vorab! :)
09.07.2015 - 02:57DROPS Design answered:
Sie können bei R 3 und 5 noch zusätzlich eine Wende-Lm häkeln, um die fM am R-Beginn zu häkeln. Nach der 8. R müssen Sie den Faden abschneiden und häkeln dann in der 9. R die Lm neu, wie in der Anleitung beschrieben.
20.07.2015 - 11:47
![]() Josephina Cretier wrote:
Josephina Cretier wrote:
Hoi Linda, bedankt ik ga het proberen.
04.07.2015 - 21:41
![]() Cecilie wrote:
Cecilie wrote:
Hei, har et spørsmål ang venstre forstykke, når en er ferdig med mønsteret står det: "Videre hekles det lm-buer med 5 lm i hver bue slik fra retten:- Det fortsettes videre med 1.rad i az". Men i mønsteret az er det i rad 1 8 lm-buer, mens jeg får 15 hvis jeg følger oppskriften. Hva gjør jeg galt?
02.07.2015 - 14:41DROPS Design answered:
Hej Cecilie, har det ikke bare noget med størrelsen at gøre, større størrelse flere lm-buer - eller så forstår jeg muligvis ikke dit spørgsmål.
31.07.2015 - 11:23
![]() Linda wrote:
Linda wrote:
Josephina, Ik heb inmiddels mijn vestje af, maar als je 'm aan elkaar haakt/naait valt het patroon gewoon op zijn plek, sluit dus goed op elkaar aan. dus het klopt wel, voor heeft 1 rij dubb stokjes en achter 2 rijen. Succes nog!
01.07.2015 - 08:01
![]() Tineke Barendregt wrote:
Tineke Barendregt wrote:
Ik zit met hetzelfde probleem Corrie. Mijn achterpand valt ook veel breder uit dan de voorpanden, terwijl ik met dezelfde haaknaald haak.
17.06.2015 - 16:43DROPS Design answered:
Hoi Tineke. Zie mijn reactie voor Corrie hieronder.
17.06.2015 - 17:06
![]() Corry Dubois wrote:
Corry Dubois wrote:
Nog geen antwoord op mijn vraag?
15.06.2015 - 11:09DROPS Design answered:
Hoi Corry. Ik werk niet in het weekend ;-) Maar ik zal in de loop van de week er naar kijken.
15.06.2015 - 11:23
![]() Corry Dubois wrote:
Corry Dubois wrote:
Mijn rugpand valt zeer breed uit heb de juiste aantal steken gebruikt zoals voor de maat van voorpand en zelfde naald gebruikt Voorpand meet 23,5 cm en rugpand 74 cm wat mij zeer breed lijkt voor maat large .Snap niet waar het verkeerd gaat alvast bedankt Corry
13.06.2015 - 17:41DROPS Design answered:
Hoi Corry. Klopt de stekenverhouding wel? Je moet de naald gebruiken, die je nodig hebt voor de juiste stekenverhouding: 3 herhalingen van A.5 = 11 cm breed. Wij raden 3 mm aan maar afhankelijk van je manier van haken kan dat verschillen.
16.06.2015 - 15:54
![]() Linda wrote:
Linda wrote:
Tja Josephina ik zag dat andere meteen antwoord krijgen en wij moeten maar wachten hihi, misschien is er niemand meer die in het Nederlands kan helpen. Maar ik ben nu ook op dat punt van jou aanbeland, hoe heb jij het opgelost? Ik vind het sowieso een apart patroon hoor met steeds afknippen en aanhechten, maar wel een heel mooi patroon.
12.06.2015 - 08:59DROPS Design answered:
Beste Linda en Josephina. Ik probeer zo snel mogelijk te reageren - maar er kan wel wachttijd zijn in drukke periodes. Maar kunnen jullie niet hier op wachten, dan zijn er ook veel DROPS winkels die ook kunnen helpen (of misschien de winkel waarin jullie de garens hebben gekocht) Fijn weekend ;-)
12.06.2015 - 09:50
|
||||||||||||||||||||||||||||
Summer Blush#summerblushcardigan |
||||||||||||||||||||||||||||
|
|
||||||||||||||||||||||||||||
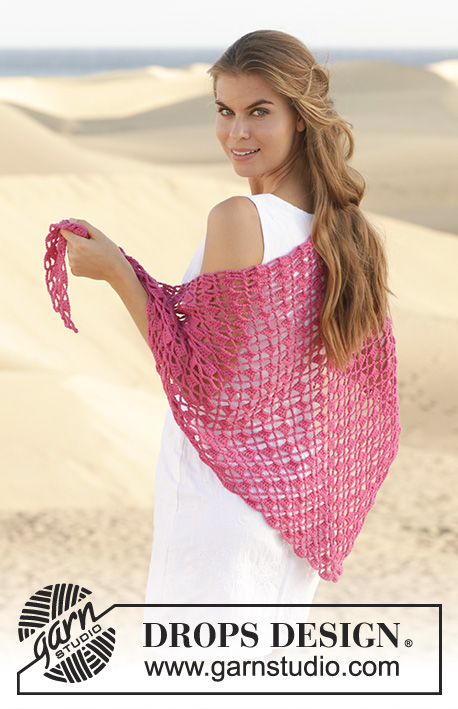
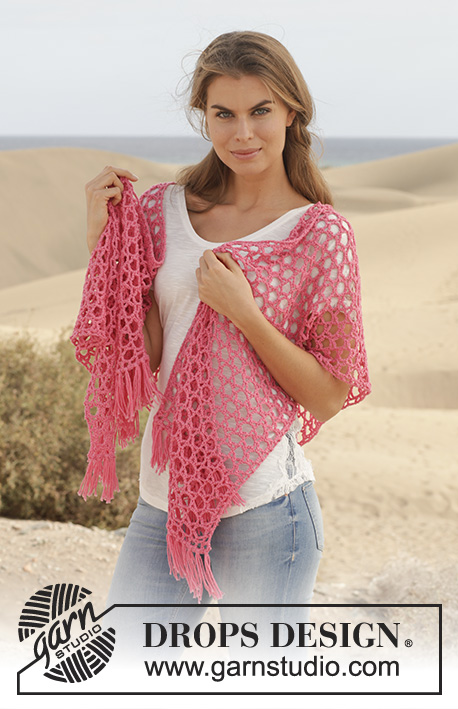
Crochet DROPS jacket with lace pattern in ”Cotton Merino”. Size S-XXXL.
DROPS 154-1 |
||||||||||||||||||||||||||||
|
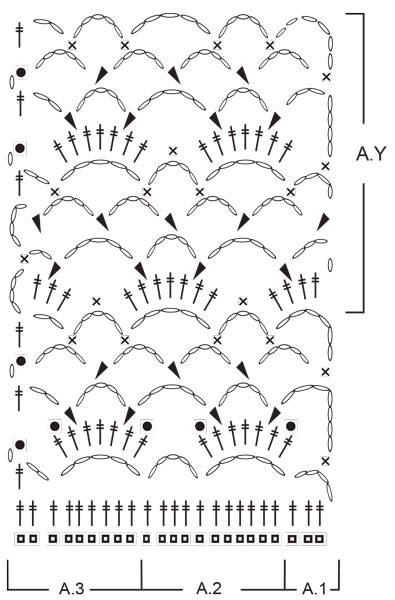
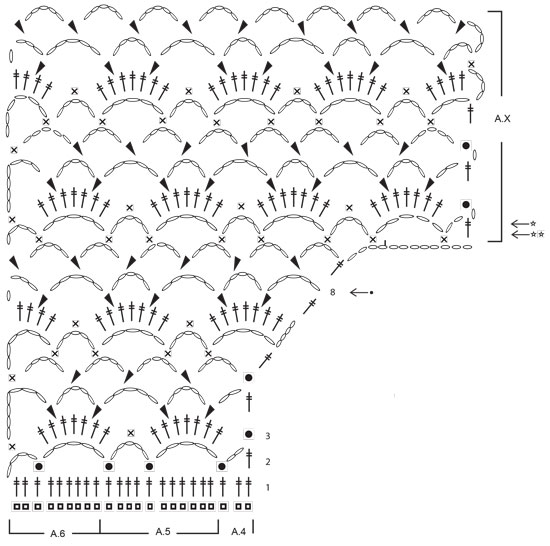
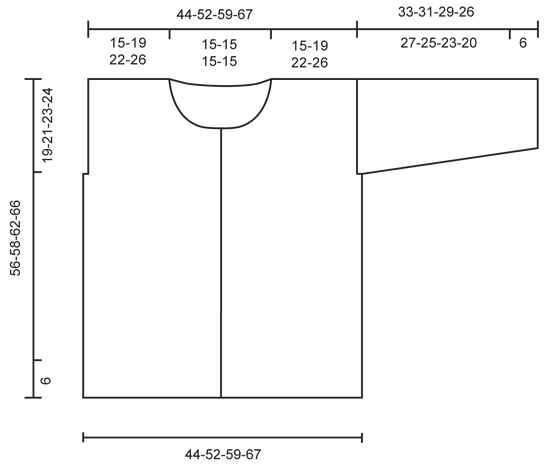
PATTERN: See diagrams A.1-A.8. CROCHET TIP: Ch-spaces will contract more than crochet pattern at the upper part of body. The jacket will thus be naturally rounded without dec in pattern. BUTTONHOLES: Measure from neck edge at the front and sew buttons on left band: SIZE S/M: 1, 7, 14, 21, 28, 35 and 41 cm / ⅜",2¾",5½",8¼",11",13¾",16⅛" SIZE L: 1, 7, 15, 22, 29, 36 and 43 cm / ⅜",2¾",6",8¾",11⅜",14¼",17" SIZE XL/XXL: 1, 8, 15, 21, 27, 33, 40 and 47 cm / ⅜",3⅛",6",8¼",10⅝",13",15¾",18½" SIZE XXXL: 1, 8, 15, 22, 29, 36, 43 and 50 cm / ⅜",3⅛",6",8¾",11⅜",14¼",17",19¾" --------------------------------------------------------- JACKET: Worked in parts, top down and worked tog when finished. LEFT FRONT PIECE: Work 54-66-79-92 ch with Cotton Merino on hook size 3 mm / C. Continue with 1 tr in 4th ch from hook = 2 tr. Continue to work as follows: 1 tr in each of the next 1-6-5-4 ch, * skip ch 1, 1 tr in each of the next 6 ch *, repeat from *-* 7-8-10-12 times in total = 45-56-67-78 tr. (= 1ST ROW in diagrams A.4, A.5 and A.6). Continue to work as follows: ROW 2 (= WS): Work A.6, then work A.5 3-4-5-6 times in total, and finish with A.4. Turn piece. ROW 3: Work A.6, then work A.5 3-4-5-6 times in total, and finish with A.4. Continue back and forth with this pattern, AT THE SAME TIME inc for neck in right side of piece (seen from RS) from 6th row in diagram. When 8th row in diagram has been worked from WS, cut the yarn. Then work 12 loose ch, before working as follows from RS (= 9th row): 1 tr in last tr on 8TH ROW. Continue with pattern according to diagram A.4, A.5 and A.6 as before. When piece measures 19-21-23-24 cm / 7½"-8¼"-9"-9½", insert a marker for armhole in the side, AT THE SAME TIME when A.4, A.5 and A.6 have been worked 1 time vertically, repeat A.x until piece measures approx. 27-29-31-33 cm / 10½"-11½"-12¼"-13". Adjust so that pattern is finished on a row with ch-spaces from WS. Then work ch-spaces with 5 ch in every space as follows from RS: Continue with 1ST ROW in A.Z. Repeat the 4 rows in A.Z until piece measures 51-55-57-61 cm / 10½"-11½"-12¼"-13" in total – Read CROCHET TIP! Work an edge as follows, beg from WS: Beg on 1st row in A.X. Work A.6, A.5 3-4-5-6 times in width, A.4. Continue back and forth until 2nd row in A.X with tr-groups has been worked (i.e. until 6th row in A.X has been worked). Piece measures approx. 56-58-62-66 cm / 22"-22¾"-24½"-26". Fasten off. Put piece aside and work right front piece. RIGHT FRONT PIECE: Beg and work as left front piece but reversed. Adjust according to left front piece. BACK PIECE: First work right shoulder as follows: Work 52-64-77-90 ch with Cotton Merino on hook size 3 mm / C. Cut the yarn and put piece aside. Then work left shoulder as follows: Work 54-66-79-92 ch with Cotton Merino on hook size 3 mm / C. Continue with 1 tr in 4th ch from hook = 2 tr. Continue to work as follows: 1 tr in each of the next 1-6-5-4 ch, * skip ch 1, 1 tr in each of the next 6 ch *, repeat from *-* 7-8-10-12 times in total = 45-56-67-78 tr for left shoulder. Then work 43 LOOSE ch before continuing over right shoulder (i.e. the ch-row): Continue with 1 tr in the first 2 ch on row = 2 tr. Continue to work as follows: 1 tr in each of the next 1-6-5-4 ch, * skip ch 1, 1 tr in each of the next 6 ch *, repeat from *-* 7-8-10-12 times in total = 45-56-67-78 tr for right shoulder. Turn piece (= WS), and work 1 tr in each of the 45-56-67-78 next tr, then work 1 tr in each of the next 43 ch, and finish with 1 tr in each of the next 45-56-67-78 tr = 133-155-177-199 tr. NOTE! This row is the 1st row in diagram A.1, A.2 and A.3. On next row work as follows (= RS): A.1, then work A.2 11-13-15-17 times in total, and finish with A.3. Continue as follows. When piece measures 19-21-23-24 cm / 7½"-8¼"-9"-9½", insert a marker each side to mark armholes, AT THE SAME TIME when A.1, A.2 and A.3 have been worked 1 time vertically, repeat A.Y until piece measures approx. 27-29-31-33 cm / 10½"-11½"-12¼"-13". Adjust pattern according to front pieces. Then work ch-spaces with 5 ch in every space as follows from RS: Continue with 1ST ROW in A.Z. Repeat the 4 rows in A.Z until piece measures 51-55-57-61 cm / 10½"-11½"-12¼"-13" in total – adjust according to front pieces. Work an edge at the bottom of body as on front pieces. Fasten off. Put piece aside. Piece measures approx. 56-58-62-66 cm / 22"-22¾"-24½"-26". Sew shoulder seams on front pieces and back piece tog. SLEEVE: Worked back and forth from body and outwards. ROW 1: Beg at one of the markers, and work ch-spaces along armhole as follows: * ch 5, skip approx. 1½ cm / ½", 1 sc *, repeat from *-* until there are 22-26-27-28 ch-spaces in total between the two markers. Continue with pattern from 2nd row in diagram A.Z, AT THE SAME TIME at beg of the next 2 rows dec 1 ch-space in the side – See diagram A.7 for left side of sleeve, and A.8 for right side of sleeve. 20-24-25-26 ch-spaces remain. Repeat the same dec at beg of the next 2-4-4-4 rows = 18-20-21-22 ch-spaces remain. Continue with ch-spaces as before, AT THE SAME TIME dec as follows: for S/M dec 1 ch-space in each side of sleeve when piece measures 15 cm / 6", and for sizes L - XL/XXL – XXXL dec 1 ch-space in each side of sleeve when piece measures 13-12-11 cm / 5"-4¾"-4½" and 1 ch-space in each side when piece measures 19-18-15 cm / 7½"-7"-6" = 16-16-17-18 ch-spaces remain. Continue until sleeve measures 27-25-23-20 cm / 10½"-9¾"-9"-8" (shorter measurements in the larger sizes because of wider shoulders), and adjust to finish on next to last row in A.Z (i.e. a row with whole ch-spaces in each side of piece). Then work an edge as follows: Beg on 1st row in A.X (= row with ch-spaces, and half ch-spaces in each side of piece) and work this pattern over all ch-spaces at the bottom of sleeve. Continue back and forth until 6th row in A.X has been worked (i.e. 2nd row in with tr-groups). Fasten off. ASSEMBLY: Work underarm seams and side seams in one as follows: 1 sc in front piece, ch 3, 1 sc in back piece, * ch 3, skip approx. 1 cm / ⅜", 1 sc in front piece, ch 3, skip 1 cm / ⅜", 1 sc in back piece *, repeat from *-* and continue the same way for sleeve. NECK EDGE AND BAND: Then work an edge along the band and neck. Beg at the bottom on right front piece, and work as follows: Fasten yarn with one sc, * ch 3, skip 1 cm / ⅜", 1 sc *, repeat from *-* along right band, neck and left band. Sew buttons on to the left band - see explanation above. Button through a hole in right front piece. |
||||||||||||||||||||||||||||
Diagram explanations |
||||||||||||||||||||||||||||
|
||||||||||||||||||||||||||||
 |
||||||||||||||||||||||||||||
 |
||||||||||||||||||||||||||||
 |
||||||||||||||||||||||||||||
 |
||||||||||||||||||||||||||||
Have you finished this pattern?Tag your pictures with #dropspattern #summerblushcardigan or submit them to the #dropsfan gallery. Do you need help with this pattern?You'll find 3 tutorial videos, a Comments/Questions area and more by visiting the pattern on garnstudio.com. © 1982-2026 DROPS Design A/S. We reserve all rights. This document, including all its sub-sections, has copyrights. Read more about what you can do with our patterns at the bottom of each pattern on our site. |
||||||||||||||||||||||||||||


With over 40 years in knitting and crochet design, DROPS Design offers one of the most extensive collections of free patterns on the internet - translated to 17 languages. As of today we count 324 catalogs and 12290 patterns - 12280 of which are translated into English (US/in).
We work hard to bring you the best knitting and crochet have to offer, inspiration and advice as well as great quality yarns at incredible prices! Would you like to use our patterns for other than personal use? You can read what you are allowed to do in the Copyright text at the bottom of all our patterns. Happy crafting!
Post a comment to pattern DROPS 154-1
We would love to hear what you have to say about this pattern!
If you want to leave a question, please make sure you select the correct category in the form below, to speed up the answering process. Required fields are marked *.