
Popular categories
Looking for a yarn?


Comments / Questions (179)
![]() Tiziana wrote:
Tiziana wrote:
Salve devo iniziare a lavorare le maniche ma non capisco bene la spiegazione. Devo cominciare dalle spalle? E quante maglie devo mettere? Qualcosa mi sfugge! Grazie
02.05.2016 - 21:37DROPS Design answered:
Buonasera Tiziana, abbiamo risposto più volte alla sua domanda riguardo le maniche: legga bene i commenti precedenti. Buon lavoro!
02.05.2016 - 21:40
![]() Mandy wrote:
Mandy wrote:
Hallo liebes Drops-Team, ich möchte diese Jacke mit dem Cotton-Light-Garn häkeln, scheiter aber schon an der Maschenprobe. Ich bekomme selbst mit Nadel 3 keine 3 Rapporte auf 11 cm hin. 2 Rapporte passen, aber keine 3 Rapporte. Was mach ich falsch?
23.04.2016 - 11:05DROPS Design answered:
Liebe Mandy, wenn Sie mit der angegebenen Nadelstärke 3 die Maschenprobe nicht erreichen, müssen Sie eine dünnere Nadel (2,5) nehmen.
26.04.2016 - 09:33
![]() Tiziana wrote:
Tiziana wrote:
Salve devo iniziare a lavorare le maniche ma non capisco bene la spiegazione. Devo cominciare dalle spalle? E quante maglie devo mettere? Qualcosa mi sfugge! Grazie
22.04.2016 - 20:18DROPS Design answered:
Buonasera Tiziana. Le maniche non vengono lavorate separatamente e poi cucite, ma sono lavorate unite al davanti e dietro. Deve puntare l’uncinetto nelle m della parte superiore del davanti / dietro, tra i due segnapunti che ha inserito all’altezza degli scalfi. Può vedere anche la risposta che le abbiamo dato al questito precedente. Buon lavoro!
22.04.2016 - 20:51
![]() Tiziana wrote:
Tiziana wrote:
Salve devo iniziare a lavorare le maniche ma non capisco bene la spiegazione. Devo cominciare dalle spalle? E quante maglie devo mettere? Qualcosa mi sfugge! Grazie
20.04.2016 - 22:00DROPS Design answered:
Buonasera Tiziana. Le maniche vengono lavorate dall'alto verso il basso. Non viene avviata una catenella di base, ma si lavora intorno agli scalfi del davanti /dietro, tra i due segnapunti. Inizia da uno dei segnapunti messi per lo scalfo e lavora il numero di archi di cat indicati per la sua taglia lasciando ca.1½ cm tra 1 m.b e la m.b successiva. Buon lavoro!
20.04.2016 - 22:27
![]() Tiziana wrote:
Tiziana wrote:
Buongiorno sto per iniziare a lavorare questo golfino ma vorrei allungare le maniche. Come posso regolarmi, allungo un po la lunghezza della manica in proporzione? Grazie
06.03.2016 - 10:09DROPS Design answered:
Buongiorno Tiziana, è corretto, continui a lavorare la manica fino a quando desidera, aggiustando con delle diminuzioni proporzionate mano a mano che si avvicina al polso e alla fine può lavorare il bordo come indicato nel modello. Le consigliamo però l'acquisto di un gomitolo in più di filato. Buon lavoro!
06.03.2016 - 18:30
![]() Claire wrote:
Claire wrote:
Comment fait-on pour faire le devant droit en sens inverse? on débute le patron dans l'autre sens? i.e. devant gauche: au 2ème rg on commence par A6 vers A4 alors que pour le devant droit, au 2ème rang, commence-t-on par A4 vers A6? Merci.
24.02.2016 - 21:34DROPS Design answered:
Bonjour Claire, pour le devant droit, commencez par A.4 vers A.6 sur l'envers - vous pouvez également imprimer le diagramme en effet miroir pour le suivre plus facilement. Bon crochet!
25.02.2016 - 10:10
![]() Claire wrote:
Claire wrote:
J'ai commencé les 2 devants avec la laine et le crochet identique au patron, je crochète correctement ni trop serré ni trop lâche et je dois prendre la plus petite grandeur pour avoir plus grand (L). Ex: j'ai fait 54ml et 45 db etc et ça donne 18 cm et demi de largeur comme la plus grande grandeur (XL). Est-ce normal ou avez-vous entendu parler que le patron était trop grand?
24.02.2016 - 21:30DROPS Design answered:
Bonjour Claire, pensez à bien vérifier votre échantillon et ajustez le crochet en fonction, vous devez avoir 3 x A.5 en largeur = 11 cm de large avec 1 fil Cotton Merino. Ajustez la taille du crochet si nécessaire. Bon crochet!
25.02.2016 - 10:07
![]() Marge Dondero wrote:
Marge Dondero wrote:
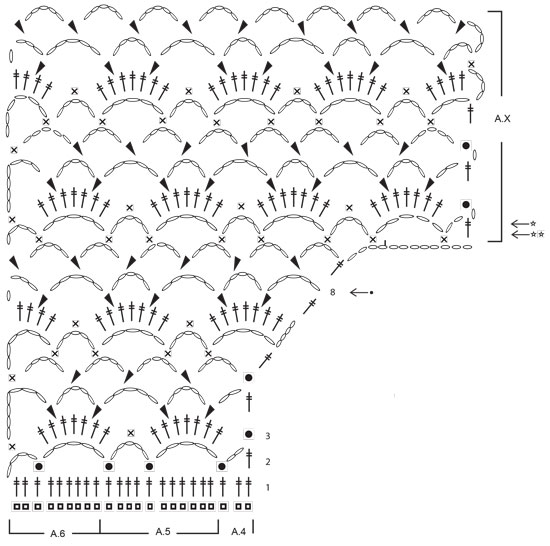
Back again...Sorry. Could you please describe how you decrease both sides of the diamond mesh in A.7 and A.8? No one can figure out both the 4 dangling chains in the chart. Couldn't even find out how on internet. Sorry and thank you!!!
26.08.2015 - 03:24DROPS Design answered:
Dear Mrs Dondero, A.7 and A.8 are worked the same way: at the end of row, work *4 ch (for turning), then 1 sc in first ch-space, ch5, 1 sc in next ch-space and so on to the end of row*, then turn and repeat from *-*. At the end of this row, crochet **7 ch (turning ch), 1 sc in next ch-looop, then accross as before to the end of row**, turn and crochet from **-**. Remember you will get further assistance (even per mail or telephone) from you DROPS store. Happy crocheting!
26.08.2015 - 10:37
![]() Marge Dondero wrote:
Marge Dondero wrote:
Marge Dondero 22.08.2015 kl. 23:35: How come deceases on A.7, A.8 are not staggered? I cannot understand the diagram. How can decreases be on both sides of row 1? Help. Thank you again.
23.08.2015 - 02:48DROPS Design answered:
Dear Mrs Dondero, for sleeve you dec at beg and end of row working A.7 and A.8, work as before between A.7 and A.8 - ie work A.7 and A.8 over the first/last sts on row. Dec are included in each diagram. Happy crocheting!
24.08.2015 - 10:55
![]() Marge Dondero wrote:
Marge Dondero wrote:
How come deceases on A.7, A.8 are not staggered? I cannot understand the diagram. How can decreases be on both sides of row 1? Help. Thank you again.
22.08.2015 - 23:35
|
||||||||||||||||||||||||||||
Summer Blush#summerblushcardigan |
||||||||||||||||||||||||||||
|
|
||||||||||||||||||||||||||||
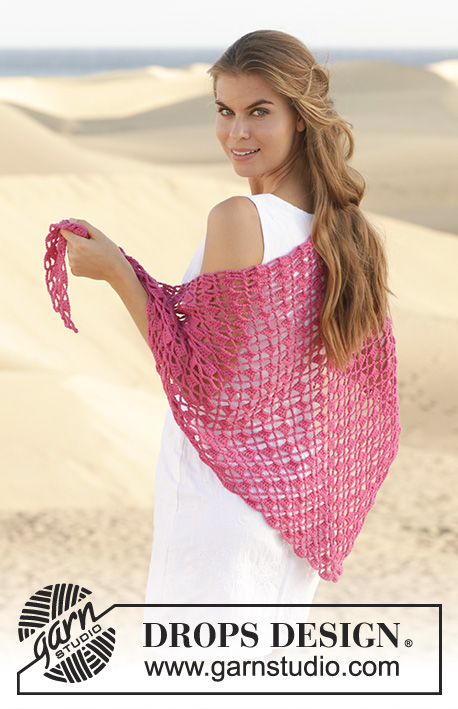
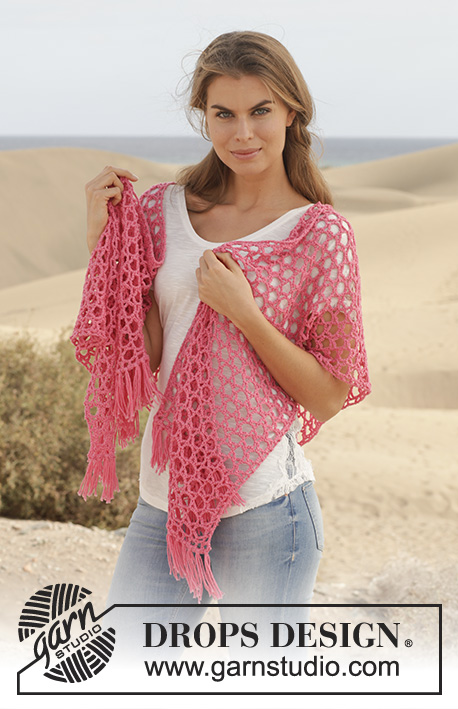
Crochet DROPS jacket with lace pattern in ”Cotton Merino”. Size S-XXXL.
DROPS 154-1 |
||||||||||||||||||||||||||||
|
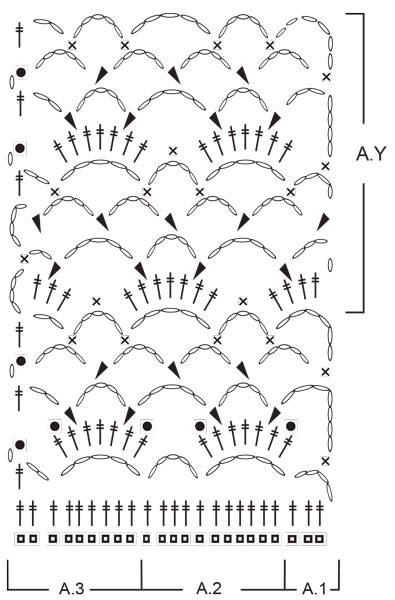
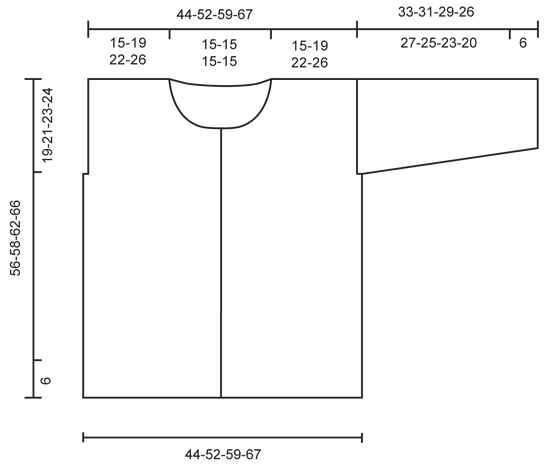
PATTERN: See diagrams A.1-A.8. CROCHET TIP: Ch-spaces will contract more than crochet pattern at the upper part of body. The jacket will thus be naturally rounded without dec in pattern. BUTTONHOLES: Measure from neck edge at the front and sew buttons on left band: SIZE S/M: 1, 7, 14, 21, 28, 35 and 41 cm / ⅜",2¾",5½",8¼",11",13¾",16⅛" SIZE L: 1, 7, 15, 22, 29, 36 and 43 cm / ⅜",2¾",6",8¾",11⅜",14¼",17" SIZE XL/XXL: 1, 8, 15, 21, 27, 33, 40 and 47 cm / ⅜",3⅛",6",8¼",10⅝",13",15¾",18½" SIZE XXXL: 1, 8, 15, 22, 29, 36, 43 and 50 cm / ⅜",3⅛",6",8¾",11⅜",14¼",17",19¾" --------------------------------------------------------- JACKET: Worked in parts, top down and worked tog when finished. LEFT FRONT PIECE: Work 54-66-79-92 ch with Cotton Merino on hook size 3 mm / C. Continue with 1 tr in 4th ch from hook = 2 tr. Continue to work as follows: 1 tr in each of the next 1-6-5-4 ch, * skip ch 1, 1 tr in each of the next 6 ch *, repeat from *-* 7-8-10-12 times in total = 45-56-67-78 tr. (= 1ST ROW in diagrams A.4, A.5 and A.6). Continue to work as follows: ROW 2 (= WS): Work A.6, then work A.5 3-4-5-6 times in total, and finish with A.4. Turn piece. ROW 3: Work A.6, then work A.5 3-4-5-6 times in total, and finish with A.4. Continue back and forth with this pattern, AT THE SAME TIME inc for neck in right side of piece (seen from RS) from 6th row in diagram. When 8th row in diagram has been worked from WS, cut the yarn. Then work 12 loose ch, before working as follows from RS (= 9th row): 1 tr in last tr on 8TH ROW. Continue with pattern according to diagram A.4, A.5 and A.6 as before. When piece measures 19-21-23-24 cm / 7½"-8¼"-9"-9½", insert a marker for armhole in the side, AT THE SAME TIME when A.4, A.5 and A.6 have been worked 1 time vertically, repeat A.x until piece measures approx. 27-29-31-33 cm / 10½"-11½"-12¼"-13". Adjust so that pattern is finished on a row with ch-spaces from WS. Then work ch-spaces with 5 ch in every space as follows from RS: Continue with 1ST ROW in A.Z. Repeat the 4 rows in A.Z until piece measures 51-55-57-61 cm / 10½"-11½"-12¼"-13" in total – Read CROCHET TIP! Work an edge as follows, beg from WS: Beg on 1st row in A.X. Work A.6, A.5 3-4-5-6 times in width, A.4. Continue back and forth until 2nd row in A.X with tr-groups has been worked (i.e. until 6th row in A.X has been worked). Piece measures approx. 56-58-62-66 cm / 22"-22¾"-24½"-26". Fasten off. Put piece aside and work right front piece. RIGHT FRONT PIECE: Beg and work as left front piece but reversed. Adjust according to left front piece. BACK PIECE: First work right shoulder as follows: Work 52-64-77-90 ch with Cotton Merino on hook size 3 mm / C. Cut the yarn and put piece aside. Then work left shoulder as follows: Work 54-66-79-92 ch with Cotton Merino on hook size 3 mm / C. Continue with 1 tr in 4th ch from hook = 2 tr. Continue to work as follows: 1 tr in each of the next 1-6-5-4 ch, * skip ch 1, 1 tr in each of the next 6 ch *, repeat from *-* 7-8-10-12 times in total = 45-56-67-78 tr for left shoulder. Then work 43 LOOSE ch before continuing over right shoulder (i.e. the ch-row): Continue with 1 tr in the first 2 ch on row = 2 tr. Continue to work as follows: 1 tr in each of the next 1-6-5-4 ch, * skip ch 1, 1 tr in each of the next 6 ch *, repeat from *-* 7-8-10-12 times in total = 45-56-67-78 tr for right shoulder. Turn piece (= WS), and work 1 tr in each of the 45-56-67-78 next tr, then work 1 tr in each of the next 43 ch, and finish with 1 tr in each of the next 45-56-67-78 tr = 133-155-177-199 tr. NOTE! This row is the 1st row in diagram A.1, A.2 and A.3. On next row work as follows (= RS): A.1, then work A.2 11-13-15-17 times in total, and finish with A.3. Continue as follows. When piece measures 19-21-23-24 cm / 7½"-8¼"-9"-9½", insert a marker each side to mark armholes, AT THE SAME TIME when A.1, A.2 and A.3 have been worked 1 time vertically, repeat A.Y until piece measures approx. 27-29-31-33 cm / 10½"-11½"-12¼"-13". Adjust pattern according to front pieces. Then work ch-spaces with 5 ch in every space as follows from RS: Continue with 1ST ROW in A.Z. Repeat the 4 rows in A.Z until piece measures 51-55-57-61 cm / 10½"-11½"-12¼"-13" in total – adjust according to front pieces. Work an edge at the bottom of body as on front pieces. Fasten off. Put piece aside. Piece measures approx. 56-58-62-66 cm / 22"-22¾"-24½"-26". Sew shoulder seams on front pieces and back piece tog. SLEEVE: Worked back and forth from body and outwards. ROW 1: Beg at one of the markers, and work ch-spaces along armhole as follows: * ch 5, skip approx. 1½ cm / ½", 1 sc *, repeat from *-* until there are 22-26-27-28 ch-spaces in total between the two markers. Continue with pattern from 2nd row in diagram A.Z, AT THE SAME TIME at beg of the next 2 rows dec 1 ch-space in the side – See diagram A.7 for left side of sleeve, and A.8 for right side of sleeve. 20-24-25-26 ch-spaces remain. Repeat the same dec at beg of the next 2-4-4-4 rows = 18-20-21-22 ch-spaces remain. Continue with ch-spaces as before, AT THE SAME TIME dec as follows: for S/M dec 1 ch-space in each side of sleeve when piece measures 15 cm / 6", and for sizes L - XL/XXL – XXXL dec 1 ch-space in each side of sleeve when piece measures 13-12-11 cm / 5"-4¾"-4½" and 1 ch-space in each side when piece measures 19-18-15 cm / 7½"-7"-6" = 16-16-17-18 ch-spaces remain. Continue until sleeve measures 27-25-23-20 cm / 10½"-9¾"-9"-8" (shorter measurements in the larger sizes because of wider shoulders), and adjust to finish on next to last row in A.Z (i.e. a row with whole ch-spaces in each side of piece). Then work an edge as follows: Beg on 1st row in A.X (= row with ch-spaces, and half ch-spaces in each side of piece) and work this pattern over all ch-spaces at the bottom of sleeve. Continue back and forth until 6th row in A.X has been worked (i.e. 2nd row in with tr-groups). Fasten off. ASSEMBLY: Work underarm seams and side seams in one as follows: 1 sc in front piece, ch 3, 1 sc in back piece, * ch 3, skip approx. 1 cm / ⅜", 1 sc in front piece, ch 3, skip 1 cm / ⅜", 1 sc in back piece *, repeat from *-* and continue the same way for sleeve. NECK EDGE AND BAND: Then work an edge along the band and neck. Beg at the bottom on right front piece, and work as follows: Fasten yarn with one sc, * ch 3, skip 1 cm / ⅜", 1 sc *, repeat from *-* along right band, neck and left band. Sew buttons on to the left band - see explanation above. Button through a hole in right front piece. |
||||||||||||||||||||||||||||
Diagram explanations |
||||||||||||||||||||||||||||
|
||||||||||||||||||||||||||||
 |
||||||||||||||||||||||||||||
 |
||||||||||||||||||||||||||||
 |
||||||||||||||||||||||||||||
 |
||||||||||||||||||||||||||||
Have you finished this pattern?Tag your pictures with #dropspattern #summerblushcardigan or submit them to the #dropsfan gallery. Do you need help with this pattern?You'll find 3 tutorial videos, a Comments/Questions area and more by visiting the pattern on garnstudio.com. © 1982-2026 DROPS Design A/S. We reserve all rights. This document, including all its sub-sections, has copyrights. Read more about what you can do with our patterns at the bottom of each pattern on our site. |
||||||||||||||||||||||||||||


With over 40 years in knitting and crochet design, DROPS Design offers one of the most extensive collections of free patterns on the internet - translated to 17 languages. As of today we count 324 catalogs and 12290 patterns - 12280 of which are translated into English (US/in).
We work hard to bring you the best knitting and crochet have to offer, inspiration and advice as well as great quality yarns at incredible prices! Would you like to use our patterns for other than personal use? You can read what you are allowed to do in the Copyright text at the bottom of all our patterns. Happy crafting!
Post a comment to pattern DROPS 154-1
We would love to hear what you have to say about this pattern!
If you want to leave a question, please make sure you select the correct category in the form below, to speed up the answering process. Required fields are marked *.