
Popular categories
Looking for a yarn?


Comments / Questions (179)
![]() Sara Vallo wrote:
Sara Vallo wrote:
I would love to make this pattern. Do I need to read through all the comment/questions to make sure I make all necessary changes in this pattern. Or, is there somewhere I can find the complete pattern with all corrections made? Thank you.
29.04.2019 - 18:42DROPS Design answered:
Hi Sara! It is not necessary. All changes/corrections to the pattern are included in the pattern instructions on the website. Happy crocheting!
29.04.2019 - 19:15
![]() Helga Menzel wrote:
Helga Menzel wrote:
Liebes Team, hätte gern gewusst wie in der Anleitung beschrieben ein DStäbchen in die 1 6 5 4 LfM häkeln. Komme da nicht klar. Vielleicht können Sie mir das etwas deutlicher erläutern, wie das gemeint sein soll ? Danke und herzliche Grüße Helga Menzel
04.02.2019 - 11:30DROPS Design answered:
Liebe Frau Menzel, in die 1. Grösse häklen Sie 1 DStb in die 1 Lfm, in die 2. Grösse häkeln Sie 1 DStb in die 6 nächsten Lfm usw. dh 1 Stb in jeder der nächsten 5 Lfm in die 3. Grösse und 4 Lfm in die letzte Grösse. Viel Spaß beim häkeln!
04.02.2019 - 14:24
![]() Marian Diez wrote:
Marian Diez wrote:
He hecho el delantero izquierdo. Ahora tengo que hacer el derecho, según dice como el izquierdo pero a la inversa. ?cómo se hace a la,inversa?
16.06.2018 - 00:14DROPS Design answered:
Hola Maria. A la inversa significa que se trabajan los puntos del inicio de la fila de la parte trabajada al final de la fila en la parte a trabajar y los puntos del final de la fila de la parte trabajada al principio de la fila de la parte a trabajar. De esta forma, es como un reflejo la parte derecha de la izquierda, tal y como se puede apreciar en la foto.
23.06.2018 - 20:35
![]() Kerry Hullett wrote:
Kerry Hullett wrote:
Please can you explain why the first row contains so many double trebles? The start of all my pieces is very full because there are so many stitches so that the seams don't lie flat
13.03.2018 - 01:25DROPS Design answered:
Dear Mrs Hullett, you start with a double treble row and then crochet pattern following diagrams as explained. This double treble row is the first row of diagrams A.4,A.5.A.6. When you will crochet diagram, the first row will look more flat. Make sure to check and keep the stated tension. Happy crocheting!
13.03.2018 - 09:47
![]() Elke wrote:
Elke wrote:
Wahnsinn, so eine schwierig komplizierte anleitung hab ich noch nie gesehen. Ich handarbeite seit 40 jahren, aber da blick ich nicht durch.
28.02.2018 - 15:12DROPS Design answered:
Liebe Elke, wenn Sie eine Frage haben, können Sie sie hier stellen, oder für individuelle Hilfe bitte Kontakt mit Ihrem Laden aufnehmen. Viel Spaß beim häkeln!
28.02.2018 - 17:54
![]() Judy Caudill wrote:
Judy Caudill wrote:
I'm so sad I can't figure out the instructions for this pattern I really wanted to make this sweater. I've only got the first row done. I crochet left handed, does this change the order the pattern is worked such as A.4,A.5,and A.6 are now reversed for me? The instructions say on row 2 to work those three sections again but the diagram for row 2 shows chains connected to treble crochets. The same for row 3.
17.07.2017 - 04:17DROPS Design answered:
Dear Mrs Caudill, diagram show only 1 repeat of A.5 but you have to work 2 repeats of A.5 in width before working next diagram in your size. Remember A.4 = towards neck and A.6 = towrds shoulder, so that you can adjust your way of crocheting if it is different. Do not hesitate to contact your DROPS store, they will help you to read diagrams if necessary. Happy crocheting!
17.07.2017 - 09:51
![]() Judy Caudill wrote:
Judy Caudill wrote:
I don't need a tutorial to work this pattern, the stitches look simple enough, but the instructions (A.l, A.6, A.z) are very complicated and it appears many people are having difficulty reading the instructions too. Do you have someplace on your website where there is a good explanation of these type of instructions? Or maybe there is a simpler pattern to get me started before I buy my yarn?
13.07.2017 - 20:37DROPS Design answered:
Dear Mrs Caudill, start reading the diagrams from the bottom corner on the right side and read towards the left from RS and from left to right from WS. Each symbol = 1 st/group of sts (see diagram text). Should you need any further individual assistance on how to read a diagram, remember you can contact your DROPS store even per mail or telephone. Happy crocheting!
14.07.2017 - 10:01
![]() Fernandes wrote:
Fernandes wrote:
Pourriez vous m'envoyer les corrections du gilet drops 154-1 ainsi que le diagramme avec les corrections merci d avance
26.05.2016 - 06:54DROPS Design answered:
Bonjour Mme Fernandes, vous trouverez toutes les corrections sous l'onglet du même nom (à droite de celui des fournitures), si vous avez le catalogue, vous pouvez imprimer à nouveau le modèle pour être certaine de tout avoir, si vous avez imprimé le modèle après la date de la dernière correction, les explications sont justes telles quelles. Bon crochet!
26.05.2016 - 09:55
![]() Tiziana wrote:
Tiziana wrote:
Scusate per la ripetizione e' stato un errore!! Grazie per i preziosi consigli
02.05.2016 - 21:40
![]() Tiziana wrote:
Tiziana wrote:
Salve devo iniziare a lavorare le maniche ma non capisco bene la spiegazione. Devo cominciare dalle spalle? E quante maglie devo mettere? Qualcosa mi sfugge! Grazie
02.05.2016 - 21:37DROPS Design answered:
Buonasera Tiziana, abbiamo risposto più volte alla sua domanda riguardo le maniche: legga bene i commenti precedenti. Buon lavoro!
02.05.2016 - 21:40
|
||||||||||||||||||||||||||||
Summer Blush#summerblushcardigan |
||||||||||||||||||||||||||||
|
|
||||||||||||||||||||||||||||
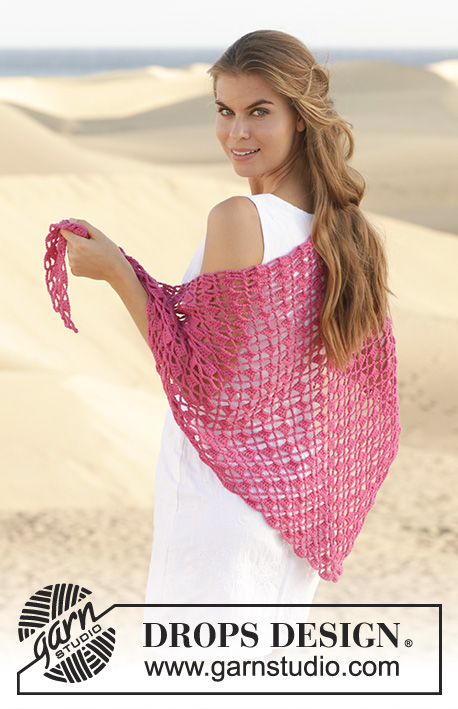
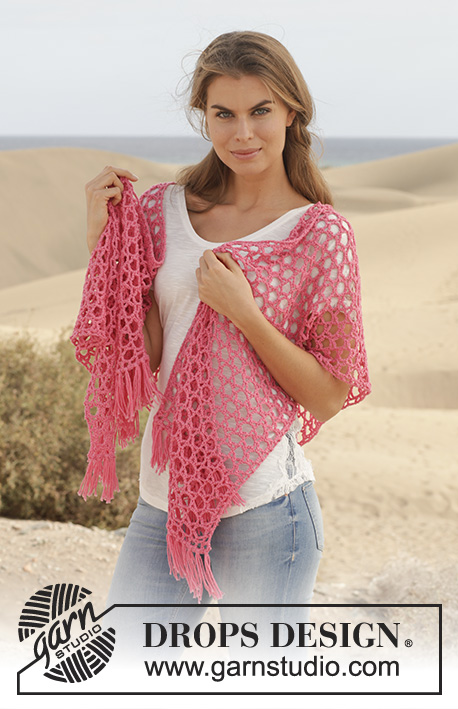
Crochet DROPS jacket with lace pattern in ”Cotton Merino”. Size S-XXXL.
DROPS 154-1 |
||||||||||||||||||||||||||||
|
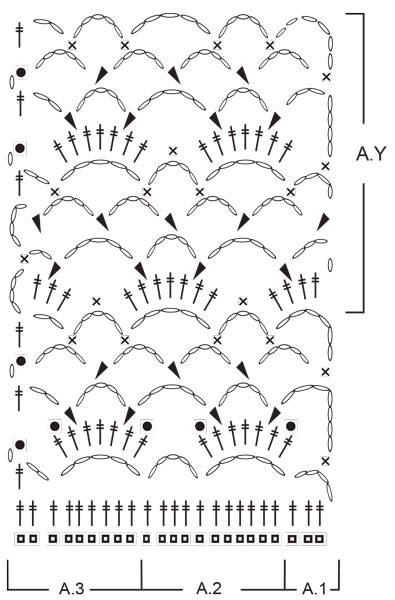
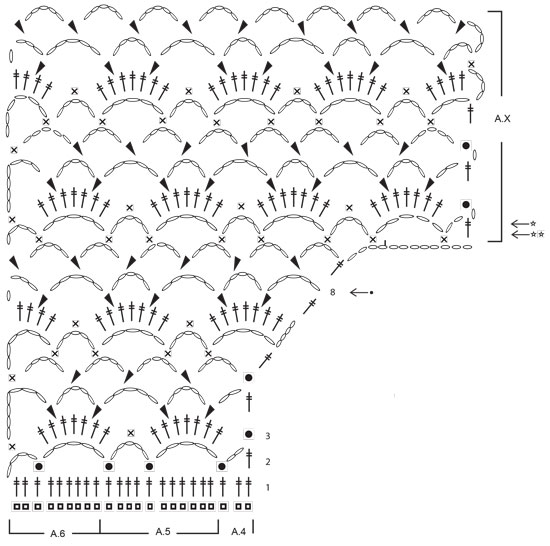
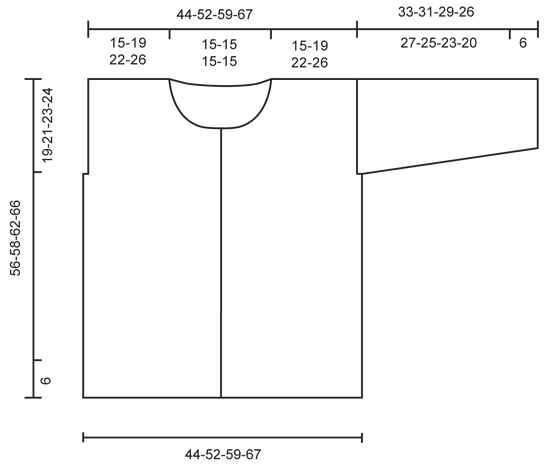
PATTERN: See diagrams A.1-A.8. CROCHET TIP: Ch-spaces will contract more than crochet pattern at the upper part of body. The jacket will thus be naturally rounded without dec in pattern. BUTTONHOLES: Measure from neck edge at the front and sew buttons on left band: SIZE S/M: 1, 7, 14, 21, 28, 35 and 41 cm / ⅜",2¾",5½",8¼",11",13¾",16⅛" SIZE L: 1, 7, 15, 22, 29, 36 and 43 cm / ⅜",2¾",6",8¾",11⅜",14¼",17" SIZE XL/XXL: 1, 8, 15, 21, 27, 33, 40 and 47 cm / ⅜",3⅛",6",8¼",10⅝",13",15¾",18½" SIZE XXXL: 1, 8, 15, 22, 29, 36, 43 and 50 cm / ⅜",3⅛",6",8¾",11⅜",14¼",17",19¾" --------------------------------------------------------- JACKET: Worked in parts, top down and worked tog when finished. LEFT FRONT PIECE: Work 54-66-79-92 ch with Cotton Merino on hook size 3 mm / C. Continue with 1 tr in 4th ch from hook = 2 tr. Continue to work as follows: 1 tr in each of the next 1-6-5-4 ch, * skip ch 1, 1 tr in each of the next 6 ch *, repeat from *-* 7-8-10-12 times in total = 45-56-67-78 tr. (= 1ST ROW in diagrams A.4, A.5 and A.6). Continue to work as follows: ROW 2 (= WS): Work A.6, then work A.5 3-4-5-6 times in total, and finish with A.4. Turn piece. ROW 3: Work A.6, then work A.5 3-4-5-6 times in total, and finish with A.4. Continue back and forth with this pattern, AT THE SAME TIME inc for neck in right side of piece (seen from RS) from 6th row in diagram. When 8th row in diagram has been worked from WS, cut the yarn. Then work 12 loose ch, before working as follows from RS (= 9th row): 1 tr in last tr on 8TH ROW. Continue with pattern according to diagram A.4, A.5 and A.6 as before. When piece measures 19-21-23-24 cm / 7½"-8¼"-9"-9½", insert a marker for armhole in the side, AT THE SAME TIME when A.4, A.5 and A.6 have been worked 1 time vertically, repeat A.x until piece measures approx. 27-29-31-33 cm / 10½"-11½"-12¼"-13". Adjust so that pattern is finished on a row with ch-spaces from WS. Then work ch-spaces with 5 ch in every space as follows from RS: Continue with 1ST ROW in A.Z. Repeat the 4 rows in A.Z until piece measures 51-55-57-61 cm / 10½"-11½"-12¼"-13" in total – Read CROCHET TIP! Work an edge as follows, beg from WS: Beg on 1st row in A.X. Work A.6, A.5 3-4-5-6 times in width, A.4. Continue back and forth until 2nd row in A.X with tr-groups has been worked (i.e. until 6th row in A.X has been worked). Piece measures approx. 56-58-62-66 cm / 22"-22¾"-24½"-26". Fasten off. Put piece aside and work right front piece. RIGHT FRONT PIECE: Beg and work as left front piece but reversed. Adjust according to left front piece. BACK PIECE: First work right shoulder as follows: Work 52-64-77-90 ch with Cotton Merino on hook size 3 mm / C. Cut the yarn and put piece aside. Then work left shoulder as follows: Work 54-66-79-92 ch with Cotton Merino on hook size 3 mm / C. Continue with 1 tr in 4th ch from hook = 2 tr. Continue to work as follows: 1 tr in each of the next 1-6-5-4 ch, * skip ch 1, 1 tr in each of the next 6 ch *, repeat from *-* 7-8-10-12 times in total = 45-56-67-78 tr for left shoulder. Then work 43 LOOSE ch before continuing over right shoulder (i.e. the ch-row): Continue with 1 tr in the first 2 ch on row = 2 tr. Continue to work as follows: 1 tr in each of the next 1-6-5-4 ch, * skip ch 1, 1 tr in each of the next 6 ch *, repeat from *-* 7-8-10-12 times in total = 45-56-67-78 tr for right shoulder. Turn piece (= WS), and work 1 tr in each of the 45-56-67-78 next tr, then work 1 tr in each of the next 43 ch, and finish with 1 tr in each of the next 45-56-67-78 tr = 133-155-177-199 tr. NOTE! This row is the 1st row in diagram A.1, A.2 and A.3. On next row work as follows (= RS): A.1, then work A.2 11-13-15-17 times in total, and finish with A.3. Continue as follows. When piece measures 19-21-23-24 cm / 7½"-8¼"-9"-9½", insert a marker each side to mark armholes, AT THE SAME TIME when A.1, A.2 and A.3 have been worked 1 time vertically, repeat A.Y until piece measures approx. 27-29-31-33 cm / 10½"-11½"-12¼"-13". Adjust pattern according to front pieces. Then work ch-spaces with 5 ch in every space as follows from RS: Continue with 1ST ROW in A.Z. Repeat the 4 rows in A.Z until piece measures 51-55-57-61 cm / 10½"-11½"-12¼"-13" in total – adjust according to front pieces. Work an edge at the bottom of body as on front pieces. Fasten off. Put piece aside. Piece measures approx. 56-58-62-66 cm / 22"-22¾"-24½"-26". Sew shoulder seams on front pieces and back piece tog. SLEEVE: Worked back and forth from body and outwards. ROW 1: Beg at one of the markers, and work ch-spaces along armhole as follows: * ch 5, skip approx. 1½ cm / ½", 1 sc *, repeat from *-* until there are 22-26-27-28 ch-spaces in total between the two markers. Continue with pattern from 2nd row in diagram A.Z, AT THE SAME TIME at beg of the next 2 rows dec 1 ch-space in the side – See diagram A.7 for left side of sleeve, and A.8 for right side of sleeve. 20-24-25-26 ch-spaces remain. Repeat the same dec at beg of the next 2-4-4-4 rows = 18-20-21-22 ch-spaces remain. Continue with ch-spaces as before, AT THE SAME TIME dec as follows: for S/M dec 1 ch-space in each side of sleeve when piece measures 15 cm / 6", and for sizes L - XL/XXL – XXXL dec 1 ch-space in each side of sleeve when piece measures 13-12-11 cm / 5"-4¾"-4½" and 1 ch-space in each side when piece measures 19-18-15 cm / 7½"-7"-6" = 16-16-17-18 ch-spaces remain. Continue until sleeve measures 27-25-23-20 cm / 10½"-9¾"-9"-8" (shorter measurements in the larger sizes because of wider shoulders), and adjust to finish on next to last row in A.Z (i.e. a row with whole ch-spaces in each side of piece). Then work an edge as follows: Beg on 1st row in A.X (= row with ch-spaces, and half ch-spaces in each side of piece) and work this pattern over all ch-spaces at the bottom of sleeve. Continue back and forth until 6th row in A.X has been worked (i.e. 2nd row in with tr-groups). Fasten off. ASSEMBLY: Work underarm seams and side seams in one as follows: 1 sc in front piece, ch 3, 1 sc in back piece, * ch 3, skip approx. 1 cm / ⅜", 1 sc in front piece, ch 3, skip 1 cm / ⅜", 1 sc in back piece *, repeat from *-* and continue the same way for sleeve. NECK EDGE AND BAND: Then work an edge along the band and neck. Beg at the bottom on right front piece, and work as follows: Fasten yarn with one sc, * ch 3, skip 1 cm / ⅜", 1 sc *, repeat from *-* along right band, neck and left band. Sew buttons on to the left band - see explanation above. Button through a hole in right front piece. |
||||||||||||||||||||||||||||
Diagram explanations |
||||||||||||||||||||||||||||
|
||||||||||||||||||||||||||||
 |
||||||||||||||||||||||||||||
 |
||||||||||||||||||||||||||||
 |
||||||||||||||||||||||||||||
 |
||||||||||||||||||||||||||||
Have you finished this pattern?Tag your pictures with #dropspattern #summerblushcardigan or submit them to the #dropsfan gallery. Do you need help with this pattern?You'll find 3 tutorial videos, a Comments/Questions area and more by visiting the pattern on garnstudio.com. © 1982-2026 DROPS Design A/S. We reserve all rights. This document, including all its sub-sections, has copyrights. Read more about what you can do with our patterns at the bottom of each pattern on our site. |
||||||||||||||||||||||||||||


With over 40 years in knitting and crochet design, DROPS Design offers one of the most extensive collections of free patterns on the internet - translated to 17 languages. As of today we count 324 catalogs and 12290 patterns - 12280 of which are translated into English (US/in).
We work hard to bring you the best knitting and crochet have to offer, inspiration and advice as well as great quality yarns at incredible prices! Would you like to use our patterns for other than personal use? You can read what you are allowed to do in the Copyright text at the bottom of all our patterns. Happy crafting!
Post a comment to pattern DROPS 154-1
We would love to hear what you have to say about this pattern!
If you want to leave a question, please make sure you select the correct category in the form below, to speed up the answering process. Required fields are marked *.