
Popular categories
Looking for a yarn?


Comments / Questions (179)
![]() Carol Anne Dashwood wrote:
Carol Anne Dashwood wrote:
I would love to make this blush top but it looks so difficult. What does A1 A2 A3 A5 etc. mean? Is this for advanced skill crochet as i am beginner intermediate but just love this design Carol
24.05.2021 - 19:06DROPS Design answered:
Dear Carol Anne, this is actually not that complicated piece, and intermediate crocheter can easily do it. A.1, A.2 etc are elements of the pattern, like A.1 is what you start with, A.2 is the part you repeat, A.3 is how you finish a row. A.4-A.5 shows how you shape the neckline. There are a few tutorial you can use, they are linked below the pattern, and you can always ask for help in the store you bought your DROPS yarn from. Happy Crafting!
24.05.2021 - 20:49
![]() Helle Nordal wrote:
Helle Nordal wrote:
Jeg er ved at hækle Summer Blush, men kan ikke få diagram A6, A5 og A4 til at passe med maskeantallet, da jeg skal gentage A6 og A5 6 gange, og det får jeg til at blive mere end 92 masker
11.03.2021 - 15:47DROPS Design answered:
Hej Helle, første række er forklaret i opskriften, når du har hæklet den har du 78 dbl-st. Nu starter du med A6, og gentager kun A5 6 gange og afslutter med A4. God fornøjelse!
12.03.2021 - 08:57
![]() Susan Williamson wrote:
Susan Williamson wrote:
I have made the two fronts and am now working on the back, but it is so big. I am usually a medium but I have now started it in small - but it is still way too big. I have also gone down a crochet hook size and my crochet is tight, rather than loose, but I can't get three repeats to anything like 11cm. Is anyone else having this problem with this pattern?
31.07.2020 - 18:14DROPS Design answered:
Dear Mrs Williamson, are you working with DROPS Cotton Merino? Read more about tension here. Happy crocheting!
03.08.2020 - 07:29
![]() Cinzia wrote:
Cinzia wrote:
All'inizio della spiegazione di DAVANTI SINISTRO non capisco cosa devo fare con la dicitura : "1 m.a.d in ognuna delle 1-6-5-4 cat successive" ; non vedo la corrispondenza col disegno! Grazie
15.07.2020 - 22:51DROPS Design answered:
Buongiorno Cinzia, a seconda della taglia deve lavorare 1 maglia alta doppia nella catenella successiva per la taglia S/M, nelle 6 cat successive per la taglia L, nelle 5 catenelle successive per la taglia XL/XXL, nelle 4 catenelle successive per la taglia XXXL. Buon lavoro!
25.09.2020 - 09:26
![]() Annemarie Kappen wrote:
Annemarie Kappen wrote:
Hoi, ik heb hetzelfde probleem, ook achterpand breder dan voorpanden. Endat terwijl ik met de zelfde haaknaald gebruik. De fout moet dan in het patroon zitten
24.06.2020 - 13:53
![]() Dawn Hales wrote:
Dawn Hales wrote:
I have managed to work out the pattern and the pattern chart but am struggling with the gauge for tension . 3 mm hook , 3 repeats of A5= 11 cm I’m assuming that’s the tr first row stitches with 11 per repeat therefore 33 tr =11 cm but can not get to that tension . Have I misunderstood? Or Is it 3 blocks of 6 tr as per the first row? Thank you
02.06.2020 - 10:46DROPS Design answered:
See answer below :)
02.06.2020 - 10:47
![]() Dawn Hales wrote:
Dawn Hales wrote:
I have managed to work out the pattern and the pattern chart but am struggling with the gauge for tension . 3 mm hook , 3 repeats of A5= 11 cm I’m assuming that’s the tr first row stitches with 11 per repeat therefore 33 tr =11 cm but can not get to that tension . Have I misunderstood? Or Is it 3 blocks of 6 tr as per the first row? Thank you
02.06.2020 - 10:39DROPS Design answered:
Dear Mrs Hales, the gauge is here only given in width, ie you should have 3 repeats of A.5 = 11 cm in width - the height will here be measured so it shouldn't be a problem. Happy crocheting!
02.06.2020 - 10:46
![]() Samanta wrote:
Samanta wrote:
Scusate il disturbo. Sto seguendo il modello per una taglia S/M, ma ho paura sia grande. Ho lavorato 15 cm n lunghezza del dietro e ora, misurandolo, il cardigan va oltre le mie spalle di alcuni centimetri per lato, è normale o dovrebbe arrivare alle spalle? grazie mille
20.08.2019 - 01:13DROPS Design answered:
Buongiorno Samanta. Se riesce ad ingrandire un po’ la fotografia, vede che il motivo va di poco oltre la spalla. Le suggeriamo di confrontare la misura del suo lavoro con quella indicata nel grafico delle misure alla fine delle spiegazioni, per verificare che la sua tensione sia corretta e di confrontarlo anche con un suo capo simile per verificare se troppo largo. Buon lavoro!
20.08.2019 - 07:14
![]() Belen wrote:
Belen wrote:
No entiendo el comienzo de la espalda. Tras la 1 vuelta tengo 45pad, 43 cad y otros 45pad. Si al girar la labor solo trabajo 45 puntos que pasa con las cad y los 45 pad restantes?. Por otro lado, Si según las instrucciones tengo 133 puntos es mucho más ancha que el delantero, un tercio más como puede ser? Gracias por responder cuanto antes.
27.07.2019 - 10:35DROPS Design answered:
Hola Belen .Ha sido un fallo al publicar el patrón. Ya está corregido. 45 p.a.d. forman los hombros del delantero y la espalda, 43 p.de cad. forman el escote en la espalda y la forma del escote en el delantero se obtiene trabajando varias filas con aumentos (ver el patrón).
01.08.2019 - 00:04
![]() Trudy L Flores wrote:
Trudy L Flores wrote:
I'm finding pattern a little hard to follow. Continue with 1 tr in 4th ch from hook = 2 tr. Continue to work as follows: 1 tr in each of the next 1-6-5-4 ch, * skip ch 1, ... Does it mean this for row 1: 2 Tr , ch1, 1 tr, ch1, 6 tr, ch 1, 1 tr, ch1, 6 tr, etc....
12.07.2019 - 00:51DROPS Design answered:
Dear Mrs Flores, on the very first row you won't crochet any chain, you will skip chains from fundation chains, ie in the 2nd size work: 1 tr in 4th ch from hook (= the 3 chains + this tr = first 2 sts on row), then work 1 tr in each of the next 6 chains, and skip now chains repeating: (skip 1 ch, 1 tr in each of the next 6 ch* a total of 8 times. Read more here about the fundation chain getting more chains than first row. Happy crocheting!
12.07.2019 - 08:46
|
||||||||||||||||||||||||||||
Summer Blush#summerblushcardigan |
||||||||||||||||||||||||||||
|
|
||||||||||||||||||||||||||||
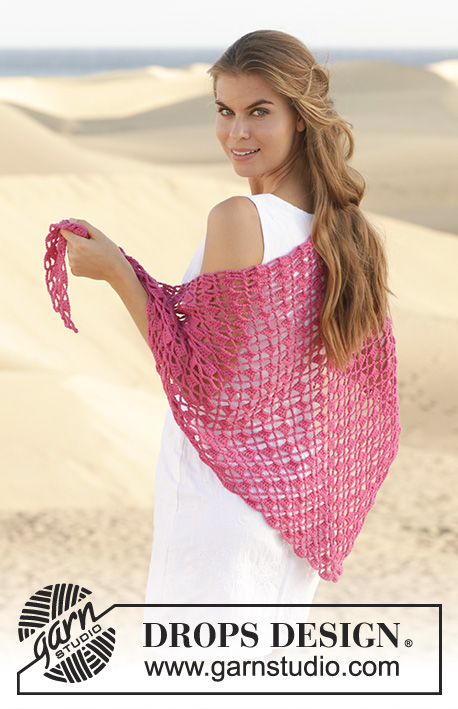
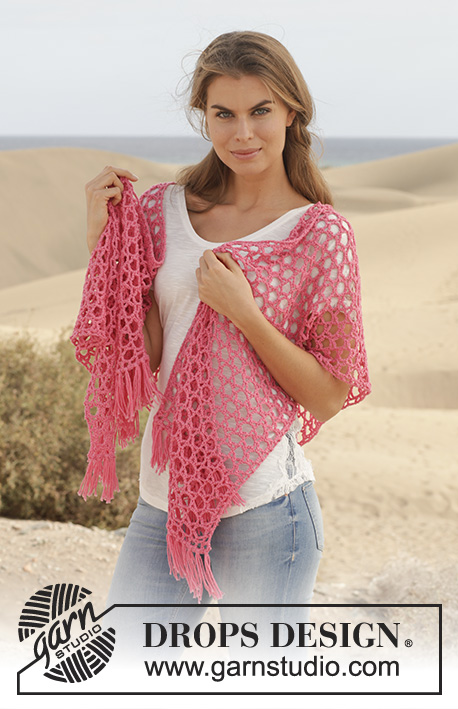
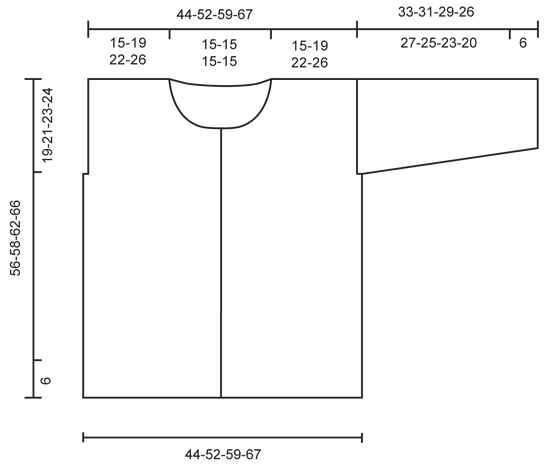
Crochet DROPS jacket with lace pattern in ”Cotton Merino”. Size S-XXXL.
DROPS 154-1 |
||||||||||||||||||||||||||||
|
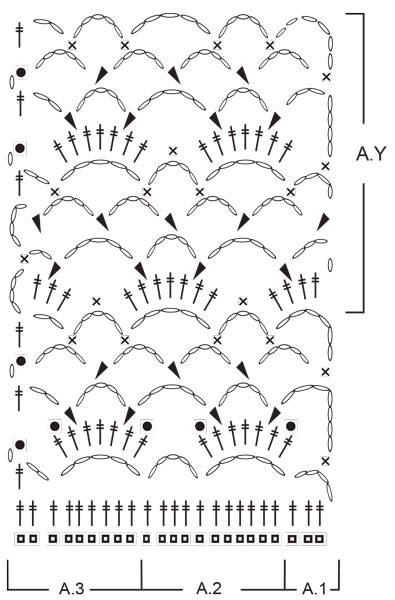
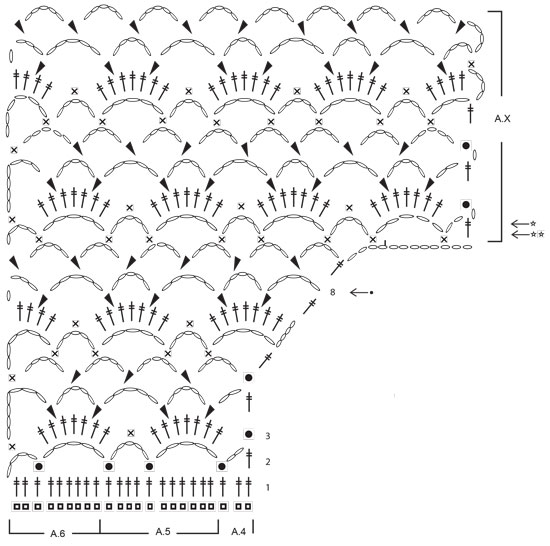
PATTERN: See diagrams A.1-A.8. CROCHET TIP: Ch-spaces will contract more than crochet pattern at the upper part of body. The jacket will thus be naturally rounded without dec in pattern. BUTTONHOLES: Measure from neck edge at the front and sew buttons on left band: SIZE S/M: 1, 7, 14, 21, 28, 35 and 41 cm / ⅜",2¾",5½",8¼",11",13¾",16⅛" SIZE L: 1, 7, 15, 22, 29, 36 and 43 cm / ⅜",2¾",6",8¾",11⅜",14¼",17" SIZE XL/XXL: 1, 8, 15, 21, 27, 33, 40 and 47 cm / ⅜",3⅛",6",8¼",10⅝",13",15¾",18½" SIZE XXXL: 1, 8, 15, 22, 29, 36, 43 and 50 cm / ⅜",3⅛",6",8¾",11⅜",14¼",17",19¾" --------------------------------------------------------- JACKET: Worked in parts, top down and worked tog when finished. LEFT FRONT PIECE: Work 54-66-79-92 ch with Cotton Merino on hook size 3 mm / C. Continue with 1 tr in 4th ch from hook = 2 tr. Continue to work as follows: 1 tr in each of the next 1-6-5-4 ch, * skip ch 1, 1 tr in each of the next 6 ch *, repeat from *-* 7-8-10-12 times in total = 45-56-67-78 tr. (= 1ST ROW in diagrams A.4, A.5 and A.6). Continue to work as follows: ROW 2 (= WS): Work A.6, then work A.5 3-4-5-6 times in total, and finish with A.4. Turn piece. ROW 3: Work A.6, then work A.5 3-4-5-6 times in total, and finish with A.4. Continue back and forth with this pattern, AT THE SAME TIME inc for neck in right side of piece (seen from RS) from 6th row in diagram. When 8th row in diagram has been worked from WS, cut the yarn. Then work 12 loose ch, before working as follows from RS (= 9th row): 1 tr in last tr on 8TH ROW. Continue with pattern according to diagram A.4, A.5 and A.6 as before. When piece measures 19-21-23-24 cm / 7½"-8¼"-9"-9½", insert a marker for armhole in the side, AT THE SAME TIME when A.4, A.5 and A.6 have been worked 1 time vertically, repeat A.x until piece measures approx. 27-29-31-33 cm / 10½"-11½"-12¼"-13". Adjust so that pattern is finished on a row with ch-spaces from WS. Then work ch-spaces with 5 ch in every space as follows from RS: Continue with 1ST ROW in A.Z. Repeat the 4 rows in A.Z until piece measures 51-55-57-61 cm / 10½"-11½"-12¼"-13" in total – Read CROCHET TIP! Work an edge as follows, beg from WS: Beg on 1st row in A.X. Work A.6, A.5 3-4-5-6 times in width, A.4. Continue back and forth until 2nd row in A.X with tr-groups has been worked (i.e. until 6th row in A.X has been worked). Piece measures approx. 56-58-62-66 cm / 22"-22¾"-24½"-26". Fasten off. Put piece aside and work right front piece. RIGHT FRONT PIECE: Beg and work as left front piece but reversed. Adjust according to left front piece. BACK PIECE: First work right shoulder as follows: Work 52-64-77-90 ch with Cotton Merino on hook size 3 mm / C. Cut the yarn and put piece aside. Then work left shoulder as follows: Work 54-66-79-92 ch with Cotton Merino on hook size 3 mm / C. Continue with 1 tr in 4th ch from hook = 2 tr. Continue to work as follows: 1 tr in each of the next 1-6-5-4 ch, * skip ch 1, 1 tr in each of the next 6 ch *, repeat from *-* 7-8-10-12 times in total = 45-56-67-78 tr for left shoulder. Then work 43 LOOSE ch before continuing over right shoulder (i.e. the ch-row): Continue with 1 tr in the first 2 ch on row = 2 tr. Continue to work as follows: 1 tr in each of the next 1-6-5-4 ch, * skip ch 1, 1 tr in each of the next 6 ch *, repeat from *-* 7-8-10-12 times in total = 45-56-67-78 tr for right shoulder. Turn piece (= WS), and work 1 tr in each of the 45-56-67-78 next tr, then work 1 tr in each of the next 43 ch, and finish with 1 tr in each of the next 45-56-67-78 tr = 133-155-177-199 tr. NOTE! This row is the 1st row in diagram A.1, A.2 and A.3. On next row work as follows (= RS): A.1, then work A.2 11-13-15-17 times in total, and finish with A.3. Continue as follows. When piece measures 19-21-23-24 cm / 7½"-8¼"-9"-9½", insert a marker each side to mark armholes, AT THE SAME TIME when A.1, A.2 and A.3 have been worked 1 time vertically, repeat A.Y until piece measures approx. 27-29-31-33 cm / 10½"-11½"-12¼"-13". Adjust pattern according to front pieces. Then work ch-spaces with 5 ch in every space as follows from RS: Continue with 1ST ROW in A.Z. Repeat the 4 rows in A.Z until piece measures 51-55-57-61 cm / 10½"-11½"-12¼"-13" in total – adjust according to front pieces. Work an edge at the bottom of body as on front pieces. Fasten off. Put piece aside. Piece measures approx. 56-58-62-66 cm / 22"-22¾"-24½"-26". Sew shoulder seams on front pieces and back piece tog. SLEEVE: Worked back and forth from body and outwards. ROW 1: Beg at one of the markers, and work ch-spaces along armhole as follows: * ch 5, skip approx. 1½ cm / ½", 1 sc *, repeat from *-* until there are 22-26-27-28 ch-spaces in total between the two markers. Continue with pattern from 2nd row in diagram A.Z, AT THE SAME TIME at beg of the next 2 rows dec 1 ch-space in the side – See diagram A.7 for left side of sleeve, and A.8 for right side of sleeve. 20-24-25-26 ch-spaces remain. Repeat the same dec at beg of the next 2-4-4-4 rows = 18-20-21-22 ch-spaces remain. Continue with ch-spaces as before, AT THE SAME TIME dec as follows: for S/M dec 1 ch-space in each side of sleeve when piece measures 15 cm / 6", and for sizes L - XL/XXL – XXXL dec 1 ch-space in each side of sleeve when piece measures 13-12-11 cm / 5"-4¾"-4½" and 1 ch-space in each side when piece measures 19-18-15 cm / 7½"-7"-6" = 16-16-17-18 ch-spaces remain. Continue until sleeve measures 27-25-23-20 cm / 10½"-9¾"-9"-8" (shorter measurements in the larger sizes because of wider shoulders), and adjust to finish on next to last row in A.Z (i.e. a row with whole ch-spaces in each side of piece). Then work an edge as follows: Beg on 1st row in A.X (= row with ch-spaces, and half ch-spaces in each side of piece) and work this pattern over all ch-spaces at the bottom of sleeve. Continue back and forth until 6th row in A.X has been worked (i.e. 2nd row in with tr-groups). Fasten off. ASSEMBLY: Work underarm seams and side seams in one as follows: 1 sc in front piece, ch 3, 1 sc in back piece, * ch 3, skip approx. 1 cm / ⅜", 1 sc in front piece, ch 3, skip 1 cm / ⅜", 1 sc in back piece *, repeat from *-* and continue the same way for sleeve. NECK EDGE AND BAND: Then work an edge along the band and neck. Beg at the bottom on right front piece, and work as follows: Fasten yarn with one sc, * ch 3, skip 1 cm / ⅜", 1 sc *, repeat from *-* along right band, neck and left band. Sew buttons on to the left band - see explanation above. Button through a hole in right front piece. |
||||||||||||||||||||||||||||
Diagram explanations |
||||||||||||||||||||||||||||
|
||||||||||||||||||||||||||||
 |
||||||||||||||||||||||||||||
 |
||||||||||||||||||||||||||||
 |
||||||||||||||||||||||||||||
 |
||||||||||||||||||||||||||||
Have you finished this pattern?Tag your pictures with #dropspattern #summerblushcardigan or submit them to the #dropsfan gallery. Do you need help with this pattern?You'll find 3 tutorial videos, a Comments/Questions area and more by visiting the pattern on garnstudio.com. © 1982-2026 DROPS Design A/S. We reserve all rights. This document, including all its sub-sections, has copyrights. Read more about what you can do with our patterns at the bottom of each pattern on our site. |
||||||||||||||||||||||||||||


With over 40 years in knitting and crochet design, DROPS Design offers one of the most extensive collections of free patterns on the internet - translated to 17 languages. As of today we count 324 catalogs and 12290 patterns - 12280 of which are translated into English (US/in).
We work hard to bring you the best knitting and crochet have to offer, inspiration and advice as well as great quality yarns at incredible prices! Would you like to use our patterns for other than personal use? You can read what you are allowed to do in the Copyright text at the bottom of all our patterns. Happy crafting!
Post a comment to pattern DROPS 154-1
We would love to hear what you have to say about this pattern!
If you want to leave a question, please make sure you select the correct category in the form below, to speed up the answering process. Required fields are marked *.