
Popular categories
Looking for a yarn?


Comments / Questions (70)
![]() Massiel wrote:
Massiel wrote:
Hello, it's me again! On the back piece, when binding off the outermost stitches, how do I bind off the last three (left side) if I need to keep knitting? do I knit them and then bind off on the WS?
07.07.2024 - 06:32DROPS Design answered:
Dear Massiel, you bind off the middle stitches for the neck but you still have 23 to 26 stitches for each shoulder. Of these stitches, the last 3 stitches towards the neck on each side will be worked in garter stitch. Happy knitting!
15.07.2024 - 00:39
![]() Massiel wrote:
Massiel wrote:
Hello! Two questions: 1) What increase method is recommended? 2)When I need to increase on the sides, does this mean to increase after the 1 edge stitch? Or where is it done exactly? Thanks!
04.07.2024 - 07:26DROPS Design answered:
Dear Massiel, you can use your favorite technique to increase - see also tab "videos" at the top of the pattern. You can increase inside 1 edge stitch. Happy knitting!
04.07.2024 - 09:18
![]() Christine SARCIAT wrote:
Christine SARCIAT wrote:
Bonjour, J'aime beaucoup le point du modèle 73-6 en photo, avec les jours en moins. Pourrais-je avoir le diagramme s'il vous plaît ? Merci
07.06.2024 - 09:58DROPS Design answered:
Bonjour Mme Sarciat, nous avons uniquement ce modèle avec le point ajouré correspondant (cf diagrammes), vous pouvez tenter de tricoter les jetés torse pour voir si l'effet vous convient, ou bien consultez nos modèles analogues ici, pensez à ajouter des filtres pour affiner votre recherche si besoin. Bon tricot!
07.06.2024 - 15:54
![]() Ina wrote:
Ina wrote:
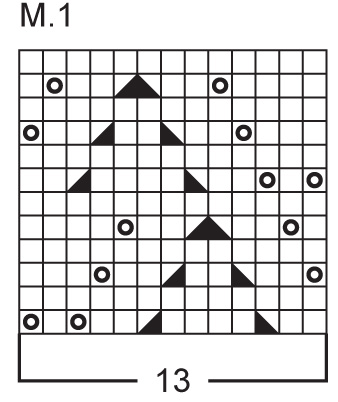
Hallo, wenn man das Muster wie in der Strickschrift angegeben strickt verschieben sich die Umschläge in der 13ten Reihe und sind nicht mittig über dem Umschlag der 12ten Reihe platziert, wie es sein müsste, wenn das Muster aussehen soll wie auf dem Foto. Sieht auch hübsch aus, aber dann passen die Muster der Vorderteile nicht dazu, weil hier die Lochreihe gerade und nicht versetzt läuft. Gibt es eine verbesserte Strickschrift, damit das Muster aussieht wie auf dem Foto? Danke
01.06.2024 - 07:59DROPS Design answered:
Liebe Ina, das Muster wurde vor kurzem neu geprüft, M.1 sollte so gestrickt/wiederholt werden. Viel Spaß beim Stricken!
03.06.2024 - 07:15
![]() Luisa wrote:
Luisa wrote:
Sto per iniziare la diminuzione per lo scollo del davanti destro. la diminuzione per lo scollo la devo fare dopo le 3 maglie di vivagno o all’interno delle tre maglie? e se lo devo fare all’interno delle 3 maglie come scritto nelle spiegazione alla riga successiva avrò solo due maglie di vivagno. come proseguo?
19.05.2024 - 02:42DROPS Design answered:
Buonasera Luisa, deve lavorare le diminuzioni per il collo dopo le 3 maglie a maglia legaccio. Buon lavoro!
16.06.2024 - 22:31
![]() Miquel wrote:
Miquel wrote:
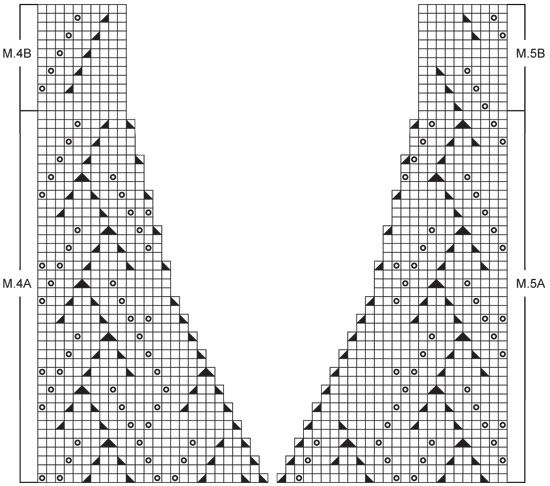
Bonjour, suite Au commentaire d'une tricoteuse italienne, Lucilla wrote, un rectificatif des explications des devants droit et gauche a t-il été émis ? Cordialement
14.03.2024 - 08:28
![]() Miquel wrote:
Miquel wrote:
Bonjour, suite Au commentaire d'une tricoteuse italienne, Lucilla wrote, un rectificatif des explications des devants droit et gauche a t-il été émis ? Cordialement
14.03.2024 - 08:27DROPS Design answered:
Bonjour Mme Miquel, le diagramme M.4A est correct ainsi, tricotez ces 26 mailles au-dessus des 2 motifs de M.1 tricotés précédemment. Bon tricot!
14.03.2024 - 09:28
![]() Gaby Morys wrote:
Gaby Morys wrote:
Sehr schön habe zum Ende alles mit einer Reihe feste Maschen und einer Reihe Krebs Maschen umhäkelt dann wird die jeweilige Abschlusskante fester und gibt dem Teil mehr halt.
03.03.2024 - 17:44
![]() Hanna wrote:
Hanna wrote:
Bonjour c’est pas précisé ds l’as explications si les 13 premières mailles au début et fin doivent être tricoter en jersey et ds le lexique n’est pas précisé si sur le rang envers les Mailles doivent tricoter endroit ou envers Merci en attente d’une reponse
27.01.2024 - 10:20DROPS Design answered:
Bonjour Hanna, les 19 mailles jersey tricotées en M entre la m lis et M.1 se tricotent à l'endroit sur l'endroit et à l'envers sur l'envers = jersey endroit. Les diagrammes montrent les motifs vu sur l'endroit, autrement dit, vous tricotez les mailles à l'endroit (et les diminutions) sur l'endroit et les mailles à l'envers sur l'envers. bon tricot!
29.01.2024 - 11:38
![]() Miri wrote:
Miri wrote:
Hallo! Ich bin gerade beim rechten Vorderteil und würde jetzt mit dem Diagramm 4A beginnen. Allerdings habe von M1 kommend nur 26 Maschen. Laut Diagramm 4A würde ich aber 27 Maschen benötigen wegen der Abnahme zu Beginn. Ein paar andere hatten hier ja schon das gleiche Problem. Ich hab die Antwort allerdings nicht verstanden.
04.12.2023 - 21:43DROPS Design answered:
Liebe Miri, die 1. Reihe M.4A wird über 26 Maschen gestrickt, dh direkt über die 26 Maschen die zuvor mit M.1 gestrickt wurden. Viel Spaß beim stricken!
05.12.2023 - 08:57
|
|||||||||||||
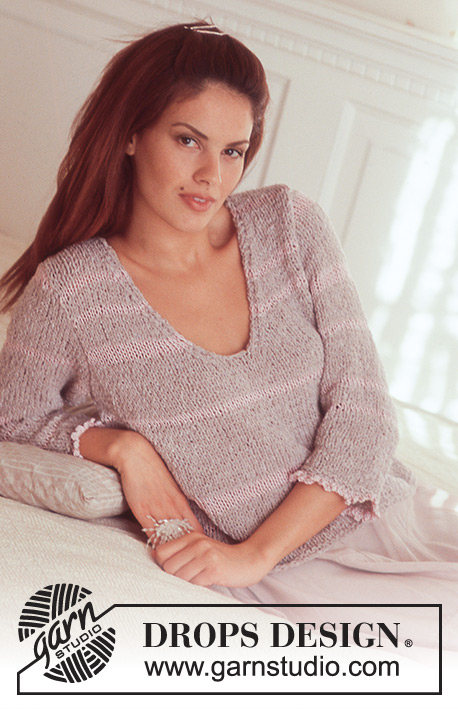
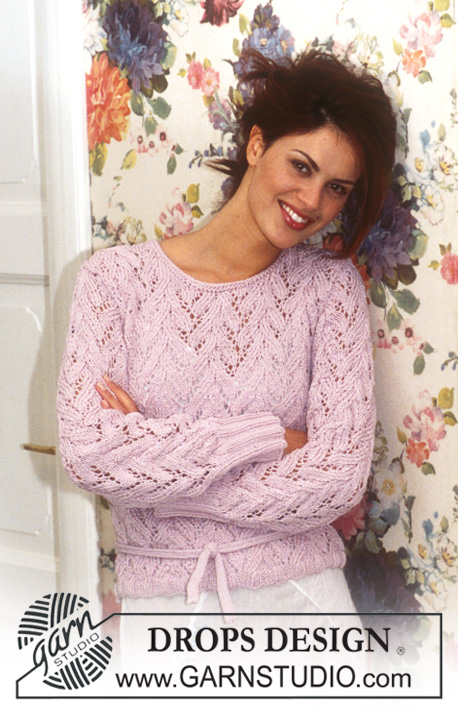
Summer Vines Vest#summervinesvest |
|||||||||||||
|
|
|||||||||||||
DROPS Top in Muskat
DROPS 73-6 |
|||||||||||||
|
Gauge: 20 sts x 26 rows = 10 x 10 cm on larger needles in pattern. 1 repeat of Pattern 1 = 7 cm wide. Garter st, when knitting flat: Knit all sts, all rows. Pattern: See diagrams M.1 - M.5. The pattern is seen from the right side. Note: Patterns 2 and 3 (armhole shaping) are different for each size - use the chart for your size. NB: On the garment, the lace pattern (by mistake) is shown with a couple of holes too small, but follow the diagram and possibly see DROPS Design Model no. 73-5 to see how the pattern will look when the diagram is worked. Knitting tips (for armhole): All decs are made on right side rows. Dec 1 st inside 3 edge sts knit in garter st as follows: After 3 sts: Slip 1 as if to knit, K 1, psso. Before 3 sts: K 2 tog. Buttonhole: Make buttonholes along right button band. 1 buttonhole = bind off the center st of buttonband and yo over the bound off st on the next row. Make buttonhole when the piece measures (for all sizes): 2 cm, 6.5 cm, 11 cm, 15.5 cm and 20 cm. ---------------------------------------------------------------------- Back: Cast on 72-80-88-96 sts on smaller needles. Knit 6 rows garter st. Change to larger needles and continue as follows: K 1 (edge st), 9-13-17-21 sts stockinette st, Pattern 1 over 52 sts (4 repeats), 9-13-17-21 sts stockinette st, K 1 (edge st). When the piece measures 5 cm inc 1 st at each side every 2 cm a total of 5 times = 82-90-98-106 sts - knit the increased sts in stockinette st. When the piece measures 17 cm knit 4 rows garter st over 6-6-7-8 sts at each side (knit the remaining sts as before). On the next row bind off the outermost 3-3-4-5 sts at each side for armhole. Then dec 1 st at armholes inside 3 garter st edge sts every other row 2-5-7-9 times - see knitting tips = 72-74-76-78 sts remain. Continue with 3 sts garter st and 7-8-9-10 sts stockinette st at each side of Pattern 1. When the piece measures 35-36-37-38 cm knit 4 rows garter st over the center 32 sts - knit the remaining sts as before. Then bind off the center 26 sts for the neck = 23-24-25-26 sts remain on each shoulder. Knit pattern as before with 3 sts in garter st at each neck edge. Bind off when the piece measures approx. 37-38-39-40 cm. Right front: Cast on 39-43-47-51 sts on smaller needles. Knit 6 rows garter st, change to larger needles and knit the next row as follows from center front edge: K 3 (buttonband sts knit in garter st throughout), Pattern 1 over 26 sts (2 repeats), 9-13-17-21 sts stockinette st and K 1 (edge st). Make buttonholes along buttonband - see instructions above. When the piece measures 5 cm inc at the side as on back = 44-48-52-56 sts (knit the increased sts in stockinette st). When the piece measures 17 cm knit 4 rows garter st over 6-6-7-8 sts at the side (knit the remaining sts as before). On the next row bind off the outermost 3-3-4-5 sts at the side for armhole. Then shape armhole as on back. At the same time when the piece measures approx. 20 cm - adjust to end after a complete repeat of Pattern 1 - knit and bind off for the neck following Pattern 4A - dec for neck inside 3 button band sts knit in garter st. Knit the remaining sts in each row as before. After all armhole and neck shaping is complete 23-24-25-26 sts remain on shoulder. Continue with Pattern 4B and remaining sts in stockinette st and garter st until piece measures approx. 37-38-39-40 (match back). Bind off. Left front: Cast on as right front and knit 6 rows garter st, change to larger needles. Knit the next row as follows from side: K 1 (edge st), 9-13-17-21 sts stockinette st, Pattern 1 over 26 sts (2 repeats) and 3 sts in garter st (buttonband). Inc at the side and shape armhole as on right front. For neck shaping follow Pattern 5A, then continue with Pattern 5B. Bind off when piece matches right front. Assembly: Sew shoulder- and side seams using edge sts as seam allowance. Sew on buttons. |
|||||||||||||
Diagram explanations |
|||||||||||||
|
|||||||||||||
 |
|||||||||||||
 |
|||||||||||||
 |
|||||||||||||
Have you finished this pattern?Tag your pictures with #dropspattern #summervinesvest or submit them to the #dropsfan gallery. Do you need help with this pattern?You'll find 13 tutorial videos, a Comments/Questions area and more by visiting the pattern on garnstudio.com. © 1982-2026 DROPS Design A/S. We reserve all rights. This document, including all its sub-sections, has copyrights. Read more about what you can do with our patterns at the bottom of each pattern on our site. |
|||||||||||||


With over 40 years in knitting and crochet design, DROPS Design offers one of the most extensive collections of free patterns on the internet - translated to 17 languages. As of today we count 324 catalogs and 12290 patterns - 12280 of which are translated into English (US/in).
We work hard to bring you the best knitting and crochet have to offer, inspiration and advice as well as great quality yarns at incredible prices! Would you like to use our patterns for other than personal use? You can read what you are allowed to do in the Copyright text at the bottom of all our patterns. Happy crafting!
Post a comment to pattern DROPS 73-6
We would love to hear what you have to say about this pattern!
If you want to leave a question, please make sure you select the correct category in the form below, to speed up the answering process. Required fields are marked *.