
Popular categories
Looking for a yarn?


Comments / Questions (37)
![]() Alessia wrote:
Alessia wrote:
Buonasera, sto lavorando una taglia S/M. Potreste aiutarmi a capire meglio questo passaggio? "intrecciare per l’arrotondamento della manica a ogni lato a f. alterni: 4 m. 1 volta, 2 m. 4 volte, 1 m. 2 volte, poi intrecciare 2 m. a ogni lato... e poi intrecciare 4 m. 1 volta." "A ogni lato a ferri alterni" significa che devo diminuire all'inizio di ogni ferro, cioè lato dx sempre a dritto e lato sx sempre a rovescio, fino alla fine delle diminuzioni? Grazie
16.02.2021 - 18:56DROPS Design answered:
Buonasera Alessia, si, esatto, è corretta la sua interpretazione. Buon lavoro!
16.02.2021 - 22:33
![]() Judy wrote:
Judy wrote:
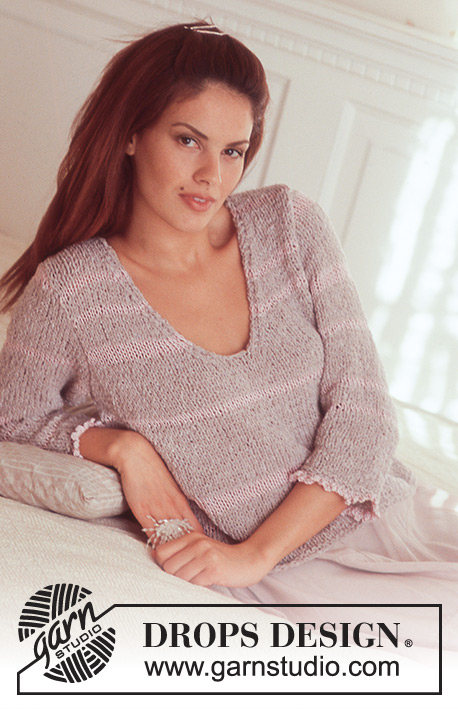
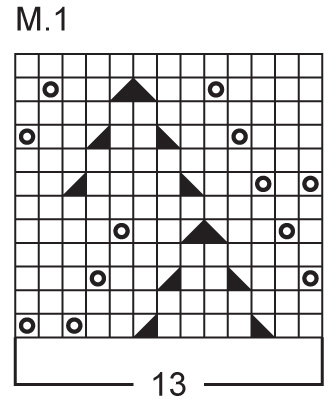
I'm confused on how to knit the top of the sleeves where it says ( do not make any yo in the pattern even if sts are knit together). Do I knit the yarn over or skip that entirely. And if skipped how does the 13 st pattern stay even??? This is a really beautiful sweater.
10.02.2021 - 21:36DROPS Design answered:
Dear Judy, to get the correct number of stitches while decreasing, make sure that you can work as many yarn overs as you will work decreasing, fo example on a row like row 1 in M.1 you have 2 decreases + 2 yarn overs, if you can make only 1 of the decreases + the yarn over, then just knit the 2 sts instead of decrease them and do not work the yarn over. If any decrease is not compensate with a yarn over /if any yarn over is not compensate with a decrease, your number of stitches will not match. Hope this helps; Happy knitting!
11.02.2021 - 06:47
![]() Patricia TOILIER wrote:
Patricia TOILIER wrote:
Merci pour votre site qui est génial .... de très beaux modèles - de bonnes explications et quand on le désire un accompagnement. Bravo ..... je le consulte en permanence.... cordialement Patricia
23.01.2020 - 14:44
![]() Wiviann Björklund wrote:
Wiviann Björklund wrote:
Vad betyder den svarta trekanten i mönstret. Saknas i diagram förklaring. mvh Wiviann
12.05.2019 - 14:40DROPS Design answered:
Hei Wiviann. Det er 2 ulike symboler: først strikker du "ta 1 maske løs av pinnen som om den skulle strikkes rett, 1 rett, løft den løse masken over" og så strikker du "2 rett sammen". God fornøyelse
13.05.2019 - 07:10
![]() Bloem wrote:
Bloem wrote:
Goedemiddag, kan deze trui op een rondbreinaald gebreid worden? En zijn er dan nog dingen waar ik rekening mee moet houden of die ik moet aanpassen? Alvast dank voor uw antwoord.
16.11.2018 - 12:48DROPS Design answered:
Dag Bloem,
Deze trui kan inderdaad om de rondbreinaald gemaakt worden. Je laat de kantsteken dan weg. Dus als je alle steken van het voorpand en het achterpand bij elkaar optelt om samen op de naald te zetten, zet je 4 steken minder op en bij de mouw zet je 2 steken minder op.
19.11.2018 - 08:27Erika wrote:
Good evening, I have just found this oldish paternal and it's lovely!! This is the best web side for both knitting and crochet!!! Well done for your excellent job!! ;) ;)
21.02.2015 - 22:39
![]() DANY DUFLOS wrote:
DANY DUFLOS wrote:
Bonjour, un joli pull que je voudrais tricoter avec 2 aiguilles serait il possible d'avoir le diagramme pour cela (je ne suis pas une pro pour recalculer ce qu'il me faut) merci amicalement Dany62
03.05.2014 - 13:08DROPS Design answered:
Bonjour Mme Duflos, chaque pièce de ce pull se tricote en allers et retours, vous pouvez ainsi suivre toutes les explications telles qu'elles sont décrites. Pensez à consulter nos tutoriels en vidéo si nécessaire (cf onglet "Vidéos" à droite de la photo. Bon tricot!
05.05.2014 - 08:43
![]() Iloveuncinetto wrote:
Iloveuncinetto wrote:
Mannaggia,ho interpretato male le spiegazioni,mi tocca rifarlo nuovamente! Grazie ancora della Vs disponibilità.
23.11.2013 - 16:04
![]() Iloveuncinetto wrote:
Iloveuncinetto wrote:
Scusate la mia ottusità,dato che M1 si ripete su 13 maglie le ripetizioni si concludono perfettamente su 91maglie ma avendone montate 92 + 1aumento= 93 maglie per la taglia S,ne restano 2 che mi creano il problema delle maglie in più nei giri seguenti,devo forse lavorare i 2 vivagni? Sono una principiante ma grazie a Voi ho realizzato le mie prime maglie decenti,complimenti per il sito meraviglioso e per la pazienza e la sollecitudine delle risposte! Grazie di cuore.
23.11.2013 - 13:28DROPS Design answered:
Buongiorno. Le due maglie in più sono le m vivagno, una per ciascun lato. Queste m vanno lavorate sempre a dir, sia sui ferri di andata che su quelli di ritorno. Buon lavoro!
23.11.2013 - 15:10
![]() Iloveuncinetto wrote:
Iloveuncinetto wrote:
Ho iniziato a lavorare il davanti,con i primi 12 giri è normale che dal lato sinistro aumentino le maglie? Spero di sì perchè l'ho già rifatto 2 volte! Grazie. :-\
12.11.2013 - 00:12DROPS Design answered:
Buongiorno, quindi ha lavorato i 6 f a coste, aumentato e continuato con il motivo 1. M.1 è lavorato su 13 m e si mantengono tali, ci sono 2 diminuzioni e due aumenti per motivo, quindi le m non dovrebbero aumentare, è sicura di aver seguito bene il diagramma? ci riscriva se le serve ancora aiuto! Buon lavoro!
12.11.2013 - 15:31
|
|||||||||||||
Wisteria Weaving |
|||||||||||||
|
|
|||||||||||||
DROPS Pullover in Muskat
DROPS 73-5 |
|||||||||||||
|
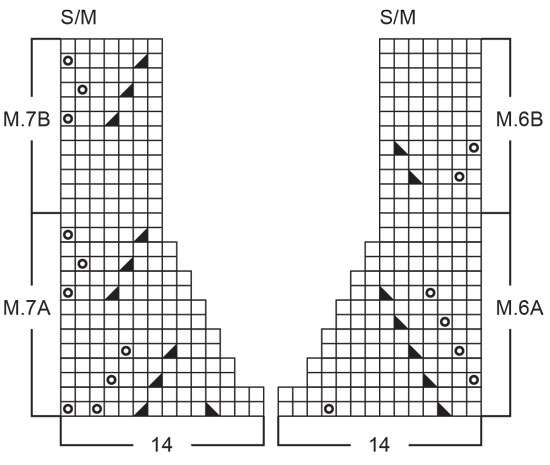
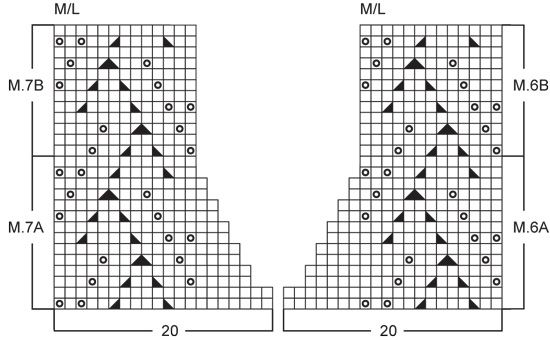
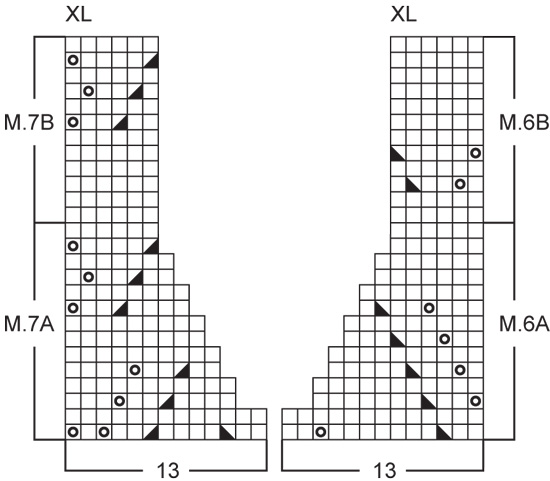
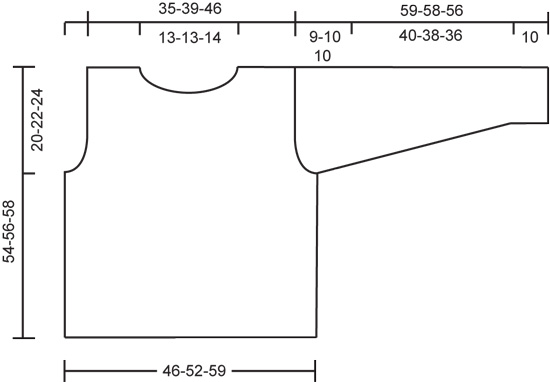
Gauge: 20 sts x 26 rows = 10 x 10 cm on larger needles in pattern. 1 repeat of Pattern 1 = 7 cm wide Rib: * K 2, P 4 *, repeat from * - *. Garter st, when knitting flat: Knit all sts, all rows. Pattern: See charts. The pattern is seen from the right side. Note: Patterns 6 and 7 (neck shaping) are different for each size - use the appropriate chart for your size. ------------------------------------------------------------------ Front: Cast on 92-104-116 sts on smaller needles. Knit 6 rows rib, but keep 1 edge st at each side knit in garter st throughout. Change to larger needles and Pattern 1, increasing 1-2-3 sts evenly distributed on the first row = 93-106-119 sts (the edge st at each side should not be knit in Pattern 1). When the piece measures approx. 34 cm - adjust to end after a complete repeat of Pattern 1 - knit the next row as follows (right side row): 14 sts stockinette st, Pattern 1 over 65-78-91 sts, 14 sts stockinette st. Continue Pattern 1 with stockinette st at each side and bind off for armhole at each side every other row: 4 sts 1 time, 2 sts 2 times and 1 st 3-5-5 times = 71-80-93 sts. Continue Pattern 1 with 3-1-1 sts stockinette st each side. When the piece measures approx. 43 cm (adjust to end after a complete repeat of Pattern 1) knit the next row as follows: 3-1-1 sts stockinette st, 13-13-26 sts of Pattern 1, Pattern 6A (use chart for your size) for 14-20-13 sts, bind off 11-12-13 sts for the neck, Pattern 7A (use chart for your size) for 14-20-13 sts, 13-13-26 sts of Pattern 1 and 3-1-1 sts stockinette st. Shape neck following Patterns 6A and 7A. When neck shaping is complete 23-27-33 sts remain on each shoulder. Continue with Patterns 6B and 7B over 7-13-6 sts to finished measurements, knit the remaining sts as before. Bind off when the piece measures 54-56-58 cm. Back: Cast on and knit the same as the front. Bind off for armhole as on front and continue until the piece measures 52-54-56 cm. Now bind off the center 23-24-25 sts for the neck. On the next row dec 1 st at each neck edge = 23-27-33 sts remain on each shoulder. Bind off when the piece measures 54-56-58 cm. Sleeve: Cast on 56-56-56 sts on smaller needles and knit rib for 10 cm, keeping 1 edge st at each side in garter st. Change to larger needles and continue as follows: 2 sts stockinette st, Pattern 1 over 52 sts, 2 sts stockinette st. When the piece measures 12 cm inc 1 st at each side a total of 10-14-18 times: Size S/M: every 10 rows. Size M/L: alternately every 6th and 7th row. Size XL: alternately every 4th and 5th row = 76-84-92 sts - knit the increased sts in stockinette st. When sleeve measures 50-48-46 cm bind off for sleeve cap at each side every other row (do not make any yo in the pattern even if sts are knit together): 4 sts 1 time, 2 sts 4-5-5 times, 1 st 2-2-1 times, then bind off 2 sts at each side until the piece measures 58-57-55 cm and then bind off 4 sts 1 time. Bind off, sleeve measures approx. 59-58-56 cm. Assembly: Sew right shoulder. Neckband: Pick up approx. 80-90 sts around the neck on smaller needles. Knit 4 rows garter st, bind off. Sew left shoulder and up along neckband. Sew in sleeves and sew sleeve and side seams using edge sts as a seam allowance. Belt: Cast on 7 sts on double-pointed needle. Knit 1 row, * push sts to right side of needle without turning the work, pull yarn tight on back side and knit 1 row from same side as previous row *. Repeat from * - *. For best results, pull yarn tight on previously knit rows as you go along. Bind off when belt measures approx. 120-150 cm. |
|||||||||||||
Diagram explanations |
|||||||||||||
|
|||||||||||||
 |
|||||||||||||
 |
|||||||||||||
 |
|||||||||||||
 |
|||||||||||||
 |
|||||||||||||
Have you finished this pattern?Tag your pictures with #dropspattern or submit them to the #dropsfan gallery. Do you need help with this pattern?You'll find 18 tutorial videos, a Comments/Questions area and more by visiting the pattern on garnstudio.com. © 1982-2026 DROPS Design A/S. We reserve all rights. This document, including all its sub-sections, has copyrights. Read more about what you can do with our patterns at the bottom of each pattern on our site. |
|||||||||||||


With over 40 years in knitting and crochet design, DROPS Design offers one of the most extensive collections of free patterns on the internet - translated to 17 languages. As of today we count 324 catalogs and 12291 patterns - 12281 of which are translated into English (US/in).
We work hard to bring you the best knitting and crochet have to offer, inspiration and advice as well as great quality yarns at incredible prices! Would you like to use our patterns for other than personal use? You can read what you are allowed to do in the Copyright text at the bottom of all our patterns. Happy crafting!
Post a comment to pattern DROPS 73-5
We would love to hear what you have to say about this pattern!
If you want to leave a question, please make sure you select the correct category in the form below, to speed up the answering process. Required fields are marked *.