
Popular categories
Looking for a yarn?


Comments / Questions (20)
![]() Silkelana wrote:
Silkelana wrote:
What are the replacing color numbers for Babyalpaca Silk 4314 and 1760? I love this colors but they didn't exist anymore. Thanks for your answer. Kind regards.
03.03.2022 - 11:05DROPS Design answered:
Dear Silkelana, please contact your DROPS store for any assistance choosing the best matching colours, they will help you even per mail or telephone. Happy knitting!
03.03.2022 - 14:12
![]() Monika Schafus wrote:
Monika Schafus wrote:
Modell DROPS 149-2 - Teil B - habe 190 Maschen aufgenommen und Reihe 1 bis 13 gestrickt. Reihe 8 und 9 hellgraulila gestrickt. Es ergibt sich eine Rippe auf der rechten Seite. Wenn ich die Reihen 6-13 wiederhole, erscheint die hellgraulila Rippe nicht, d.h. Es sieht wie links aus. Was mache ich falsch❓ Danke für schnelle Hilfe Monika Schafus
01.10.2020 - 14:29DROPS Design answered:
Liebe Frau Schafus, die Reihen 6 +7 und 10 bis 13 sind mit graulila gestrickt und die Reihen 8 und 9 sind mit hellgraulila gestrickt so haben Sie mit Reihen 6 bis 13: 1 Krausrippe mit graulila, 1 krausrippe mit hell graulila und 2 Krausrippen mit graulila (= 1 kraus rippe mit hellgraulila nach 4 krausrippen graulila). Viel Spaß beim stricken!
01.10.2020 - 16:13
![]() Christiane Grenier wrote:
Christiane Grenier wrote:
Pour le modèle 149-2 pour débuter la deuxième partie je fais une maille dans chaque trou et entre les trous je fais une jeté pour atteindre 190 mailles c’est ce que je comprends juste me confirmer merci
15.04.2018 - 21:54DROPS Design answered:
Bonjour Mme Grenier, tout à fait, vous relever 1 m dans chacun des jours le long du côté et vous faites 1 jeté entre les mailles relevées. Si vous n'arrivez pas à 190 m ainsi, relevez des mailles entre les jours à intervalles réguliers. Bon tricot!
16.04.2018 - 09:51
![]() Bärbl Rupp wrote:
Bärbl Rupp wrote:
Der Schluß (einfärbiger Teil) funktioniert nicht, da in der deutschen Anleitung in der letzten Reihe steht, dass man in jeder zweiten Hin-Reihe 1 Masche ABNEHMEN soll. Es sollte jedoch wie in der englischen Fassung 1 Masche AUFNEHMEN heißen (siehe auch jenen Teil, wo abwechselnd nach jeder Krausrippe der Farbwechsel gemacht wird.). Das Tuch macht sonst einen ziemlichen Hacken.
08.11.2014 - 13:12DROPS Design answered:
Sie haben Recht, vielen Dank für den Hinweis, das wird gleich korrigiert!
09.11.2014 - 22:26
![]() Sabine Habke wrote:
Sabine Habke wrote:
Vielen lieben Dank für Eure Hilfe. Jetzt klappt alles wunderbar.
02.07.2014 - 15:56
![]() Sabine Habke wrote:
Sabine Habke wrote:
Bitte um genaue angabe für die zweiten 11 reihen. meine löcher sind nicht da wo sie sein sollen
21.06.2014 - 12:01DROPS Design answered:
Liebe Sabine, Sie wdh. die 4.-11. (das was leider etwas falsch angegeben, es stand dort, dass Sie die 11 R wdh, das wurde nun korrigiert). Sie stricken den LETZTEN Umschlag jeder 2. Rück-R immer re, sodass sich ein Loch ergibt. Also: 12.R (= 4.R = Hin-R): re stricken, 13.R (= 5.R = Rück-R): re stricken, 14.R (= 6.R = Hin-R): 1 re, 1 Umschlag, re bis zur letzten M, 1 Umschlag, 1 M re, 15.R (= 7.R = Rück-R): 1 re, 1 re veschr., die R re zu Ende stricken (der LETZTE Umschlag = Loch) usw.
23.06.2014 - 17:50
![]() Sabine Habke wrote:
Sabine Habke wrote:
Leider komme ich nicht mit der Anleitung klar. Die ersten 11 R. und dann wiederholen. Die Löcher sind dann nicht da wo sie sein sollen. Ich bitte um Hilfe
12.06.2014 - 08:23DROPS Design answered:
Liebe Sabine, die Zunahmen (= Umschläge) erfolgen in jeder 4. R immer nur nach der ersten und vor der letzten M(also 2 Umschläge pro Zunahme-R), dazwischen stricken Sie einfach rechts. In der darauffolgenden Rück-R stricken Sie den 1. Umschlag verschränkt, damit sich kein Loch ergibt, und den 2. Umschlag normal, damit sich ein Loch ergibt. Die Streifenfolge stricken Sie wie in R 4-11 beschrieben.
13.06.2014 - 15:14
![]() Ruth wrote:
Ruth wrote:
Der einfarbige Schluss funktioniert nicht wie beschrieben. Auch nach drei Interpretationsvarianten wurde das Tuch nicht symetrisch. Trotzdem schön.
19.05.2014 - 07:23
![]() Johanna wrote:
Johanna wrote:
Jag har precis stickat färdigt min och den blev fin. Jag behövde dock bara 4 nystan av den färg som motsvarar grålila och har mycket kvar på de sista använda nystanen av båda färgerna, så det blir till att göra tillbehör med allt överblivet garn. Det gör i och för sig absolut ingenting =)
05.02.2014 - 15:04
![]() Ana wrote:
Ana wrote:
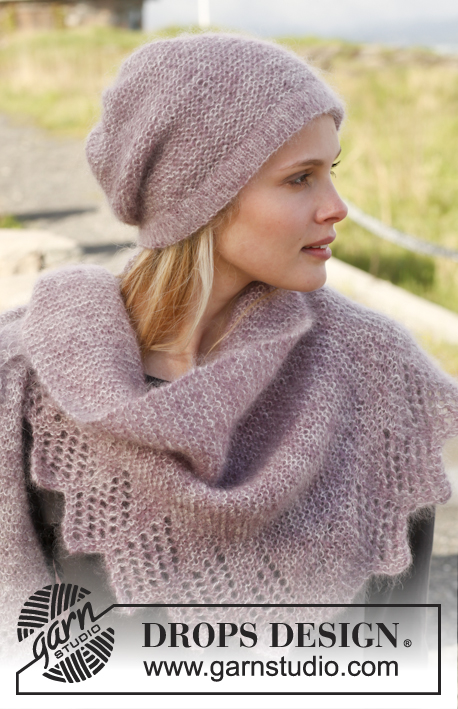
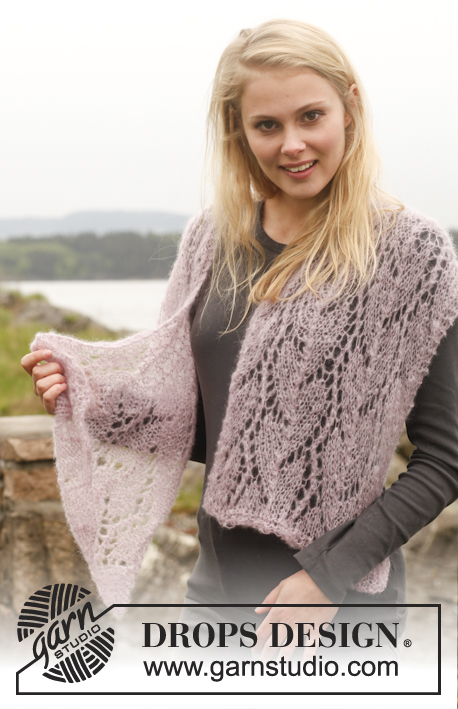
Cozy seaside shawl.
03.07.2013 - 17:13
|
|
Jette#jetteshawl |
|
|
|
|
Knitted DROPS shawl in garter st in ”BabyAlpaca Silk”.
DROPS 149-2 |
|
|
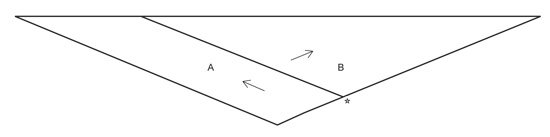
GARTER ST (back and forth on circular needle): K all rows. 1 ridge = K2 rows. KNITTING TIP: It is important when changing color in the stripes with 3 ridges light gray purple and 1 ridge gray purple, to lightly pull both the piece and strand of yarn to avoid a tight edge. ---------------------------------------------------------- SHAWL: Work piece in 2 parts, i.e. first part is worked as a diagonal edge on shawl. Then pick up along one long side on this part and finish the shawl. READ KNITTING TIP! 1ST PART (= A on chart): Cast on 3 sts on circular needle size 3.5 mm / US 4 with light gray purple. Row 1 (= WS): K all sts. Row 2 (= RS): K 1, 1 YO, K 1, 1 YO, K 1 = 5 sts. Row 3 (= WS): K 1, K 1 twisted, K 3 (last YO = hole) = 5 sts. Row 4 (= RS): K all sts. Row 5 (= WS): K all sts. Row 6 (= RS): K 1, 1 YO, K 3, 1 YO, K 1 = 7 sts. Row 7 (= WS): K 1, K 1 twisted, K 5 (last YO = hole) = 7 sts. Row 8 (= RS): Switch to gray purple and K all sts. Row 9 (= WS): K all sts. Row 10 (= RS): Switch back to light gray purple and K 1, 1 YO, K 5, 1 YO, K 1 = 9 sts. Row 11 (= WS): K 1, K 1 twisted, K 7 (last YO = hole) = 9 sts. Repeat rows 4-11 until there are 45 sts on needle (i.e. inc in each side every 4th row AT THE SAME TIME work stripes with 3 ridges light gray purple and 1 ridge gray purple). When there are 45 sts on needle, piece measures approx. 20 cm / 8" in width (measured along sts). Work 1 ridge more with light gray purple so that there are 2 ridges with light gray purple after 1 ridge with gray purple. Then work as follows: Row 1 (= RS and continue with light gray purple): K 1, 1 YO, K until 3 sts remain on row, K 2 tog and K 1 = 45 sts. Row 2 (= WS): K all sts (YO = hole) = 45 sts. Row 3 (= RS): Switch to gray purple and K all sts. Row 4 (= WS): K all sts. Row 5 (= RS): Switch back to light gray purple and K 1, 1 YO, K until 3 sts remain on needle, K 2 tog and K 1 = 45 sts. Row 6 (= WS): K all sts (YO = hole) = 45 sts. Row 7 (= RS): K all sts. Row 8 (= WS): K all sts. Repeat rows 1-8, i.e. inc in one side and dec in the other side every 4th row (i.e. every other row from RS) and continue stripes as before with 3 ridges light gray purple and 1 ridge gray purple. When piece measures approx. 85 cm / 33½" along right long side (seen from RS) – finish after 2 ridges with light gray purple, insert 1 marker at beg of row from RS. There should now be approx. 95 holes along right long side (seen from RS). Continue to dec as follows: Row 1 (= RS and continue with light gray purple): K until 3 sts remain on row, K 2 tog and K 1 = 44 sts. Row 2 (= WS): K all sts. Row 3 (= RS): Switch to gray purple and K all sts. Row 4 (= WS): K all sts. Row 5 (= RS): Switch back to light gray purple and K until 3 sts remain, K 2 tog, K 1 = 43 sts. Row 6 (= WS): K all sts. Row 7 (= RS): K all sts. Row 8 (= WS): K all sts. Repeat rows 1-8, i.e. dec 1 st at end of every 4th row (i.e. at the end of every other row from RS) and continue stripes as before with 3 ridges light gray purple and 1 ridge gray purple. When 3 sts remain on row, work as follows: K 1, K 2 tog, turn piece, K 2, turn piece, K 2 tog, cut the yarn and pull it through st. 2ND PART (= B on chart): Pick up from RS with gray purple as follows: Pick up 1 st in the tip on part A (marked with a star on chart), pick up 1 st through first hole, i.e. insert needle through hole, get the yarn and pull yarn back through hole, * 1 YO on needle, pick up 1 st through next hole (= 2 new sts on needle) *, repeat from *-* along the entire side with hole until marker, so that there are 190 sts on needle (if you need to pick up more sts to get correct no of sts, pick up 1 st between holes evenly). Then work as follows: Row 1 (= WS): K all sts. Row 2 (= RS): K until 3 sts remain on row, K 2 tog and K 1 (= 1 st dec). Row 3 (= WS): K all sts. Row 4 (= RS): K 1, 1 YO, K until 4 sts on row, K 3 tog, K 1 (= 1 st inc and 2 sts dec). Row 5 (= WS): K until 2 sts remain on row, K YO twisted and finish K 1. Row 6 (= RS): K until 3 sts remain on row, K 2 tog and K 1 (= 1 st dec). Row 7 (= WS): K all sts. Row 8 (= RS): Switch to light gray purple and K 1, 1 YO, K until 4 sts remain on needle, K 3 tog and K 1 (= 1 st inc and 2 sts dec). Row 9 (= WS): K until 2 sts remain on row, K YO twisted and finish K 1. Row 10 (= RS): Switch back to gray purple and K until 3 sts remain on row, K 2 tog and K 1 (= 1 st dec). Row 11 (= WS): K all sts. Row 12 (= RS): K 1, 1 YO, K until 4 sts on row, K 3 tog and K 1 (= 1 st inc and 2 sts dec). Row 13 (= WS): K until 2 sts remain on row, K YO twisted and finish K 1. Repeat rows 6-13 until piece measures approx. 15 cm / 6" from where sts were picked up - finish after 3 ridges with gray purple. Then work as follows: Row 1 (= RS): Switch to light gray purple and K until 3 sts remain on row, K 2 tog and K 1 (= 1 st dec). Row 2 (= WS): K all sts. Row 3 (= RS): Switch to gray purple and K 1, 1 YO, K until 4 sts remain on needle, K 3 tog and K 1 (= 1 st inc and 2 sts dec). Row 4 (= WS): K until 2 sts remain on row, K YO twisted and finish K 1. Repeat rows 1-4 until piece measures approx. 31 cm / 12¼" from where sts were picked up - finish after 1 ridge with light gray purple. Then work as before but only with gray purple, i.e. dec alternately 1 and 2 sts at the end of every row from RS and inc 1 st at beg of every other row from RS. When all sts have been dec, cut the yarn and weave in all tails. |
|
 |
|
Have you finished this pattern?Tag your pictures with #dropspattern #jetteshawl or submit them to the #dropsfan gallery. Do you need help with this pattern?You'll find 9 tutorial videos, a Comments/Questions area and more by visiting the pattern on garnstudio.com. © 1982-2026 DROPS Design A/S. We reserve all rights. This document, including all its sub-sections, has copyrights. Read more about what you can do with our patterns at the bottom of each pattern on our site. |


With over 40 years in knitting and crochet design, DROPS Design offers one of the most extensive collections of free patterns on the internet - translated to 17 languages. As of today we count 324 catalogs and 12290 patterns - 12280 of which are translated into English (US/in).
We work hard to bring you the best knitting and crochet have to offer, inspiration and advice as well as great quality yarns at incredible prices! Would you like to use our patterns for other than personal use? You can read what you are allowed to do in the Copyright text at the bottom of all our patterns. Happy crafting!
Post a comment to pattern DROPS 149-2
We would love to hear what you have to say about this pattern!
If you want to leave a question, please make sure you select the correct category in the form below, to speed up the answering process. Required fields are marked *.