
Popular categories
Looking for a yarn?


Comments / Questions (72)
![]() Silvia wrote:
Silvia wrote:
Hallo, kann man für dieses Modell auch Baby Marino verwenden?
22.08.2014 - 17:12DROPS Design answered:
Ja, Sie können statt BabyAlpaca Silk auch Baby Merino verwenden. Da beide in etwa die gleiche Lauflänge haben (Baby Merino hat geringfügig mehr), benötigen Sie die gleiche Menge wie bei BabyAlpaca Silk. Zusätzlich verwenden Sie Kid-Silk, Glitter können Sie weglassen. Wenn Sie die Jacke ganz in Baby Merino stricken wollen (also ohne Kid-Silk + Glitter), geht das auch, dann brauchen Sie entsprechend die doppelte Menge Baby Merino. Beachten Sie, dass die Maschenprobe stimmen muss.
23.08.2014 - 10:04
![]() BOUNOUS Aline wrote:
BOUNOUS Aline wrote:
Bonjour, J'aimerai faire ce modèle mais en aiguilles droites,serait-il possible de savoir comment faire pour les mailles du dos,devant-droitetdevant gauche.Merci beaucoup. MME BOUNOUS
01.06.2014 - 22:08DROPS Design answered:
Bonjour Mme Bounous, le dos & les devants se tricotent en allers et retours sur aiguille circulaire pour avoir suffisamment de place pour y loger toutes les mailles. Si vous souhaitez tricoter chaque pièce séparément, calculez pour votre taille le nombre de m à monter et ajoutez les m lis. Pour les manches, ajoutez 2 m (1 m lis de chaque côté) à rabattre au moment de les mettre en attente. Bon tricot!
03.06.2014 - 10:28
![]() Tina wrote:
Tina wrote:
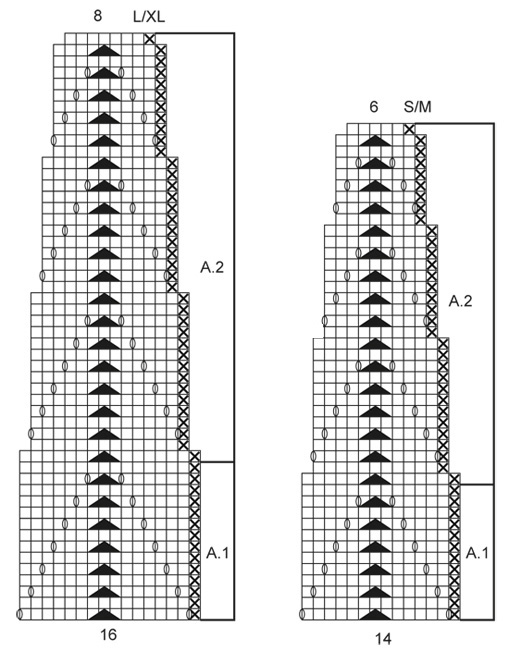
Hallo! Ich würde sehr gerne die Jacke in Größe M Stricken. Jedoch geht der Rapport A1 bei mir nicht auf. Ich müsste 194 Maschen anschlagen um am Rand jeweils 6 Blendmaschen zu haben und den Rapport dann 13 mal stricken zu können. Kann das sein? Vielen lieben Dank!
28.05.2014 - 12:29DROPS Design answered:
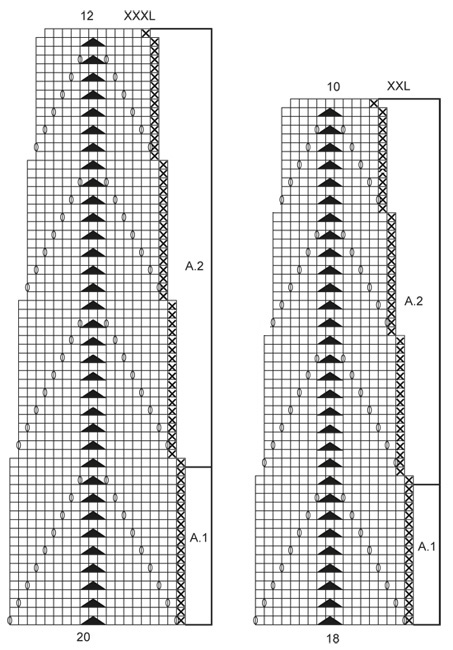
Liebe Tina, der Rapport geht auf: Für Größe S/M gilt immer die erste Zahl und Sie müssen das zur Größe passende Diagramm A.1 benutzen, also 167 M anschlagen, dann stricken Sie wie beschrieben: 6 M Blende + 154 M A.1 (= 11x 14 M A.1) + 1 M li + 6 M Blende = 167 M. Wenn Sie Größe L/XL stricken (also immer die zweite Zahl), passt es auch: 189 M = 6 M Blende + 11x 16 M A.1 + 1 M li + 6 M Blende.
28.05.2014 - 14:14
![]() Florence Trombini wrote:
Florence Trombini wrote:
Bonjour je viens de tricoter ce modele que j;ai un peu modifier pour en faire des manches courtes. Les explications sont tres claires et le rendu est vraiment tres beau!
16.04.2014 - 19:38
![]() Inge Voigt wrote:
Inge Voigt wrote:
Jeg er nået til bærestykket og kan ikke se hvordan jeg uden at tage ind kan gå fra A1 og strikke A2 ovenpå ... der må være nogle masker der skal tages ind for at det passer!! how to??
25.03.2014 - 22:08DROPS Design answered:
Hej Inge. I sidste pind af A.1 har du strikket sammen uden at slaa om = taget 2 masker ind per gentagelse. Saa kan du fortsaette uden problemer med A.2.
26.03.2014 - 12:28
![]() Carmen wrote:
Carmen wrote:
Die 1.Maschenabnahme soll nach 7cm erfolgen. 7cm ab Anschlagkante gemessen oder ab dem Punkt, an dem nur noch glatt Rechts gestrickt wird?
23.03.2014 - 11:08DROPS Design answered:
Liebe Carmen, die Maßangaben beziehen sich, soweit nicht anders angegeben, immer auf die Anschlagkante. Viel Spaß beim Stricken!
23.03.2014 - 11:59
![]() Sofia wrote:
Sofia wrote:
Wenn ich am oberen Ärmel die Maschen für die Unterseite links und rechts der Markierung abnehme, dann ist auf jeder Seite ein halber Rapport übrig. Sollte ich besser einen ganzen Rapport abnehmen, damit das Muster nach dem Einfügen des Ärmels aufgeht?
22.03.2014 - 17:55DROPS Design answered:
Liebe Sofia, an den Vorderteilen in Richtung Ärmel und an beiden Seiten des Rückenteils in Richtung Ärmel stricken Sie auch jeweils einen halben Rapport von A.1., sodass sich das Muster dann jeweils mit dem halben Rapport von den Ärmeln zu einem ganzen Rapport zusammenfügt. Weiterhin viel Spaß beim Stricken!
22.03.2014 - 18:53Susanna wrote:
I'm having trouble with the right amount of stitches when casting off for the sleeves at the top of the body. Even though I had a total of 167 stitches, I have more than 70 left for the back. The sides for the front are 34/35, though. Where did I go wrong?
17.03.2014 - 22:45DROPS Design answered:
Dear Suzanna, did you keep the correct number of sts in first repetition in A.1 (all dec are compensated with a YO), you have then to dec a total of 16 sts (2 sts each side of 2 markers x 4 times). Happy knitting!
18.03.2014 - 08:53
![]() Carmen wrote:
Carmen wrote:
Diese Strickjacke würde ich zu gerne nacharbeiten, allerdings ohne (!) Kid-Silk und Glitter. Wenn ich allein nur mit Baby Alpaca Silk stricke, genügt dann 1 Faden oder muss ich 2fädig stricken?
17.03.2014 - 11:29DROPS Design answered:
Liebe Carmen, damit das Strickbild nicht zu locker wird (Sie stricken ja mit Nadel 5), sollten Sie 2 Fäden Baby Alpaca Silk verwenden. Beachten Sie auf jeden Fall, dass die Maschenprobe stimmen muss. Viel Spaß beim Stricken!
17.03.2014 - 16:29
![]() Karin wrote:
Karin wrote:
Diese Jacke ist ein apartes, schlichtes und wunderschönes Modell. Rundpassen stricke ich sehr gern.Herzliche Grüße aus Bayern
09.02.2014 - 16:16
|
|||||||||||||
Fox Jacket#foxjacketcardigan |
|||||||||||||
|
|
|||||||||||||
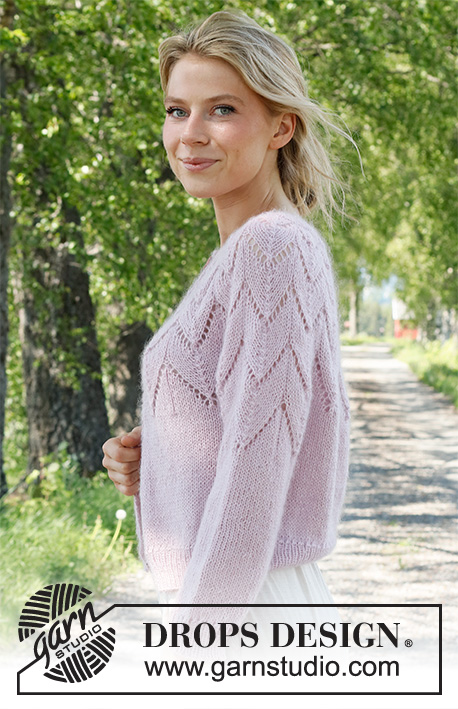
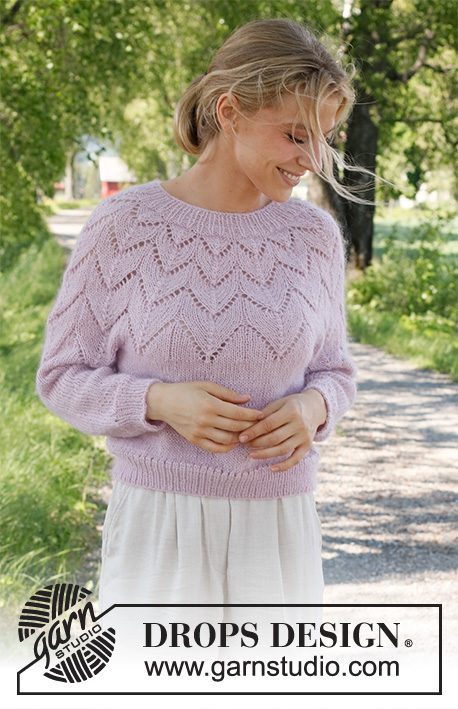
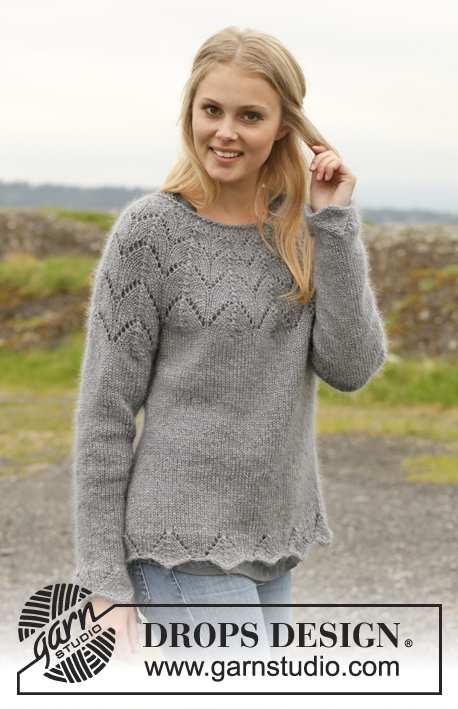
Knitted DROPS jacket with round yoke and lace pattern in ”BabyAlpaca Silk”, ”Kid- Silk” and ”Glitter”. Size: S - XXXL.
DROPS 150-8 |
|||||||||||||
|
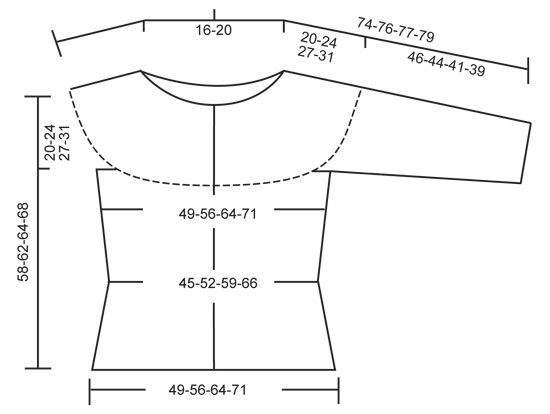
GARTER ST (back and forth on circular needle): K all rows. 1 ridge = 2 rows K. GARTER ST (in the round on double pointed needles): * K 1 round and P 1 round *, repeat from *-*. 1 ridge = 2 rounds. PATTERN: See diagrams A.1 and A.2. Diagram shows all rows in pattern from RS. See diagram for size! DECREASE TIP (applies to the body): Dec as follows before marker: K 2 tog. Dec as follows after marker: Slip 1 st as if to K, K 1, psso. INCREASE TIP: Inc 1 st by making 1 YO. On next row/round work YO twisted to avoid holes. BUTTONHOLES: Dec for buttonholes on right band. 1 buttonhole = K tog third and fourth st from mid front and make 1 YO. Dec for buttonholes when piece measures: SIZE S/M: 12, 21, 30, 39, 48 and 56 cm / 4¾", 8¼", 11¾", 15¼", 19" and 22". SIZE L/XL: 12, 20, 28, 36, 44, 52 and 60 cm / 4¾", 8", 11", 14¼", 17¼", 20½" and 23⅝" SIZE XXL: 12, 20, 28, 36, 44, 53 and 62 cm / 4¾", 8", 11", 14¼", 17¼", 21" and 24⅜" SIZE XXXL: 12, 20, 28, 37, 44, 55 and 66 cm / 4¾", 8", 11", 14½", 17¼", 21⅝" and 26" -------------------------------------------------------- BODY: Worked back and forth on circular needle from mid front. Cast on 167-189-211-233 sts (includes 6 band sts in each side towards mid front) on circular needle size 5 mm / US 8 with 1 strand BabyAlpaca Silk + 1 strand Kid-Silk and 2 strands Glitter. K 1 round, P 1 round. Then work as follows from RS: 6 sts in garter st (= band) A.1 over the next 154-176-198-220 sts (= 11 repetitions in width), 1 st in reversed stockinette st (i.e. P from RS, K from WS), 6 sts in garter st (= band). When A.1 has been worked 1 time vertically, insert 2 markers in piece; the first after 41-46-51-56 sts and the second after 125-142-159-176 sts in total (back piece = 84-96-108-120 sts). Right front piece = 41-46-51-56 sts, left front piece = 42-47-52-57 sts (so that pattern on body fits later). Then work in stockinette st with 6 sts in garter st in each side (= bands). REMEMBER THE KNITTING GAUGE and remember to dec for BUTTONHOLES on right band - see explanation above. When piece measures 7 cm / 2¾", dec 1 st on each side of both markers - READ DECREASE TIP (= 4 sts dec). Repeat dec every 3½-4-4½-5 cm / 1¼"-1½"-1¾"-2" 3 more times (= 4 dec in total) = 151-173-195-217 sts. When piece measures 24-26-27-29 cm / 9½"-10¼"-10⅝"-11⅜", inc 1 st on each side of both markers – READ INCREASE TIP (= 4 sts inc). Repeat inc every 3-3-2½-2 cm / 1⅛"-1⅛"-⅞"-¾" 3 more times (= 4 inc in total) = 167-189-211-233 sts. When piece measures 38-38-37-37 cm / 15"-15"-14½"-14½", bind off the middle 14-16-18-20 sts in each side for armholes from WS (i.e. Bind off 7-8-9-10 sts on each side of both markers) = 70-80-90-100 sts remain on back piece and 34/35-38/39-42/43-46/47 sts remain on front piece. Put piece aside and make the sleeves. SLEEVE: Worked in the round on double pointed needles. Cast on 42-48-54-60 sts on double pointed needles size 5 mm / US 8 with 1 strand BabyAlpaca Silk + 1 strand Kid-Silk + 2 strands Glitter. K 1 round, P 1 round. Then work A.1 over all sts (= 3 repetitions in width). When A.1 has been worked 1 time vertically, continue in stockinette st. Insert 1 marker at beg of round (= mid under sleeve). When piece measures 8 cm / 3", inc 1 st on each side of marker. Repeat inc every 5-4-3-2 cm / 2"-1½"-1⅛"-¾" 6-7-8-9 more times (= 7-8-9-10 inc in total) = 56-64-72-80 sts. When piece measures 41-38-34-31 cm / 16⅛"-15"-13⅜"-12¼" (shorter measurements in the larger sizes because of wider shoulders), work A.1 over all sts (= 4 repetitions)- NOTE! Start first repeat of A.1 7-8-9-10 sts before the marker! On last round with A.1 bind off 14-16-18-20 sts mid under sleeve (i.e. bind off 7-8-9-10 sts on each side of marker) = 42-48-54-60 sts remain on needle (= 3 whole repetitions of A.1). Sleeve measures 46-44-41-39 cm / 18"-17¼"-16⅛"-15¼". Put piece aside and make another sleeve. YOKE: Slip sleeves on to same circular needle as body = 223-253-283-313 sts. Work next row as follows from RS: 6 band sts as before, work pattern according to diagram A.1 until 7 sts remain on row, finish with 1 st in reversed stockinette st and 6 band sts in garter st. When A.1 has been worked one time vertically, continue with A.2 over A.1. Continue the pattern like this. When A.2 has been worked, 103-133-163-193 sts remain on needle. K1 row AT THE SAME TIME dec 19-45-61-87 sts evenly = 84-88-102-106 sts. P 1 row. Then work an elevation at the back of neck as follows in stockinette st, insert 1 marker in middle st (= mid back): K 7 sts past marker mid back, turn, tighten yarn and P 14 sts back, turn, tighten yarn and K 21 sts, turn, continue to work 7 sts more for every turn until a total of 56-70-70-70 sts have been worked, turn and K 1 row until mid front. Work 2 ridges. Bind off with K from RS. Yoke measures approx. 20-24-27-31 cm / 8"-9½"-10½"-12¼" (mid front) and entire jacket measures approx. 58-62-64-68 cm / 22¾"-24½"-25¼"-26¾". ASSEMBLY: Sew the openings under the sleeves tog. Sew the buttons on to left front piece. |
|||||||||||||
Diagram explanations |
|||||||||||||
|
|||||||||||||
 |
|||||||||||||
 |
|||||||||||||
 |
|||||||||||||
Have you finished this pattern?Tag your pictures with #dropspattern #foxjacketcardigan or submit them to the #dropsfan gallery. Do you need help with this pattern?You'll find 17 tutorial videos, a Comments/Questions area and more by visiting the pattern on garnstudio.com. © 1982-2026 DROPS Design A/S. We reserve all rights. This document, including all its sub-sections, has copyrights. Read more about what you can do with our patterns at the bottom of each pattern on our site. |
|||||||||||||


With over 40 years in knitting and crochet design, DROPS Design offers one of the most extensive collections of free patterns on the internet - translated to 17 languages. As of today we count 324 catalogs and 12290 patterns - 12280 of which are translated into English (US/in).
We work hard to bring you the best knitting and crochet have to offer, inspiration and advice as well as great quality yarns at incredible prices! Would you like to use our patterns for other than personal use? You can read what you are allowed to do in the Copyright text at the bottom of all our patterns. Happy crafting!
Post a comment to pattern DROPS 150-8
We would love to hear what you have to say about this pattern!
If you want to leave a question, please make sure you select the correct category in the form below, to speed up the answering process. Required fields are marked *.