
Popular categories
Looking for a yarn?


Comments / Questions (110)
Lucie Podrouzkova wrote:
I am left-handed so the spiral pattern weaves the other way round, i.e. from right to left. Does it mean that I also need to decrease the other way round, i.e. on the LEFT side of my marker? Thank you.
18.11.2013 - 15:17DROPS Design answered:
Dear Mrs Podrouzkova, the spiral pattern is worked around on the basis of the number of sts (divided by 6+1). Just follow pattern as stated, or as you rather like. Happy knitting!
19.11.2013 - 10:02
![]() Myriam Pétrel wrote:
Myriam Pétrel wrote:
Belle photo qui permet heureusement de reconstituer la marche à suivre pour obtenir l'effet spirale... Les explications donnée pour la réalisation du point sont inexactes et ne permettent en aucun cas de réaliser ce beau modèle.
28.10.2013 - 09:54DROPS Design answered:
Bonjour Mme Pétrel, sur la base du nombre de mailles indiqués, vous répétez jusqu'à la fin le motif *4 m end,2 m env* sans discontinuer pour obtenir l'effet spirale. Bon tricot!
29.10.2013 - 10:33
![]() Raquel wrote:
Raquel wrote:
Hola!Tengo muchas ganas de hacerme este conjunto, y aunque aún no tengo la lana me surge una duda al leer el patrón: "Al trabajar en redondo el patrón cambiará automáticamente 1 pt a la derecha en cada vta". Muchas gracias
27.10.2013 - 19:53DROPS Design answered:
Hola Raquel. Al trabajar en redondo el patrón cambiará automáticamente 1 pt a la derecha en cada vta y creará así un patrón de espiral.
29.10.2013 - 13:25Karla Enciso wrote:
No entiendo la instrucción del gorro sobre que es un MP
27.10.2013 - 03:30DROPS Design answered:
Hola Karla. Primero, cuando escribas una pregunta marca por favor la casilla "pregunta" y no "general", así tardaremos menos en contestar. MP es la abreviatura de marcapunto.
03.11.2013 - 10:25Susan wrote:
Det står at man skal jobbe til arbeid måler 17-18cm. Men totalt høyde er kun 18-22cm. Hvis man redusere antall masker over 10 pinner, som det står i oppskrift, så blir totalt høyde mye, mye mer enn 18-22cm. Er dette riktig eller har jeg misforstått?
23.10.2013 - 13:12DROPS Design answered:
Huen fortsætter du ifølge opskriften. Det er halsen så skal måle 18-22 cm når du lukker af!
24.10.2013 - 12:10
![]() Anna H. D. wrote:
Anna H. D. wrote:
Jeg har nå strikket denne luen for 2. gang. Første gang jeg prøvde ble den ALTFOR stor! For stor på alle måter egentlig, for høy og for bred. Det var veldig rart, fordi jeg er AKKURAT 54 cm rundt hodet mitt, strikket derfor etter den størrelsen. Jeg bestemte meg for å strikke den for 2. gang. Masketallet skulle jo være delbart på 6+1, så jeg gikk ned på 6-gangetabellen fra 6x8 til 6x6+1. Dermed ble masketalet 37. Jeg forandret oppskriften deretter, og fikk en lue som passet perfekt! Hilsen Anna
18.10.2013 - 19:32Isabel Ariza wrote:
Hola. Tendran algun video que me guie para empezar el gorro y se haga el espiral.me encanta el modelo y lo he intentado pero no me sale.AYUDA POR FAVOR. Soy de Mexico. Gracias
15.10.2013 - 18:22DROPS Design answered:
Hola Isabel. En la parte de arriba del patrón ya tienes algunos videos como ayuda para trabajar. Voy a pasar tu petición al departamento de tutoriales de todas maneras.
16.10.2013 - 09:18
![]() Kress wrote:
Kress wrote:
Merci beaucoup pour vos explications et vos modèle , bonne continuation
13.10.2013 - 11:02
![]() Sandra wrote:
Sandra wrote:
Ciao! Volevo far notare un errore nella pagina italiana: per fare il girocollo, invece di 54-60 si dovrebbero montare 55-61. Grazie mille per questo modello carinissimo
25.09.2013 - 14:31DROPS Design answered:
Buongiorno Sandra. Abbiamo corretto l'errore. Grazie della segnalazione e buon lavoro!
25.09.2013 - 14:41
![]() Raquel wrote:
Raquel wrote:
Me encantan el gorro y el cuello! :)
18.09.2013 - 09:23
|
|
Cupcake#cupcakeset |
|
|
|
|
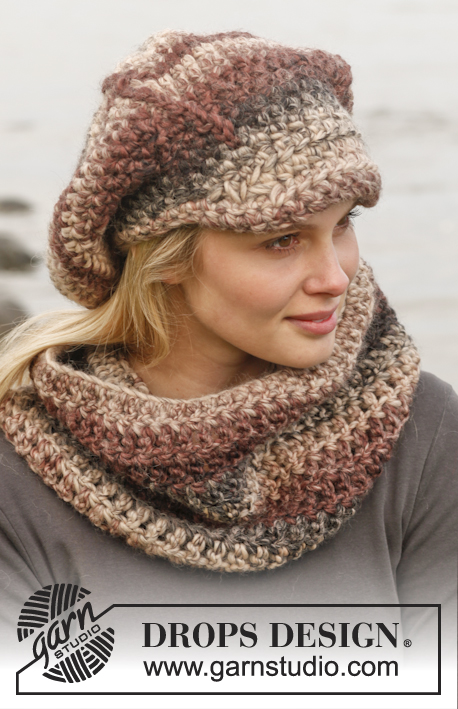
Knitted DROPS neck warmer and hat with spiral pattern in 1 strand ”Polaris” or 2 strands "Snow" or "Andes".
DROPS 151-43 |
|
|
YARN CHANGE TIP: When switching ball with Polaris, split the old strand in two on the last 15 cm / 6" – cut off one part, do the same on the new strand. Place the first and last 15 cm / 6" on top of each other so that the yarn is the normal thickness and continue to work – this is done to make the switch invisible. SPIRAL PATTERN: Work * K 4, P 2*, repeat *-* around. The pattern repeat goes over 6 sts and the stitch number can be divided by 6 + 1. When working in the round the pattern will automatically shift 1 st to the right for each round and creates a spiral pattern. ---------------------------------------------------------- HAT: Cast on 49-55 sts on double pointed needles size 8 mm / US 11 with 1 strand Polaris or 2 strands Snow and work in the round. K 1 round over all sts. Then work according to SPIRAL PATTERN – see explanation above until piece measures approx. 17-18 cm / 6¾"-7" – READ YARN CHANGE TIP! K 1 round, insert 6 markers in piece with 8-9 sts before each of the first 5 markers and 9-10 sts before last marker. Continue in stockinette st AT THE SAME TIME on first round dec 1 st on right side of every marker by K 2 tog, repeat every other round 4-5 more times (= a total of 5-6 times) = 19-19 sts. K2 tog around = 10-10 sts. Cut the yarn and pull it through the remaining sts, tighten tog and fasten. POMPOM: Make a large, somewhat loose pompom of 15 cm / 6" in diameter and fasten at the top of hat. ---------------------------------------------------------- NECK WARMER: Cast on 55-61 sts on circular needle size 8 mm / US 11 with 1 strand Polaris or 2 strands Snow and work in the round. K 1 round over all sts. Then work according to SPIRAL PATTERN – see explanation above until piece measures approx. 17-21 cm / 6¾"-8¼" – READ YARN CHANGE TIP! K 1 round and then bind off. Piece measures approx. 18-22 cm / 7"-8¾". |
|
Have you finished this pattern?Tag your pictures with #dropspattern #cupcakeset or submit them to the #dropsfan gallery. Do you need help with this pattern?You'll find 11 tutorial videos, a Comments/Questions area and more by visiting the pattern on garnstudio.com. © 1982-2026 DROPS Design A/S. We reserve all rights. This document, including all its sub-sections, has copyrights. Read more about what you can do with our patterns at the bottom of each pattern on our site. |


With over 40 years in knitting and crochet design, DROPS Design offers one of the most extensive collections of free patterns on the internet - translated to 17 languages. As of today we count 325 catalogs and 12298 patterns - 12288 of which are translated into English (US/in).
We work hard to bring you the best knitting and crochet have to offer, inspiration and advice as well as great quality yarns at incredible prices! Would you like to use our patterns for other than personal use? You can read what you are allowed to do in the Copyright text at the bottom of all our patterns. Happy crafting!
Post a comment to pattern DROPS 151-43
We would love to hear what you have to say about this pattern!
If you want to leave a question, please make sure you select the correct category in the form below, to speed up the answering process. Required fields are marked *.