
Popular categories
Looking for a yarn?


Comments / Questions (110)
![]() Roberta wrote:
Roberta wrote:
Buonasera, ho provato a fare il motivo del cappello con i ferri dritti ma non risulta uguale al modello.
10.12.2013 - 19:17DROPS Design answered:
Buonasera Roberta. Avvii 50-56 m. 1° f: 1m vivagno, * 4m dir, 2m rov *, rip *-*, 1m viv. 2° f: 1m viv, 1m rov, *2m dir, 4m rov * rip *-* e finisca con 2m dir, 3m rov, 1m viv. 3° f: 1m viv, 2m dir , 2m rov, * 4m dir, 2m rov * rip *-* e finisca con 2m dir, 1m viv. 4° f: 1m viv, 3m rov, * 2m dir, 4m rov*, rip *-* finisca con 2m dir 1m rov, 1m viv. e così via spostando sempre di 1m il motivo.Buon lavoro!
10.12.2013 - 20:08
![]() ANNA wrote:
ANNA wrote:
Buonasera,io non riesco a realizzare il punto spirale fantasia posso avere una spiegazione dettagliata o meglio ancora un video tutorial dove poter vedere la realizzazione dello stesso?
10.12.2013 - 16:40DROPS Design answered:
Buonasera Anna. Avvii 50-56 m. 1° f: 1m vivagno, * 4m dir, 2m rov *, rip *-*, 1m viv. 2° f: 1m viv, 1m rov, *2m dir, 4m rov * rip *-* e finisca con 2m dir, 3m rov, 1m viv. 3° f: 1m viv, 2m dir , 2m rov, * 4m dir, 2m rov * rip *-* e finisca con 2m dir, 1m viv. 4° f: 1m viv, 3m rov, * 2m dir, 4m rov*, rip *-* finisca con 2m dir 1m rov, 1m viv. e così via spostando sempre di 1m il motivo.Buon lavoro!
10.12.2013 - 20:07
![]() Anna wrote:
Anna wrote:
Ma come devo impostare il lavoro con i ferri dritti per far realizzare il punto spirale fantasia? Non posso vedere un video tutorial?
10.12.2013 - 14:25DROPS Design answered:
Buonasera Anna. Avvii 50-56 m. 1° f: 1m vivagno, * 4m dir, 2m rov *, rip *-*, 1m viv. 2° f: 1m viv, 1m rov, *2m dir, 4m rov * rip *-* e finisca con 2m dir, 3m rov, 1m viv. 3° f: 1m viv, 2m dir , 2m rov, * 4m dir, 2m rov * rip *-* e finisca con 2m dir, 1m viv. 4° f: 1m viv, 3m rov, * 2m dir, 4m rov*, rip *-* finisca con 2m dir 1m rov, 1m viv. e così via spostando sempre di 1m il motivo.Buon lavoro!
10.12.2013 - 20:07
![]() Anna wrote:
Anna wrote:
Buonasera ma per il cappello bisogna necessariamente utilizzare i ferri a punta doppia? Non possono essere sostituiti con i ferri normali o circolari?
09.12.2013 - 22:21DROPS Design answered:
Buonasera Anna. Può lavorare il cappello anche con i ferri circolari o con i ferri dritti. Con i circolari le potrebbe essere utile la tecnica del magic loop quando rimangono poche m. Se preferisce i ferri dritti, si ricordi di aggiungere 1 m vivagno ai lati per la cucitura e di adattare il motivo ad essere lavorato in ferri di andata e ritorno e non in tondo. Buon lavoro!
09.12.2013 - 23:47
![]() Anna wrote:
Anna wrote:
Buonasera ma per il cappello bisogna necessariamente utilizzare i ferri a punta doppia? Non possono essere sostituiti con i ferri normali o circolari?
09.12.2013 - 22:06DROPS Design answered:
Buonasera Anna. Può lavorare il cappello anche con i ferri circolari o con i ferri dritti. Con i circolari le potrebbe essere utile la tecnica del magic loop quando rimangono poche m. Se preferisce i ferri dritti, si ricordi di aggiungere 1 m vivagno ai lati per la cucitura e di adattare il motivo ad essere lavorato in ferri di andata e ritorno e non in tondo. Buon lavoro!
09.12.2013 - 23:47
![]() Valeria wrote:
Valeria wrote:
Grazie per la riisposta e sopratutto per il vostro bellissimo sito, peró per la questione specifica, mi dispiace ma se si guarda bene la foto del cappello si vede che sia le maglie, sia i giri sono molto meno. Lo sto facendo con il ferro n. 9 e per una taglia media ci vogliono 30 +1 maglie, come in effetti si vede anche dalla foto.
09.12.2013 - 18:13
![]() Valeria wrote:
Valeria wrote:
Salve, volvevo segnalare che il filato Polaris ha 10x10 cm con 7 m x 8 ferri, per cui il campione indicato in questo modello non é corretto. Per avere un cappello di misura media occorrono meno di 35 maglie
06.12.2013 - 21:06DROPS Design answered:
Buonasera Valeria, il campione da lei indicato è quello riportato sulla fascetta e si ottiene con i ferri del 15 mm; cambiando il n° di f cambia anche la tensione, il campione del modello segnalato è ottenuto con i ferri 8 mm. Buon lavoro!
06.12.2013 - 21:25
![]() Fichte wrote:
Fichte wrote:
Hallo! Kann ich das Muster auch mit dem Nadelspiel stricken? (Mütze und Schal)
02.12.2013 - 14:53DROPS Design answered:
Liebe Frau Fichte, das können Sie gerne! Ich vermute aber, das es beim Schal auf der Nadel ein wenig eng werden könnte.
03.12.2013 - 15:42
![]() Franziska wrote:
Franziska wrote:
Ich frag mich manchmal warum einige Muster nicht komplett bis zum Ende der Mütze gestrickt werden? Als ich ein brombeer-Muster stricken wollte war das genau so, gibt es da nicht einen trick damit das Muster so bleibt und man trotzdem die Mütze oben enger machen kann?Danke
24.11.2013 - 09:00DROPS Design answered:
Liebe Franziska, die vielen Abnahmen oben an der Mütze lassen sich nicht mehr in das Spiralmuster integrieren und es sieht viel schöner aus, wenn der Schluss glatt re gestrickt wird. Zudem wird dieser Teil durch die grosse Bommel weitgehend verdeckt.
25.11.2013 - 08:23
![]() Hibiscus37 wrote:
Hibiscus37 wrote:
Bonjour, tout comme cela a déjà été notifié, en respectant les points 4 m end, 2 m env dès le 2ème rang (répété 6 fois au total sur un rang complet) et en tricotant la dernière maille restante du rang à l'endroit (puisque 49 mailles au total) je n'arrive pas à obtenir ce joli effet spirale mais un effet de côte. Manquerait il une étape, ou n'aurais je pas compris correctement la consigne ? Merci pour vos éclaircissements. Très cordialement
19.11.2013 - 17:08DROPS Design answered:
Bonjour Hibiscus37, quand vous avez monté les mailles, répétez *4 m end, 2 m env* en rond jusqu'à la hauteur souhaitée, le motif va se décaler de lui même tant que le nombre de mailles est bien multiple de 6+1. Ainsi, à la fin de chaque tour, faites glisser votre marqueur de début de tour mais continuez toujours en répétant ces 6 m. Bon tricot!
19.11.2013 - 18:10
|
|
Cupcake#cupcakeset |
|
|
|
|
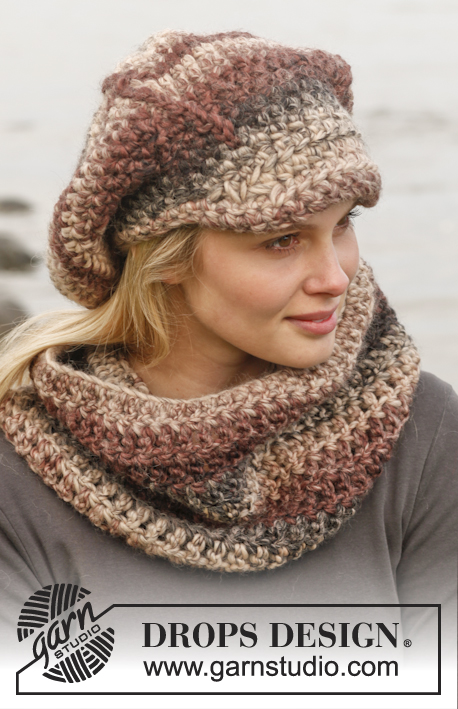
Knitted DROPS neck warmer and hat with spiral pattern in 1 strand ”Polaris” or 2 strands "Snow" or "Andes".
DROPS 151-43 |
|
|
YARN CHANGE TIP: When switching ball with Polaris, split the old strand in two on the last 15 cm / 6" – cut off one part, do the same on the new strand. Place the first and last 15 cm / 6" on top of each other so that the yarn is the normal thickness and continue to work – this is done to make the switch invisible. SPIRAL PATTERN: Work * K 4, P 2*, repeat *-* around. The pattern repeat goes over 6 sts and the stitch number can be divided by 6 + 1. When working in the round the pattern will automatically shift 1 st to the right for each round and creates a spiral pattern. ---------------------------------------------------------- HAT: Cast on 49-55 sts on double pointed needles size 8 mm / US 11 with 1 strand Polaris or 2 strands Snow and work in the round. K 1 round over all sts. Then work according to SPIRAL PATTERN – see explanation above until piece measures approx. 17-18 cm / 6¾"-7" – READ YARN CHANGE TIP! K 1 round, insert 6 markers in piece with 8-9 sts before each of the first 5 markers and 9-10 sts before last marker. Continue in stockinette st AT THE SAME TIME on first round dec 1 st on right side of every marker by K 2 tog, repeat every other round 4-5 more times (= a total of 5-6 times) = 19-19 sts. K2 tog around = 10-10 sts. Cut the yarn and pull it through the remaining sts, tighten tog and fasten. POMPOM: Make a large, somewhat loose pompom of 15 cm / 6" in diameter and fasten at the top of hat. ---------------------------------------------------------- NECK WARMER: Cast on 55-61 sts on circular needle size 8 mm / US 11 with 1 strand Polaris or 2 strands Snow and work in the round. K 1 round over all sts. Then work according to SPIRAL PATTERN – see explanation above until piece measures approx. 17-21 cm / 6¾"-8¼" – READ YARN CHANGE TIP! K 1 round and then bind off. Piece measures approx. 18-22 cm / 7"-8¾". |
|
Have you finished this pattern?Tag your pictures with #dropspattern #cupcakeset or submit them to the #dropsfan gallery. Do you need help with this pattern?You'll find 11 tutorial videos, a Comments/Questions area and more by visiting the pattern on garnstudio.com. © 1982-2026 DROPS Design A/S. We reserve all rights. This document, including all its sub-sections, has copyrights. Read more about what you can do with our patterns at the bottom of each pattern on our site. |


With over 40 years in knitting and crochet design, DROPS Design offers one of the most extensive collections of free patterns on the internet - translated to 17 languages. As of today we count 325 catalogs and 12298 patterns - 12288 of which are translated into English (US/in).
We work hard to bring you the best knitting and crochet have to offer, inspiration and advice as well as great quality yarns at incredible prices! Would you like to use our patterns for other than personal use? You can read what you are allowed to do in the Copyright text at the bottom of all our patterns. Happy crafting!
Post a comment to pattern DROPS 151-43
We would love to hear what you have to say about this pattern!
If you want to leave a question, please make sure you select the correct category in the form below, to speed up the answering process. Required fields are marked *.