
Popular categories
Looking for a yarn?


Comments / Questions (36)
![]() Raquel Polo wrote:
Raquel Polo wrote:
Al comienzo de la vuelta 3 no se exactamente qué hay que hacer. 5 cadenetas y luego ? Lo que explica el patrón no queda claro. No hay forma de que quede bien. Me lo podéis explicar mejor? Gracias
04.08.2025 - 18:33DROPS Design answered:
Hola Raquel, el grupo de p.a se explica arriba: 2 p.a., 2 cad y 2 p.a. en el mismo p.a La vuelta 3 es: Hacer 5 cad, * ( 2 p.a., 2 cad y 2 p.a.) en el p.a. siguiente, 2 cad, 1 p.a. en el bucle de cad del grupo de p.a. sig, 2 cad *, repetir de *a* en toda la vta, terminar con 1 grupo de p.a. en el último p.a., 2 cad y 1 p.bjs en la 3ª cad del inicio de la vta. Es decir, después de los 5 p.de cad, vas a repetir toda la vuelta: 1 grupo de p.a en el p.a - 2 p.de cad - 1 p.a en los 2 p.de cad del grupo debajo - 2 p.de cad. En el último p.a trabajas el grupo de p.a y terminas con 2 p.de cad y 1 punto enano o punto bajísimo en el 3º p.de cad de las 5 p.de cad iniciales.
05.08.2025 - 13:00
![]() Lis Arnoldi wrote:
Lis Arnoldi wrote:
Sorry det var mig der havde misforstået opskriften.
27.07.2024 - 14:35
![]() Lis Arnoldi wrote:
Lis Arnoldi wrote:
Er der ikke en fejl i opskriften. Der er28 stangmaske grupper. 112:4=28. Hilsen Lis Arnoldi
27.07.2024 - 14:27
![]() Nathalie wrote:
Nathalie wrote:
Hej! Jag förstår inte riktigt hur man ska göra en st-grupp? Vad menas med att " I samma st virkas 2 st, 2 lm och 2 st"?
27.11.2022 - 22:24DROPS Design answered:
Hei Nathalie. Du hekler 2 staver i sammen stav, så hekler du 2 luftmasker og så 2 staver i den samme staven du heklet de 2 første stavene i. Dette (2 staver+2 luftmasker+2 staver) danner en gruppe = stav-gruppe. mvh DROPS Design
28.11.2022 - 14:20
![]() Ines wrote:
Ines wrote:
Hallo, ich würde die Tasche gern mit einer Kordel beenden anstatt des Schulterriemens. Hätten Sie einen Vorschlag, wie ich das machen könnte? Freundliche Grüße Ines
14.07.2021 - 10:59DROPS Design answered:
Liebe Ines, Sie können sich vielleicht von unseren anderen gehäkelten Taschen mit Kordel inspirieren lassen. Viel Spaß beim häkeln!
15.07.2021 - 09:19
![]() Ines wrote:
Ines wrote:
Hallo, vielen Dank für eure schnelle Antwort und die Erklärung! Jetzt komme ich prima mit dem Muster klar! Freundliche Grüße Ines
12.07.2021 - 19:02
![]() Ines wrote:
Ines wrote:
Hallo, in der 3. Reihe des Musters müsste ich es doch dann eigentlich so arbeiten; 5 Luftmaschen, 1 Stäbchen in die 2 Luftmaschen der Vorreihe, eine Stäbchengruppe ins folgende Stäbchen. Ist das so richtig? Danke für Ihre Antwort, freundliche Grüße, Ines
12.07.2021 - 13:34DROPS Design answered:
Liebe Ines, nach der ersten 5 Lm (= 1. Stb + 2 Lm) häkeln Sie von *bis* = *1 Stb-Gruppe in das nächste Stb, 2 Lm, 1 Stb in den Luftmaschenbogen der nächsten Stb-Gruppen, 2 Lm*, und von *bis* wiederholen. dh das 1. Stäbchen am Anfang der 3. Reihe in A.1 wird durch 3 Luftmaschen ersetzt + 2 Lm = 5 Lm. Viel Spaß beim häkeln!
12.07.2021 - 16:17
![]() Ines wrote:
Ines wrote:
Hallo, jetzt muss ich euch doch noch einmal fragen; soll ich in der 3. Runde des Musters die erste Stäbchengruppe komplett überspringen und die erste Stäbchengruppe in das Stäbchen danach häkeln? Leider stehe ich nach wie vor auf dem Schlauch und weiß nicht recht weiter. Freundliche Grüße, Ines
12.07.2021 - 10:31
![]() Ines wrote:
Ines wrote:
Hallo, ich häkele gerade diese hübsche marineblaue Tasche für den Urlaub am Meer und das Häkeln bereitet mir wie immer große Freude. Momentan möchte ich die dritte Muschelreihe (2 Stäbchen, 2 Luftmaschen, 2 Stäbchen) beginnen und überlege nach den 5 Luftmaschen, in welches Stäbchen das erste Stäbchen gehört. In das erste Stäbchen der Reihe oder wie genau ist das gemeint? Ist gerade ein wenig undurchsichtig für mich. Freundliche Grüße Ines
11.07.2021 - 21:50DROPS Design answered:
Liebe Ines, diese 5 Luftmaschen gelten für 3 Lm = 1. Stäbchen + 2 Luftmaschen als 1. Luftmaschenbogen - siehe auch Diagram A.1. Viel Spaß beim häkeln!
12.07.2021 - 08:33
![]() Le Chat Détricote wrote:
Le Chat Détricote wrote:
Bonjour, Merci pour votre réponse. Je bute maintenant sur le début du tour 3 du point de fantaisie A1.😞 Le tour 2 commence par 1 groupe de B, 2ml, 1 B dans l'arceau du groupe de B suivant... et finit par 1 groupe de B, 2ml, 1mc dans la 3e ml du début du tour. Le tour 3 commence par 5ml, 1 groupe de B dans la B suivante, 2ml,... Mais au rang en dessous, j'ai déjà un groupe de B? Je ne vois pas comment faire? Merci pour vos lumières. Belle journée
21.08.2020 - 12:44DROPS Design answered:
Bonjour Le Chat Détricote, le motif se croc hète sur 8 mailles, au 2ème tour vous devez terminez par 1 bride dans le groupe de Brides, 2 ml, 1 mc dans le groupe de brides du début du tour (= la 3ème ml qui remplace la1ère bride du 1er groupe de brides), le 3ème tour va ainsi commencer par 3 ml, (= 1ère bride), puis 2 ml, 1 groupe de bride dans la bride suivante, etc... Au début du 3ème rang, vous pouvez crocheter des mc dans le 1er arceau pour que les 3 ml partent au milieu du groupe de brides du début du 2ème tour. Bon crochet!
21.08.2020 - 13:12
|
||||||||||||||||
Jean#jeanbag |
||||||||||||||||
 |
 |
|||||||||||||||
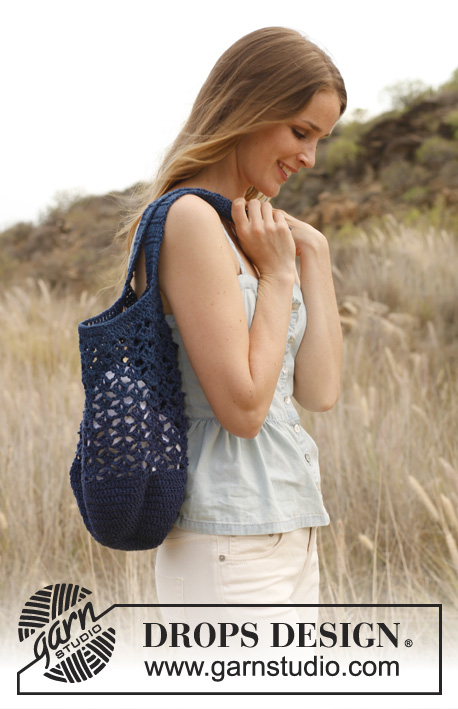
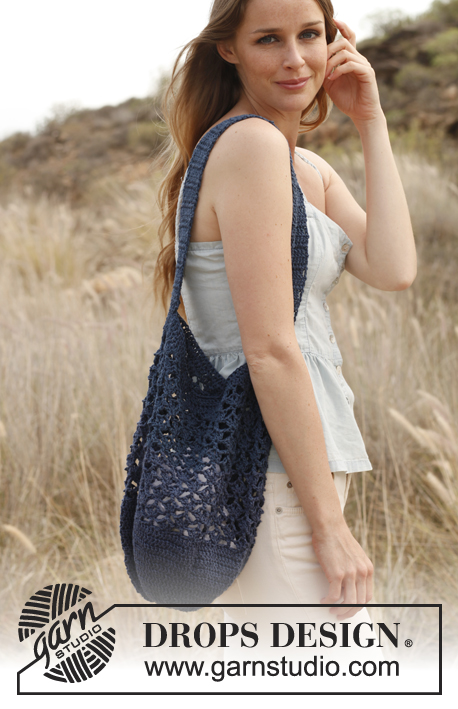
Crochet bag/tote bag in DROPS Bomull-Lin or DROPS Paris.
DROPS 147-22 |
||||||||||||||||
|
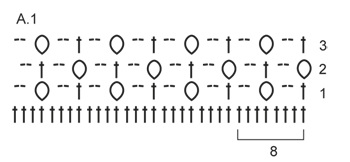
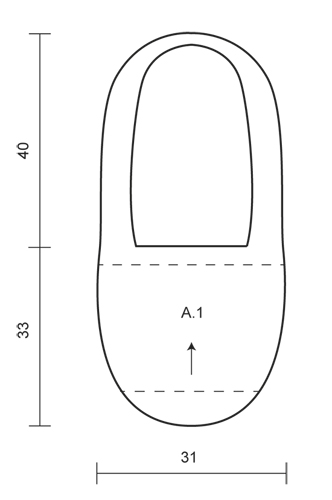
MAGIC CIRCLE: When piece is worked in the round, start with this technique to avoid hole in the middle (instead of ch-ring): Hold the yarn end and wind the yarn one time around the index finger to make a loop. Hold the loop with left thumb and middle finger, place the thread over left index finger. Insert hook through the loop, make a YO and pull thread through loop, work 3 ch (counted as 1st dc), then work dc around the loop. When the desired no of dc have been reached, pull the yarn end to tighten the loop. Fasten the yarn end at the back. CROCHET INFO: Beg every round with dc with 3 ch (counted as 1st dc), work dc in every dc, finish with 1 sl st in 3rd ch from beg of round. DC-GROUP: 1 dc-group = in same dc work 2 dc, ch 2 and 2 dc. ---------------------------------------------------------- BAG: Worked in the round. Start by making a MAGIC CIRCLE - read explanation above - at the bottom of bag with Bomull-Lin on hook size 4 mm / G/6. ROUND 1: Work 16 dc in the magic circle. ROUND 2: READ CROCHET INFO! Work 2 dc in every dc = 32 dc. ROUND 3: * 1 dc in next dc, work 2 dc in next dc *, repeat from *-* the entire round = 48 dc. ROUND 4: * 1 dc in each of the next 2 dc, work 2 dc in next dc *, repeat from *-* the entire round = 64 dc. ROUND 5: Work 1 dc in every dc. ROUND 6: * 1 dc in each of the next 3 dc, work 2 dc in next dc *, repeat from *-* the entire round = 80 dc. ROUND 7: Work 1 dc in every dc. ROUND 8: * 1 dc in each of the next 4 dc, work 2 dc in next dc *, repeat from *-* the entire round = 96 dc. ROUND 9: Work 1 dc in every dc. ROUND 10: * 1 dc in each of the next 5 dc, work 2 dc in next dc *, repeat from *-* the entire round = 112 dc. ROUND 11-13: Work 1 dc in every dc. Then work pattern A.1 - see diagram - as follows: ROUND 1: ch 5 (replaces 1 dc and 2 ch), skip the first 3 dc, * work 1 DC-GROUP - read explanation above - in next dc, ch 2, skip the next 3 dc, 1 dc in next dc, ch 2, skip 3 dc *, repeat from *-* the entire round, finish with 1 dc-group, ch 2, skip the last 3 dc and 1 sl st in 3rd ch from beg of round = 14 dc-groups. ROUND 2: In same ch work 1 dc-group, * ch 2, 1 dc in ch-space on next dc-group, ch 2, 1 dc-group in next dc *, repeat from *-* the entire round, finish with ch 2, 1 dc in ch-space on last dc-group, ch 2 and 1 sl st in 3rd ch from beg of round = 14 dc-groups. ROUND 3: ch 5, * 1 dc-group in next dc, ch 2, 1 dc in ch-space on next dc-group, ch 2 *, repeat from *-* the entire round, finish with 1 dc-group in last dc, ch 2 and 1 sl st in 3rd ch from beg of round = 14 dc-groups. Repeat ROUND 2 and 3 upwards. Work diagram A.1 for approx. 18 cm / 7" (piece measures approx. 30 cm / 11¾" vertically). Then work as follows: In every ch-space (also in ch-space on dc-groups) on round work 2 dc, in every single dc (not in dc on dc-groups) work 2 dc (i.e. 8 dc over every repetition of diagram A.1) = 112 dc in total. Work 1 round with 1 dc in every dc, do not cut the yarn, now piece measures approx. 33 cm / 13" vertically. Insert a marker at beg of round and a marker after 56 dc (= middle of the side). SHOULDER STRAP: Worked back and forth as follows: Turn piece and work sl sts until 5th dc after 1st marker, turn piece and work 1 dc in each of the next 10 sts (marker is in the middle of these sts), turn. Work 1 dc in every dc on row until strap measures approx. 80 cm / 31½" from marker (or until desired length). Fasten off. Fasten the end directly above the marker on the other side of bag as follows: sew with neat little stitches in front loops on last row. |
||||||||||||||||
Diagram explanations |
||||||||||||||||
|
||||||||||||||||
 |
||||||||||||||||
 |
||||||||||||||||
Have you finished this pattern?Tag your pictures with #dropspattern #jeanbag or submit them to the #dropsfan gallery. Do you need help with this pattern?You'll find 5 tutorial videos, a Comments/Questions area and more by visiting the pattern on garnstudio.com. © 1982-2026 DROPS Design A/S. We reserve all rights. This document, including all its sub-sections, has copyrights. Read more about what you can do with our patterns at the bottom of each pattern on our site. |
||||||||||||||||


With over 40 years in knitting and crochet design, DROPS Design offers one of the most extensive collections of free patterns on the internet - translated to 17 languages. As of today we count 324 catalogs and 12290 patterns - 12280 of which are translated into English (US/in).
We work hard to bring you the best knitting and crochet have to offer, inspiration and advice as well as great quality yarns at incredible prices! Would you like to use our patterns for other than personal use? You can read what you are allowed to do in the Copyright text at the bottom of all our patterns. Happy crafting!
Post a comment to pattern DROPS 147-22
We would love to hear what you have to say about this pattern!
If you want to leave a question, please make sure you select the correct category in the form below, to speed up the answering process. Required fields are marked *.