
Popular categories
Looking for a yarn?


Comments / Questions (33)
![]() Lebigot wrote:
Lebigot wrote:
Merci pour vos explications. Je fais bien des augmentations à tous les rangs? Et pas un rang sur 2?
30.01.2017 - 11:42
![]() Lebigot wrote:
Lebigot wrote:
Bonjour, je voudrais d'abord vous remercier pour vos réponses toujours rapides et précises! Je suis bloquée sur le premier rang de cote avec les 331 mailles.J'ai fais le rang de cote avec les jetés sur l'endroit mais je ne sais pas quoi faire pour le rang suivant envers? Dois je faire également des jetés? Si je fais ça je vais décaler mes cotes? Pouvez vous m'aider? Après 67cm de hauteur, il est indiqué d'augmenter 1 M dans chaque section envers, qu’appelez vous une section? Merci
28.01.2017 - 12:02DROPS Design answered:
Bonjour Mme Lebigot, vous allez incorporer les augmentations en côtes au fur et à mesure, c'est-à-dire que vous tricotez les mailles avant/après les m de bordure ou au milieu en suivant les côtes. Ainsi, les 2 premières augmentations de chaque côté du châle vont se tricoter à l'envers (vu sur l'endroit), puis à l'endroit (vu sur l'endroit) et ainsi de suite pour toujours bien conserver les côtes 2/2. Augmenter 1 m dans chaque section en mailles envers = augmentez 1 m env dans les 2 m env et continuez en côtes 2 m end/3 m env. Bon tricot!
30.01.2017 - 10:52
![]() Carolyn Clapham wrote:
Carolyn Clapham wrote:
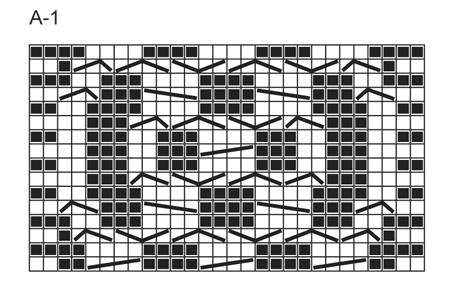
I've looked again at Chart A1 for the hat rib. There are16 rows, and the last (bottom) row definitely has cables in it, so I am still confused! Or, thinking about it, should I have started from the bottom of the chart rather than the top?
09.11.2016 - 11:04DROPS Design answered:
Dear Mrs Clapham, start to read diagram from the bottom corner on the right side towards the left from RS and from left towards right from WS, ie 1st row in A.1 is the bottom row in diagram with cables. Read more here about diagrams. Happy knitting!
09.11.2016 - 13:38Carolyn Clapham wrote:
I'm stuck on how to end the hat cable edge. As I underestand it, the last row of an A1 repeat is always worked from right side, but to finish off after the required number of repeats, this is followed by a decrease row (which would be worked from wrong side), then by a knit row which according to instructions is worked from wrong side. Is there a mistake here or have I gone wrong somewhere?
08.11.2016 - 20:50DROPS Design answered:
Dear Mrs Chlapham, all rows with cables in A.1 are worked from RS of piece, so that last row in A.1 is worked from WS, and dec row after last repeat of A.1 is worked from RS, then K 1 row from WS and bind off. Read more about diagrams here. Happy knitting!
09.11.2016 - 09:01
![]() Davesne wrote:
Davesne wrote:
Je ne comprends pas bien au niveau des augmentations faire 1jeté avant / après les 3 mailles au point mousse de chaque coté. Pourquoi parlez vous des 3 mailles au point mousse puisque tous le rang est au point mousse .comment dois je faire les rangs les rangs 4 ,6 et ainsi de suite . Pour les augmentations du milieu j'ai compris .
15.04.2016 - 21:57DROPS Design answered:
Bonjour Mme Davesne, on augmente tous les 2 rangs (= tous les rangs sur l'endroit = rangs 1, 3, 5, 7...) un total de 4 m: 1 m à 3 m des bords et 1 m de chaque côté de la m centrale. Sur l'envers (= rang 2, 4, 6...), on tricote les mailles et les jetés à l'endroit. Bon tricot!
18.04.2016 - 08:46
![]() Madelene wrote:
Madelene wrote:
När man ska sticka 2 räta 2 aviga maskor ska man då öka på båda sidorna eller bara på rätsida? Alltså efter man ökat till 331 maskor?
29.02.2016 - 22:00DROPS Design answered:
Hej, du fortsätter att öka från rätsidan. Lycka till!
02.03.2016 - 14:42
![]() Crab wrote:
Crab wrote:
Moet ik bij 60 cm in het midden van de naald verder gaan met een andere rondbreinaald ?wat gebeurd er dan met de reeds gebreide steken ?
02.02.2014 - 18:28DROPS Design answered:
Hoi Crab. Nee, je moet wisselen van naald aan het begin van een nld van de goede kant: "pas zo aan dat de volgende nld aan de goede kant is en meet terwijl u het werk omhoog houd"
04.02.2014 - 14:33
![]() GEORJON wrote:
GEORJON wrote:
Le diagramme A1 ne donne pas le motif de la torsade
29.12.2013 - 14:22DROPS Design answered:
Bonjour Mme Goerjon, pour réussir la torsade comme dans le modèle, 1 case = 1 m x 1 rang, commencez à lire le diagramme en bas à droite vers la gauche (sur l'endroit), au rang suivant (sur l'envers), lisez de gauche à droite. Bon tricot!
30.12.2013 - 15:42
![]() Xaminal wrote:
Xaminal wrote:
Puede sustituirse el punto derecho o bobo por punto liso?
06.10.2013 - 15:12DROPS Design answered:
Hola Xaminal. El punto musgo (bobo) se utiliza en los chales porque permite conseguir una labor muy plana. El pt jersey derecho no tiene esta propiedad.
10.10.2013 - 11:10
![]() Laperdrix wrote:
Laperdrix wrote:
Combien faut il de pelotes de laine pour realiser ce modele merci
03.02.2013 - 13:12DROPS Design answered:
Bonjour Madame Laperdrix, les quantités sont indiquées au poids pour chacun des 2 ouvrages : 600 g pour le châle et 150 g pour le bonnet. Divisez par le poids de la pelote (50 g pour Nepal) et vous aurez ainsi par ex 3 pelotes pour le bonnet. Bon tricot !
04.02.2013 - 09:54
|
|||||||||||||||||||||||||
Weekend Get Away#weekendgetawayset |
|||||||||||||||||||||||||
 |
 |
||||||||||||||||||||||||
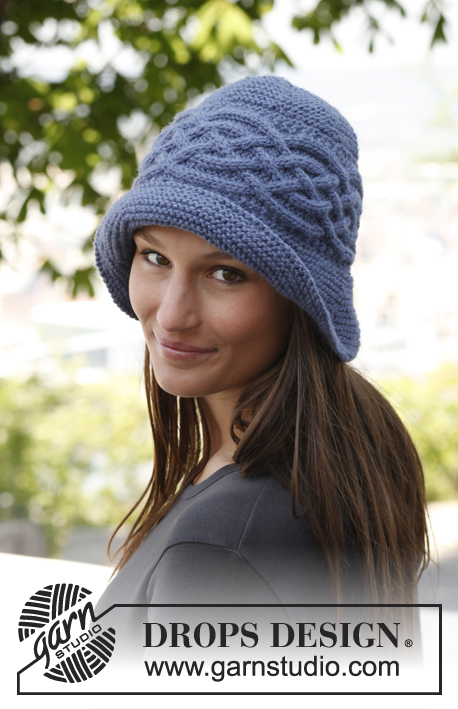
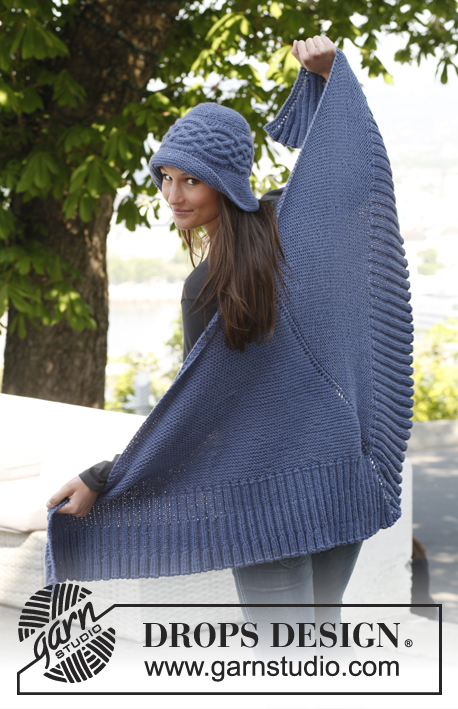
Knitted DROPS shawl with rib and hat with cable sideways in ”Nepal”.
DROPS 141-43 |
|||||||||||||||||||||||||
|
GARTER ST (back and forth on needle): K sts on all rows. 2 K rows = 1 ridge. PATTERN: See diagram A-1. Diagram shows 1 repetition of pattern in width and vertically, the diagram shows all rows in pattern seen from RS. ---------------------------------------------------------- SHAWL: Worked back and forth on circular needle to make room for all the sts. Cast on 7 sts on circular needle size 5.5 mm / US 9 with Nepal. Insert 1 marker in the 4th st (mid st - marks mid back of shawl). Work 1 row as follows (= RS): K 3, 1 YO, K 1, 1 YO, K 3 = 9 sts. Then K every row while AT THE SAME TIME inc 4 sts on every row from RS as follows: Make 1 YO inside 3 sts in garter st in each side and make a YO on each side of st with marker. On next row K YO to make holes. When piece measures approx. 60 cm / 23½" in the middle (adjust so that next row is worked from RS and measure when holding the piece up), work as follows: Switch to circular needle size 4.5 mm / US 7 and K 1 row while at the same time inc evenly to 331 sts. K 1 row from WS, then work as follows: 3 sts in garter st, 1 YO, * K 2, P 2 *, repeat from *-* until 2 sts remain before mid st, K 2, 1 YO, K the mid st, 1 YO, * K 2, P 2 *, repeat from *-* until 5 sts remain, K 2, 1 YO and 3 sts in garter st. Continue like this with rib and inc, work inc sts in rib. When piece measures 67 cm / 26½", inc 1 st in every P-section (seen from RS), continue with K 2/P 3. When piece measures 74 cm / 29", inc 1 st in every K-section (seen from RS), continue with K 3/P 3. When piece measures 80 cm / 31½" in the middle, bind off with K over K and P over P. ---------------------------------------------------------- HAT: First work the cable back and forth sideways. Then pick up sts along one side of cable and work crown of hat. Then pick up sts along the other side of cable and work brim of hat. Finally sew the hat tog mid back. CABLE EDGE: Worked back and forth on needle size 4.5 mm / US 7. Cast on 22 sts with Nepal. K 1 row from WS. Work next row as follows: 2 sts in GARTER ST – see explanation above, * P 2, K 2 in each of the next 2 sts (= K 4), P 2 *, repeat from *-* 2 more times, finish with 2 sts in garter st = 28 sts. Work 1 row from WS with K over K and P over P with 2 sts in garter st in each side. Continue with A-1 until 7-8 repetitions have been worked (piece measures approx. 49-55 cm / 19¼"-21½""). Work next row as follows: 2 sts in garter st, * P 2, K 2 tog, K 2 tog, P 2 *, repeat from *-* 2 more times, finish with 2 sts in garter st = 22 sts. K 1 row from WS over all sts, then bind off. Edge is approx. 12 cm / 4¾" wide. CROWN OF HAT: Worked back and forth on circular needle size 4 mm / US 6. Pick up 1 st in every ridge in front loop of outermost st along one side of cable edge. K 1 row from WS while at the same time inc evenly to 90-100 sts (inc by working 2 sts in 1 st). Insert 1 marker at beg of row (from RS) and then 1 marker for every 10th st (= 9-10 markers in total). Work in GARTER ST back and forth - see explanation above. AT THE SAME TIME on 4th row from when sts where knit up (= row from RS), dec 1 st after every marker by K 2 tog. Repeat dec every 4 rows 3 more times and then every other row 5 times = 9-10 sts remain on needle. Cut the thread and pull it through the remaining sts and tighten tog. BRIM OF HAT: Worked back and forth on circular needle size 4 mm / US 6. Pick up 1 st in every ridge along the other side of cable edge. K 1 row from WS while at the same time inc evenly to 90-100 sts. Insert 1 marker at beg of row (from RS) and then 1 marker for every 10th st (= 9-10 markers in total). Work in GARTER ST back and forth - see explanation above. AT THE SAME TIME on 2nd row from when sts where picked up (= row from RS), inc 1 st after every marker by making 1 YO. On next row K YOs twisted to avoid holes. Repeat inc every other row 2 more times and then every 4 rows 2 times = 135-150 sts. Work in garter st without inc until brim measures 7½-8 cm / 2¾"-3", bind off from RS (NOTE: Do not bind off too loosely). ASSEMBLY: Sew hat tog mid back outermost sts to avoid a chunky seam. |
|||||||||||||||||||||||||
Diagram explanations |
|||||||||||||||||||||||||
|
|||||||||||||||||||||||||
 |
|||||||||||||||||||||||||
Have you finished this pattern?Tag your pictures with #dropspattern #weekendgetawayset or submit them to the #dropsfan gallery. Do you need help with this pattern?You'll find 9 tutorial videos, a Comments/Questions area and more by visiting the pattern on garnstudio.com. © 1982-2026 DROPS Design A/S. We reserve all rights. This document, including all its sub-sections, has copyrights. Read more about what you can do with our patterns at the bottom of each pattern on our site. |
|||||||||||||||||||||||||


With over 40 years in knitting and crochet design, DROPS Design offers one of the most extensive collections of free patterns on the internet - translated to 17 languages. As of today we count 324 catalogs and 12272 patterns - 12262 of which are translated into English (US/in).
We work hard to bring you the best knitting and crochet have to offer, inspiration and advice as well as great quality yarns at incredible prices! Would you like to use our patterns for other than personal use? You can read what you are allowed to do in the Copyright text at the bottom of all our patterns. Happy crafting!
Post a comment to pattern DROPS 141-43
We would love to hear what you have to say about this pattern!
If you want to leave a question, please make sure you select the correct category in the form below, to speed up the answering process. Required fields are marked *.